Solved: Corsair SSD Not Detected in Windows or BIOS
Have you ever faced the problem of your Corsair SSD not detected? If yes, there’s no need to panic. This article breaks down the common causes and offers practical solutions to help you get your SSD recognized again.
Par Hedy / Mis à jour le July 15, 2025
Overview of Corsair SSD not detected
Many users experience frustration when their Corsair SSD fails to be recognized by their system. This issue can disrupt daily tasks and slow productivity. Based on widespread user reports, this problem typically appears under two main scenarios:
➤ The Corsair SSD is not detected in Windows.
➤ The Corsair SSD is not detected in BIOS.
When Windows fails to recognize the SSD, several common factors may be responsible:
• The SSD is brand new and hasn’t been initialized.
• The firmware is outdated.
• The drive is physically damaged.
• The partition exists but lacks a drive letter.
On the other hand, if the SSD isn’t detected in BIOS, the issue often stems from incorrect BIOS configurations or improper physical installation.
Addressing this problem requires identifying the root cause and applying the proper fix accordingly. The following sections offer targeted solutions for each scenario.
How to recover data from non-detected Corsair SSD
Before attempting to fix the issue of your Corsair SSD not being detected, it's strongly advised to recover any important data to prevent permanent loss.
For a safe and efficient data recovery process, consider using PartitionAssistant Recovery. This powerful and trusted tool is designed to help users retrieve lost or inaccessible data from SSDs with ease. Whether the SSD is not recognized by Windows or BIOS, this software offers a straightforward solution to recover valuable files before applying any fixes.
Step 1. Install and launch PartitionAssistant Recovery. Choose the exact partition or disk where your data is lost and click Scan.

Step 2. Then, the recovery tool starts to scan and search. It will execute the “Quickly Scan" first for finding your deleted data fast, and then execute the “Deep Scan" for searchingfor other lost data.

Step 3. Once the scan is completed, all deleted files, recycle bins, and other missing files will be displayed. Please select the file you would like to recover and then click "Recover".

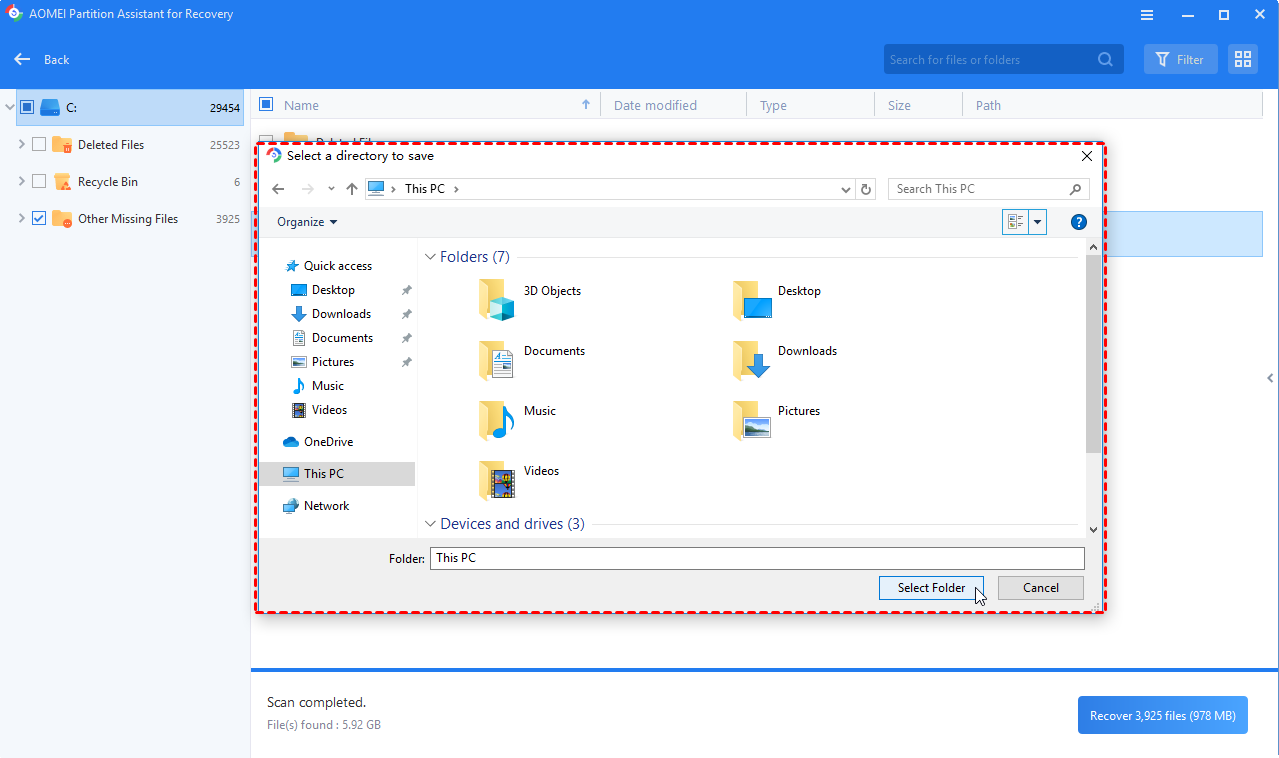
Step 4. Then, select a folder path to save your recovered files.
Step 5. Wait patiently for this process of recovery to end.
How to fix Corsair SSD not detected in Windows
If your Corsair SSD isn’t showing up in Windows, there are several effective solutions you can try to resolve the issue:
Fix 1. Check the connection
A faulty connection is one of the most common reasons your Corsair SSD might not be detected. Start by inspecting all cable connections—ensure the data and power cables are securely and properly connected. A loose or damaged cable can prevent your system from recognizing the SSD altogether.
Fix 2. Initialize Corsair SSD
If you're using a Corsair SSD for the first time and it doesn’t appear in Windows, the drive may not have been initialized yet. In this case, initializing the SSD and creating a partition can help resolve the issue. Follow these steps to get started:
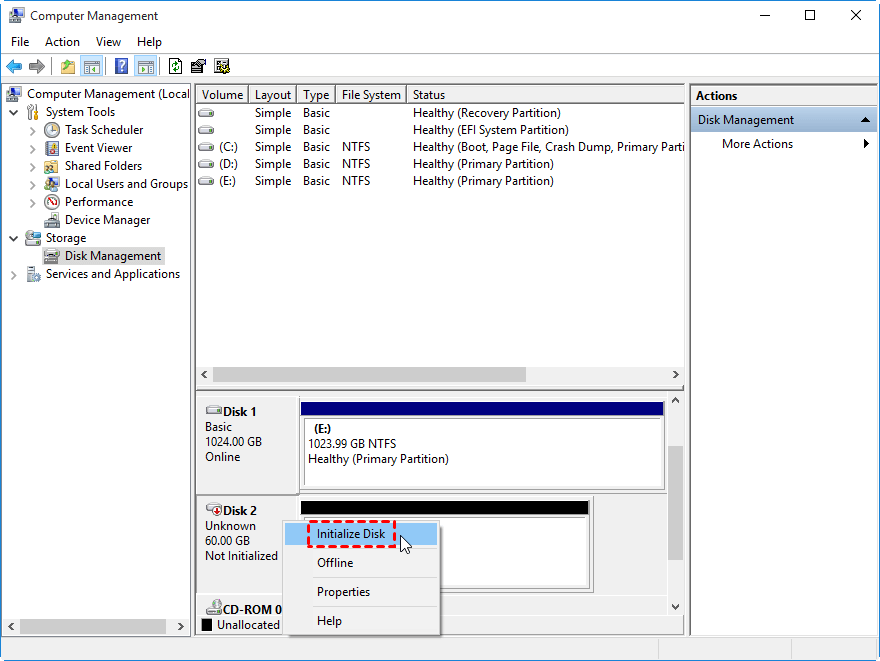
Step 1. Right-click the Windows Start icon and select Disk Management from the menu.
Step 2. Locate the SSD that isn’t showing up. If it's marked as "Not Initialized", right-click on it and choose "Initialize Disk".
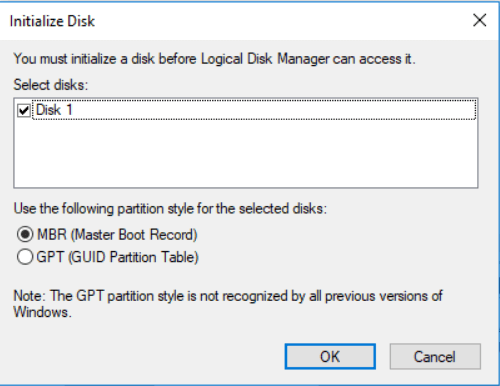
Step 3. In the window that appears, select a partition style—MBR (Master Boot Record) or GPT (GUID Partition Table)—based on your system requirements, then click OK.
Step 4. After initialization, you’ll see unallocated space on the drive. Right-click on it and choose "New Simple Volume".
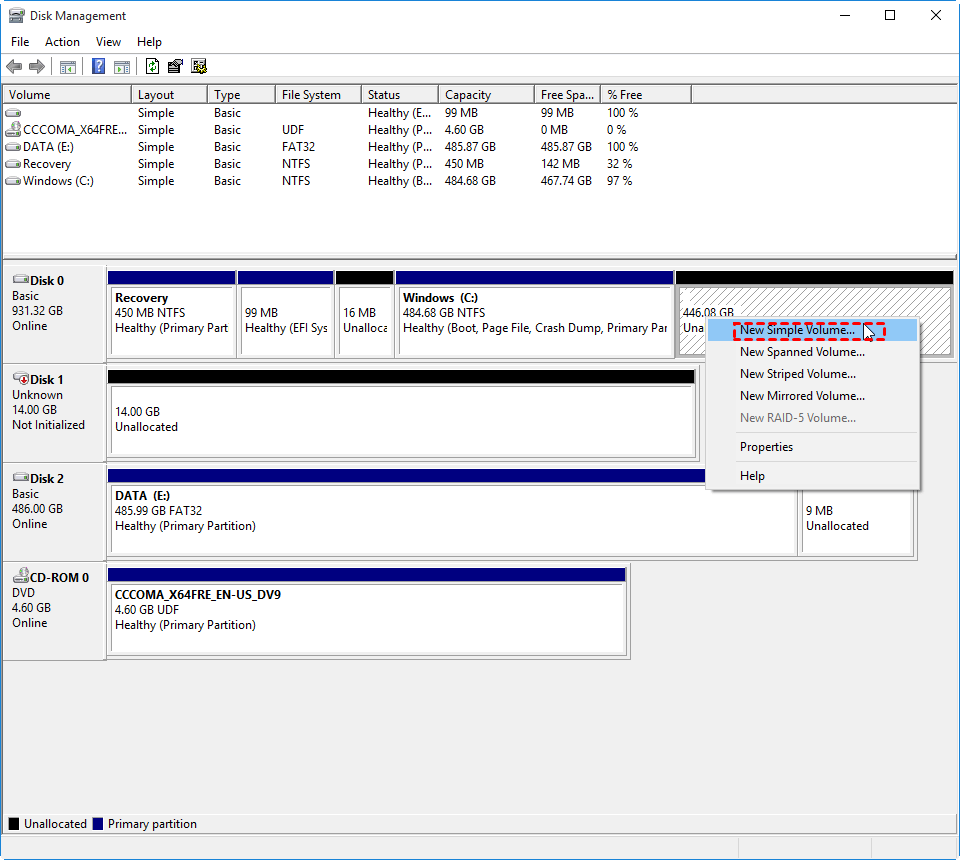
Step 5. Follow the setup wizard to create a new partition, assign a drive letter, and format the volume. Once complete, the SSD should be visible in Windows.
Fix 3. Assign a drive letter to SSD partition
Sometimes, your Corsair SSD may appear in Device Manager but remain invisible in File Explorer. This often happens when the SSD partition doesn’t have an assigned drive letter, making it inaccessible through Windows Explorer.
To fix this, you can manually assign a drive letter using Disk Management:
Step 1. Open Disk Management.
Step 2. Locate your Corsair SSD, right-click the partition that lacks a drive letter, and select "Change Drive Letter and Paths".
Step 3. Click "Add", choose an available drive letter from the list, and click OK to confirm.
As an alternative, you can also use the Change Drive Letter feature in AOMEI Partition Assistant for a simpler and more user-friendly experience. Here’s how to do it using AOMEI:
Step 1. Download, install, and launch AOMEI Partition Assistant. Right-click the SSD which you want to give a permanent drive letter to, select “Advanced”, and then “Change Drive Letter”.
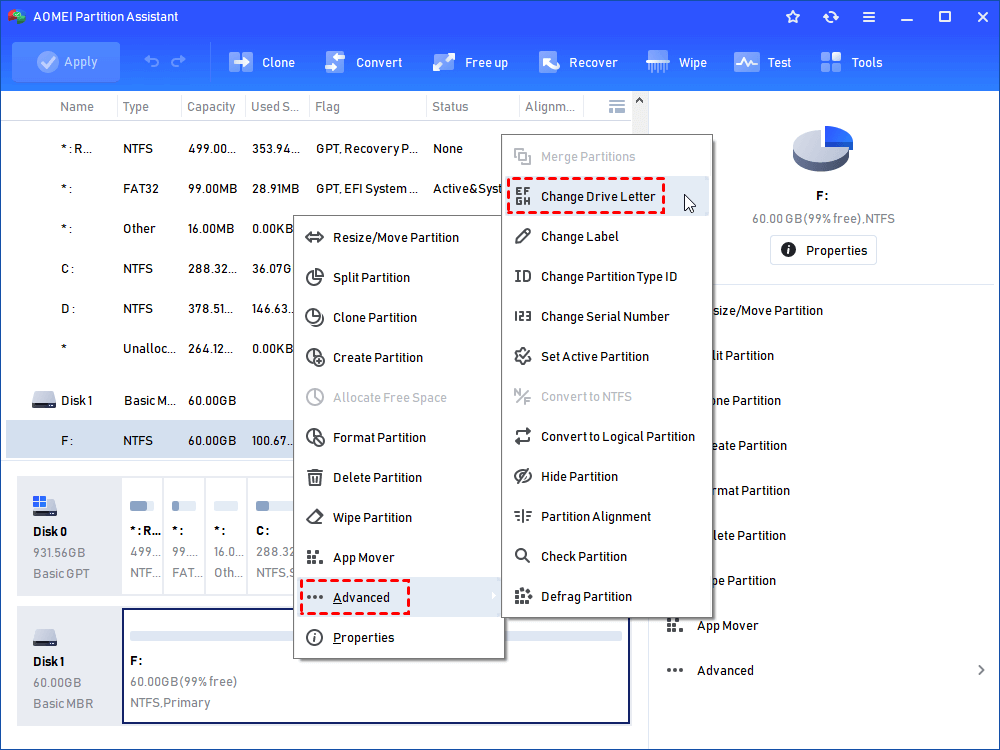
Step 2. Select a new drive letter in the pop-up window. You are suggested to choose a rarely-used drive letter like M-Z.

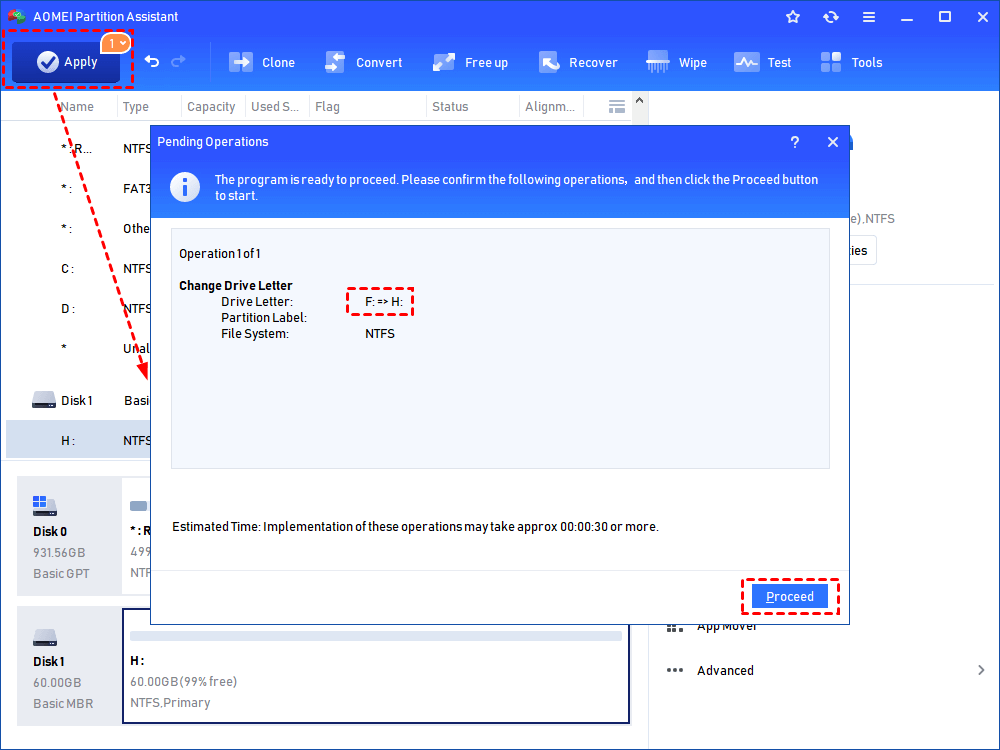
Step 3. Click “Apply” to view pending operations and then “Proceed” to commit the operations.
Fix 4. Scan for hardware changes
If your Corsair SSD isn’t showing up in Device Manager, it could be due to a delay in detecting newly connected hardware. In many cases, a simple rescan can prompt Windows to recognize the SSD. Follow these steps to scan for hardware changes:
Step 1. Right-click the Windows Start icon and select Device Manager.
Step 2. In the Device Manager window, expand the Disk drives section. Then, right-click it and select "Scan for hardware changes".
Step 3. Wait a few moments while the system refreshes the hardware list. Once complete, check to see if your Corsair SSD appears in the list.
Fix 5. Run the hardware and devices troubleshooter
The Hardware and Devices Troubleshooter is a built-in Windows tool designed to detect and fix common hardware-related issues. It can also help resolve the problem of a Corsair SSD not being detected. Here’s how to run it:
Step 1. Type cmd in the Windows Search bar.
Step 2. Under Best Match, right-click on Command Prompt and choose Run as administrator.
Step 3. In the Command Prompt window, enter the following command and press Enter:
msdt.exe -id DeviceDiagnostic
Step 4. In the troubleshooter window, click Advanced, then ensure Apply repairs automatically is checked. If it isn’t, check the box.
Step 5. Click Next to start the troubleshooting process. Allow Windows to scan for issues and apply any recommended fixes.
Fix 6. Format Corsair SSD
If your Corsair SSD isn’t recognized, an incompatible file system could be the culprit. To fix this, you’ll need to format the SSD to a file system supported by Windows, such as NTFS, FAT32, or exFAT.
Windows offers several built-in tools for formatting, including Disk Management, Diskpart, and File Explorer. However, these utilities come with limitations:
☛ Diskpart may return errors like “Diskpart has encountered an error: Incorrect function” or “Virtual Disk Service error”.
☛ Disk Management can sometimes have all options greyed out, especially with problematic drives.
☛ It also cannot format partitions larger than 32GB to FAT32.
For a more versatile and reliable solution, consider using AOMEI Partition Assistant. This powerful tool bypasses the limitations of native Windows utilities. It allows you to format large drives to FAT32, convert file systems, adjust cluster sizes, and change drive letters, making it a comprehensive solution for managing and formatting your Corsair SSD.
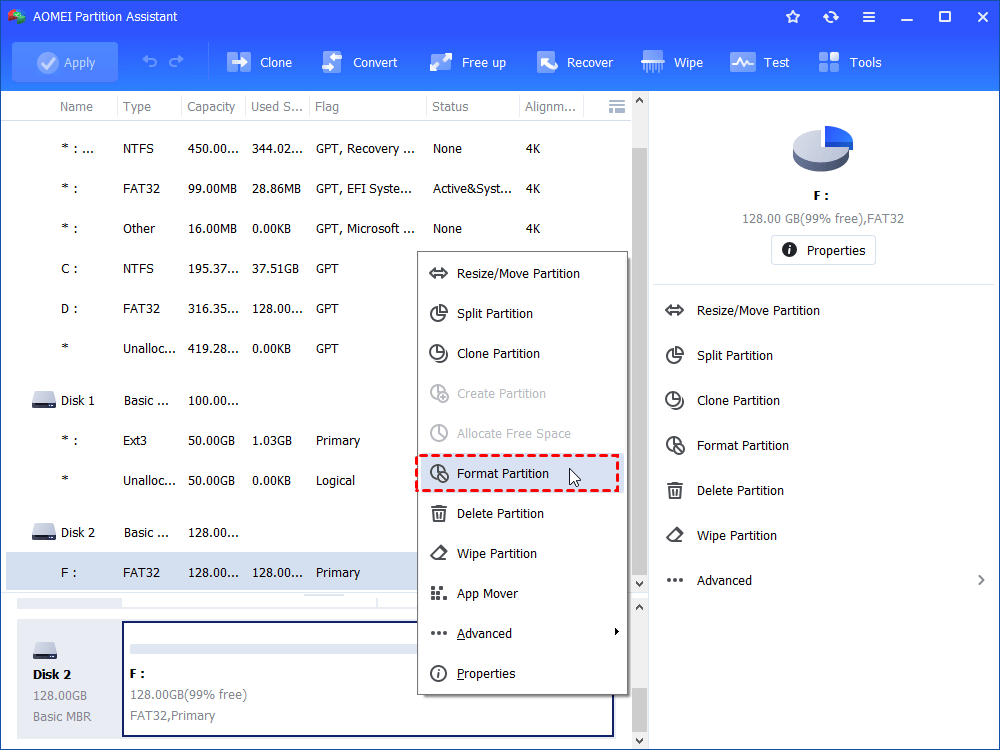
Step 1. Download AOMEI Partition Assistant, install and run it. In the main interface, right-click the target drive and select “Format Partition”.
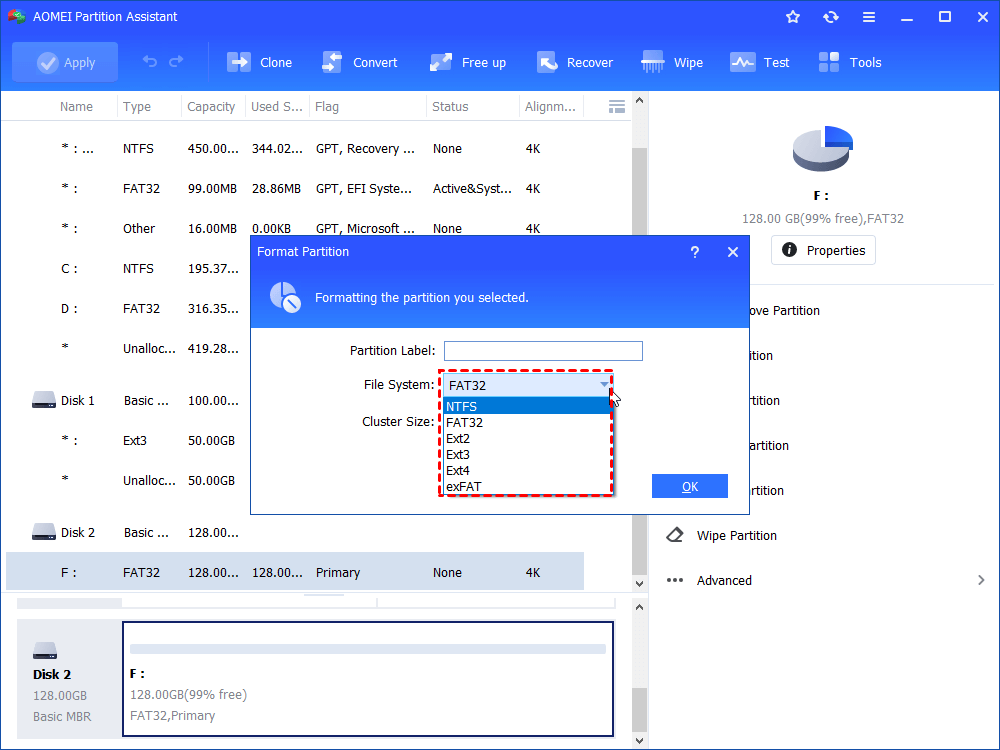
Step 2. In this small window, specify the file system of the drive based on your own demand and click “OK”.
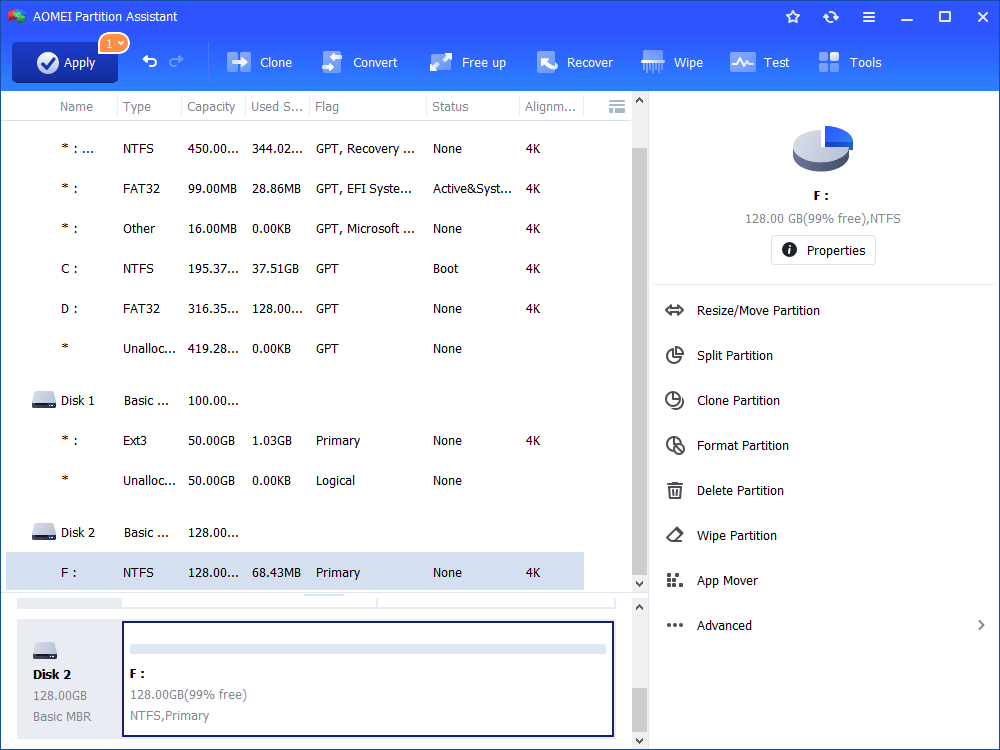
Step 3. Preview the operation. Then, click “Apply” and “Proceed” to perform it.
How to fix Corsair SSD not detected in BIOS
If your Corsair SSD isn’t showing up in the BIOS, there are several troubleshooting steps you can take to identify and resolve the issue:
Fix 1. Configure BIOS settings
Incorrect BIOS configurations—such as disabled SATA ports or an improper boot sequence—can prevent your Corsair SSD from being recognized. If you're planning to use the SSD as a boot drive, adjusting your BIOS settings may resolve the issue. Follow this step-by-step guide:
Step 1. Restart your PC and enter the BIOS setup. This is usually done by pressing a key like F2, F12, or Delete during startup. The exact key depends on your computer's manufacturer.
Step 2. In the BIOS interface, navigate to the Advanced or Integrated Peripherals section. Check that the SATA port connected to your SSD is enabled. If it’s disabled, enable it.
Step 3. Go to the Boot section. Ensure your SSD appears in the list of bootable devices. If it’s not listed, or if another drive is given priority, change the boot order to prioritize the Corsair SSD.
Step 4. Press F10 to save changes and exit the BIOS. Your system will restart with the updated configuration.
These adjustments often help the BIOS detect the SSD, allowing your system to boot from it if desired.
Fix 2. Reinstall the Corsair SSD
Aside from adjusting BIOS settings, physically reinstalling the Corsair SSD is another effective way to resolve detection issues in BIOS. Follow these steps carefully:
Step 1. Shut down your computer and disconnect the power supply to ensure safety.
Step 2. Use a screwdriver to open the side panel of your computer case.
Step 3. Disconnect the Corsair SSD and unplug both the data and power cables.
Step 4. Wait for a few seconds, then reconnect the SSD, ensuring all connections are secure.
Step 5. Close the case, reconnect the power supply, and restart your computer.
This simple reseating process can help establish a proper connection between the SSD and motherboard, which may resolve the detection issue in BIOS.
Conclusion
So far, this guide has addressed two common scenarios causing the “Corsair SSD not detected” issue. You can apply the solutions that best match your specific situation to troubleshoot and resolve the problem effectively.

