Guide: How to Set NVMe as Boot Drive
This article will show you how to set NVMe as a boot drive while introducing some basic knowledge about M.2 NVMe drive to help you understand all points better.
By Lucas / Updated on March 5, 2026
How much do you know about NVMe drive?
What’s NVMe drive? Does it have any difference from other SSDs? How to boot from NVMe drive? Can it save my slow computer? ... In this part, you can learn some crucial points about NVMe drive.
| 📌 NVMe | NVMe, short for "Non-Volatile Memory Host Controller Interface Specification," is a PCIe interface protocol. Its main advantage is time-saving. NVMe utilizes simplified commands for efficient data analysis and modification. This harnesses both solid-state storage and modern CPUs with ample RAM, leading to exceptional speed performance. |
| 📌 M.2 SSD | The M.2 interface is a new interface specification introduced by Intel to replace mSATA. However, the M.2 interface is divided into two types, supporting the SATA channel and NVME channel respectively. |
| 📌 M.2 SATA | In terms of speed, the read and write speed of M.2 SATA is similar to that of a 2.5-inch SSD, and the only difference is the interface. The data will be read from the hard disk to the memory first, then the data will be extracted to the CPU’s internal calculations, then written into the memory, and finally stored in the hard disk. |
| 📌 M.2 NVMe | However, things will be different if you choose M.2 NVMe drive. Data can be directly connected to the CPU through the bus, eliminating the need for the memory to call the hard disk, so the whole process is smoother and the speed is faster. |
| ⚔ M.2 SATA VS M.2 NVMe | M.2 SATA: The theoretical bandwidth limitation of the SATA channel, the limit transfer speed can only reach 600MB/s. M.2 NVMe: The PCI-E channel is different from M.2 SATA, the bandwidth can reach 10GB/s. |
Can you set NVMe SSD as a boot drive?
Just like other SSD, NVMe SSD can be set as boot drive for your Windows PC. What's more, as you can see in the above table, NVMe SSD is the most efficient and effective method to optimize boot times for your Windows computer. NVMe drives offer a cost-effective solution for seamlessly integrating into your system using an M.2 interface.
Ensure that your hardware meets the necessary prerequisites for booting from NVMe, as failure to do so may result in operation failure. It is highly advisable to back up your existing system data beforehand to prepare for any unforeseen mishaps:
1. For optimal performance, NVMe is most effective when used with a Skylake chipset or a newer one. However, it can still be used with older systems.
2. Check if your motherboard has an M.2 PCI-E x4 slot. If it doesn't, you may need to use a PCIe x4 adapter.
3. UEFI firmware: Systems must have UEFI compatibility to support booting from an NVMe SSD.
4. To ensure proper booting, it is recommended to switch from Legacy boot mode to UEFI mode in the BIOS after transferring Windows 10/11 to the NVMe drive.
How to set NVMe as boot drive for your Windows computer?
NVMe design takes advantage of the low latency PCIe SSD and parallelism, which can greatly improve the user experience of SSD. If you set your NVMe boot drive as a boot drive, then your PC will get its best performance.
In this part, you will know details about how to boot from PCle NVMe drive. Please, read carefully.
▌Section 1. Insert NVMe SSD into your comptuer
Before you install your NVMe drive into your computer, the first thing you need to keep in mind is to check your motherboard. Because M.2 SATA drive and M.2 NVMe drive are using different keys. If you’re a laptop user, don’t insert the M.2 drive into the mSATA port.

• M+B Key: For SATA M.2 drives and some NVMe drives
• M Key: For NVMe drives using the PCIe x4 bus.
As the following picture shows, Samsung NVMe SSD 960 EVO has an “M-Key”.
As we've mentioned before, you need to pay attention to compatibility. Windows 8 and higher systems are supported. Just make sure your system supports UEFI. If you’re using Windows 7, you’d better check motherboard settings if it can boot from the UEFI device. Then change the Legacy boot and choose UEFI.
After the check, we can move on to the next section.
▌Section 2. Install OS on NVMe drive
Way 1. Do a fresh OS installation
If you want to install new Windows on your NVMe M.2 drive, you can use an installation media, disc, or a bootable USB.
Step 1. Start your computer, and press the required key as the screen shows. Generally is “DEL” or “F2” to enter BIOS.
Step 2. Finish your settings in the Setup window: the “Language to install”, “Time and currency format”, and “Keyboard or input method”. And click “Next”.
Step 3. Click “Install now”.
Then, you can follow the requirements to activate your Windows.
Way 2: Migrate OS to SSD
If you just want to move your current OS or migrate an OS from another hard drive, here, we recommend convenient software for you. AOMEI Partition Assistant Professional is a powerful disk expert to solve your disk and partition issues. Its “Migrate OS to SSD” function can move your OS to the destination hard drive and all relative system files.
You don’t need to reinstall the system or reboot the PC many times if you want the old and the new disk both to work on your device because of the hot clone tech that this tool employs. After the migration, you can successfully boot your OS from the NVMe drive when you use your PC next time.
Now, let’s see how to boot from a PCIe NVMe drive with the help of this pragmatic software.
Step 1. Install and run AOMEI Partition Assistant. Click on “Migrate OS” under "Clone" menu. You’ll see an introduction about this wizard, read it and click “Next”.
Step 2. Select the unallocated space on SSD as the destination location and then click “Next”.
Step 3. Resize the system partition and change the drive on this page. Then a note on how to boot Windows 10 on SSD will pop up. Keep it in mind and click “Finish”.
Step 5. Click ‘’Apply“to execute all operations.
Then, turn off your computer, unplug the original hard drive with the system, leave the NVMe SSD in your computer, enter BIOS to change boot settings, and boot the computer from this SSD.
Way 3. Clone the entire disk.
You can also clone the whole disk to your NVMe drive if you need. AOMEI Partition Assistant Professional has a “Disk Clone Wizard” feature to create the same disk as the source one while all programs and the OS can boot successfully without reinstallation.
Step 1. Install and launch AOMEI Partition Assistant, and then click "Clone" and "Clone Disk".
Step 2. In the pop-up window, choose “Clone Disk Quickly”. If you need to clone a hard drive with bad sectors and the capacity of the target SSD is not smaller than the source disk, please choose “Sector-by-Sector Clone”.
Step 3. Locate the system disk and choose it as the source disk.
Step 4. Choose the SSD as the destination disk, and tick the box before “Optimize the performance of SSD…” to make SSD partition alignment.
▶ Note: If there are data saved on SSD, you'll be prompted to delete all partitions and wipe all data on SSD.
Step 5. In this window, adjust the partition size on the destination SSD.
▶ Note: If you clone HDD to a smaller SSD, the option of “Clone without resizing partitions” will be greyed out.
A note will appear in the pop window, read and keep it in mind.
Step 6. In the main interface, to perform the cloning operation, click “Proceed” and “Apply”.
▌Section 3. Boot settings
In this section, we’ll take MSI BIOS as an example to show you how to set NVMe drive as a boot drive.
Step 1. Power on the device and tap the [Delete] key to enter the BIOS settings menu:
[SETTINGS] → [Boot] → Set boot priority for your device.
Step 3. Set [Boot Option #1] as the system disk.
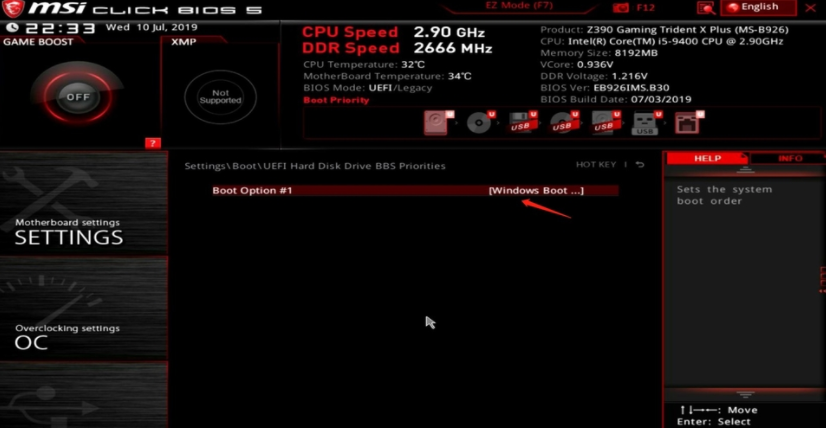
As the example in the following picture: Acer SSD is the system disk. please choose [Windows Boot Manager (P0:Acer GT500M 256G)].
Conclusion
This is the full guide about using M.2 NVMe as boot drive. With all details we explained to you, now you can have try to set your NVMe as the boot drive. AOMEI Partition Assistant is a multifunctional disk manager, it can also help you improve the performance of your SSD, and if you need to manage a Server device, you can go to the Server Edition or if you're an enterprise user, you can choose the Unlimited Edition.
FAQs about how to set NVMe as boot drive
Q1: Why do I need to set NVMe as the boot drive?
Setting NVMe as the boot drive offers several advantages. NVMe drives have significantly faster read and write speeds, which can result in faster boot times and overall system performance. By using an NVMe SSD as the boot drive, you can experience quicker system startup, faster application loading, and improved responsiveness.
Q2: Can any computer support NVMe as the boot drive?
Not all computers are equipped with the necessary hardware support for NVMe drives. To use NVMe as the boot drive, your computer must have an NVMe-compatible motherboard or expansion card. Additionally, the system's BIOS or UEFI firmware must support NVMe booting. It's recommended to check your computer's specifications or consult the manufacturer to ensure NVMe compatibility.
Q3: Can I migrate my existing operating system to an NVMe boot drive?
Yes, it is possible to migrate your existing operating system to an NVMe boot drive. There are several software tools available that allow you to clone your existing system drive to the NVMe drive. These tools ensure a smooth transition and preserve your operating system, applications, and data. It's recommended to back up your data and follow the instructions provided by the migration software to successfully transfer your system to the NVMe drive.

