How to Speed up Windows 10 Startup and Shutdown | 5 Ways
Want to know how to speed up Windows 10 startup and shutdown? This page highlights the most practical and effective techniques to boost overall system responsiveness.
By Hedy / Updated on March 2, 2026
Computers have advanced far beyond the bulky machines of the past. Even so, despite modern processors running at gigahertz speeds and lightning-fast data transfer rates, delays can still occur—especially during startup from a full shutdown. Boot time has long been a frustration, prompting countless attempts to make the process quicker. Fortunately, effective solutions do exist.
If waiting for Windows to load feels longer than solving a puzzle, the system may need some attention. Several practical adjustments can help accelerate startup, allowing you to get to work—or jump into your favourite games—without unnecessary delays.
How to speed up Windows 10 startup and shutdown
A slow startup or shutdown in Windows 10 can waste valuable time and signal underlying system inefficiencies. Fortunately, you don’t need advanced technical skills to improve performance. With a few smart adjustments, your computer can boot faster and power off smoothly.
Method 1. Disable unnecessary startup programs
Many applications automatically launch when Windows starts, even if you rarely use them. These programs consume memory and processing power, significantly delaying boot time. Disabling non-essential startup items helps your system load faster and improves overall responsiveness from the moment you turn it on.
Step 1. Press Ctrl + Shift + Esc to open Task Manager.
Step 2. Click the Startup tab.
Step 3. Review the list of enabled programs.
Step 4. Right-click unnecessary apps.
Step 5. Select Disable.
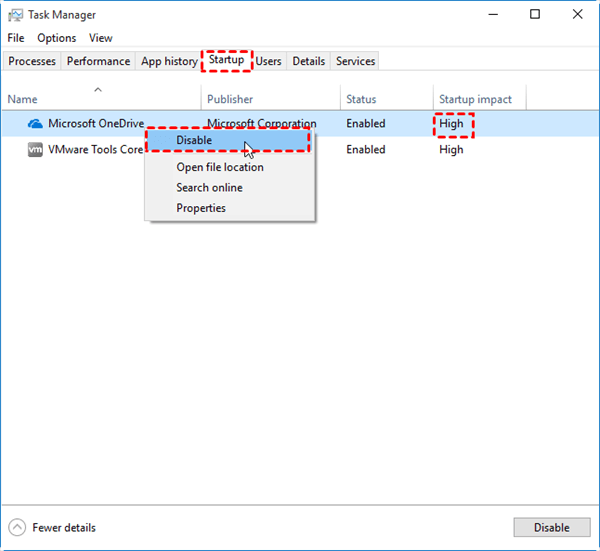
Step 6. Restart your computer to apply changes.
Method 2. Turn on fast startup
Fast Startup is a built-in Windows feature that combines shutdown and hibernation techniques to reduce boot time. When enabled, Windows saves system information before shutting down, allowing the next startup to load much quicker without performing a full system initialization.
Step 1. Simultaneously hit “Win+X” and then select “Power Options”. Then choose “Additional Power settings”.
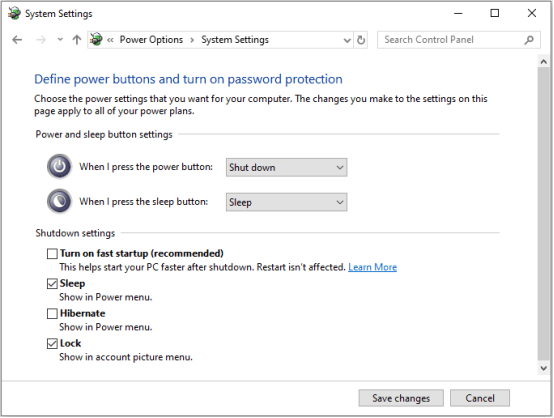
Step 2. In the left pane, click “Choose what the power buttons do”.

Step 3. In the new window, click “Change settings that are currently unavailable” and ensure the option of “turn on fast startup (recommended)” is checked. Then select “Save changes”.
Method 3. Optimize background services
Windows runs many background services to support system operations and apps. However, some services may not be necessary for your usage. Adjusting or disabling non-critical services can reduce system load, speed up startup, and allow your computer to shut down more efficiently.
Step 1. Press Win + R, type msconfig, and press Enter.
Step 2. Go to the Services tab.
Step 3. Check Hide all Microsoft services.
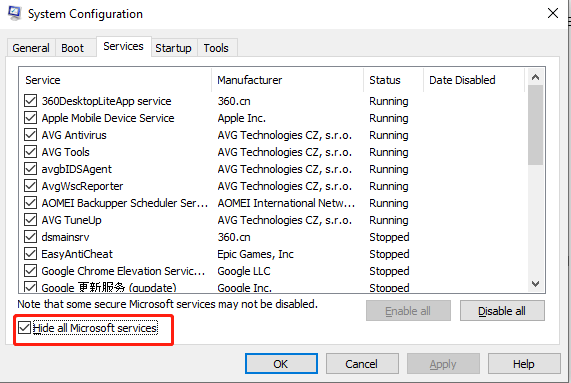
Step 4. Review remaining services.
Step 5. Uncheck unnecessary third-party services.
Step 6. Click Apply, then restart your PC.
Method 4. Clean temporary files
Temporary files accumulate over time from system operations, updates, and software usage. These files can clutter storage and slow down system performance. Regular cleanup frees up disk space and helps Windows start and shut down faster by reducing unnecessary file processing.
Step 1. Enter the "Windows Settings" interface and click on "System”.
.png)
Step 2. Navigate to "Storage" and enable "Storage Sense". Then, click on "Configure Storage Sense or run it now" to continue.
.png)
Step 3. Customize the time for cleaning up temporary files according to your preference.
.png)
Method 5. Upgrade from HDD to SSD
Traditional hard drives are slower because they rely on mechanical parts. Upgrading to a Solid State Drive (SSD) dramatically improves boot speed, shutdown time, and overall responsiveness. SSDs load system files faster and reduce delays caused by data read/write limitations.
Upgrading from an HDD to an SSD is one of the most effective ways to dramatically speed up Windows 10 startup and shutdown. Instead of reinstalling everything from scratch, AOMEI Partition Assistant provides a simple and safe way to migrate your entire system to a faster SSD.
AOMEI Partition Assistant is an all-in-one disk management tool designed to help users upgrade storage without data loss. Its OS migration and disk cloning features allow you to transfer Windows 10, installed programs, and personal files directly from your old HDD to a new SSD. This eliminates the need for complex reinstallations or technical setup.
With its user-friendly interface, even beginners can complete the upgrade process smoothly.
Step 1. Install and launch AOMEI Partition Assistant, click "Clone" in the main interface, and select "Clone Disk".

Step 2. Choose the hard disk that you need to clone as the source disk and click "Next".

Step 3. Select the destination disk to store the data on the source disk, and then click "Next".

Step 4. Then, you can check the source and destination disk in the next window or change to "Sector to Sector clone", and click the "Confirm" button to continue if there is no problem.

Here, you can also click the "Settings" button to adjust the partition size on the destination disk or tick "4k alignment" to optimize the performance of SSD.

① Clone without resizing partitions: all partition will be cloned to the target disk as the original partition size. It is available when the target disk is large enough to hold all partitions on the source disk.
② Fit partitions to entire disk: all partitions will be cloned to the target disk and take up its full capacity according to the original partition size proportion.
③ Edit partitions on this disk: you can change every partition size on the target disk as you need.
Step 5. After returning to the main interface, check the pending operation and click "Apply" and "Proceed" to commit the operation.

Why Startup and Shutdown become slow over time?
Here’s why Windows startup and shutdown slow down over time, summarized in key points:
◆ Accumulation of startup programs: Over time, more applications add themselves to startup, increasing boot time.
◆ Background services build-up: Many programs run background services that consume system resources even when idle.
◆ Fragmented hard drive: On HDDs, file fragmentation causes the system to take longer to read essential boot files.
◆ Windows updates and patches: Updates can temporarily slow boot/shutdown as the system installs or configures new files.
◆ Driver conflicts or outdated drivers: Incompatible or outdated drivers can delay hardware initialization during startup and shutdown.
◆ System file corruption: Corrupt or missing system files may cause delays while Windows tries to access or repair them.
◆ Excessive temporary files and cache: Accumulated temp files, logs, and caches slow down system processes.
◆ Antivirus and security scans: Security software scanning files during boot/shutdown can significantly increase load times.
Conclusion
In short, slow startup and shutdown are often the result of gradual system clutter and aging hardware. By managing startup programs, enabling Fast Startup, optimizing services, cleaning temporary files, and upgrading to an SSD with tools like AOMEI Partition Assistant, Windows 10 can run more efficiently—saving time, improving responsiveness, and extending your computer’s overall performance lifespan.

