How to Shrink C Drive Beyond Limit Successfully in Windows?
Unable shrink C drive in Windows? Here you’ll learn how to shrink volume from C partition beyond limit successfully. Disk Management, Command Line DiskPart and professional software are introduced for you.
By Lucas / Updated on November 28, 2024
Need to shrink C drive
Shrinking volume from C drive takes full advantage of a disk that does not use its all space, especially nowadays, most PCs have one internal disk that has only a C drive. If you want to separate your system and the data files for safety to avoid data loss cause by Windows crashes, you can shrink the C drive and create a new partition to store your data files and other programs. And the point is that data separation from the system will aid in data security.
Anyway, no matter what factor leads you to shrink the system drive, the most important thing is to find out how to do this. The following parts will discuss three methods for shrinking C drive in Windows.
Shrink C drive with Windows system tools
Here in this part, it will take shrinking C drive partition with built-in tools. However, before you start, clean up some unneeded files first. You can empty the recycle bin and delete useless files on the C drive.
Next, create a system image for your computer. These methods won’t cause data loss but you cannot be more careful in dealing with system and data.
1. Disk Management: Shrink C drive in GUI
Firstly, right-click "Computer"-> "Manage"-> double click "Disk Management" and right-click the C drive, select "Shrink Partition". It will query volume for available shrink space.
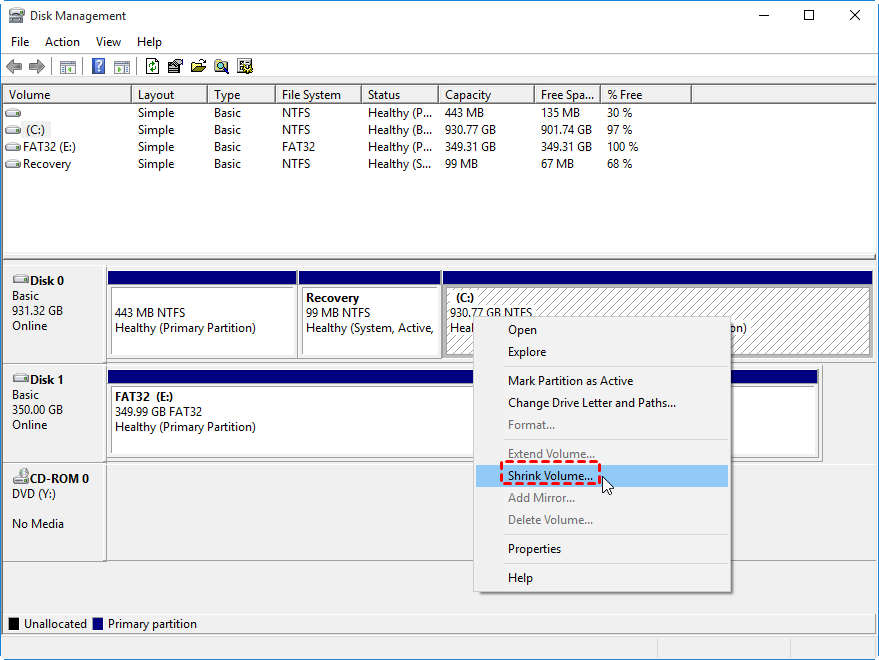
Secondly, type in the amount of space that you want to shrink by or click the up and down arrows behind the box (no more than 37152 MB).
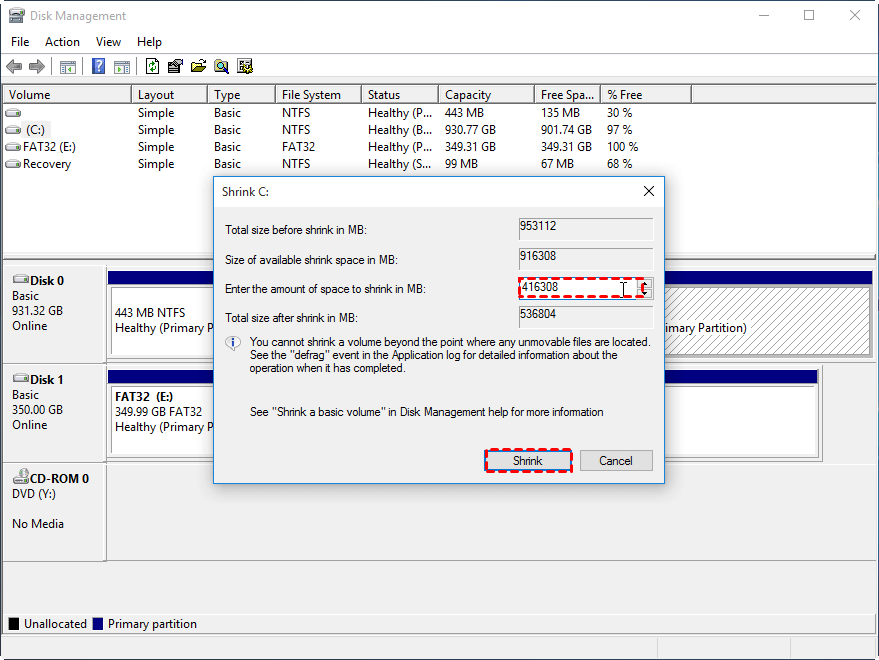
Finally, you will see the unallocated space next to C drive.
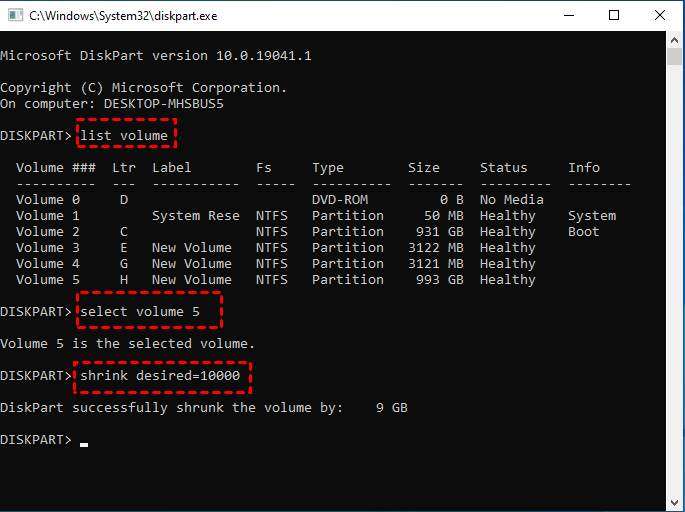
2. Command Prompt: Shrink C drive via command lines
Diskpart is a built-in partition tool in Windows, an embedded product that needs to be used under Command Prompt. Press + key at the same time to start Run box. Type cmd and press Enter key to start Command Prompt. Then type the following commands and press "Enter" after each:
• Diskpart
• list volume
• select volume x (x is the volume number you want to shrink)
• shrink desired= x (x is the number of the size you want to shrink)
• exit
Why sometimes cannot shrink C drive?
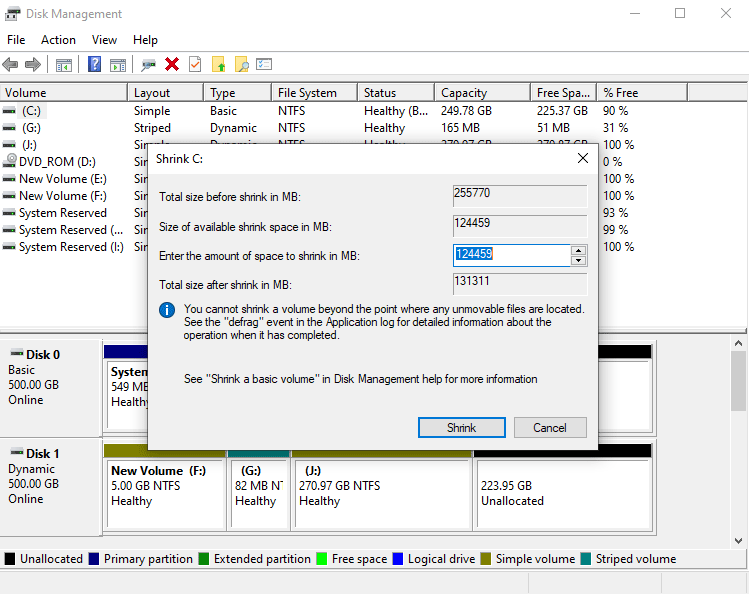
When shrinking the C partition with Disk Management, you are likely to encounter one confusing situation. For example, you have 909 GB on your C drive. However, when you plan to shrink this partition, you will find that the available space is only 297 GB, according to the querying results. At the top of the screen, it indicates that the C drive has 472 GB of free space. What is wrong?
Well, the answer is the size of the available shrink space can be restricted by the amount of space currently allocated to the hard drive for the virtual memory page file, system protection maximum storage space size, and hibernation files.
The location of the files on the hard drive plays a big part here because these files are marked as unmovable. Disk Management is unable to relocate them. If these files are located in the middle of the total amount of free space on the disk, then only the free space on the other side (usually its right side) can be used to create a new partition.
Even though there are no obstructive unmovable files, you can only shrink half space of the total amount with Disk Management.
A handy alternative tool to shrink C drive without space limitaion
It is time to turn to a third-party partition manager when Windows snap-in programs won’t work. You can try AOMEI Partition Assistant which can relocate those files without damaging any of them. It is an all-around and comprehensive application that integrates simple-to-handle options for disk and partition management. You can even resize a BitLocker partition with this handy tool.
The Standard edition is a software that has earned a good reputation among worldwide users. It can also be used to shrink C partition in the VM machine. If you wish to shrink the C drive to create a new drive, we suggest using the "Split Partition" feature to directly partition your C drive without formatting.
The Best Windows Disk Partition Manager and PC Optimizer
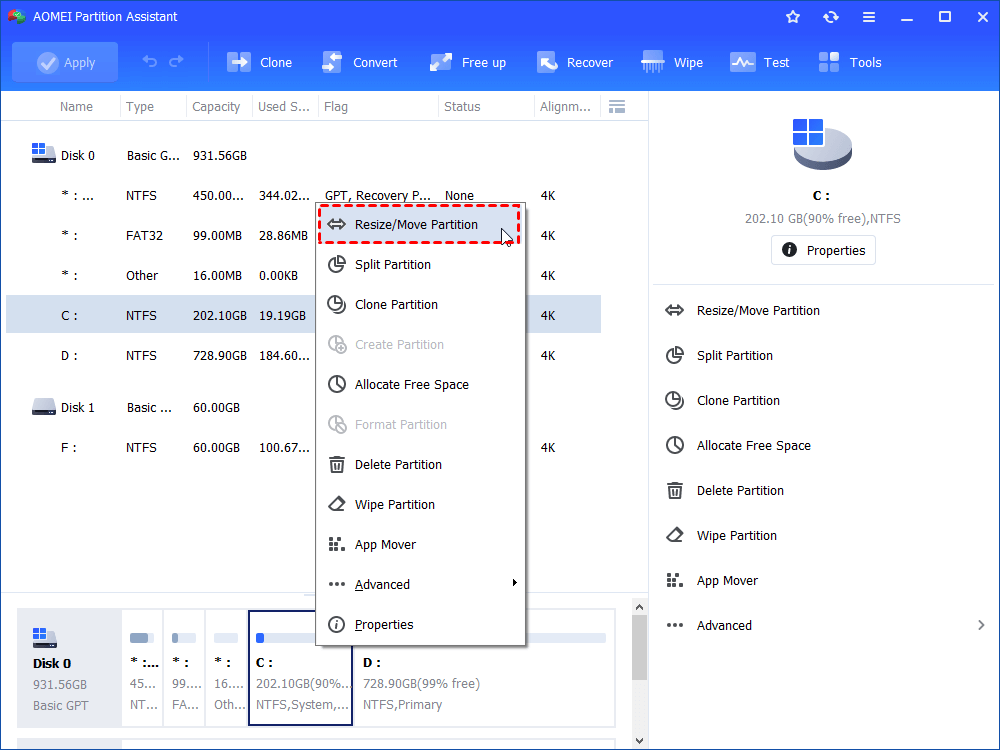
Step1. Install and run this software. Right-click C drive and select "Resize/move Partition" (you can see the free space of C drive is 29.87 GB).
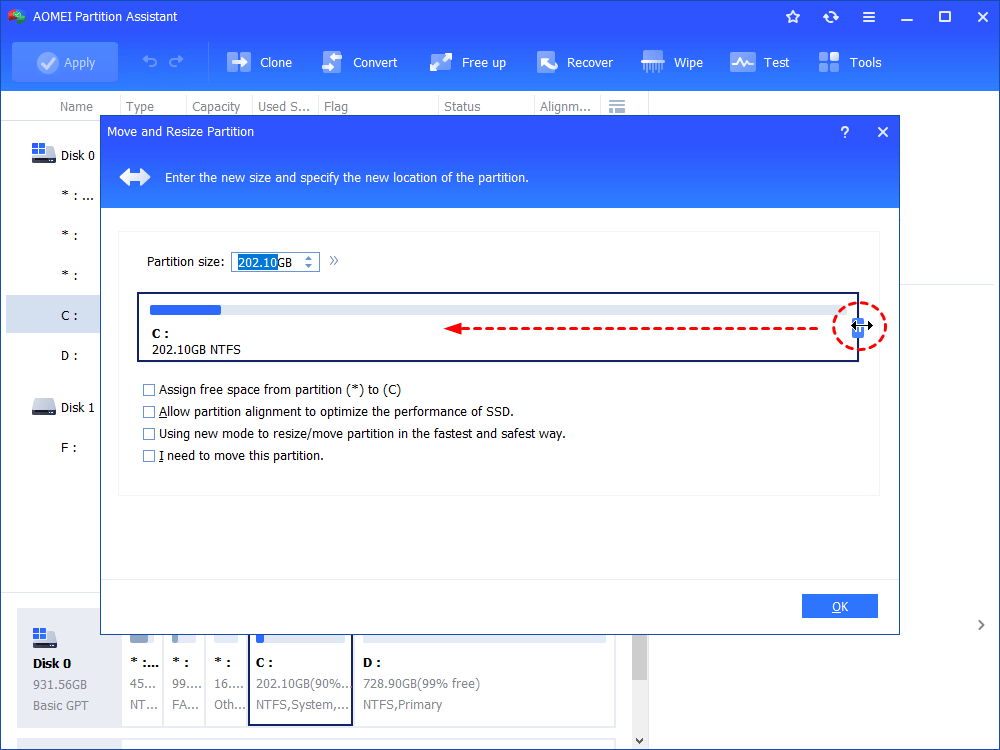
Step2. Type in the amount of space or drag the double-headed arrow to resize.
Step3. A gray unallocated space just behind C drive, click "Apply" to execute operations.
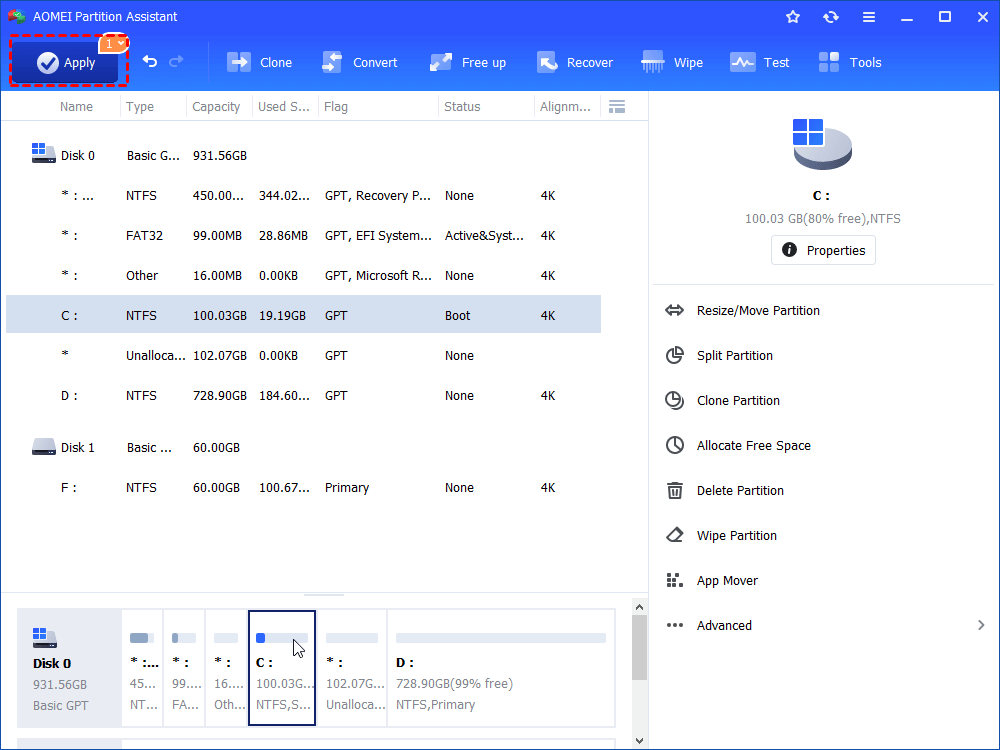
Notes: If the C drive is in use, the program will finish these operations in restart mode automatically.
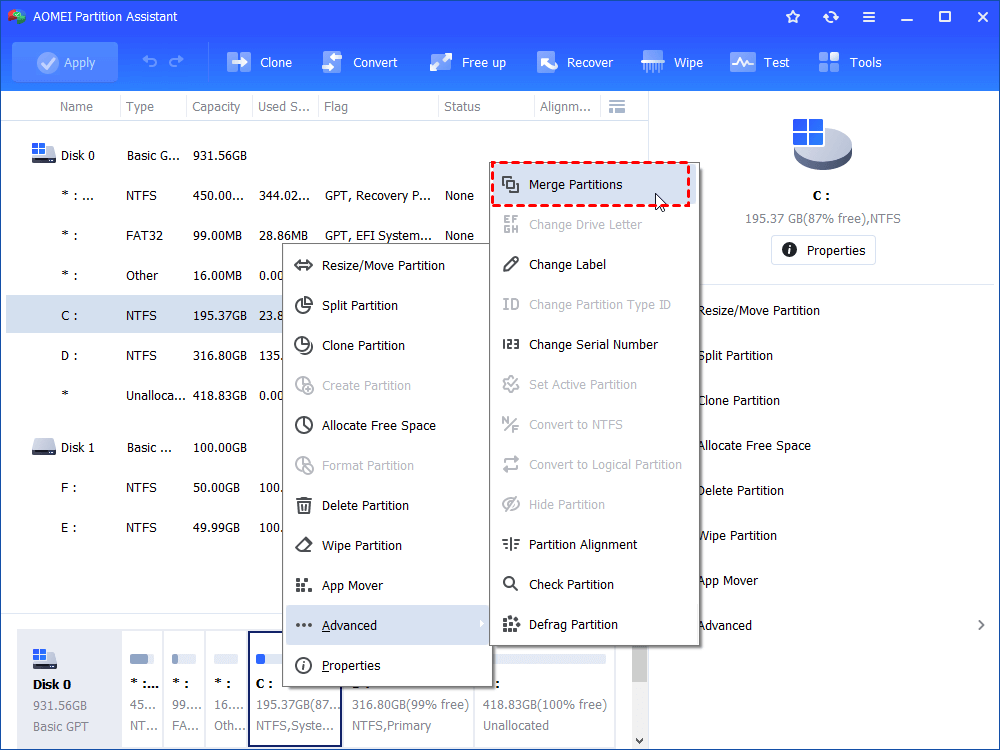
After shrinking the C drive, there is unallocated space behind the C drive. You can use the "Merge partition" feature to extend your data partition. This function allows users to merge unallocated space that's not on the right side of the target drive.
How do I choose a suitable tool to shrink C drive?
Differences |
CMD |
DiskManagement |
AOMEI Partition Assistant |
| All system formats supported | NTFS | NTFS | All formats supported: NTFS, FAT32, exFAT, and other formats. |
| Use flexibility | half of the total space can be reduced | half of the total space can be reduced | Adjust the space of C drive as your need |
| Easy to use | Typing correct commands | Some clicks | simple clicks |
Compared to Windows system tools, AOMEI Partition Assistant is more versatile and compatible. No matter what system or format you use, it can easily shrink your C drive.
To sum up
AOMEI Partition Assistant can help you do the task that the built-in tool can’t. Another way to make use of space in C drive is to create partition in C drive directly. Except for shrinking C drive to more than half space, you can use it to move partition, merge partitions, copy disk, convert system disk from MBR to GPT disk for Windows 11, and more advanced function, command line partition.
FAQs about shrinking C drive on Windows
🔧 How much space can I shrink from my C drive?
The amount of space you can shrink depends on the available free space on your C drive and the limitations of the file system. Windows will display the maximum amount you can shrink when you initiate the process.
🧐 Can I shrink the C drive on a solid-state drive (SSD)?
Yes, you can shrink the C drive on an SSD just like you can on a traditional hard drive. The process is the same.
⛓ Will shrinking my C drive affect my installed programs or files?
Shrink C drive should not affect your installed programs or files. However, it's still crucial to back up your data before making any changes to your partitions, as there is always a small risk of data loss during the process.

