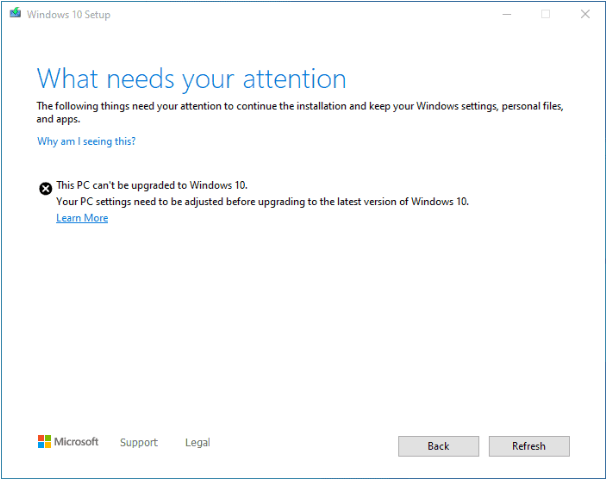
[Fixed Error] This PC Can’t Be Upgraded to Windows 10
Some Windows users complained that they meet the error “This PC can’t be upgraded to Windows 10”. If you are also experiencing the same problem, this post will offer you some solutions to fix it.
By Lucas / Updated on May 12, 2023
About the error: This PC can’t be upgraded to Windows 10
Although Windows has released Windows 11, most Windows users still run Windows 10 systems. With Windows 7 becoming obsolete, many people are opting to update to Windows 10. In addition, if users want to upgrade to Windows 11 from Windows 7, they need to upgrade to Windows 10 first.
During this process, the error “This PC can’t be upgraded to Windows 10” appears. “Why can't I upgrade to Windows 10?” Many users feel confused.
The error message usually shows during Windows 10 Setup, upgrading to versions 1903, 2004, and 20H2 may confront this error according to users’ feedback. The exact factors that can cause this error are uncertain. There’re many potential reasons like the drivers, hardware, users' account information, etc.
8 ways to fix Windows 10 upgrade failure
Since there’s no exact reason that will raise this problem, the solutions are also various. You can try some methods in this part according to your conditions.
Method 1. Remove external devices
If any external devices, such as SD cards, USB flash drives, printers, and so on, are attached to your computer during the installation, the drives will be reallocated incorrectly, resulting in the "this PC cannot be upgraded to Windows 10" issue. After unplugging any external media, restart your PC and try upgrading to Windows again.
Furthermore, if you are upgrading to Windows 10 via a USB drive, copy the installation media files to your local system and then detach the USB drive or SD card. Then, launch the setup file to resume the installation from the local disk.
Method 2. Disable certain apps
Certain programs have been shown to create updating issues with the error message. Aside from antivirus software, additional apps that may be at blame include iTunes, FutureMark, and BattleEye Anticheat.
If you have any of these programs installed on your computer, or if you encountered this problem after installing this software, you should disable them and try to update again.
Method 3. Temporarily disable antivirus
Antivirus software may potentially interfere with the installation of Windows 10, causing a variety of issues. When you encounter specific update troubles, it is usually a good idea to temporarily off the antivirus. You should turn off both the third-party antivirus software and the built-in Windows Defender and Firewall.
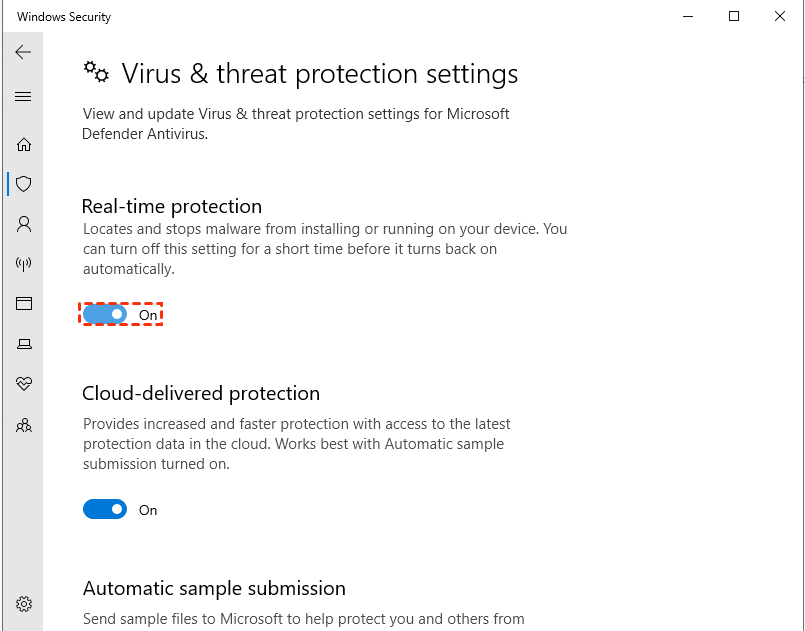
Disable Windows Defender
Step 1. Go to Windows Settings > Update & Security > Windows Security > Virus & threat protection.
Step 2. Click Virus & threat protection settings and toggle off the button of Real-time protection.
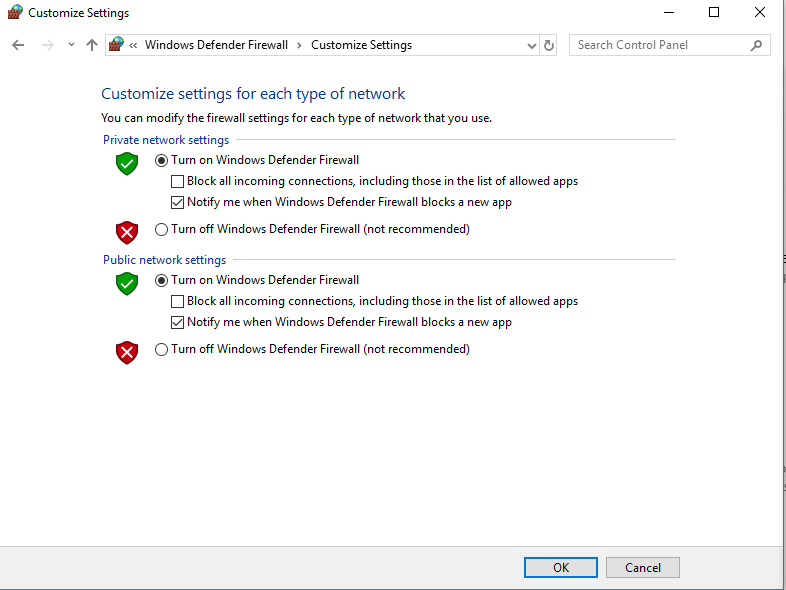
Disable Firewall
Step 1. Open Control Panel and go to System and Security > Windows Defender Firewall > Turn Windows Defender Firewall on or off.
Step 2. Choose the Turn off Windows Defender Firewall option for both private and public network settings.
Then, try upgrading to Windows again to see whether the problem has been repaired. You must immediately re-enable your antivirus and firewall after completing the installation or if the technique fails to resolve the issue. Otherwise, your system will be jeopardized.
Method 4. Use Update Troubleshooter check
Another excellent option is to run the Windows Update troubleshooter to have a check. This program will assist you in resolving issues that are preventing you from correctly upgrading Windows.
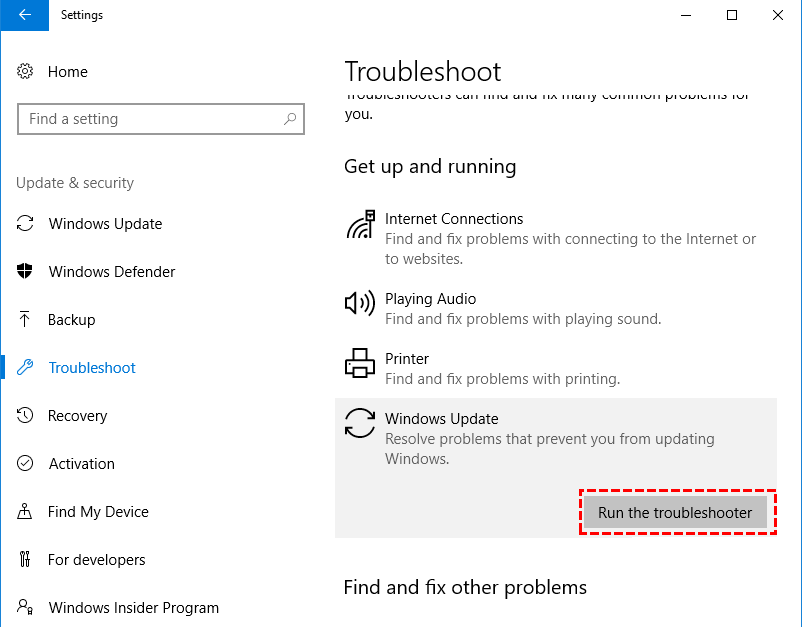
The Windows Update troubleshooter is now a built-in function in Windows Settings.
Step 1. Press Windows + I to open the Settings window. Choose Update & Security category.
Step 2. Click Troubleshoot section from the left pane, choose Windows Update in the right pane, and hit Run the troubleshooter.
Method 5. Restart BITS service
Background Intelligent Transfer Service (BITS) is a service that allows your computer to get updates. If this service has issues, you may be unable to get Windows updates or upgrade from Windows 7 to Windows 10. In this situation, just restart this service and retry updating or upgrading to Windows 10.
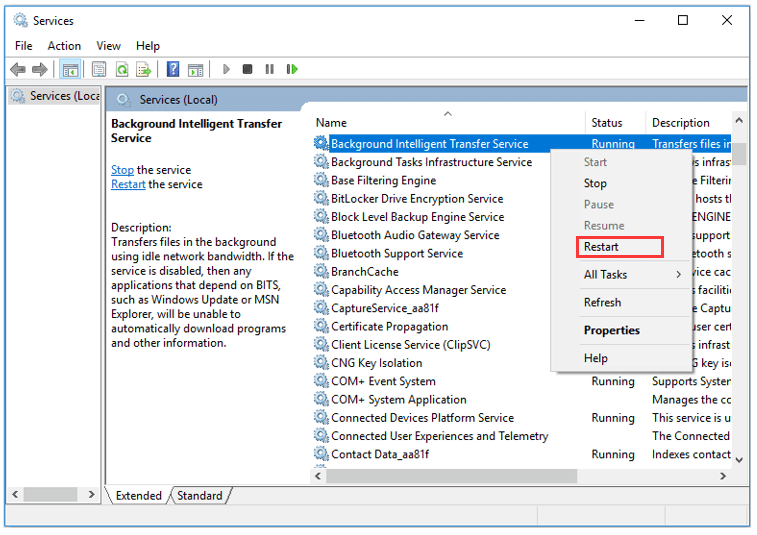
Step 1. Press Windows + R to open the Run window. Input services.msc and click the OK button to open the Services app.
Step 2. Locate the Background Intelligent Transfer Service among the list and right-click it. If it is not running, choose Start to make it running. If it is already running, choose Restart.
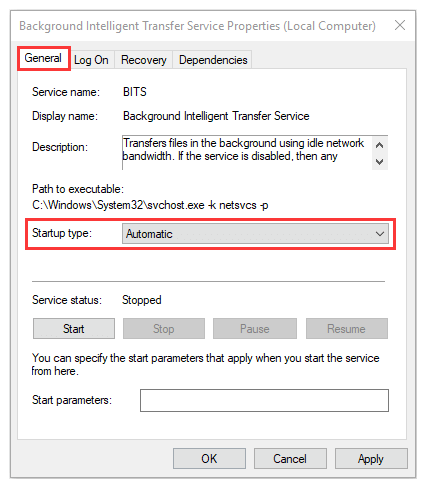
Step 3. Double-click the BITS service to open its Properties. Under the General tab, choose Automatic from the drop-down list of Startup type.
Step 4. Click Apply and OK buttons to save the changes you’ve made.
Now restart your computer, and you should be able to update to Windows 10 version 1903 or upgrade to Windows 10 from Windows 7.
Method 6. Release drive space
Before upgrading to Windows 10, ensure that your machine satisfies the Windows 10 system requirements. Most people are unable to update to Windows 10 because they do not have enough hard drive space - 16 GB for 32-bit OS or 20 GB for 64-bit OS. If this is your case, you should take certain steps to clear up disk space.
To do some basic cleanup, you can use Disk Cleanup.
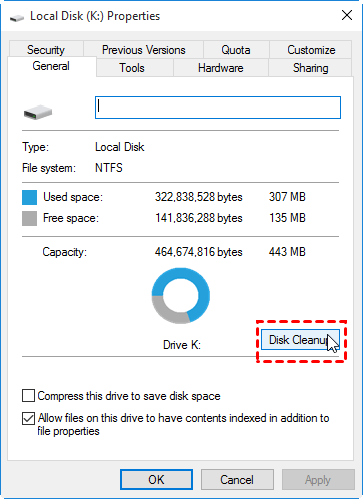
Step 1. Press Windows + E to open File Explorer and click This PC in the left pane.
Step 2. Under the Devices and drives section, right-click your system partition and choose Properties.
Step 3. Under the General tab, click Disk Cleanup.
However, if you’re system drive has received an insufficient space warning, then Disk Cleanup is not enough. In this situation, we suggest you looking help from a third-party tool. Here we recommend you to AOMEI Partition Assistant Professional. This Windows disk and partition manager supports Windows 11/10/8/8.1/7/XP users to resize partitions without data loss. You can merge two spaces into one or reallocate free space on another drive to the target drive.
▶ Option 1. Merge partitions
The “Merge Partition” function can merge neighboring partitions and merge nonadjacent unallocated space to C drive.
Step 1. Install and run AOMEI Partition Assistant. Right-click the C drive and select "Merge Partitions" from "Advanced".
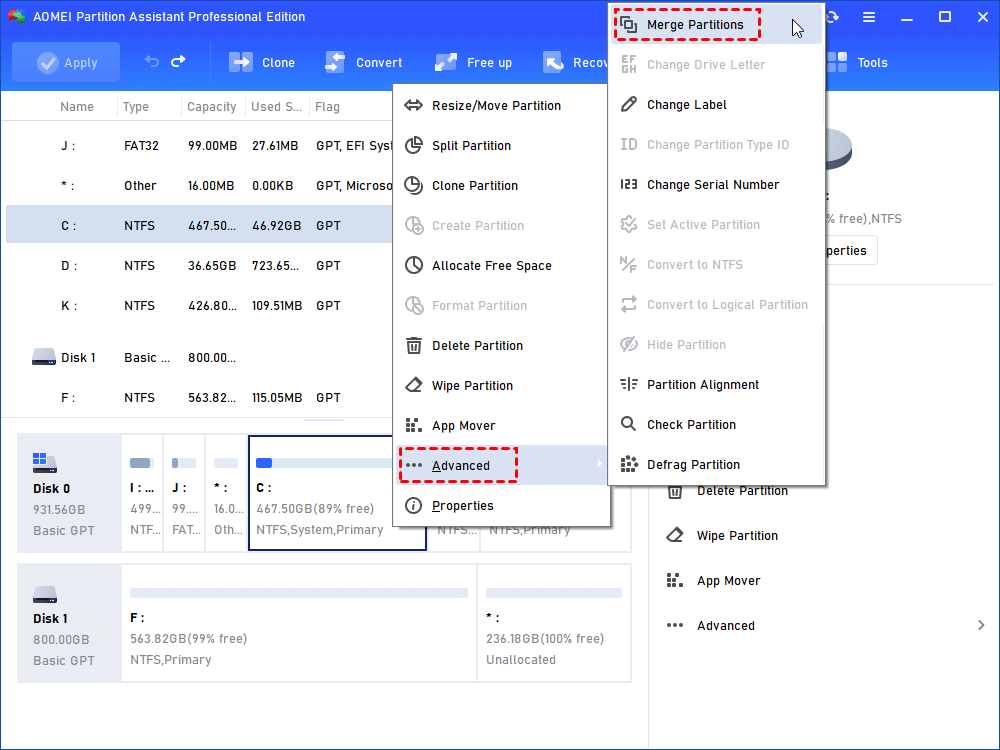
Step 2. Tick the unallocated space and click on "OK".
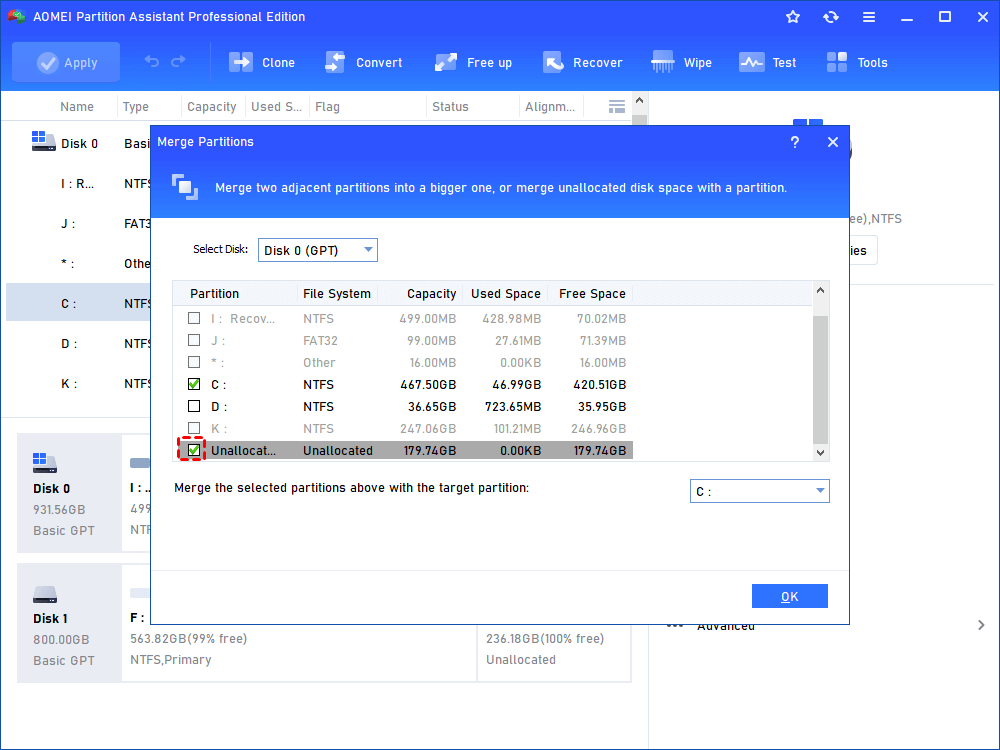
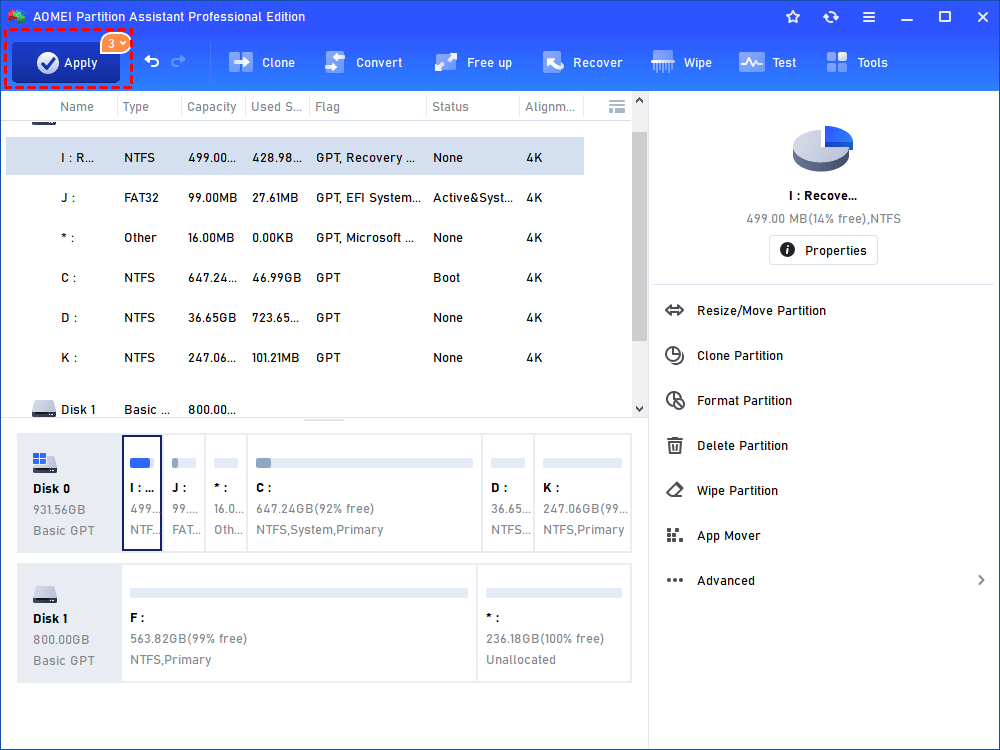
Step 3. Finally, click "Apply" to commit the pending operation.
▶ Option 2. Allocate free space
The “Allocate Free Space” feature can directly add free space from one partition to another one.
Step 1. Launch AOMEI Partition Assistant Professional, right-click D drive, and select "Allocate Free Space".

Step 2. In the pop-up window, we could specify the free space to be allocated, and the destination partition that the free space will be added.

Step 3. View "Pending Operations" on the sidebar in case of corrections and then click "Apply" on the toolbar to execute pending operations.

Since we adjust the size of the C drive, you need to reboot your PC.
1. If the system reserved partition is too small, Windows may also confront the “Windows 10 couldn’t be installed” error.
2. You can also move installed apps from C drive to another drive to release free space.
Method. 7 Modify Registry settings
According to the users' feedback, some users were able to solve the issue by making modifications to the Windows Registry. You can also give it a go. However, before making any changes, create a backup of the existing registry. Here's how to accomplish it with Windows 10.
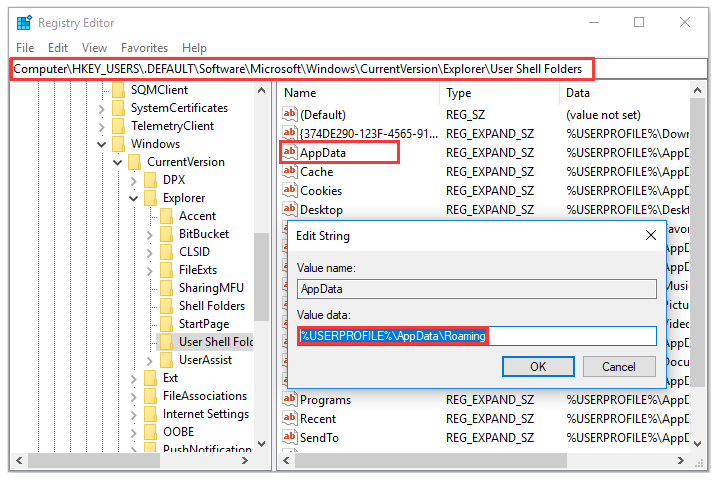
Step 1. Invoke the Run window, input regedit and press Enter to open Registry Editor.
Step 2. Copy and paste the following path to the address bar and press Enter: Computer\HKEY_USERS\.DEFAULT\Software\Microsoft\Windows\CurrentVersion\Explorer\User Shell Folders
Step 3. In the right pane, double-click AppData string and set its Value data as %USERPROFILE%\AppData\Roaming. Click OK to save the change.
Method 8. Check drivers
As the error message suggests, your PC may have a driver that isn't compatible with the latest version of Windows 10. When you are unable to update to Windows 10, you must check your drivers. You should ensure that all of your drivers are up to date and, if necessary, reinstall them.
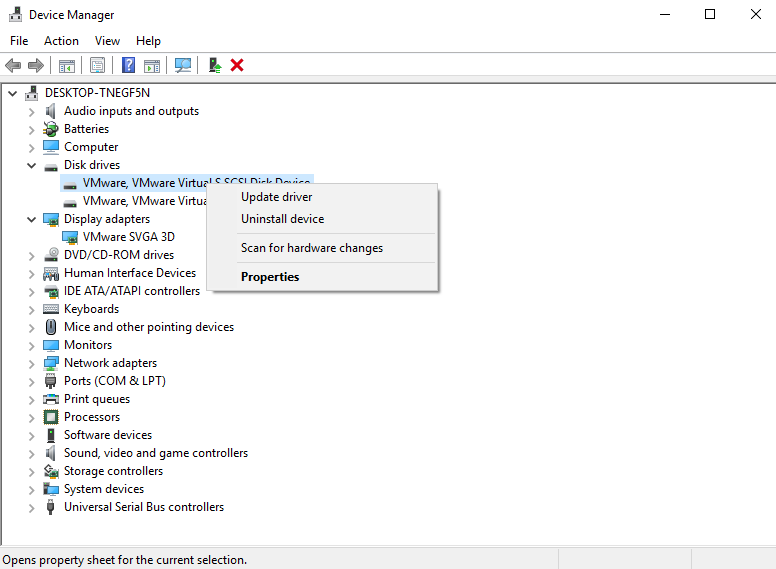
In Device Manager, you may do a quick check for your drivers.
Step 1. Open Run dialog, input devmgmt.msc, and click OK to run the tool
Step 2. Expand all the device categories to see if any drivers are displayed with yellow exclamation marks. If there’s such a driver, go to update the device driver or reinstall it.
Conclusion
“This PC can't be upgraded to Windows 10” error will not only cause that Windows 7 upgrade to Windows 10 fails, but also affect driver stability in the system. Hope these 8 methods can help you fix the error.
AOMEI Partition Assistant can do many things to help users to manage Windows PC easier. It can clone disk, convert a disk between MBR/GPT without data loss, and so on. What’s more, if you’re using Windows Server and also meet some problems, this tool has the Server Edition to offer you help.

