Fixed: Cannot Install or Upgrade to Windows 11
Learn why your device cannot install or upgrade to Windows 11 and how to fix it with different ways in different situations.
By Irene / Updated on May 26, 2025
When you cannot install or upgrade to Windows 11, it generally means you are stuck in these situations:
1. You encounter the installation error like error code 0x80070070 when upgrading to Windows 11. This suggests you need to expand the drive space for downloading Windows 11 files.
2. Windows 11 won't install with the prompt "This computer cannot run Win11". It indicates your device may cannot qualified to run Windows 11. If you want to force upgrade to Windows 11, you can click to read how to bypass the Windows 11 requirements.
3. You can't upgrade to Windows 11 because you are using the MBR partition table. When receiving this, you can just follow our guide to convert MBR to GPT and try to upgrade again.
After briefly knowing why you cannot install or upgrade to Windows 11, it is time to get detailed information and learn the corresponding solutions.
Why cannot install or upgrade to Windows 11?
From the moment Windows 11 appeared, it has become the focus of heated discussion. Now, Windows 11 has entered the phase of the 2023 Update. It includes numerous major improvements. The integration of the Windows Copilot AI assistant is the highlight. In addition, background blur for photographs, optical character recognition (OCR) in the Snipping Tool, expanded Windows Backup capabilities, and a much-improved email program are now available in Windows 11.
However, the system requirements of Windows 11 are still a problem for many users.
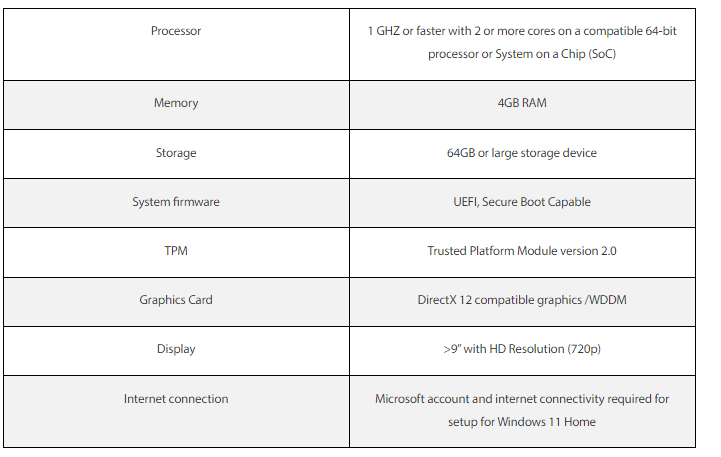
"Why won't Windows 11 install on my computer?" To be honest, just 64GB of free space on the system drive can hold some old computers back, there is no need to mention UEFI only, Secure Boot capability, and TPM 2.0. If the only obstruction is the C drive with insufficient free space, things would be easier for users who wish to upgrade. This cause will also happen with Windows 11 KB5026446 update error in the future, so it is better to make enough room for Windows 11 system.
However, most users are hindered by UEFI, Secure Boot, and TPM2.0. Thus, in this post, we will show 3 solutions to fix Windows 11 install failures caused by these 3 problems to help users.
Check Windows 11 compatibility on your PC
Before we start to fix problems, if you still don’t know how to check Windows 11 compatibility, you can follow the following steps to check your devices.
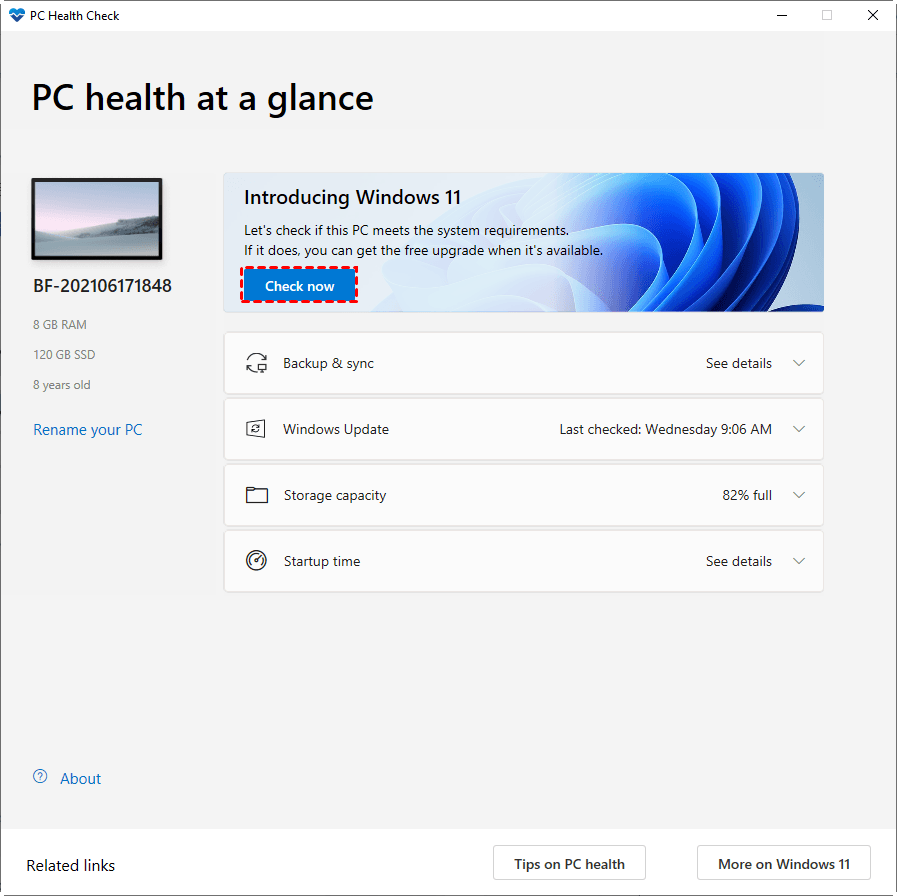
Step 1. Download the PC Health Check application from the Microsoft website and install it.
Step 2. Start the application and click “Check now” to check your computer's compatibility with Windows 11.
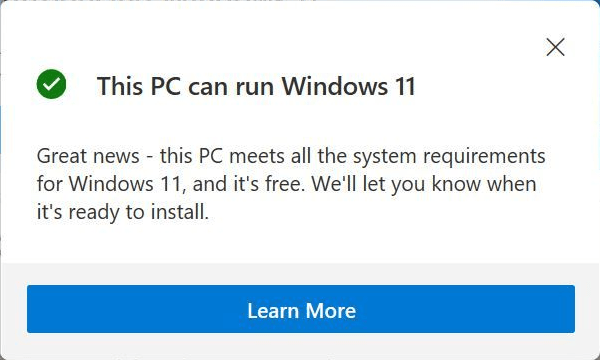
Step 3. If your computer has passed the Windows 11 compatibility check, you will receive the following prompt: This computer can run Windows 11.
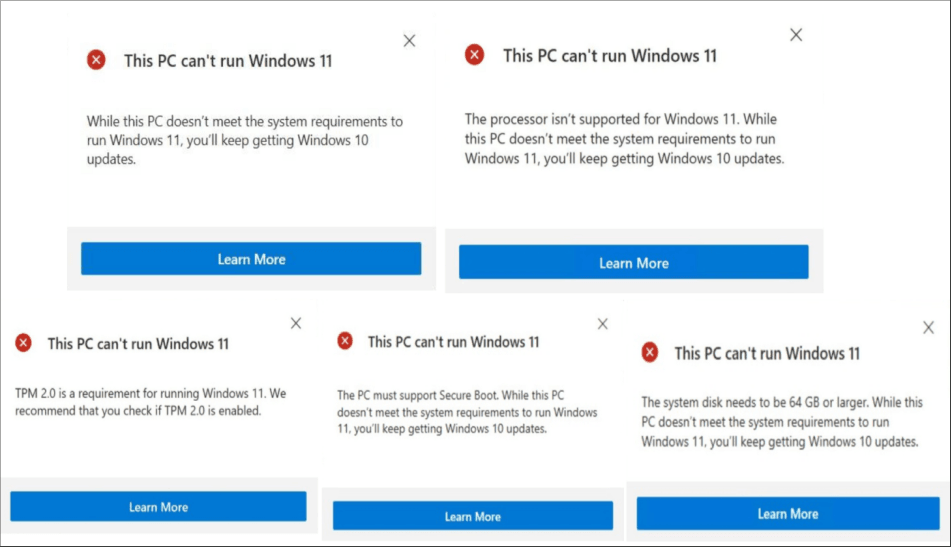
Step 4. If your computer fails the Windows 11 compatibility check, the following prompt may appear that Windows 11 cannot be run:
• This PC doesn’t meet the system requirements to run Windows 11.
• The processor does not support Windows 11.
• TPM2.0 is a requirement for running Windows 11.
• The PC must support a secure boot.
• The system disk needs to be 64GB or larger.
With this Windows 11 compatibility check tool, you can detect whether your computer is compatible with Windows 11 or not. However, if you encounter Windows update says No windows 11 but PC Health Check says Yes issue, you can use the handy Windows 11 compatibility checker as an alternative.
Fixed: Cannot upgrade to Windows 11
Why can't I upgrade to Windows 11? As we show in the last part, normally, users will be impeded from installing Windows 11 for hardware issue, space issue, TPM problem, and Secure Boot. In these problems, space, TPM, and Secure Boot requirements may be fixed by changing some settings on your disks and computer, so in this section, the 3 solutions for fixing Windows 11 upgrade/installation failure are aimed at these reasons.
1. Convert MBR to GPT disk
First, let’s fix the problem caused by UEFI. What’s UEFI? What’s the connection between UEFI and GPT?
UEFI, Unified Extensible Firmware Interface, is a PC system specification that defines the software interface between OS and system firmware. It is an excellent successor of BIOS (Basic Input Output System), its operability and compatibility with large-capacity disk make it a priority when users hesitate between MBR and GPT.
GPT is another partition table. Compared with the MBR table, it can maximize the advantages of large-capacity disks. MBR only recognizes 2 TB capacity even if your disk has 3TB, and it only allows users to partition their disk into 4 partitions. In theory, GPT supports infinite partitions.
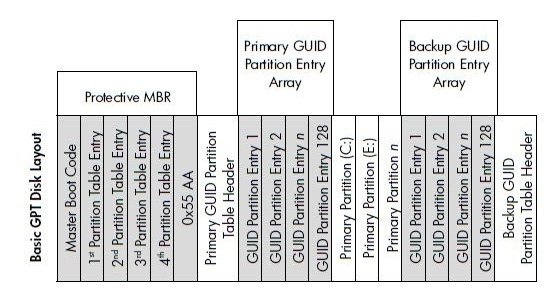
"UEFI + GPT” is almost the perfect combination for qualified devices. Your computer will have larger store space, faster boot speed, and smooth performance. But, UEFI can only successfully boot your computer with GPT as the system disk. Thus, if your motherboard supports both BIOS and UEFI, and you’re using an MBR disk, you’ll need to convert the MBR disk to a GPT disk.
If you’re preparing for the conversion, we suggest you try a third-party tool, AOMEI Partition Assistant. Because this powerful disk manager can convert system disk from MBR to GPT without losing data because you don't need to delete any partitions or data (MBR2GPT.exe will ask users to delete all data on the disk).
What’s more, this versatile software has other practical functions. You can create a Windows 11 to go USB to force upgrade to Windows 11 or enjoy your Windows 11 on another device or migrate OS from MBR/GPT disk to another MBR/GPT disk without reinstalling and keeping files on the source disk.
1. Please ensure the current motherboard supports EFI/UEFI boot mode, otherwise, the system cannot boot successfully after conversion.
2. We suggest you back up your important data before converting.
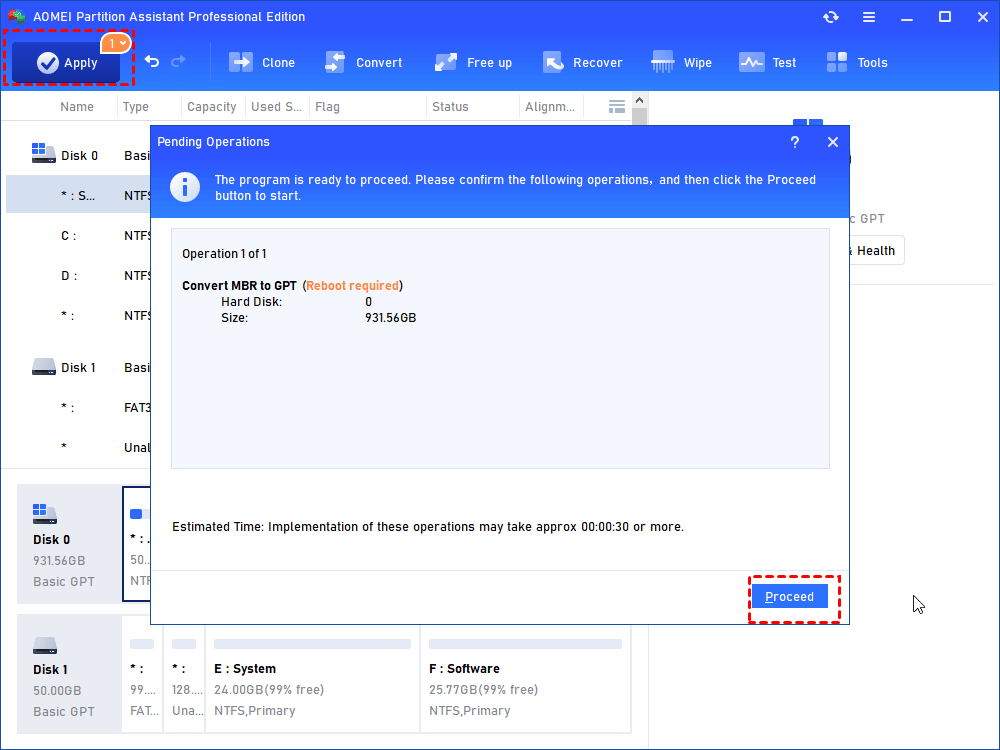
Step 1. Install and launch AOMEI Partition Assistant, right-click the MBR disk you want to change, then choose “Convert to GPT”.
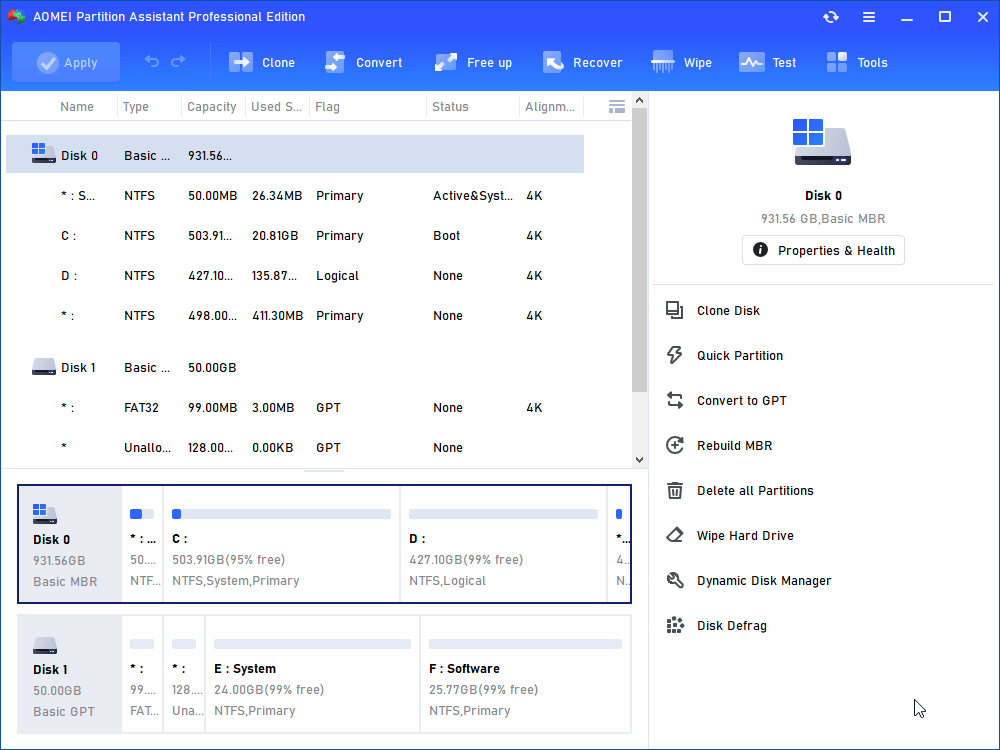
Step 2. In the pop-up window, click “OK” to continue.
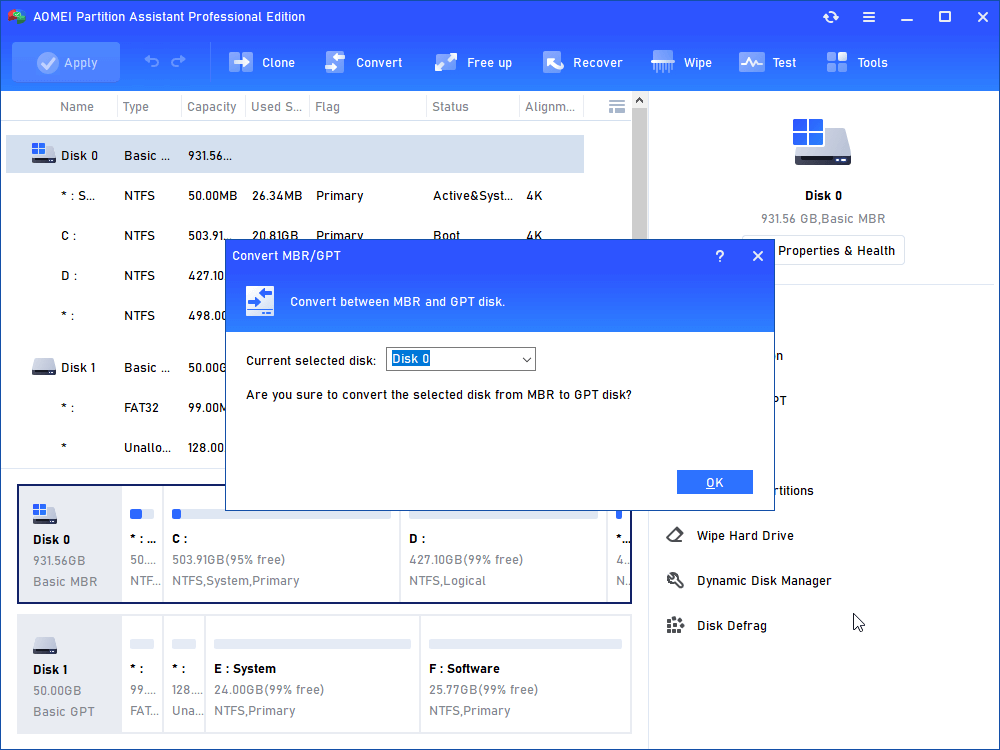
Step 3. Click “Apply” to perform the operation and then your disk will be changed into GPT disk style.
After the conversion, you need to reboot your PC and change the BIOS to UEFI mode, and then you can safely upgrade Windows 10 to Windows 11.
It’s quite easy to safely convert MBR to GPT disk with AOMEI Partition Assistant. In addition, if you’re a Windows 10 user and using HDD, and wish to replace the old HDD with a new SSD in this upgrade, AOMEI Partition Assistant can transfer your installed programs to your new drive without requiring reinstallation.
2. Enable TPM 2.0 & Secure Boot
In this part, we’ll show how to check TPM on your computer and how to enable TPM 2.0 and Secure Boot.
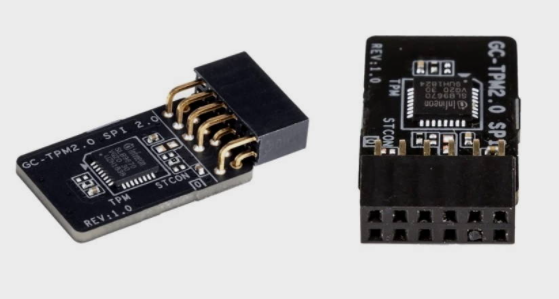
TPM stands for “Trust Platform Module”, which is an independent chip dedicated to encryption, decryption, privacy protection, and other functions. This chip is like a safe made of a hardware circuit, which locks important data such as the user's key, credentials, and biometric characteristics (face/fingerprint).
Its authority management is generally independent of the operating system, that is to say, even if a hacker installs a virus on the user's computer and controls all permissions, it still cannot be done without knowing the user's PIN code or face/fingerprint, he can’t get the identity certificate locked inside.
Section 1. Check and enable the TPM
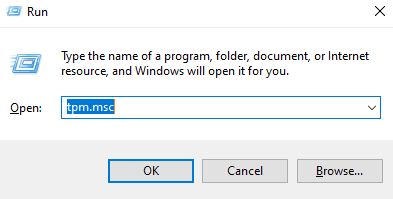
Step 1. Press "Win” and “R” together, then type "tpm.msc” and click “OK”.
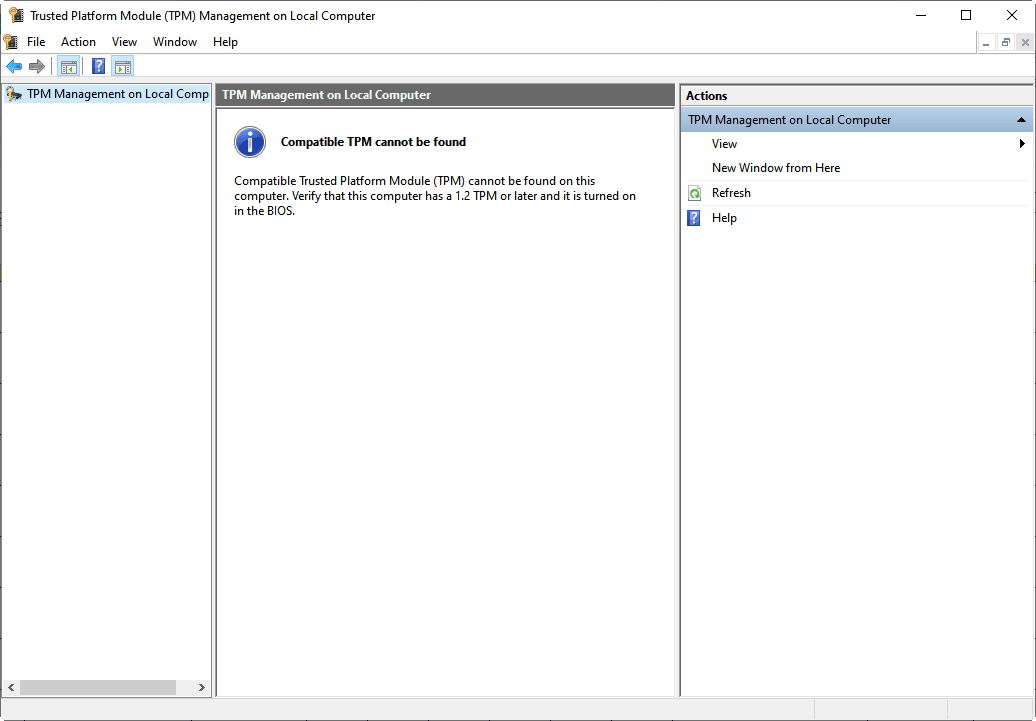
Step 2. Open TPM management window, if the "Status” tab shows "The TPM is ready for use”, it means that the TPM is already enabled. You can check the TPM version in the right corner.

Step 3. If the TPM version is compatible but disabled. The screen will show "Compatible TPM can’t be found”, then you need to turn it on in the BIOS.
If you find that your PC needs to enable TPM 2.0 manually, you can go to BIOS settings to execute it.
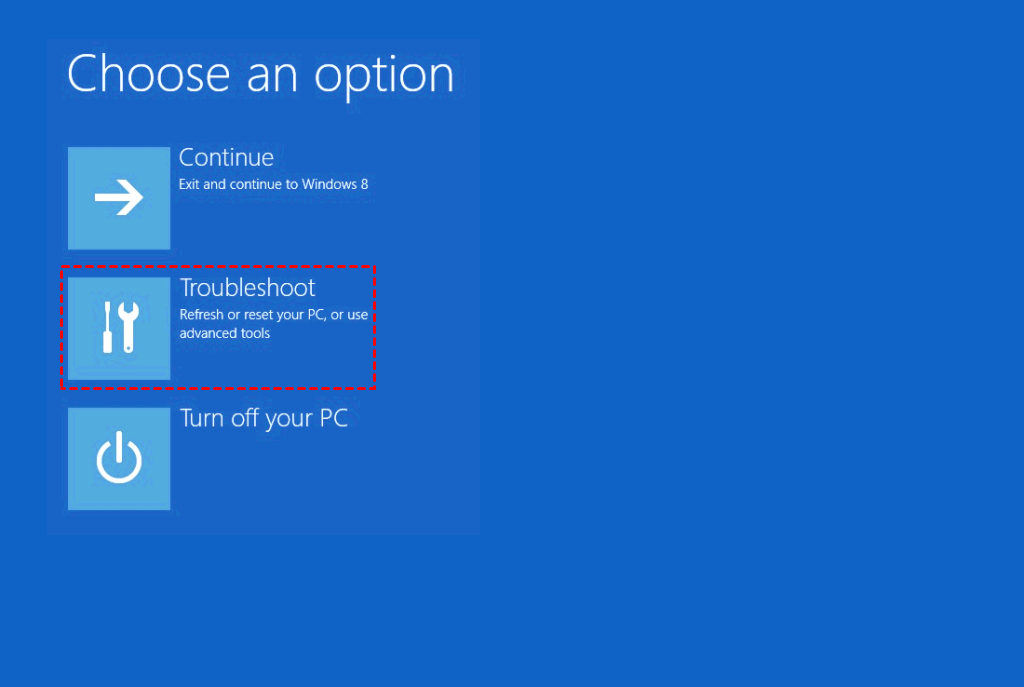
Step 1. Press “Shift” to enter the Windows Advanced Options menu after you click restart, and choose “Troubleshoot”.
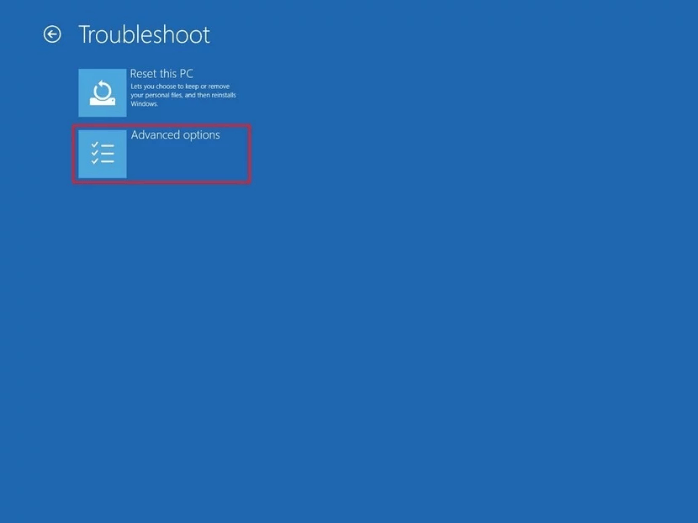
Step 2. Choose “Advanced options”.
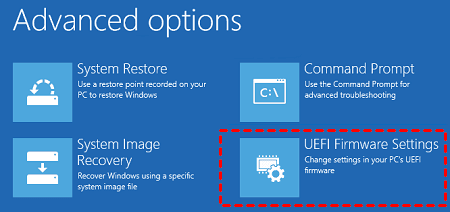
Step 3. Choose “UEFI Firmware Settings” to enter BIOS.
Because the motherboard of the computer is different, the name in the BIOS setting will be different. TPM and PTT do the same purpose; simply open it directly. The TPM will be placed under the advanced settings on some PCs, and its name will be Trusted Platform Module.
Step 4. Turn on the TPM.

Section 2. Enable Secure Boot
Secure Boot is only one part of UEFI. The purpose of Secure Boot is to prevent malicious software from intruding. Its approach is to use keys.
UEFI stipulates that when the motherboard leaves the factory, some reliable public keys can be built-in. Any operating system or hardware driver that wants to be loaded on this motherboard must pass the authentication of these public keys.
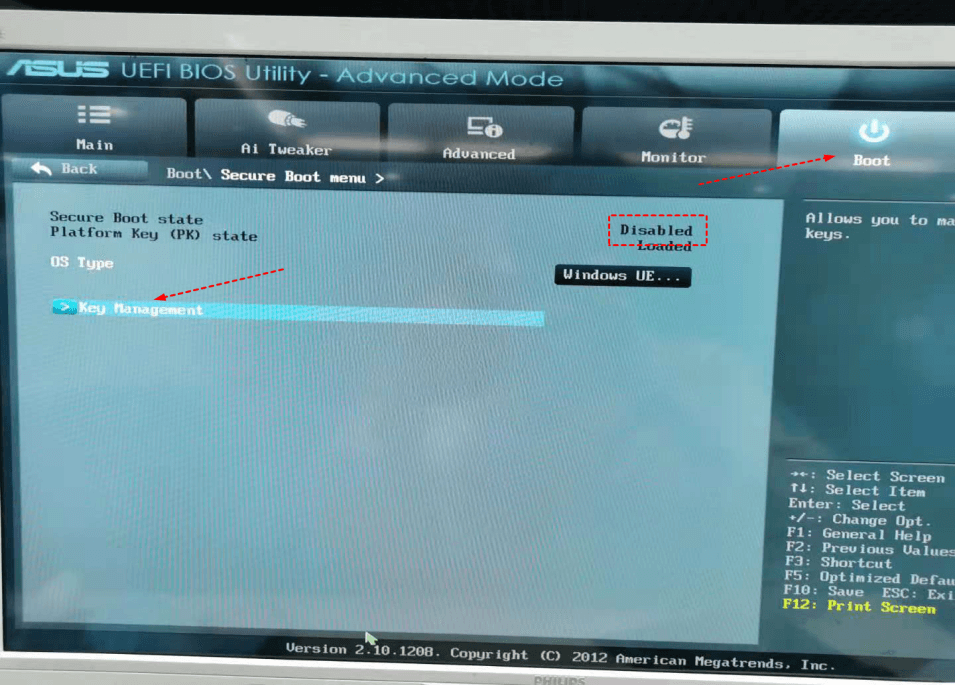
Most computers support Secure Boot, however, they might enable it. Thus, in this section, we’ll show how to enable Secure Boot in BIOS. (Make sure your PC supports Secure Boot.)
Step 1. Reboot your computer, press the specific key to enter BIOS, then click “Boot”, and choose “Secure Boot”.
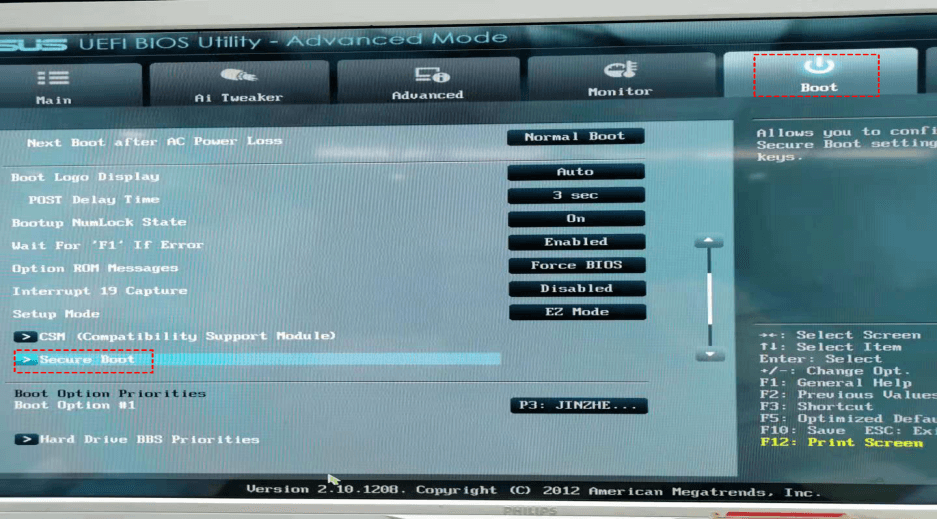
Step 2. Choose “Key Management”.
Step 3. Choose “Install default Secure Boot keys”.
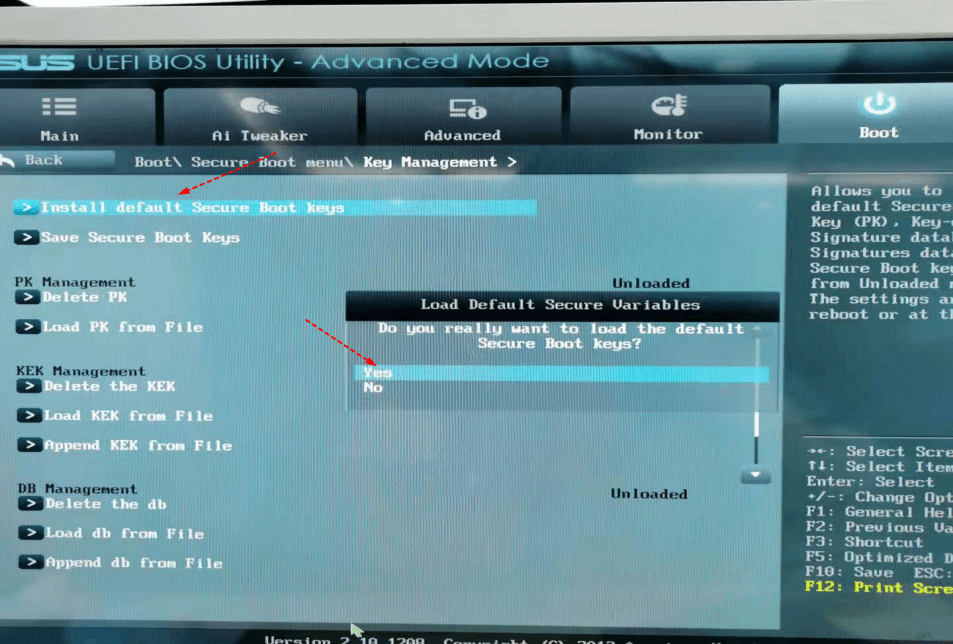
Then the Secure Boot is enabled.
Fixed: Cannot install Windows 11
1. Modifying the registry
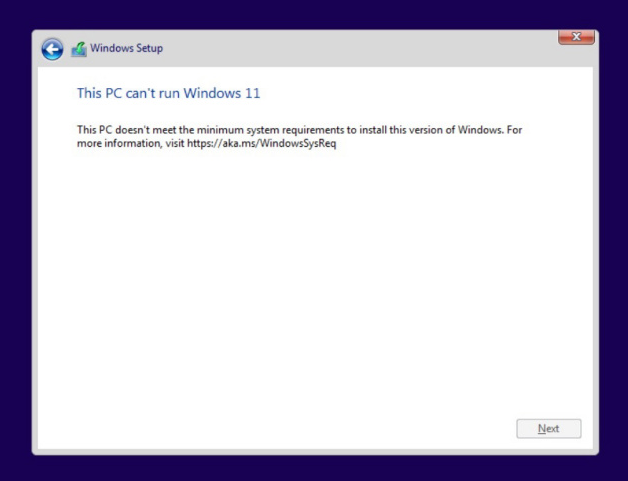
If your computer doesn’t satisfy TPM 2.0 and Secure Boot, or even if you know how to install Windows 11 and your PC is qualified, the installation still fails, then modifying the Registry might be a risky but workable method. This method is reported by the media Windows Latest. During the ISO installation, Win11 will prompt "This computer cannot run Win11".
Step 1. When you see this page during the installation of Windows 11, please press “Shift” + “F10” to open the command-line interface.
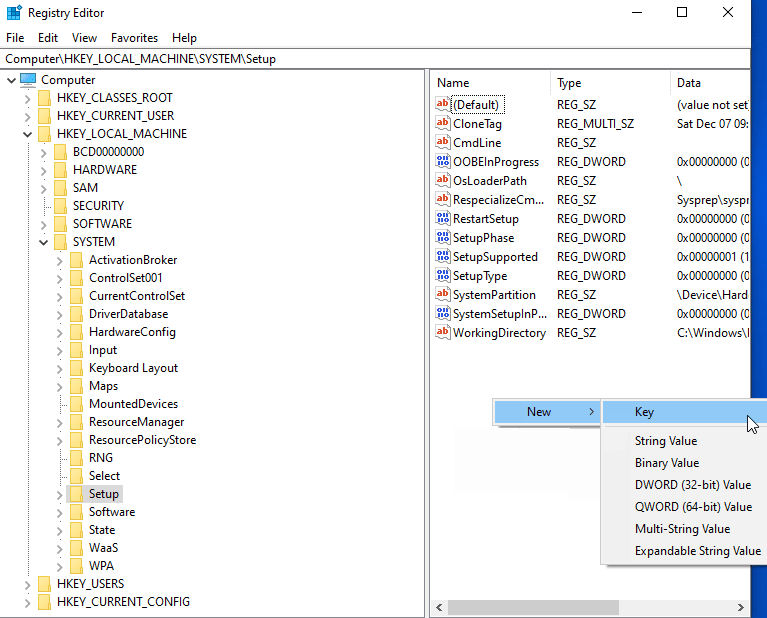
Step 2. Type “regedit” to open the “Registry Editor” window. In the “Registry Editor”, find the “HKEY_LOCAL_MACHINE\SYSTEM\Setup” folder.
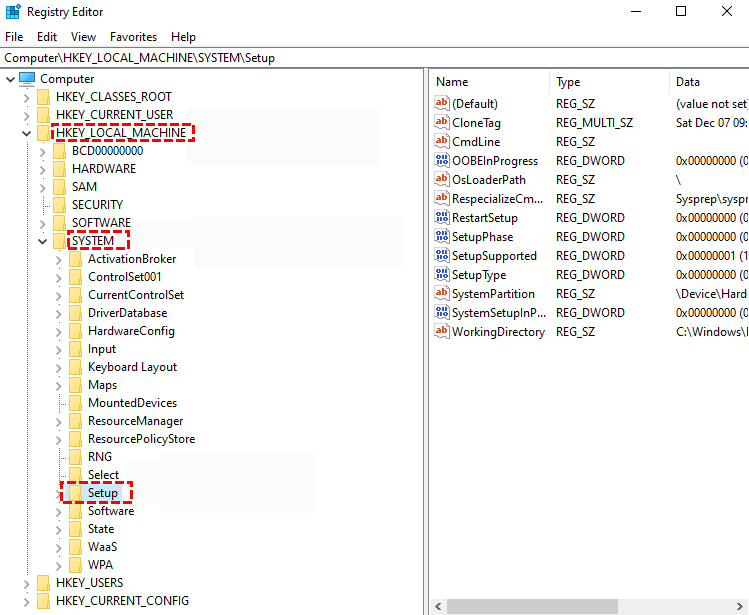
Step 3. Right-click on the right, and select “New” > “Key” to add a new registry key on the left side of the editor. Please name it “LabConfig”.
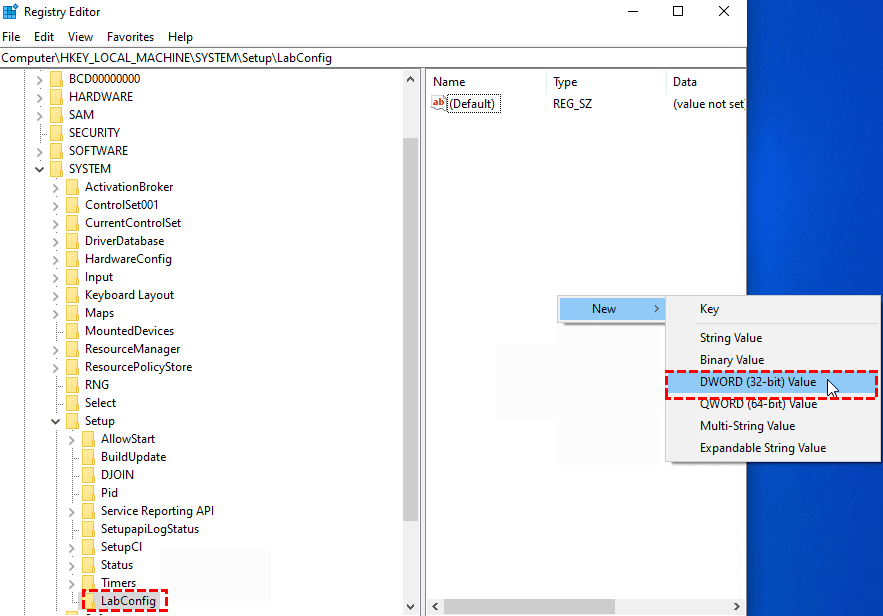
Step 4. Under the “LabConfig” key, right-click to create two “DWORD (32-bit) Value” options to create a new DWORD value
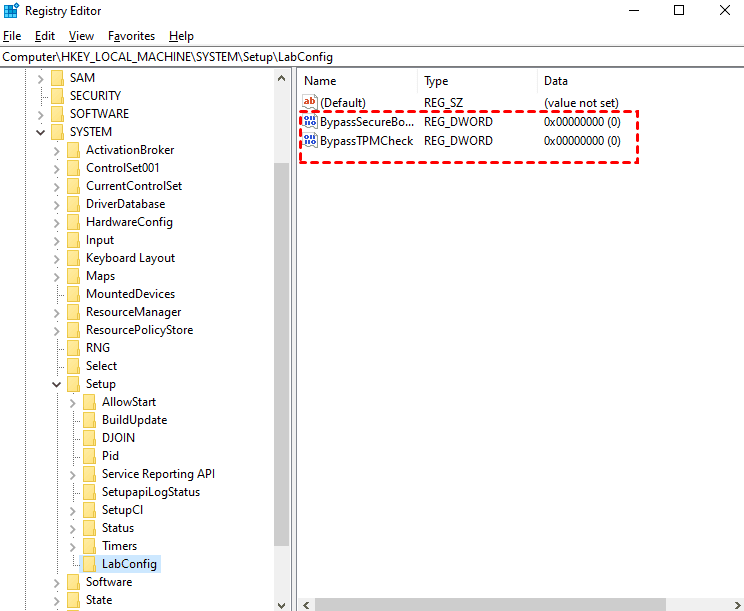
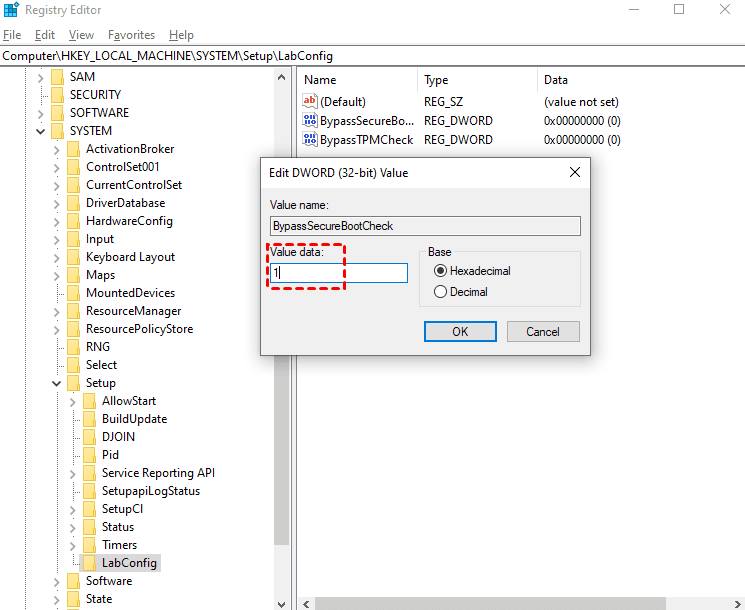
Step 5. Name them as “BypassTPMCheck” and “BypassSecureBootCheck”, then click these two each twice, changing the “Value data” from “0” to “1”.
After you modify the registry, you can install Windows 11. This method will bypass the check to TPM 2.0 and Secure boot to let users install Windows 11. But, we highly suggest you make a backup of your PC to prevent data loss caused by upgrade failure.
2. Install Windows 11 on a faulty computer
However, if your computer upgrade failed but it’s quite necessary for you to run Windows 11 system, don’t be sad, we still have a method to help you create a Windows 11 boot environment to allow your computer to use Windows 11 system.
In this part, we’ll show how to install Windows 11 with the help of AOMEI Backupper to create a Windows 11 restore and run it as a normal system.
▶ Section 1. Manually make a system image file
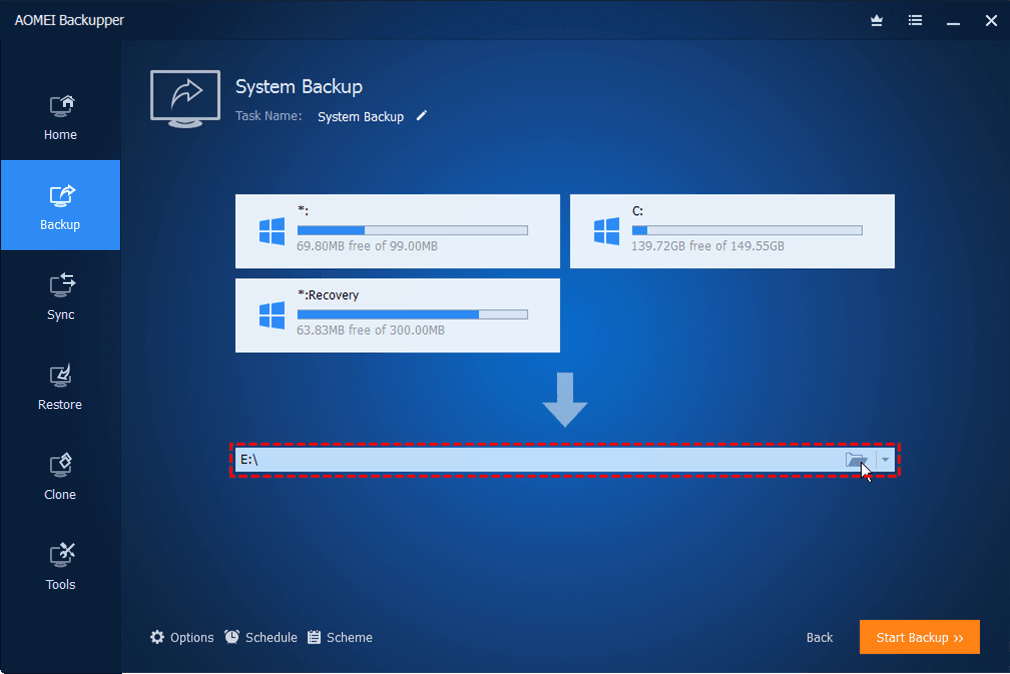
Step 1. Install and launch AOMEI Backupper Professional. Click “Backup” > “System Backup”, select a target location then click “Start Backup”. This step needs a Windows 11 PC to back up a Windows 11 system restore.
▶ Section 2. Create a Bootable Media
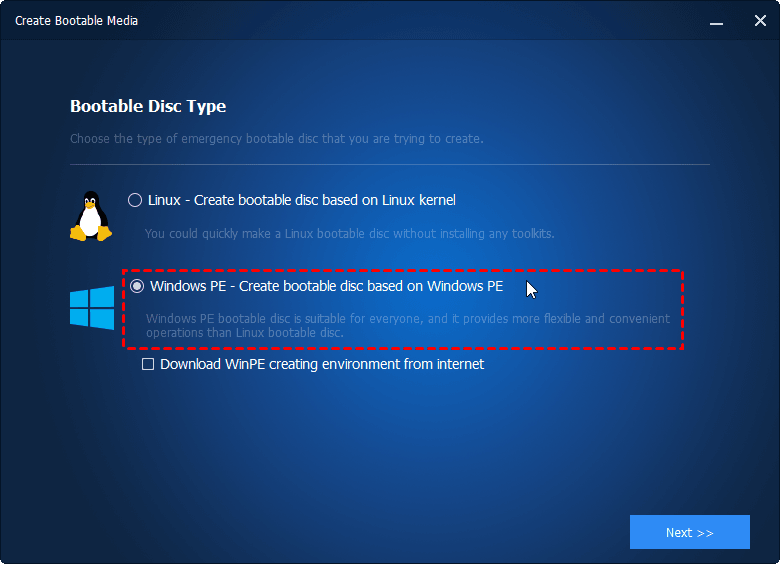
Go back to the homepage of the software. Click “Tools” > “Create Bootable Media”. Then follow the instructions to create a bootable disk based on Windows PE.
▶ Section 3. Restore Windows 11 backup to your PC
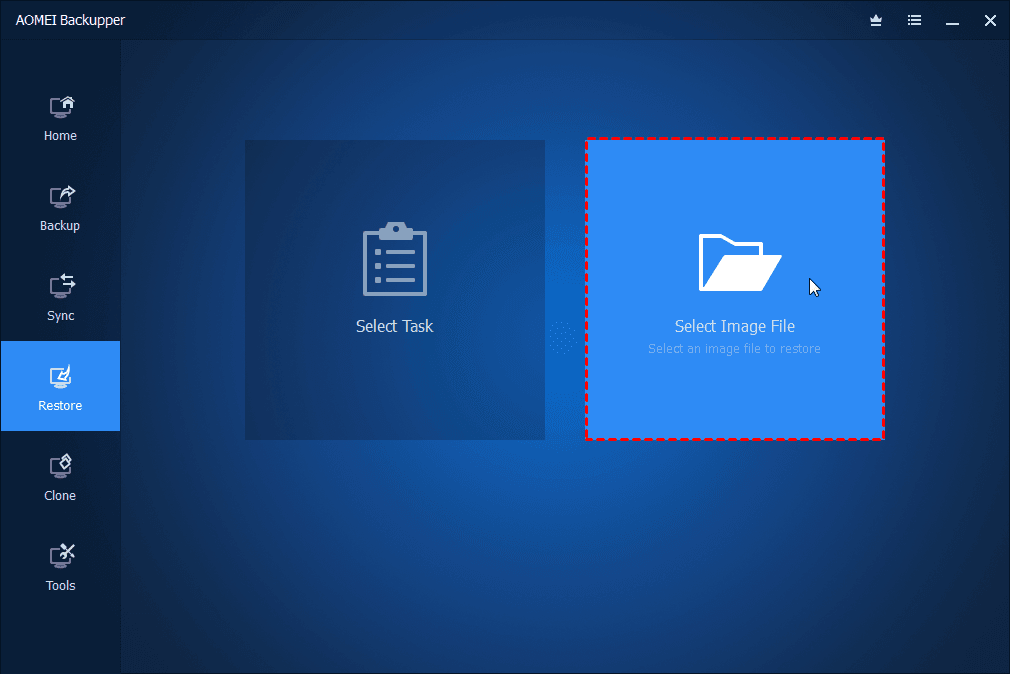
Step 1. Click “Restore” > “Select Image File” to navigate manually to the image file location.
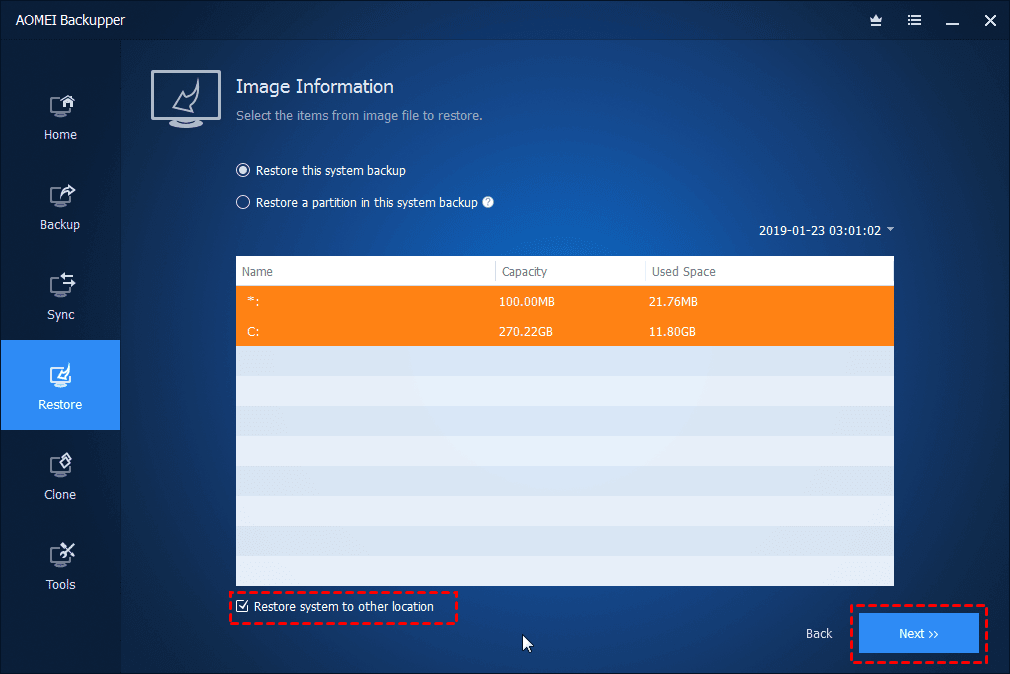
Step 2. Choose “Restore this system backup”, and check “Restore system to other location”, then click “Next”.
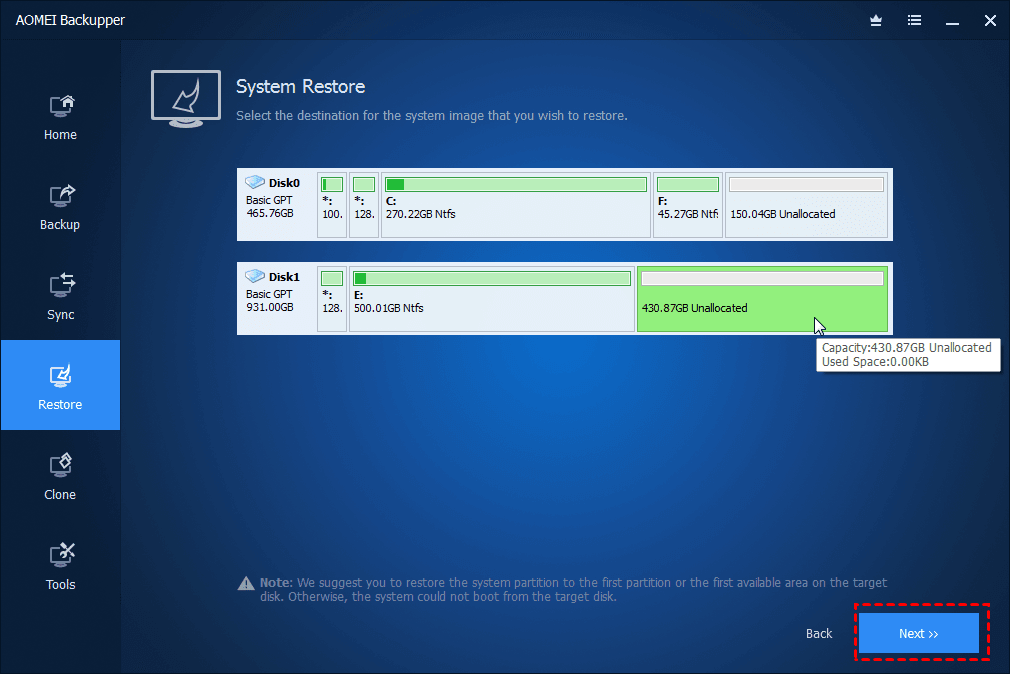
Step 3. Select the “destination” for the system image that you want to restore and click “Next”.
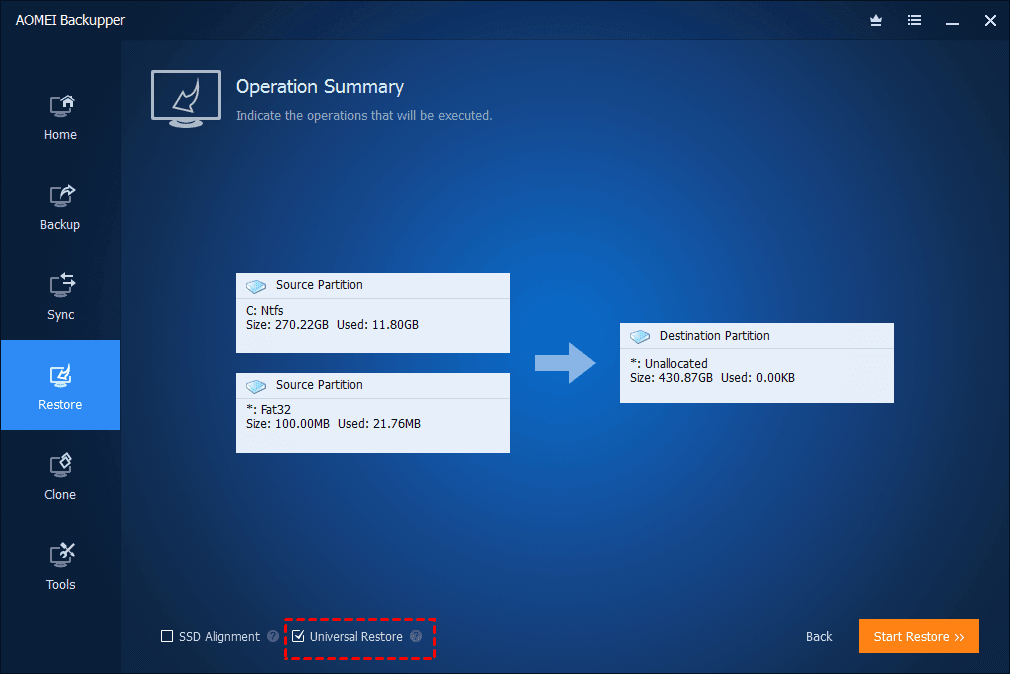
Step 4. You can restore the system backup to another computer successfully without boot issue and click “Start Restore”.
To sum up
If your computer cannot install or upgrade to Windows 11, you can check the problems and try the above methods to fix them. After you upgrade to Windows 11, if your PC needs a disk and partition manager, AOMEI Partition Assistant can be your reliable partner to keep your disk safe. And if you’re a Windows Server user, AOMEI Partition Assistant Server is specifically devised for Server users, which can support Server 2025/2022/2019/2016/2012(R2)/2008(R2)/2003(R2).

