How to Fix Windows 11 Audio Not Working
“My Windows 11 audio not working, how do I fix it?” Some users find their Windows 11 audio not working as usual, if you also meet this problem, you can read this post to fix it quickly.
By Lucas / Updated on December 25, 2023
Why audio is not working in Windows 11?
Since the upgrade of the Windows 11 Operating System, the great improvements that came with it have been the talk of the town. However, a specific issue was discovered by customers like you using the Windows 11 Operating System, and the issue is that the audio is not working.
Audio issues on Windows 11 can result from hardware or software-related problems. These issues may manifest as no sound, distorted audio, or other sound-related problems. Identifying the root cause is crucial for resolving the problem effectively.
Users may encounter issues with audio not working on Windows 11 due to various reasons. Here's a brief explanation and a list of possible causes:
Driver Issues
Outdated, incompatible, or missing audio drivers can lead to audio problems. Users should ensure they have the latest drivers installed for their audio devices.
Incorrect Audio Settings
Misconfigured audio settings, such as the default playback device or volume levels, can cause sound issues. Users should check and adjust these settings as needed.
Hardware Connection Problems
Loose or faulty connections between audio devices (speakers, headphones) and the computer can result in audio not working. Ensure all connections are secure.
Windows Update Problems
In some cases, issues with Windows updates may affect audio functionality. Users should check for and install the latest Windows updates.
Audio Service Issues
The Windows Audio service and related services may encounter problems, leading to audio disruptions. Restarting or troubleshooting these services can help.
Audio Enhancements and Effects
Audio enhancements or effects applied through sound settings may lead to problems. Disabling or adjusting these settings can sometimes resolve audio issues.
Compatibility Issues with Audio Applications
Some audio applications may not be fully compatible with Windows 11. Users should ensure they are using the latest versions of their audio software.
How to fix Windows 11 audio not working
If you also find yourself in this circumstance, don't panic. In this article, we will show you how to solve no audio on Windows 11 using various alternative approaches. As a result, let us go over some techniques.
Method 1: Update the driver for your audio device
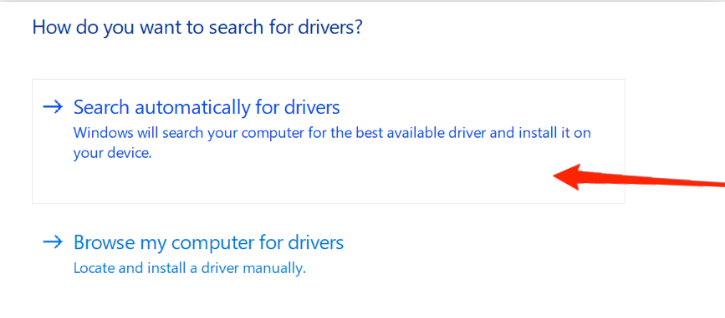
It is important to understand that you may upgrade your audio device's driver manually or automatically. One of the causes of the no audio problem in Windows 11 is an outdated driver. To resolve this issue, you must upgrade your device's driver to the most recent version, as well as confirm that the driver is highly compatible with your computer.
Step 1: Open Device Manager on your computer. Then, in Device Manager, double-click Audio inputs and outputs.
Step 2: Right-click your computer's specific audio device, such as Speakers (High-Definition Audio Device), from the drop-down Audio inputs and outputs option, and select Update driver.
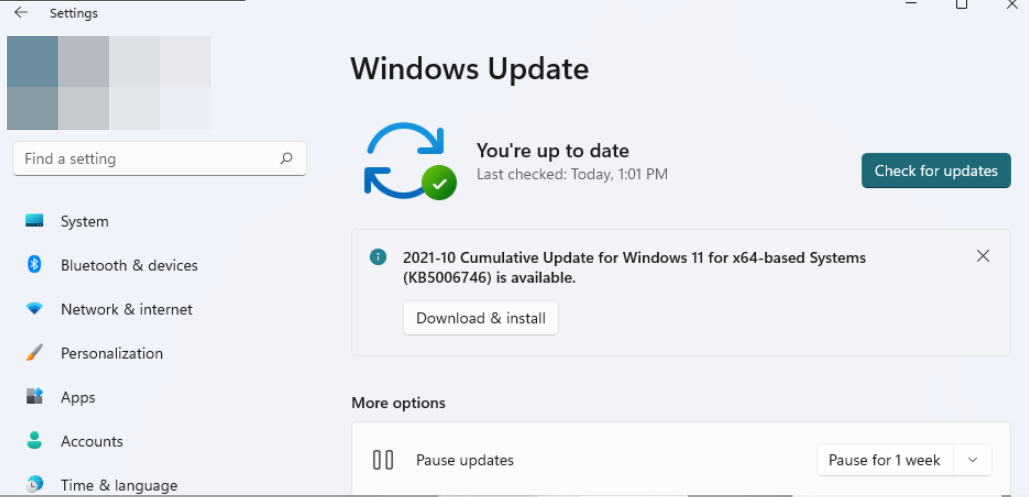
Method 2: Update Windows 11 on your computer
To begin upgrading your PC's Windows 11, complete the instructions below in the correct order:
Step 1: To use the Windows 11 search bar tool, click the magnifying glass taskbar icon found below the desktop area.
Step 2: Type Windows update into the search box that appears. Then, to view the tab shown below, pick Windows update settings, which are marked by Advanced choices.
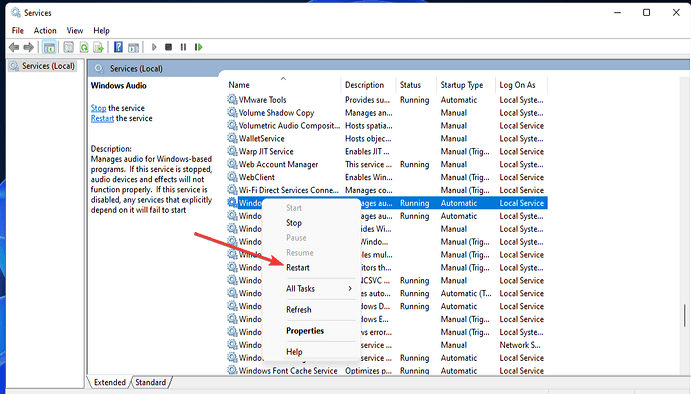
Method 3: Restart the audio service on Windows 11
To use this way of restarting the Windows 11 audio service, follow the steps outlined below.
Step 1: To begin, right-click the Start button on the taskbar and select the Run shortcut from the available menu.
Step 2: In the Run's Open box, type services.msc and press OK to launch Services. Then, as indicated, right-click the Windows Audio service and select Restart. It is also critical that you double-click these audio services to ensure that their Startup Type option is set to Automatic.
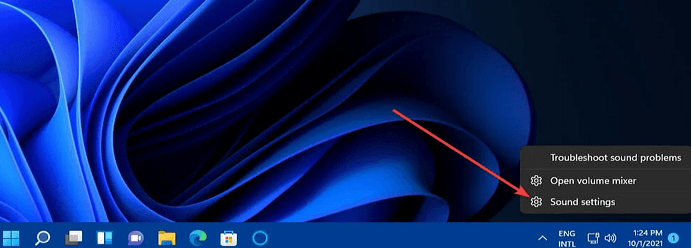
Method 4: Modify audio choices in the sound settings
After explaining the first, second, and third ways in detail, this is the final approach to be examined in depth. Ready? So, let's get started.
To resolve the No Audio problem in Windows 11, change the audio option in the sound settings. So, how can you modify the audio settings under the sound settings?
Step 1: To begin, right-click the speaker icon symbol on the Windows 11 desktop area and select Sound settings.
Step 2: To see the drop-down menu, click on Choose where to play sound. Select the sound output you want to use as the default and make sure the volume is not muted by clicking the Unmute speaker button in the Volume bar.
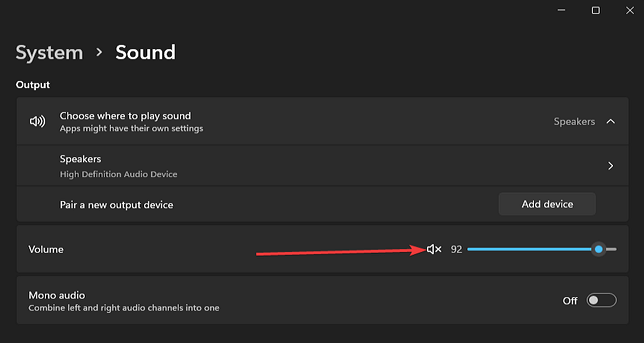
Step 3: If the Volume bar is too far to the left, move it to the right. Then activate the Audio option and choose Volume mixer in the advanced settings to get to the Volume mixer path.
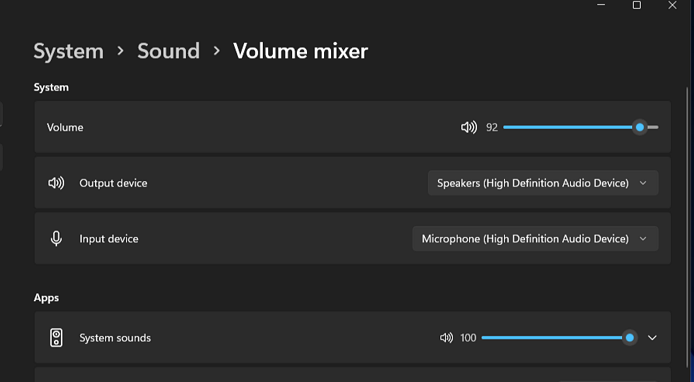
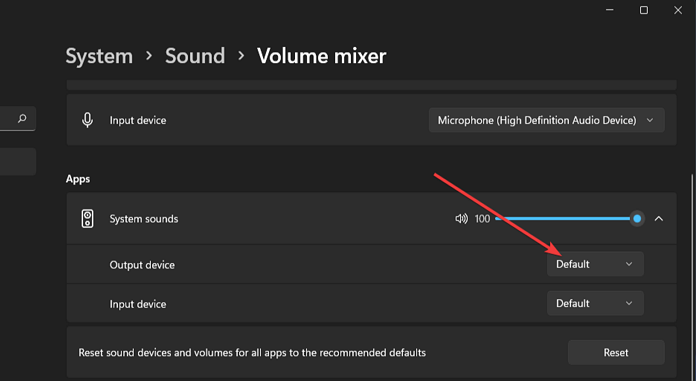
Step 4: At this point, double-check that the Volume and System sound bars are fully to the right. Then, pick system sounds to open its drop-down menu. As seen, select Default from the Output device selection.
Method 5: Check sure the program you're using
For example, if you can't hear anything in software like Zoom or Skype, check the app's settings to ensure it's set up to utilize your headset or speakers. You may silence a specific tab using the right-click menu in web browsers such as Chrome, Firefox, and Edge.

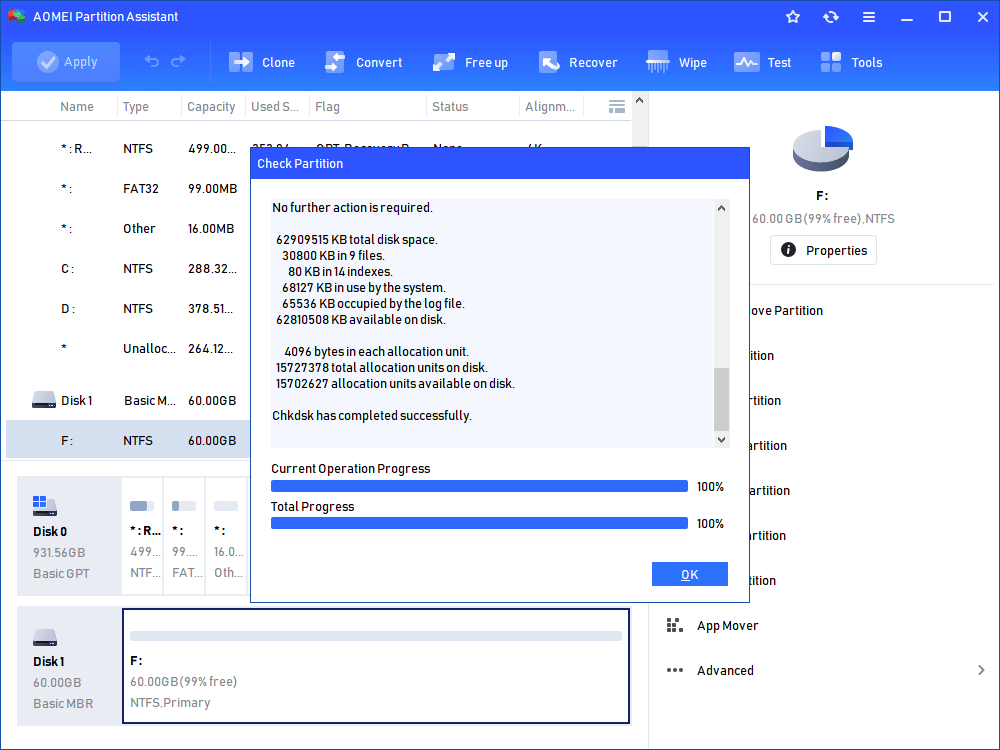
Further reading: Chech partition to troubleshoot driver issues
When drivers have problems, you repair your hard disk with AOMEI Partition Assistant Standard. It is a free fixing tool with excellent features that make everything more convenient. It is compatible with the majority of Windows operating systems, including Windows 11/10/8/7, Windows XP, and Windows Vista. Furthermore, its user-friendly interface simplifies CHKDSK repair and reduces operational hazards.
The Best Windows Disk Partition Manager and PC Optimizer
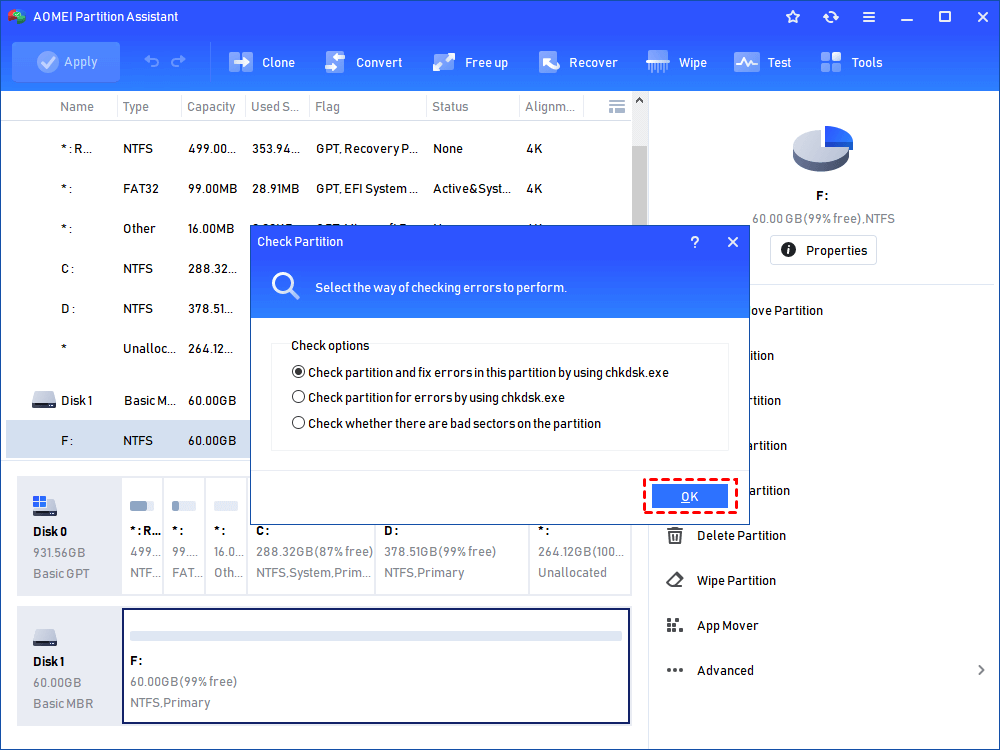
Step 1. Install and open AOMEI Partition Assistant. Right-click C drive on the main interface, and click “Advanced”> “Check Partition”.

Step 2. We choose the “Check partition and fix errors in this partition by using chkdsk.exe”. You can also choose other options or just run them one by one, and click “OK”.
Step 3. Then wait for the check to be completed, and click “OK”.
To sum up
The ways outlined in this post will assist you in resolving Windows 11 audio not working. As a result, by following the step-by-step instructions in this blog article, you will never have to deal with this problem again. You should keep in mind that you may try any of these approaches to see which one works best for you.
AOMEI Partition Assistant is a very practical tool when you need to manage your disks and drives. Besides checking problems, this tool can also recover lost data, clone disk, move installed apps, and extend drive space... And there is the Server edition and other advanced editions to help you manage multiple devices.

