How to Achieve Windows Apps Transfer to New Disk?
There are two methods to realize Windows apps transfer to new disk. Including Windows built-in tool and third-party utility.
By AOMEI / Updated on March 5, 2026
Why make Windows apps transfer to new disk drive?
People usually want to move installed programs to another drive in Windows 10 for the following reasons:
✌ Insufficient disk space causes the computer to run slowly or even crash.
✌ Store files in a distributed manner to prevent all data from being lost due to virus intrusion.
✌ Add SSD to the computer, transfer Steam, Origin and other game platforms to SSD to improve the performance of the game.
Two methods to realize Windows apps transfer to new disk in Windows 10
Many users may encounter the problems mentioned above. Next, I will introduce you to the two easiest ways to migrate programs to new hard drive. Even if you are an ordinary user with no computer foundation, you should follow the steps I gave to complete.
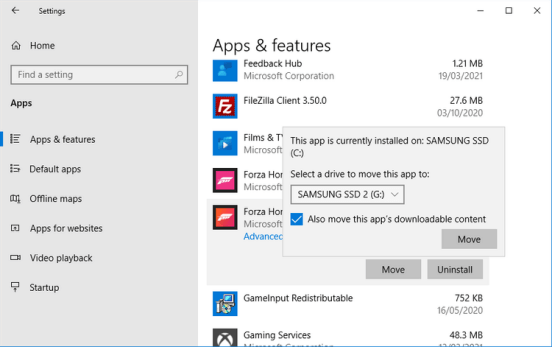
│Method 1. Move apps from Windows settings
This method will only work for apps that you have installed from the Microsoft Store.
Step 1. In the desktop of Windows 10 and press “Windows+I” to open Windows settings.
Step 2. Click “Apps”. In Apps & features, you can see all installed apps from here.
Step 3. Choose the apps you want to move and click “Move”.
│Method 2. Transfer installed apps via powerful software
Although the above method is very simple, it is extremely limited because only applications downloaded from the Microsoft Store can be moved. Many times, we download apps from the Internet. At this time, we need to find other ways to transfer these software.
AOMEI Partition Assistant Professional is a powerful disk management utility (for Windows 11/10/8/7/Vista/XP). It can make up for the shortcomings of the first method, not only can move all installed programs to different drives of the same disk, but also to different drives of different disks. And the moved program can run successfully without reinstalling, and it can even be restored to its original location.
In addition, other outstanding features are also very popular. You can use it to Delete Large Files, Clone Disk, Migrate OS to SSD, Extend the Size of the Partition.
If you want to complete these operations in Windows server, please upgrade to AOMEI Partition Assistant Server.
PS.: Don't wait any longer! Please download the demo version for a free trial.
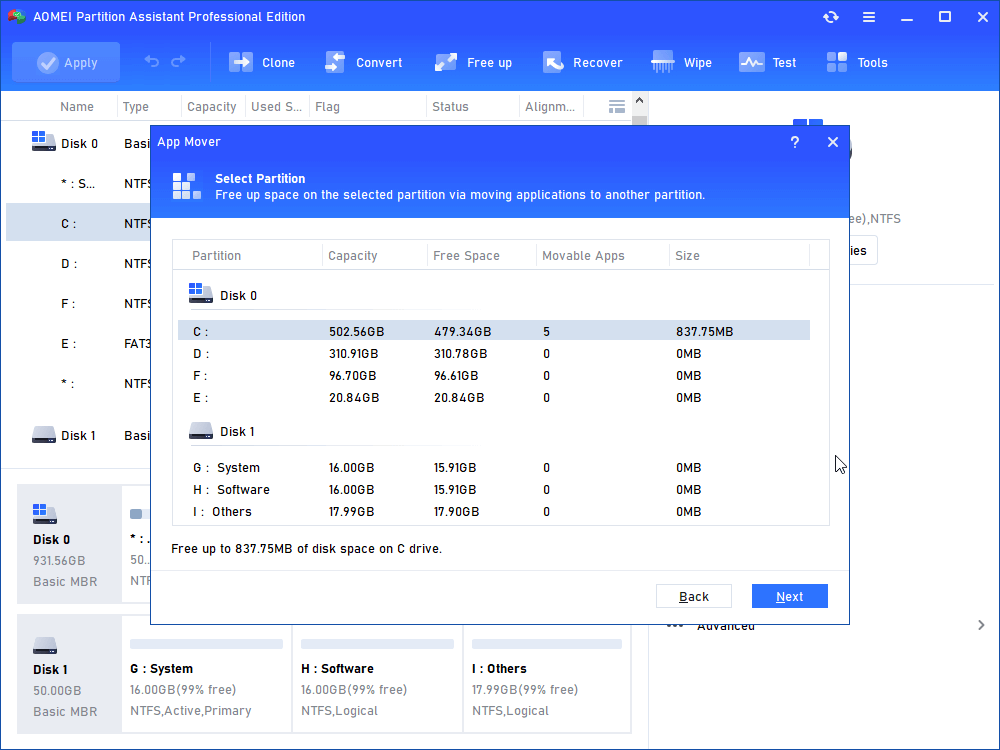
Step 1. Install and launch PA Professional, click “Free up” on the top, then select the “App Mover”.

Step 2. Select the partition where all the moved programs are located, and then click Next.
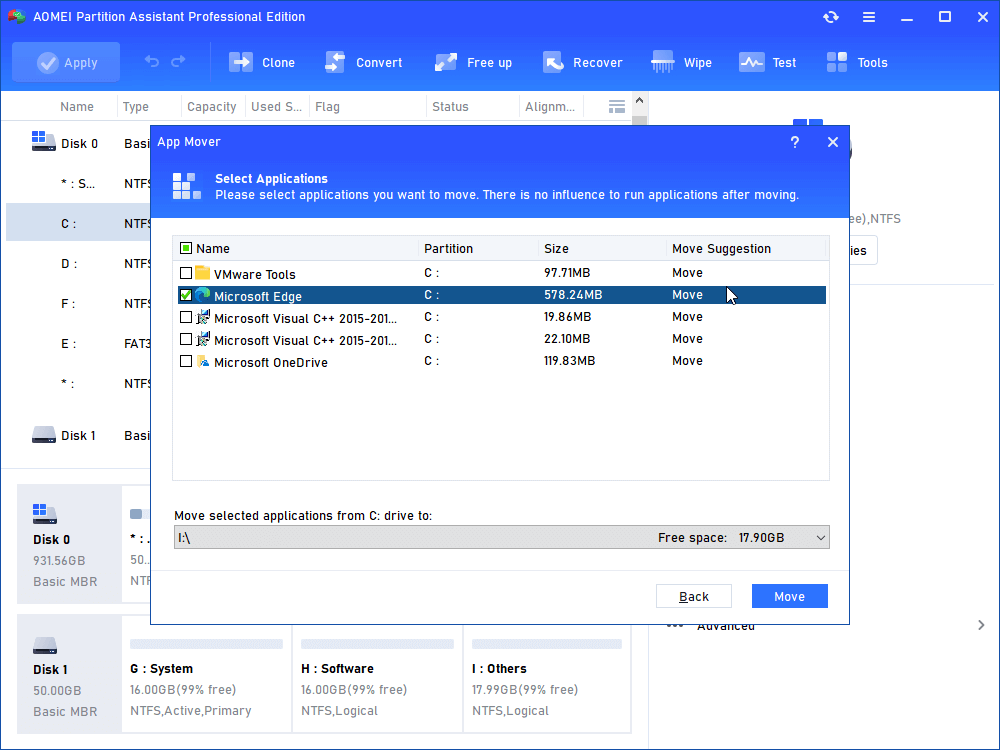
Step 3. Select the program you are going to move and destination drive here, you can select multiple programs at once. Then click Move.
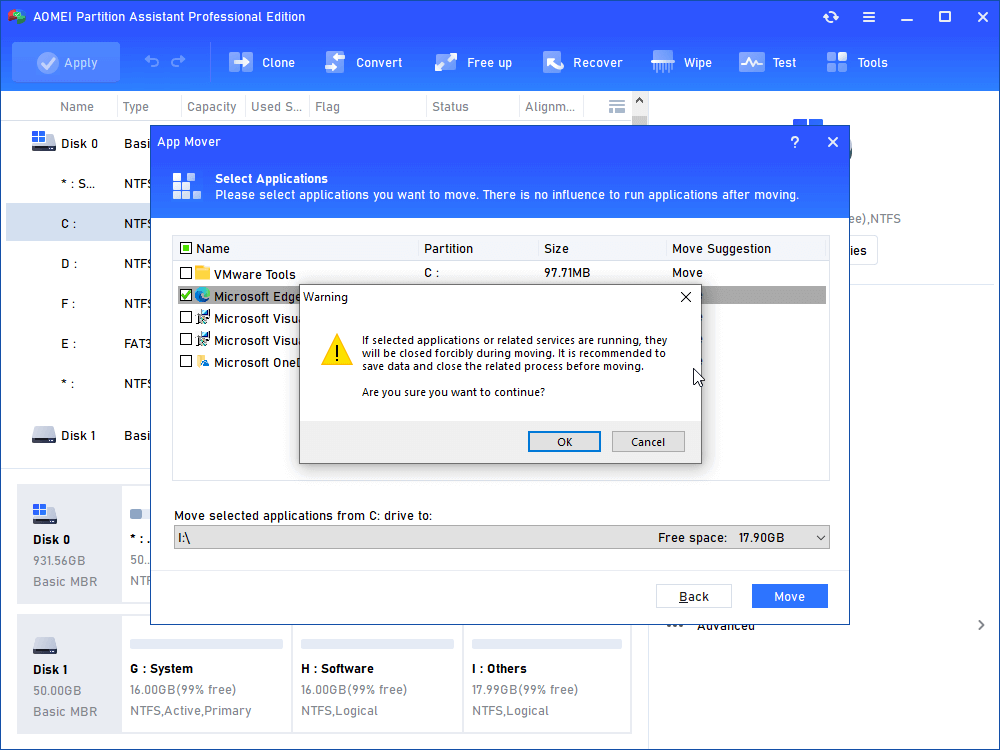
Step 4. Decide if you want to move, then click OK and Move.
Important:
You should note that apps may not work after moving to a different drive. This is because the drive letter of some apps may be changed after being transferred. After the drive letter is changed, the shortcut of the application cannot be opened because the path cannot be found. At this time, you need to right-click the desktop shortcut of the App, click "Properties", and then change the original drive letter in the “Target” and “Start Position” to the drive letter where the App is currently located.
Further reading: Allocate free space from one partition to another
You See? It is easy to make Windows apps transfer to new disk by AOMEI Partition Assistant. It only takes a few steps to complete.
By the way, if you want to free up space, then Allocate Free Space is also worth trying. This function can allocate the available space of one partition to another. Please refer to the specific steps below:
Step 1. On the main interface of AOMEI Partition Assistant Pro, right-click the partition with free space and select Allocate Free Space.

Step 2. Select the size to be allocated and the target partition. Then click OK.

Step 3. After that, you can see the size of partition C has been extended successful and then click Apply on the toolbar to execute pending operations.


