6 Ways to Fix Windows Modules Installer Worker High Disk
Frustrated by Windows modules installer work high disk? This guide explains the causes of Windows installer module working high disk and provides step-by-step solutions.
By Lucas / Updated on June 17, 2025
Is your Windows PC slowing to a crawl? Do you hear your hard drive churning relentlessly, even when you're not actively doing much? A common culprit behind this frustrating performance drain is a process known as the Windows Modules Installer Worker, which can sometimes lead to high disk usage.
This in-depth guide will explore what this process is, why it causes Windows Modules Installer Worker high disk issues, and provide you with effective solutions to reclaim your system's speed and efficiency.
Overview of Windows Modules Installer Worker
Before diving into solutions, it's crucial to understand what the Windows Modules Installer Worker is and its intended role in your operating system. This knowledge will help you appreciate why it sometimes causes Windows Module Installer Worker high disk usage and how the fixes work.
The Windows Modules Installer Worker, also known by its executable file name TiWorker.exe, is a core Windows system component. Its primary responsibility is to manage Windows updates and other optional system components. This includes checking for, downloading, installing, modifying, and removing Windows updates and system modules.
Essentially, it ensures your operating system is up-to-date with the latest features, security patches, and bug fixes released by Microsoft. Without this service, your system could become vulnerable to security threats and miss out on performance improvements or new functionalities.
Why does Windows Modules Installer Worker cause high disk usage?
Several factors can cause this process to consume excessive disk resources, leading to a sluggish system.
1. The most straightforward reason why for Windows modules installer works with high disk activity is that it's actively doing its job: downloading and installing Windows updates. These updates can sometimes be substantial, requiring significant disk read/write operations. However, persistent high disk usage can also stem from underlying issues.
2. Corrupted update files can cause the installer to get stuck in a loop, repeatedly trying to process faulty data, thus leading to continuous Windows installer module worker high disk activity.
3. Software conflicts, particularly with third-party antivirus programs or other system utilities, can interfere with the update process, prolonging disk usage.
4. If there are any pending updates or if a critical update requires extensive system changes, the Windows Modules Installer Worker will naturally demand more disk resources for a longer period.
5. System file corruption or issues within the Windows Update components themselves can also force TiWorker.exe into overdrive, resulting in sustained Windows module installer worker high disk usage. On systems with older, slower hard disk drives (HDDs), even normal update operations can appear as high disk usage due to the drive's limited speed.
How to fix Windows Module Installer Worker's high disk usage
Now that you have a better understanding of the Windows Modules Installer Worker and why it might be causing high disk usage, let's explore effective methods to resolve this issue. The following solutions are to tackle the Windows Modules Installer Worker high disk problem from various angles.
Way 1: Perform a Clean Boot
A Clean Boot starts Windows with a minimal set of drivers and startup programs, which can help you identify if a background application is conflicting with the Windows Update process and causing Windows module installer worker high disk usage. This method isolates the cause by eliminating software conflicts.
Step 1. Press the Windows key + R to open the Run dialog box. Type msconfig and press Enter to open the System Configuration window.
Step 2. Go to the Services tab.
Step 3. Check the box that says "Hide all Microsoft services". This is crucial to avoid disabling essential system services.
Step 4. Once Microsoft services are hidden, click the "Disable all" button.
Step 5. Next, go to the Startup tab. Click on "Open Task Manager".
Step 6. In the Task Manager's Startup tab, disable all startup applications. You can do this by right-clicking on each item and selecting "Disable".

Step 7. Close Task Manager. Back in the System Configuration window, click "OK".
After your computer restarts, monitor its performance and disk usage. If the Windows Modules Installer Worker high disk issue is resolved, it means a third-party service or startup item was the cause. You can then re-enable services and startup items one by one (or in small groups) and restart each time to identify the specific culprit. Once found, you can choose to keep it disabled, update it, or uninstall it.
Way 2: Run Memory Diagnostics
Faulty RAM can lead to various system instabilities, including increased disk swapping (paging), which might appear as high disk usage or exacerbate issues like Windows modules installer worker high disk. The Windows Memory Diagnostic tool checks your computer's RAM for errors.
Step 1. Save all your work and close all applications. Press the Windows key, type “Windows Memory Diagnostic”, and select it from the results.
You’ll be given two options:
Restart now and check for problems (recommended)
Check for problems the next time I start my computer
Step 2. Choose the first option to begin the test immediately. Your computer will restart and enter the diagnostic mode.
The test can take some time. Once completed, your computer will restart again, and the results will be displayed after you log in. If any errors are reported, your RAM modules might need replacement.
If memory errors are detected, replacing the faulty RAM module(s) could resolve the Windows Modules Installer Worker high disk issue if it was indirectly caused by memory problems leading to excessive paging or system errors.
Way 3: Set PC performance
Windows includes various visual effects that enhance the user experience but can consume system resources. Adjusting these for best performance can free up resources, potentially easing the burden on your disk and helping with windows modules installer worker high disk usage.
Step 1. Press the Windows key + I to open Settings. Go to System > About.
Step 2. Scroll down and click on "Advanced system settings" (often found on the right-hand side or under "Related settings").
Step 3. In the System Properties window, go to the Advanced tab. Under the Performance section, click the "Settings..." button.
Step 4. In the Performance Options window, select the radio button for "Adjust for best performance". This will disable all visual effects.
Alternatively, you can choose "Custom" and manually uncheck effects you don't need, such as animations and shadows.
Step 5. Click "Apply" and then "OK".
While this might not directly target the Windows Modules Installer Worker, reducing the overall system load can sometimes prevent it from consuming excessive disk resources.
Way 4: Delete the SoftwareDistribution Folder
The SoftwareDistribution folder (C:\Windows\SoftwareDistribution) is where Windows stores temporary files needed for Windows Updates. If these files become corrupted or if there's an issue with the update cache, it can lead to the Windows Modules Installer Worker getting stuck and causing high disk usage. Deleting this folder effectively forces Windows to create a fresh update cache.
Step 1. Press WINDOWS + R and type services.msc. Press Enter. Locate the Windows Update service and stop it.
Step 2. Close the Services Window and again press WINDOWS + R.
Step 3. Type C:\Windows\ and press Enter.
Step 4. Navigate to the SoftwareDistribution folder and delete it.
Windows will recreate the SoftwareDistribution folder and download fresh updated files. Check if the Windows Modules Installer Worker high disk issue persists.
Way 5: Run Windows Update Troubleshooter
Windows includes a built-in troubleshooter specifically designed to diagnose and fix common problems related to Windows Updates. This tool can automatically identify and resolve issues that might be causing the Windows Modules Installer Worker to exhibit high disk usage.
For Windows 10:
Step 1. Press the Windows key + I to open Settings. Go to Update & Security.
Step 2. Select Troubleshoot from the left-hand menu.
Step 3. Click on "Additional troubleshooters" (or you might see Windows Update directly).
Step 4. Select "Windows Update" from the list and click "Run the troubleshooter".
Step 5. Follow the on-screen instructions and let the troubleshooter attempt to fix any detected problems.
For Windows 11:
Step 1. Press the Windows key + I to open Settings.
Step 2. In the System menu (usually open by default), scroll down and click on Troubleshoot.
Step 3. Click on "Other troubleshooters".
Step 4. Find "Windows Update" in the list and click the "Run" button next to it.
Step 5. Follow the prompts and allow the troubleshooter to complete the process.
Way 6: Upgrade your hard disk
If you're consistently experiencing Windows modules installer worker high disk issues, especially on an older computer, your hard disk drive (HDD) itself might be the bottleneck. HDDs are significantly slower than Solid State Drives (SSDs). When a demanding process like the Windows Modules Installer Worker runs, an HDD can struggle to keep up, leading to 100% disk usage and a sluggish system. Upgrading to an SSD can dramatically improve overall system responsiveness and reduce the impact of disk-intensive tasks.
An SSD upgrade offers a substantial performance boost and can make issues like Windows installer module worker high disk far less noticeable, even if the process is active. For a seamless transition, cloning your existing hard drive to a new SSD is the recommended approach.
When considering a hard disk upgrade, the thought of reinstalling Windows and all your applications can be daunting. This is where a reliable disk cloning tool like AOMEI Partition Assistant Professional becomes invaluable. AOMEI Partition Assistant Professional is a comprehensive and user-friendly disk partition management software designed for Windows users. It offers a wide array of features to optimize, manage partitions, and protect your hard drive and its data, including powerful disk cloning and OS migration capabilities. Its intuitive interface makes complex operations accessible even to users with limited technical expertise.
Preparation:
✍ Connect the new hard drive to the computer through the USB port and ensure that it is correctly detected.
✍ Check that the hard disk has adequate space to hold all of the data from the previous hard drive. Otherwise, you can erase or eliminate unwanted data from the original disk ahead of time.
✍ Examine the partitioning styles of the old and new hard drives (MBR or GPT). If the new disk's partition style differs from the old one, you can convert it to GPT or MBR first. Alternatively, after cloning, alter the boot mode (BIOS or UEFI).
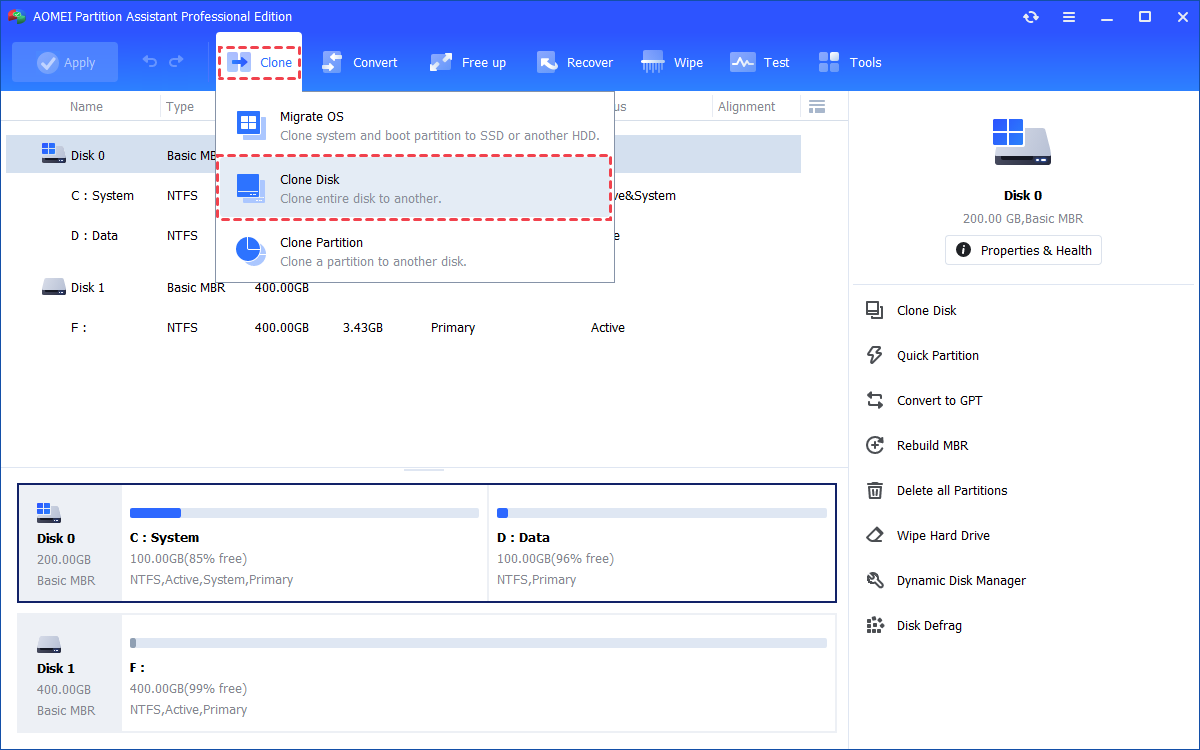
Step 1. Install and launch AOMEI Partition Assistant, click the "Clone" main tab and select "Clone Disk". (You can also right-click the Disk you want to clone and select the "Clone Disk" tool to run disk clone.)
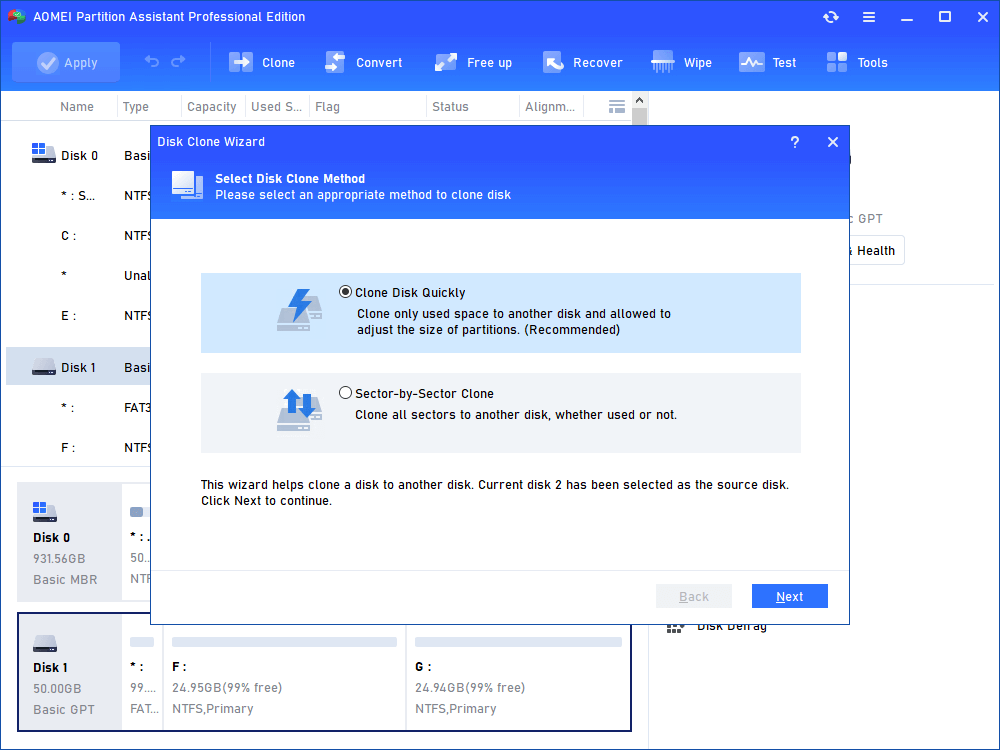
Step 2. Choose the hard disk that you need to clone as the source disk and click "Next".
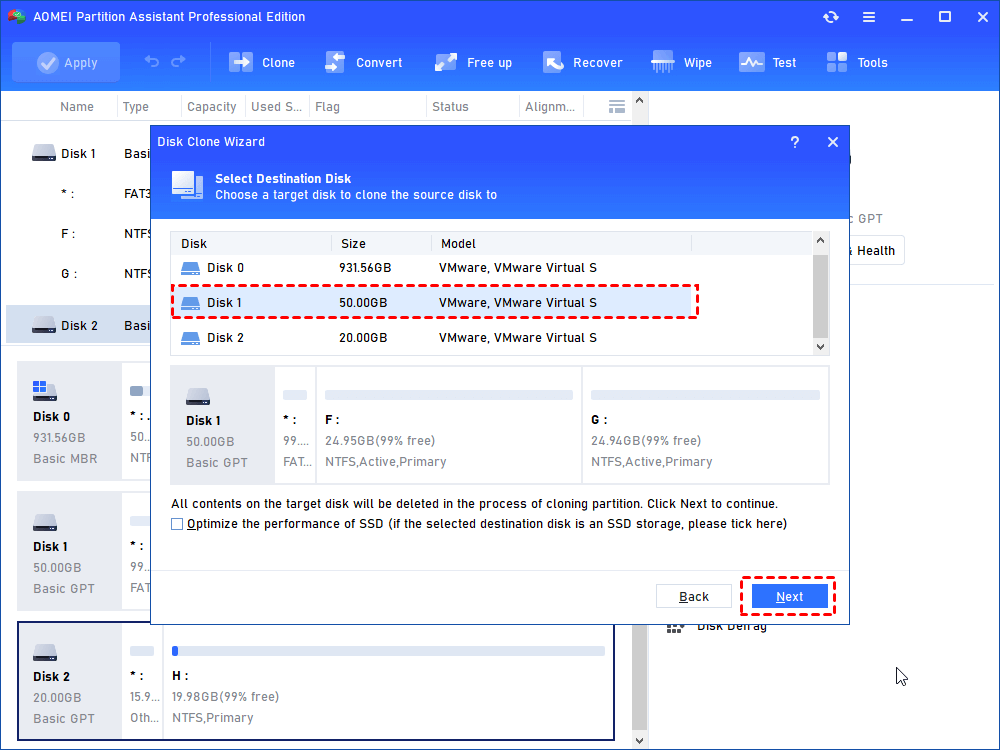
Step 3. Select the destination disk to put the data of the source disk on, and then click "Next".
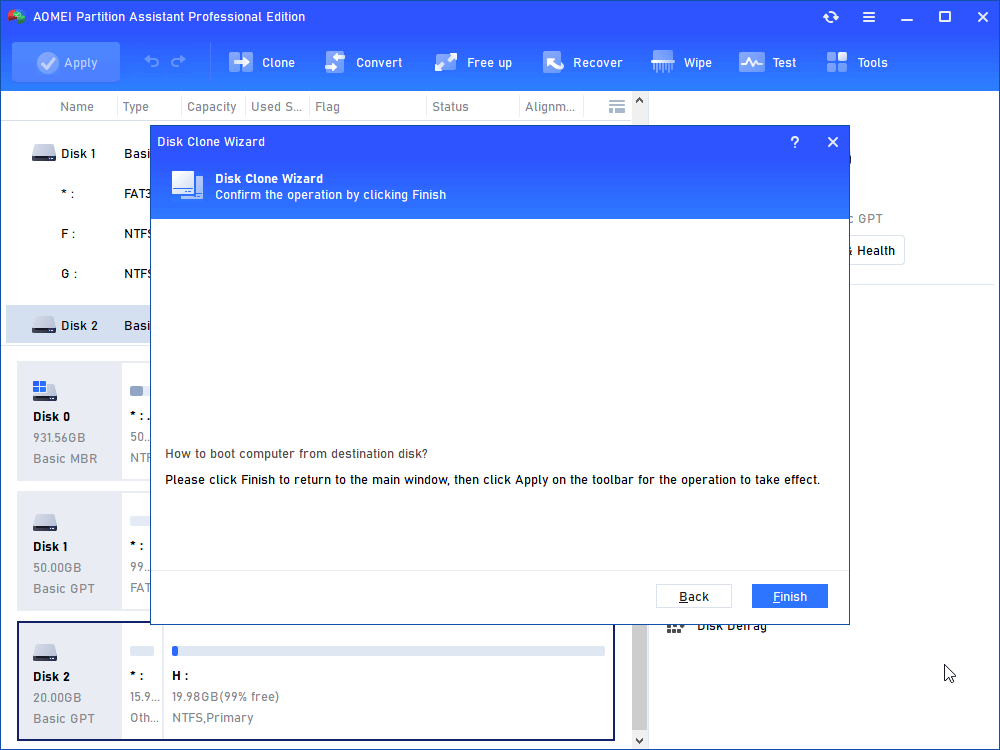
Step 4. Then, you will enter the Confirm interface where you can check the source and destination disk. After all is set, you can click the "Confirm" button to continue.
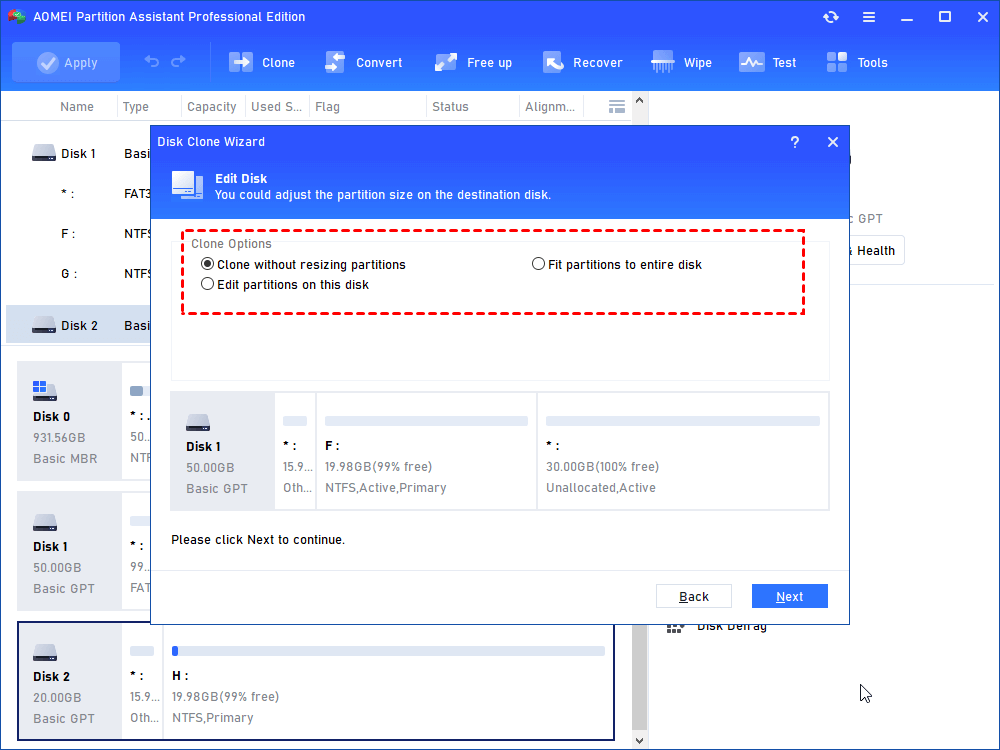
In lower left corner of the window, you can click the "Settings" button to adjust the partition size on the destination disk. There are three options for you:
- Clone without resizing partitions: all partitions will be cloned to the target disk as the original partition size. It is available when the target disk is larger than the source disk. If it is smaller, this option will be grayed out.
- Fit partitions to entire disk: all partitions will be cloned to the target disk and take up its full capacity according to the original partition size proportion.
- Edit partitions on this disk: you can change every partition size on the target disk as you need.
After finishing the adjustment, please click "Save".
Notes:
- You can tick "4k alignment" to improve the reading and writing speed of SSD if the selected destination disk is an SSD storage.
- All data on this selected destination disk will be wiped out after you save the operation to physical disk. If there is important data on the destination drive, please make a backup in advance.
- If you clone to a smaller SSD, the first option is grayed out. If you select Sector-by-Sector Clone, it is unable to adjust the size on the destination disk.
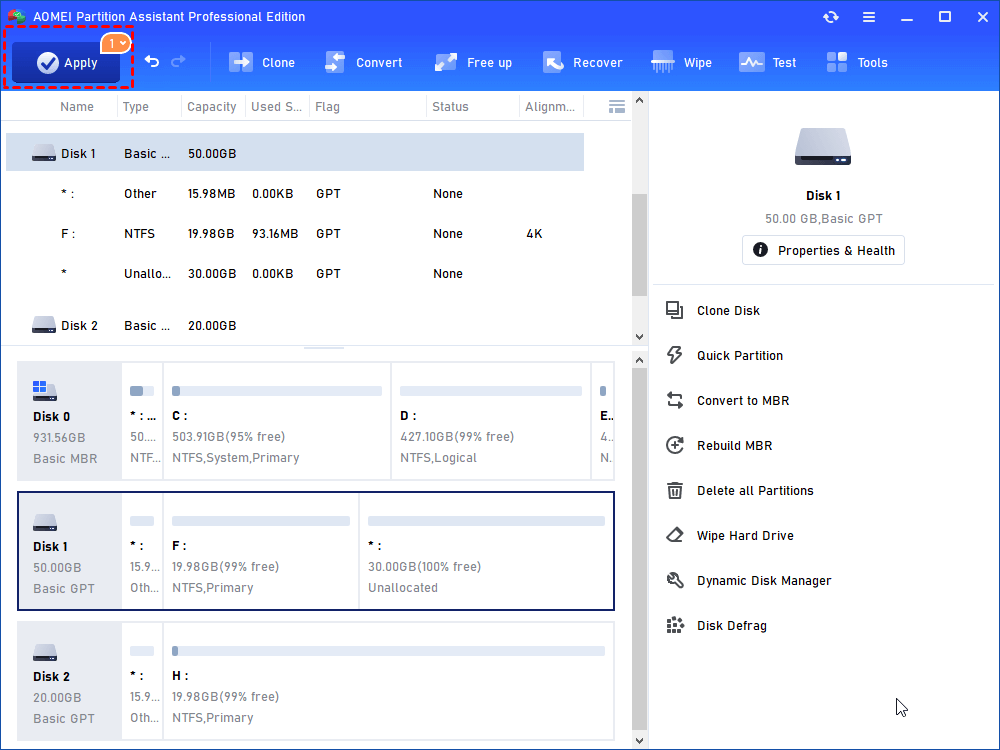
Step 5. You can preview the disk cloning operating by viewing the "Pending Operations". To commit the "Pending Operations", please click "Apply" and "Proceed".
Step 6. The cloning process will start and you can check the cloning process.
After cloning everything from the old hard drive to the new one, you can shut down the computer and install the new disk for replacement.
To sum up
The Windows Modules Installer Worker high disk usage issue is a common frustration for many Windows users, often leading to a significantly slower and less responsive PC. This article has thoroughly explored reasons and solutions.
For those facing persistent slowdowns due to aging hardware, upgrading to an SSD using a tool like AOMEI Partition Assistant Professional for a seamless disk clone was presented as a highly effective, long-term solution to combat not only Windows installer module worker high disk issues but also to enhance overall system performance dramatically.

