How to Fix Automatic Repair Loop in Windows 11
Automatic repair loop in Windows 11? Don’t do extra operation, read this article, you can quickly understand what happens and how to fix automatic repair loop in Windows 11.
By Lucas / Updated on March 2, 2026
A built-in Automatic Repair tool in Windows 11 locates and resolves startup-related problems automatically. It is unquestionably a fantastic feature. However, it's presenting a nerve-wracking problem for certain Windows users. The consumers claim that the "Automatic Repair" loading page appears every time they turn on their Windows 11 computer and that it never stops.
They are unable to utilize their computers as a result. We know how to resolve it if you too consistently get the loading screen that says "Preparing Automatic Repair" at startup. In this post, we've covered a few potential troubleshooting techniques to break Windows 11's Automatic Repair loop.
Why automatic repair loop in Windows 11 happen?
On Windows 11/10 devices, the computer initiates an automatic repair loop for multiple reasons. The procedure may take place as a result of a corrupted or missing file that prevents you from using your computer or because the system is unable to start up correctly. A virus infestation, malfunctioning peripheral devices, outdated device drivers not being installed, and other issues are possible causes.
•Problems with corrupted Windows Boot Manager (BOOTMGR) files
•Problems in the Windows Registry
•System files that are broken or absent
•Hardware driver problems (hard drive, motherboard, graphics driver, etc.)
•Other unidentified causes
Thus, how can the Automatic Repair loop in Windows 11 problem be resolved? And if you find some signs that might mean your data is not safe, what can you do before you fix the automatic repair loop? Please try any of the following diagnoses to obtain the essential answers, as there are various reasons for the dreadful circle of death.
Recover data from automatic repair loop in Windows 11
When confronted with the "Automatic Repair" loop displaying a blue or black screen, the primary objective is to retrieve your data from the seemingly unresponsive computer. Opt for the most straightforward and practical solution by utilizing PartitionAssistant Recovery. This trustworthy bootable data recovery software facilitates the booting of your Windows 11 system from a specially crafted bootable disk, effectively addressing the automatic repair loop error.
The Best Windows Disk Partition Manager and PC Optimizer
Stage 1. Create data recovery bootable media
Step 1. Install and run this tool on a well-working PC. Click the "Crashed PC Recovery" button to create WinPE bootable media according to your needs and click "Create".

You can boot the boot failure computer into BIOS configuration, then set USB as the priority boot option under boot sequence.
Stage 2. Recover lost data caused by Ndis.sys failed
Step 1. After you enter PartitionAssistant Recovery. Choose the exact partition or disk where your data lost and click Scan.
Step 2. Then, the recovery tool start to scan and search. lt will execute the “Quickly Scan" first for finding your deleted data fast, and then execute the “Deep Scan" for searching other lost data.
Step 3. Once the scan is completed, all deleted files, recycle bins and other missing files will be displayed. Please select the file you would like to recover and then click "Recover".
Step 4. Then, select a folder path to save your recovered files.
Step 5. Wait patiently for this process of recovering ends.
How to fix automatic repair loop in Windows 11 computer
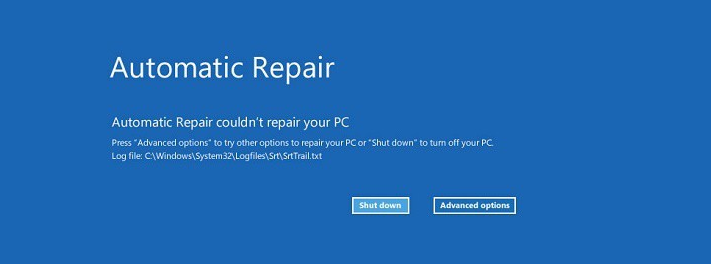
If automatic repair fails, your computer will display a blue screen with the words "Your PC did not start correctly" or "Automatic repair couldn't repair your PC." If you press the "Restart" button, the computer will repeat the operation, culminating in the Automatic Repair cycle.
Way 1. Disconnect peripheral devices
A broken peripheral device linked to the system is one of the most prevalent reasons for the Windows 11 stuck on automatic repair problem. It is conceivable that peripheral devices attached to your system, such as a mouse, camera, keyboard, and so on, have hardware or software difficulties. As a result, they are interfering with your Windows system and generating this problem.
Way 2. Remove problematic files
Your system's critical boot files may have become corrupted, preventing the PC from booting correctly. In that scenario, you should delete the infected files from your system.
To do so, boot your computer into the Windows Recovery Environment (WinRE). To enter boot mode and eliminate troublesome files from the system, follow the procedures below:
Step 1. Press and hold the Power button for at least 20 seconds until your system shuts down.
Step 2. Now, restart the system and continue doing the same steps until it enters the Windows Recovery Environment.
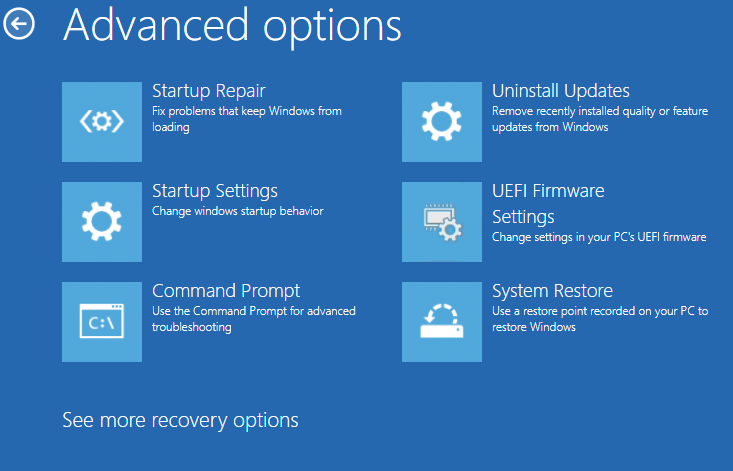
Step 3. Once the PC enters boot mode, select the Troubleshoot option from the Choose an option window and then select the Advanced options option.
Step 4. After that, select the Command Prompt option from the Advanced options window and let the Command Prompt open.
Step 5. Once the Command Prompt is opened, copy-paste the below command into it and press Enter to execute it
cd C:\Windows\System32\LogFiles\Srt
SrtTrail.txt
Step 6. Next, copy-paste the below-mentioned command in the same Command Prompt window and hit the Enter key.
cd c:windowssystem32drivers
Delvsock.sys
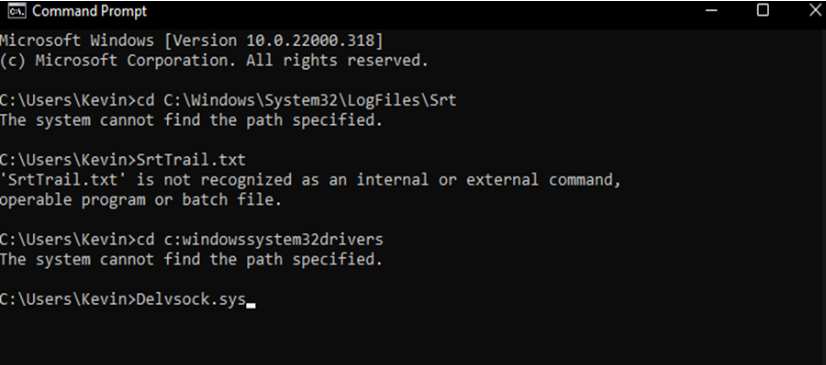
Step 7. Then, execute the mentioned command and press Enter to delete the problematic files from your system.
Way 3. Disable automatic startup repair
Windows 11/10 has an automated startup repair feature that runs during startup to resolve booting issues. The automated startup repair option is not always useful because it does not always resolve booting problems. It may occasionally cause a booting issue, thus deactivating it may be the answer to the Windows 11 automatic repair loop.
Step 1. Enter into Windows Recovery Environment (WinRE) by resetting your PC three to four times continuously.
Step 2. Once entered, navigate to the See advanced repair options > Troubleshoot > Advanced options section.
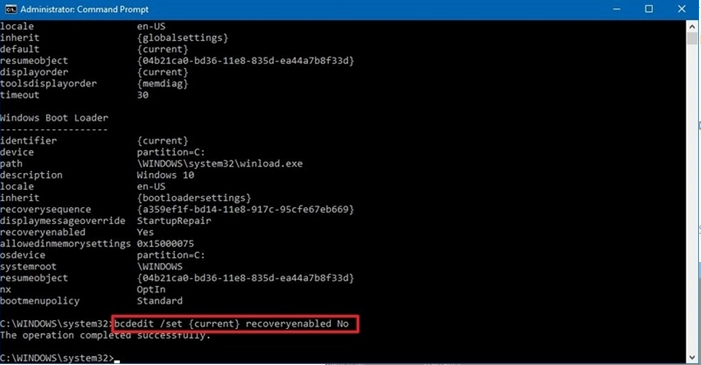
Step 3. In the Advanced options section, click on the Command Prompt option to open the Command Prompt utility and execute the below command in it.
Step 4. Input "bcdedit /set {default} recoveryenabled No" into the window and Enter to disable automatic startup repair. You can exit once the operation has been confirmed as successful.
Way 4. Rebuild the Boot Configuration Data and run CHKDSK
Some customers on the official Windows forum reported that rebuilding the BCD on their Windows 11 machine cured the problem. They also suggested running the CHKDSK scan to scan and correct hard disk issues. Then, to conduct the CHKDSK scan, boot into the Windows Recovery Environment once more. You can use CMD to do this task via entering Win RE and typing orders one by one, or you can use the repair USB created for data recovery by AOMEI Partition Assistant to quickly finish this job.
Option 1. Manually rebuild MBR and CHKDSK
Step 1. Select the Troubleshoot tile from the Choose an option window and then select Advanced options.
Step 2. Click on the Advanced options option on the Troubleshoot screen and select Command Prompt.
Step 3. In the Command Prompt, execute all three mentioned commands one at a time and wait for the process to complete.
bootrec.exe /rebuildbcd
bootrec.exe /fixmbr
bootrec.exe /fixboot
Step 4. Once you have executed all three commands, run the following commands one at a time to start the CHKDSK scan.
chkdsk /r c
chkdsk /r d
After doing so, exit the Command Prompt and restart your Windows computer to check the issue’s status.
Option 2. Use handy tool to repair MBR and check disk
Step 1. Connect the bootable media created via AOMEI Partition Assistant to the computer with a boot issue and enter BIOS to boot the computer from the USB drive.
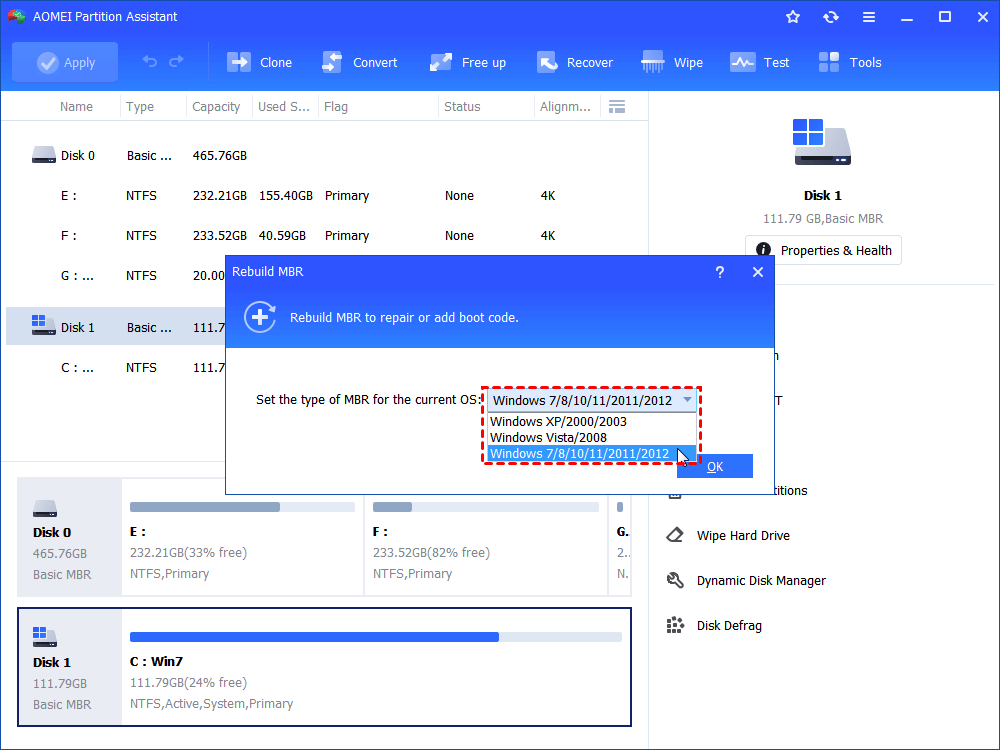
Step 2. Once logged in, the AOMEI Partition Assistant will run automatically. In the main interface, right-click the system disk that contains the corrupted MBR and choose Rebuild MBR.
Step 3. In terms of your OS, select a type of MBR for Windows 11 in the popup window.
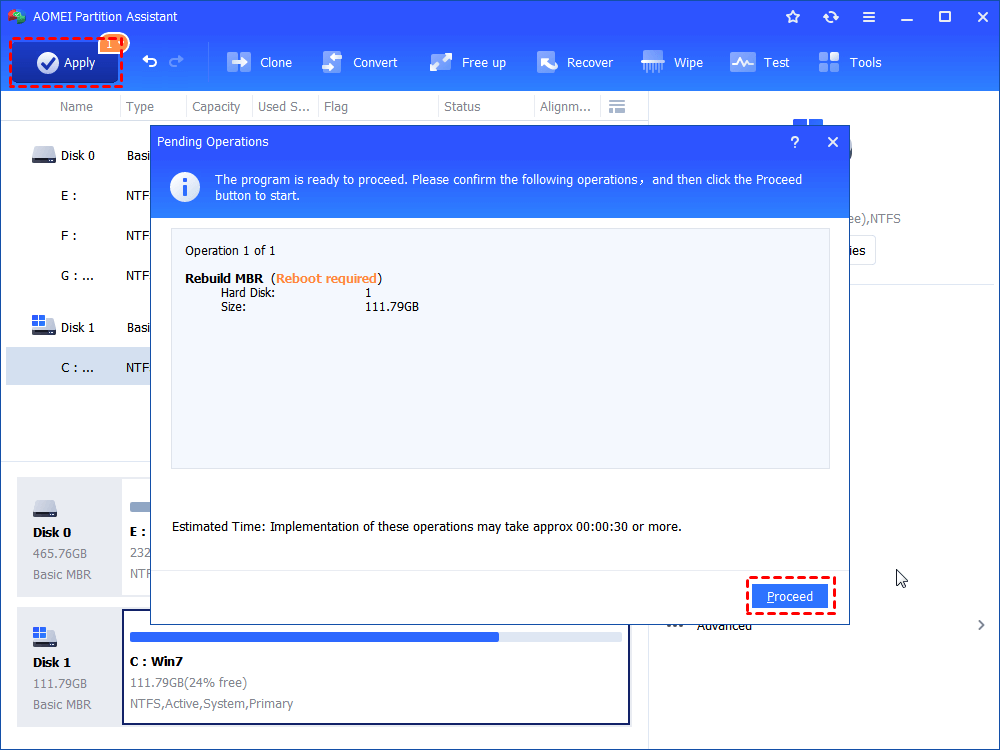
Step 4. After returning to the main interface, hit “Apply” on the upper left and “Proceed” to commit the MBR rebuilding process.
Way 5. Disable early launch anti-malware protection
Disabling early launch anti-malware protection is another technique to get out of the Windows Automatic Repair cycle.
Step 1. Restart the PC and click "Advanced options" on the Automatic Repair blue screen.
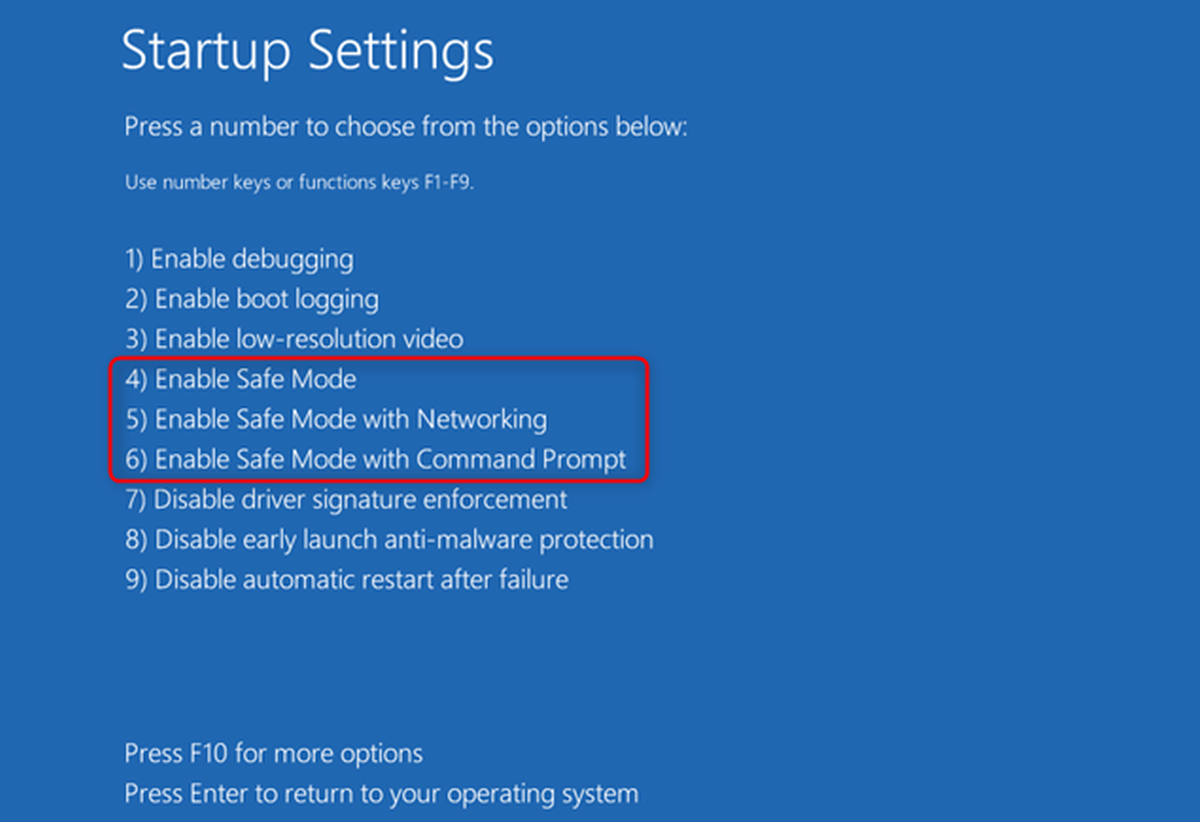
Step 2. Click "Troubleshoot" > "Advanced Options" > "Startup Settings". Your computer will restart and then present you with a list of options.
Step 3. Choose "Disable early launch anti-malware protection".

Way 6. Scan system files in Safe Mode
Some of your system's critical boot files are likely missing or damaged, producing this problem. We propose running DISM and SFC scans to see whether damaged or missing critical boot files are causing this problem. The DISM scan will service the Windows images on your system.
Simultaneously, SFC will locate and restore the system's faulty boot files, allowing you to quickly resolve the problem.
Step 1. To start, click on the Troubleshoot title in the Choose an option window and click on Advanced options.
Step 2. Click on Startup Settings and then select Enable Safe Mode option by pressing the F4 key on your keyboard.
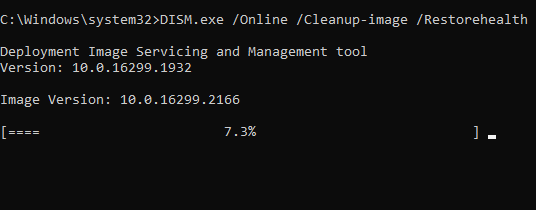
Step 3. Once the PC is restarted in Safe mode, open Windows PowerShell with admin privileges and run the following command.
DISM /Online /Cleanup-Image /RestoreHealth
After completing the screen, exit the Safe mode and check whether the issue is fixed.
Way 7. Windows Registry Restore
The Registry database stores the operating system and most apps' configuration information. When the Registry becomes corrupt, it can cause major issues such as the Automatic Repair loop. The good news is that the registry automatically backups configuration data. The backup can be used to restore the Windows registry to a functional state.
Step 1. Select "Advanced options" from the blue screen of the Automatic Repair problem.
Step 2. Select "Troubleshoot" > "Advanced Options" > "Command Prompt" from the menu.
Step 3. Choose an account and input its password.
Step 4. Enter the following commands one at a time, pressing Enter after each one:
C:\Windows\System32\config\\rregback* C:\Windows\System32\config\
Way 8. Hard reboot Windows 11 PC
Hard resetting the machine cured the problem for several customers in seconds.
Step 1. Press and hold the computer's Power button for about five to ten seconds; the PC should go off automatically.
Step 2. If some lights are still on, unplug the power cable from the charging port or the central processing unit (CPU).
Step 3. Wait for a minute and use the Power button to switch on the computer again.
To sum up
The Automatic Repair feature is a fantastic improvement. However, when you confront automatic repair loop in WIndows 11, this has become a major issue. When consumers boot their Windows 11 PC, they get the 'Preparing Automatic Repair' loading screen, which never ends.

