[Solved] Windows 11 Welcome Screen Stuck
Some users meet Windows 11 welcome screen stuck trouble on their PC. If you too, have this issue, you can try the methods in this post to fix it.
By Lucas / Updated on May 12, 2023
Scenario: I met Windows 11 welcome screen stuck, what can I do?
I updated my Windows 11 about a week ago. And two days ago, when I switched on my PC, I discovered I couldn't enter my pin. For almost 24 overs, I've been stuck on the welcome screen. Can anyone help?
Why is Windows 11 stuck on welcome/login screen?
In fact, the error Windows 11 stuck on welcome screen is a kind of traceable problem. This issue frequently emerges after making modifications to your system. Similar to the case, many Windows users encounter it after installing OS upgrades. This might mean that anything went wrong during the upgrades and the procedure was not finished properly.
Consider other modifications you've made if you haven't recently upgraded Windows. Have you installed any new software recently? Some programs may be incompatible with the operating system, or you may have downloaded malware as a result of the operation.
Other factors that might contribute to this issue include faulty drivers and registry entries, out-of-date software, and startup troubles.
Solutions for Windows 11 computer hanging on welcome screen
Due to different situations, the solutions are various. In this part, we list some methods to help you.
Method 1. Disconnect from the Internet and unplug external devices
▶ Windows 11 stuck on the welcome screen might occur while attempting to connect to a wireless network. So, for WiFi users, we suggest you disconnect your WiFi or directly unplug your WiFi to see if it resolves the issue. For Ethernet users, you can unplug your Ethernet wire and see if the problem persists.
▶ Many people use USB devices like keyboards, mouse, Bluetooth, and WiFi adapters and a few consumers stated that their Windows 11 stuck on the welcome screen error disappeared after they unplug all peripherals. Thus, please unplug any USB devices, including your keyboard and mouse, and try to boot without them.
▶ If you’re using a laptop, you may repair this issue by simply removing the battery. Shut down your laptop and remove the battery for a few minutes. Then, reconnect the battery to your laptop and see if the problem persists. If you have another laptop battery, consider changing your old one to see if that helps.
Method 2. Do a hardware check
This problem can develop as a result of malfunctioning hardware. So, you can unplug the faulty device from the motherboard. This technique may need opening your computer case, so if your PC is still under warranty or you don't know how to safely remove components, you should try other solutions.
Method 3. Boot into Safe Mode to access built-in tools
In this section, all options need you to boot your PC into Safe Mode. So, we’ll show you how to boot into the Safe Mode, and then you can follow the guide to try solutions one by one.
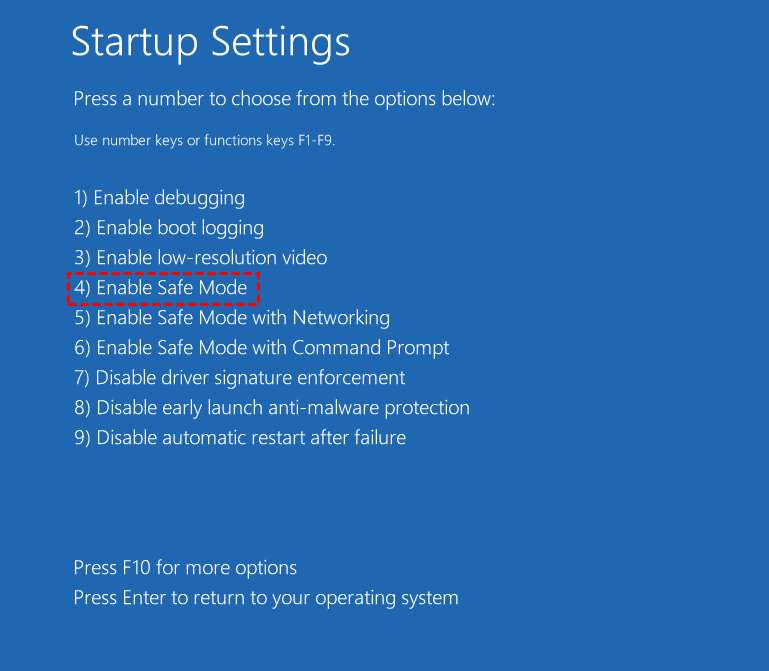
Step 1. Restart your PC while it boots. Repeat this step several times until you see the Preparing Automatic Repair message. When that happens, click on Advanced options.
Step 2. Now choose Troubleshoot > Advanced options > Startup Settings. Click the Restart button.
Once your PC restarts, you’ll see a list of options. Select any version of Safe Mode by pressing the appropriate key.
Opt. 1. Disable Credential Manager service
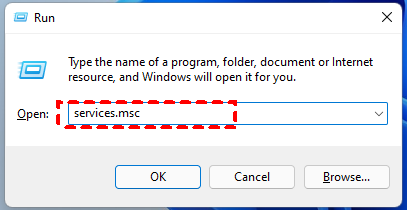
Step 1. Press Windows Key + R and enter “services.msc”. Press “Enter” or click OK.
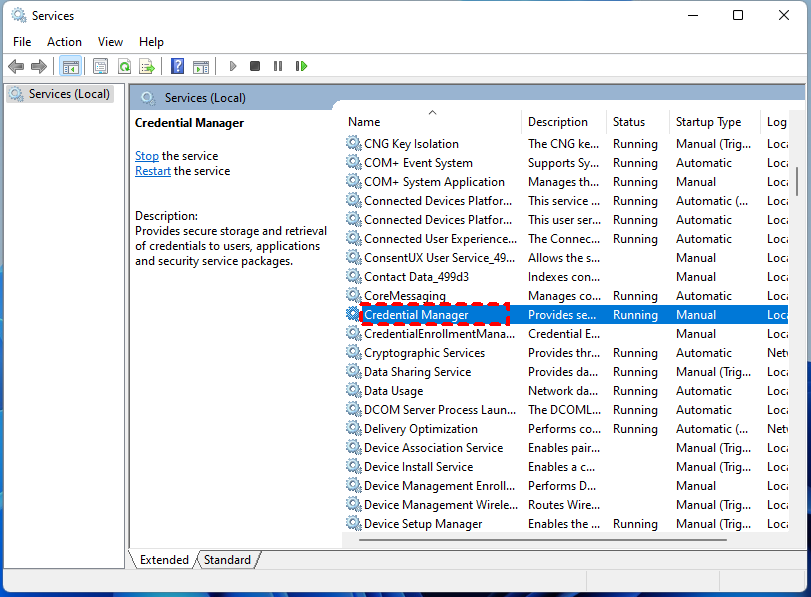
Step 2. In the Services window, locate “Credential Manager” in the list and double-click it to open its properties.
Step 3. When the Properties window opens, set the Startup type to “Disabled” and click “Apply” and “OK” to save changes.

Step 4. Restart your PC and check if the problem still appears.
Opt. 2. Change Windows Update service settings
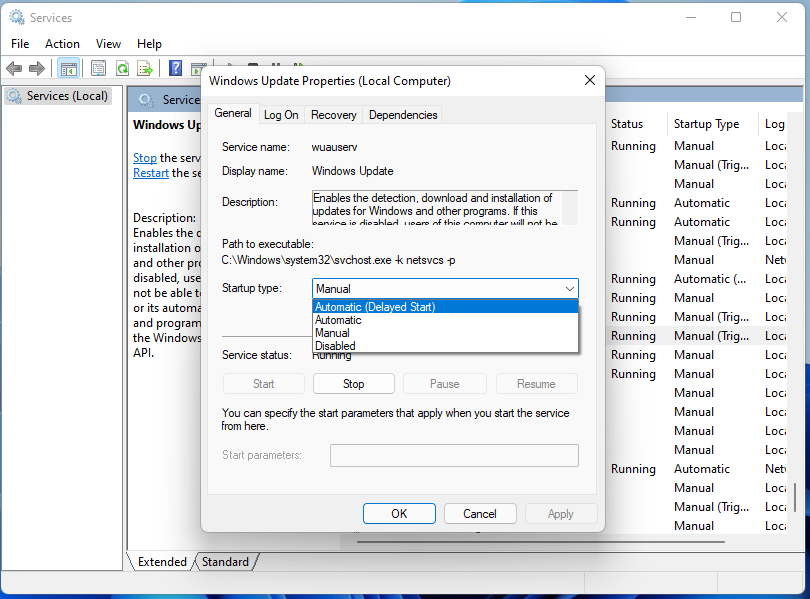
Step 1. Open the Services window as the above one. Choose “Windows Update” on the list and double-click it to open its properties.
Step 2. The Startup type to “Automatic (Delayed Start)” and click on “Apply” and “OK” to save changes.
Opt. 3. Remove recently installed updates
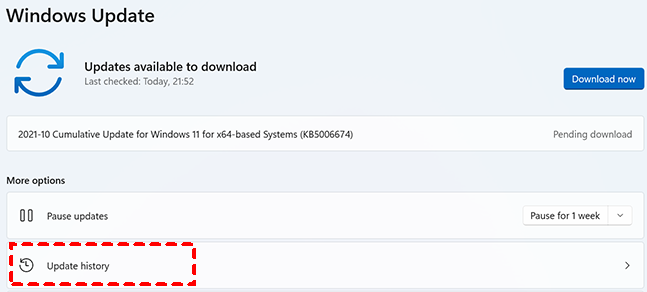
Step 1. Press Windows Key + I to open the Settings app.

Step 2. When the Settings app opens, go to Update & security, and Now click on Update history.
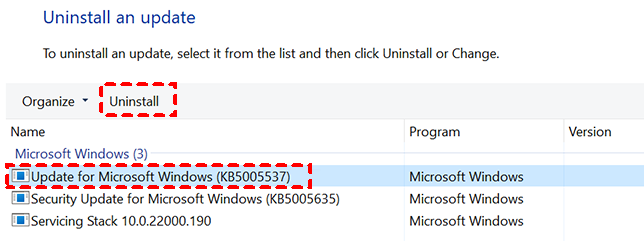
Step 3. A list of all recently installed updates will appear. Memorize the names of the recent updates. Click on Uninstall updates.
Opt. 4. Delete the Ngc directory
◤Note: This solution works if you’re using a PIN number to sign in to Windows 11.
Step 1. Open File Explorer, and navigate to this directory:
C:\Windows\ServiceProfiles\LocalService\AppData\Local\Microsoft
And click the View tab at the top and check Hidden items.
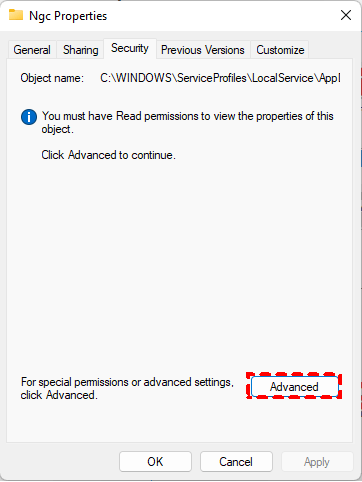
Step 2. Look for the Ngc folder and try to delete it. Right-click the directory and choose Properties from the menu.
Step 3. Go to the “Security” tab and click on “Advanced”.
Step 4. When the Advanced Settings window opens, click “Change” in the Owner section.

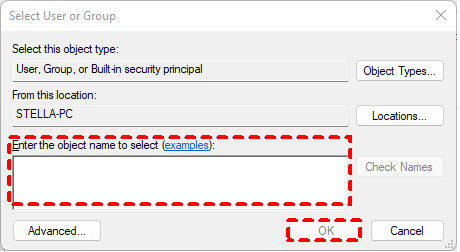
Step 5. Enter your user name in the Enter the object name to select and click on the Check Names button. If everything is in order, click on OK to save changes.
Step 6. Check Replace owner on subcontainers and objects and click on Apply and OK to save changes.
Step 7. A security warning might appear. Click “Yes”. Once you delete the folder, simply restart your PC and the problem should be resolved.
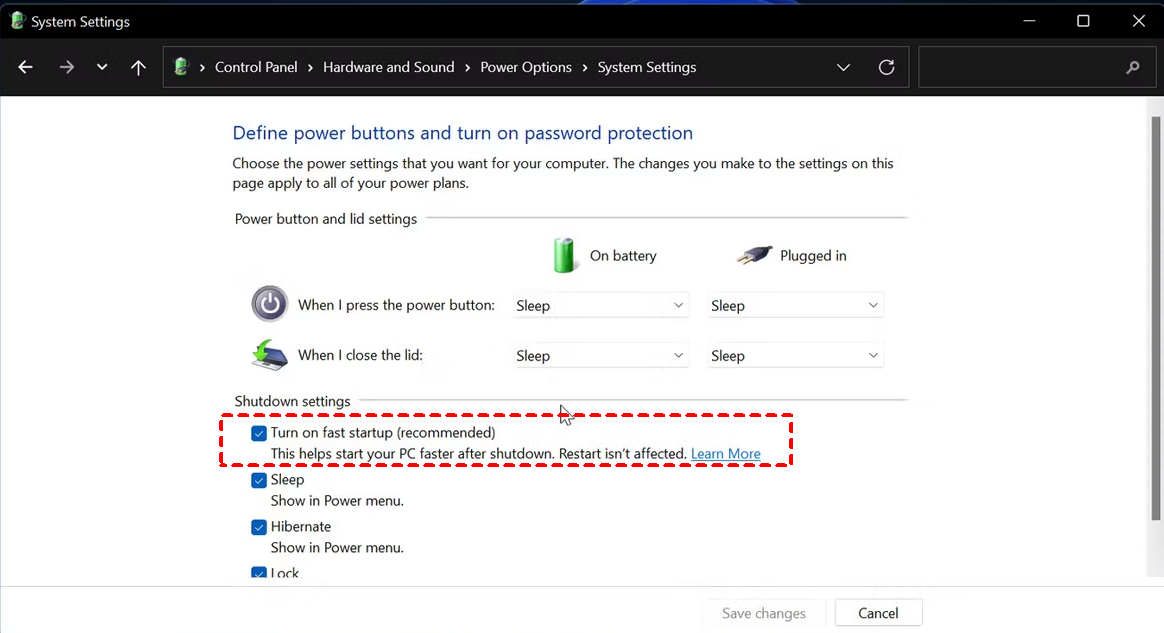
Opt. 5. Disable the fast startup feature
Step 1. Press Windows Key + S and enter the control panel. Select Control Panel from the list of results.
Step 2. When Control Panel opens, select Power Options.
Step 3. Select Choose what the power button does from the menu on the left.
Step 4. Click on Change settings that are currently unavailable.
Step 5. Uncheck "Turn on fast startup (recommended)" option and click on Save changes.
Opt. 6. Restart Windows Update service
Step 1. Press Windows Key + X to open menu and choose Command Prompt (Admin) from the menu. (If Command Prompt isn’t available, you can also use PowerShell as an administrator.)
Step 2. When Command Prompt opens, you need to enter the following commands:
· net stop wuauserv
· cd %systemroot%
· ren SoftwareDistribution SD.old
· net start wuauserv
After doing that, close Command Prompt and restart your PC. Now check if the problem is resolved.
Method 4. Use CMD order or freeware to fix boot error
1. Use CMD orders
Step 1. Restart your computer a couple of times while your PC boots to start Automatic Repair. Click on the Advanced options button once it appears.
Step 2. Select Troubleshoot > Advanced options > Command Prompt. In the CMD windows, please type the following orders:
· sfc / scannow
· chkdsk c: /f /r
When the scan is finished, you can restart the PC to check, if the problem is still here, restart the PC and enter CMD again, and try the following commands:
· bootrec /fixmbr
· bootrec /fixboot
· bootrec /scanos
· bootrec /rebuildbcd
· bcdedit /export C:\BCD_Backup
· C:
· cd boot
· attrib bcd -s -h -r
· ren c:\boot\bcd bcd.old
· bootrec /RebuildBcd
· Y
Now you can reboot your computer to check.
2. Employ freeware to repair the boot error automatically
If you’re not familiar with CMD orders, you can try a third-party tool to achieve the same result. AOMEI Partition Assistant Standard is a free tool for Windows 11/10/8/8.1/7/XP users to solve PC problems. It can clone/create/delete/wipe/format/split/ partitions, check drives and rebuild MBR.
In this case, you need to create a bootable AOMEI Partition Assistant USB and rebuild MBR on the PC.
Step 1. On another Windows 11 PC, install and run this free disk tool, and insert your USB (at least 13GB). After your PC detects your USB, click "Tools"> "Make Bootable Media" in the top panel and click "Next" to continue.

Step 2. Choose the “USB Boot Device” option and select the prepared USB drive, and press “Proceed” to create a WinPE bootable disk for Windows 11.
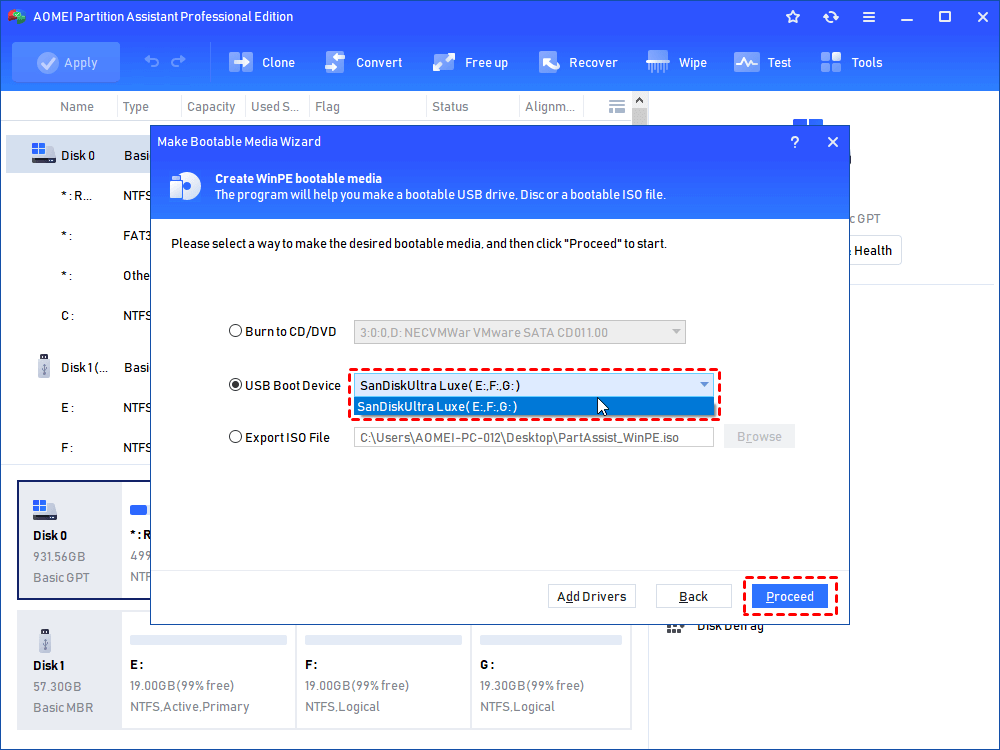
Now, plug the USB to the PC stuck on the boot screen, and go to BIOS to change the boot device and boot from it. Then you’ll see the interface of this tool.
Step 1. Right-click on the C drive and choose "Advanced" -> "Check Partition".
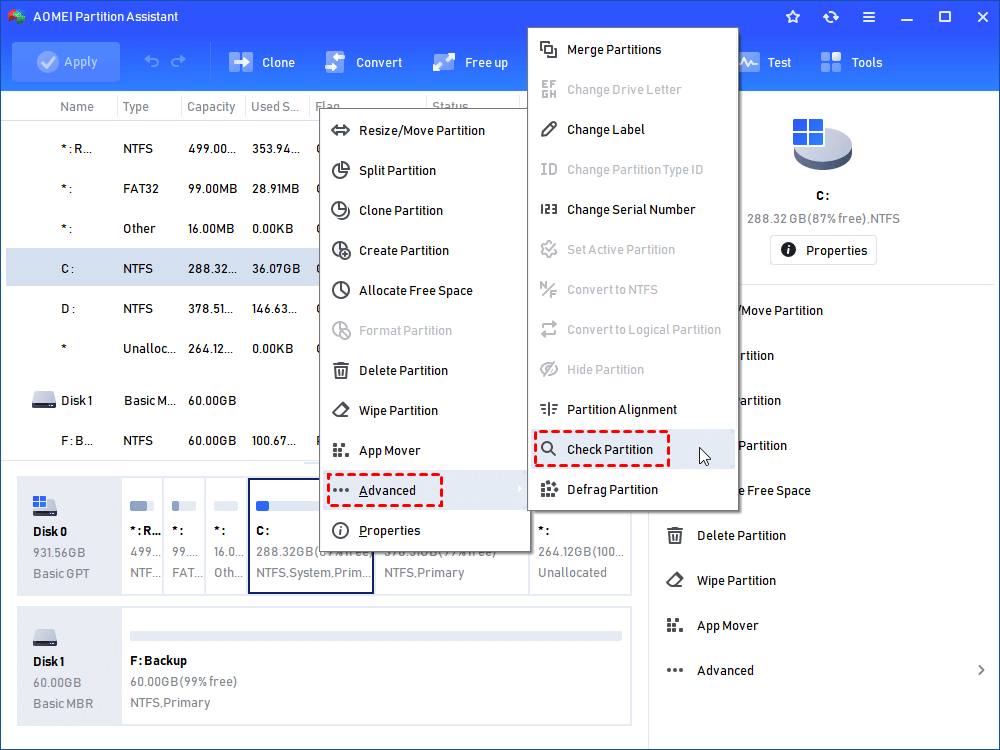
Step 2. Select the way of checking errors to perform. There are 3 options:
• Check partition for errors by using chkdsk.exe: Only find.
• Check whether there is a bad sector on the partition: Show you whether there is a bad sector on the partition.
Step 3. Click "OK" to continue.

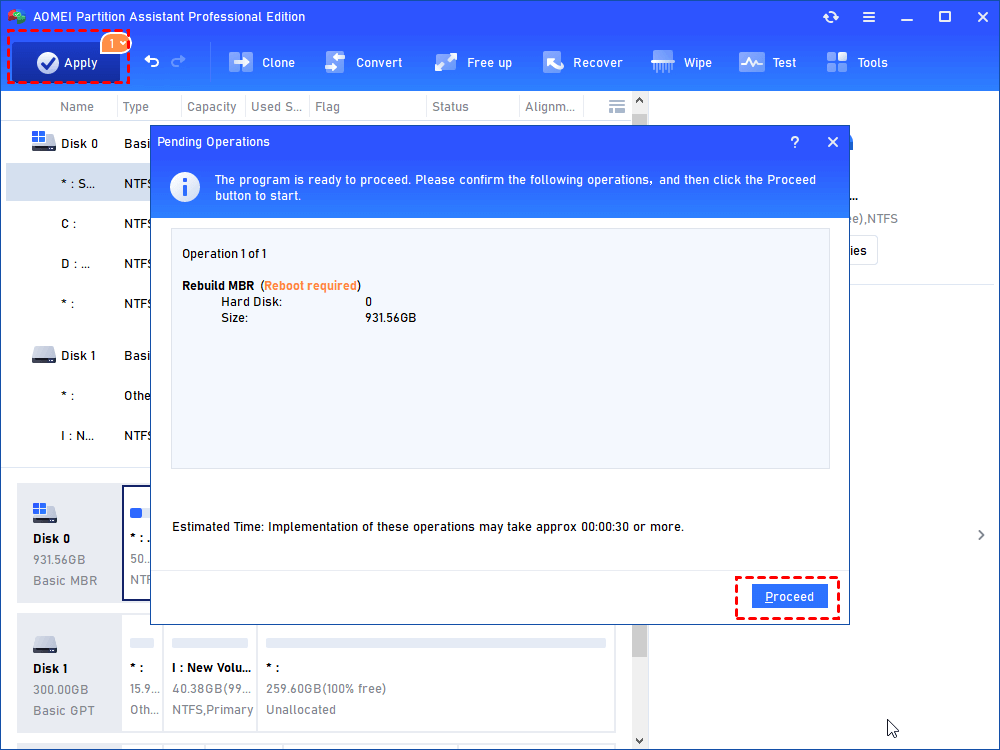
Step 4. After the check, you can select the system disk which can’t boot and right-click the disk to choose "Rebuild MBR", or in the left side interface of AOMEI Partition Assistant, and select "Disk Operations"-> "Rebuild MBR".

Step 5. Set up the type of MBR to rebuild in the "Rebuild MBR" window.
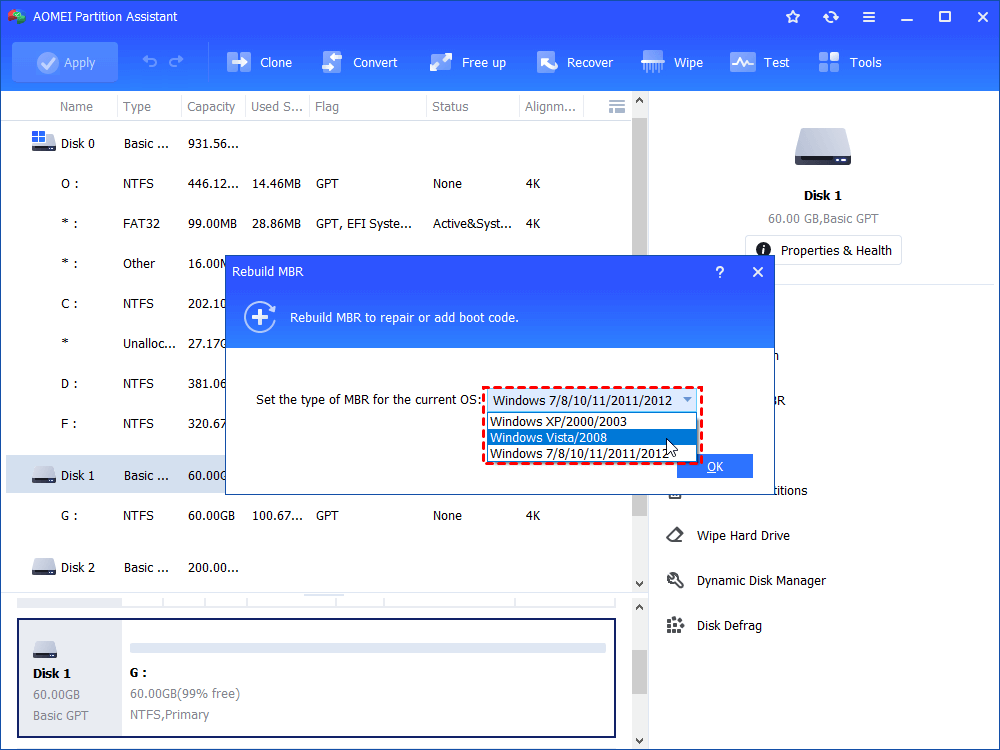
Step 6. Click "Apply" on the toolbar to commit the operation.
Now you can remove the USB and boot your PC to check if the issue is solved.
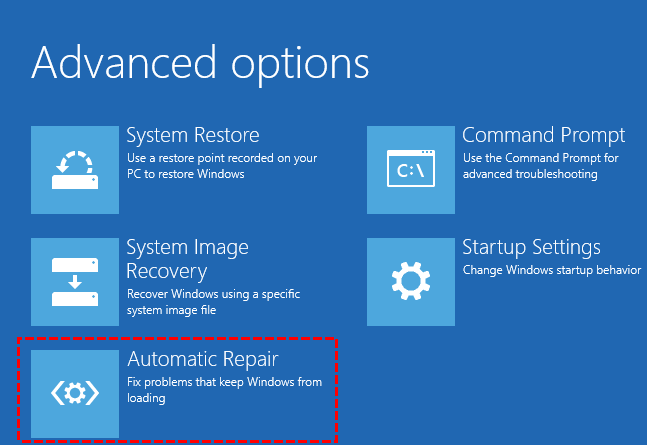
Method 5.Perform an Automatic Repair
Step 1. Restart your computer a few times during the boot sequence. Click on the Advanced options button once it appears.
Step 2. Now select Troubleshoot > Advanced options > Automatic Repair.
Automatic Repair will now start. Follow the instructions on the screen to complete the repair.
If you can’t find the Automatic Repair option, you can use Startup Repair instead. After you complete the repair process, the issue should be resolved.
Method 6. Disable wireless WAN adapter in BIOS
If you’re getting stuck on a Welcome screen in Windows 10, you might be able to solve the problem simply by disabling the wireless WAN adapter in BIOS.
To learn more about this feature and to see how to disable it, we strongly suggest that you check your motherboard manual for detailed instructions.
Method 7. Use System Restore
Step 1. Restart your PC a few times during the boot until the Automatic Repair message appears.
Now go to Troubleshoot > Advanced options > System Restore.
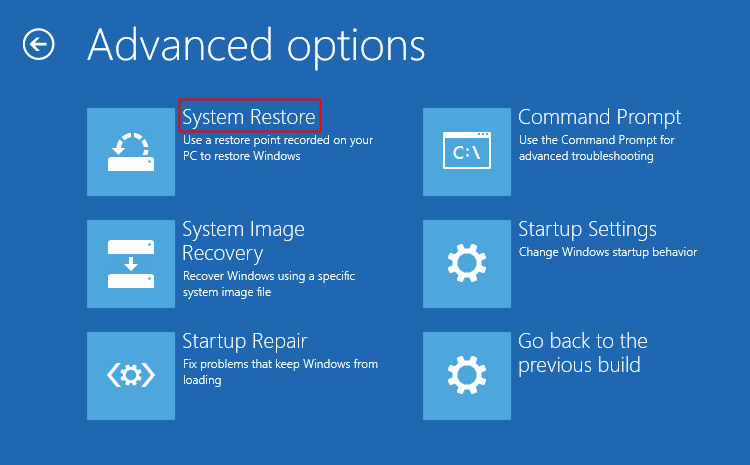
Step 2. Select your username and enter your password. Click on Next, select the desired restore point and follow the instructions on the screen to restore your PC.
After your PC is restored, check if the problem still appears.
Method 8. Reset Windows 11
If the problem persists, you may want to try resetting Windows 11 as a last resort. This method will clean all data on the C drive, so you’d better back up at first.
You may reset Windows 11 after backing up your files by following these steps:
Step 1. Restart your PC a few times until you start Automatic Repair.
Step 2. Choose Troubleshoot > Reset this PC > Remove everything.
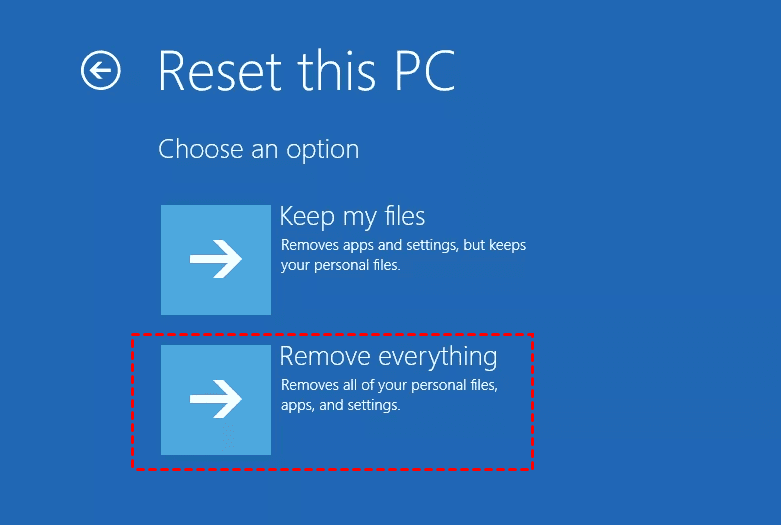
Step 3. For the next step you might be asked to insert Windows 11 installation media, so be sure to have it ready.
Step 4. Now select your version of Windows and click on Only the drive where Windows is installed > Just remove my files.
Step 5. You should now see a list of changes that reset will perform. If you’re ready to start, click on the Reset button. Then you need to follow the rest directions to complete the job.
When the reset is finished, you will have a fresh installation of Windows and the problem should be resolved permanently.
Ending
In this post, we show you several solutions for the “Windows 11 welcome screen stuck” trouble, hope you can fix this problem quickly. AOMEI Partition Assistant simplifies the CMD order for users who’re not used to running CMD. And its Professional Edition has other practical functions such as converting to GPT/MBR without deleting data, converting file systems without formatting, and so on. It can also help you clone disk/partition, migrate OS only, and move installed programs…
What’s more, it has the Server Edition for Windows Server 2025/2022/2019/2016/2012(R2)/2008(R2)/2003 users to efficiently manage Server systems.

