SD Card Lost Pictures: Recover Them Easily
When you suffer from SD card lost pictures, don’t worry. In this article, you will learn different ways to get back lost pictures on SD card with or without recovery software.
By Hedy / Updated on March 12, 2025
In an unexpected turn of events, you might discover the absence of your cherished photos within an apparently full SD card. This confusing loss can occur regardless of the type of SD card in use, whether it's employed in any Windows version.
However, the presence of SD card lost pictures does not mean the permanent loss of your photos. It's important to note that any vanished image possesses the potential for recovery, provided it hasn't been overwritten.
Within this article, a range of methods will be introduced to erase the question of how to recover lost pictures from SD card. Before delving into the methods, it's important to understand the underlying reasons behind the perplexing phenomenon of photos vanishing from SD cards. Let's started!
Why SD card lost pictures?
Why did my pictures disappeared from my SD card? Numerous factors could contribute to the scenario. The possible causes include:
◤ Inadvertent erasure or formatting of the SD card.
◤ The intrusion of a virus into the media.
◤ Activation of write protection on the SD card.
◤ Concealment of photos.
◤ Corruption or impairment of the SD card.
◤ Overwriting of the SD card's content.
◤ Persistent photo capture in a completely occupied memory card.
How do I find lost pictures on my SD card?
Utilizing photo recovery software stands out as the most effective and expedient approach to reclaiming lost photos from an SD card. Nevertheless, it is worth noting that it's also feasible to retrieve deleted photos from an SD card without reliance on dedicated software.
Method 1. Remove write-protection from the SD card
The presence of write-protection on an SD card can impede your ability to access pictures and other files. This safeguard mechanism prevents actions like adding, deleting, copying, opening, or editing image files stored within the card.
Initiate the troubleshooting process by inspecting the lock switch positioned on the side of your SD card. By sliding it upwards, you effectively disable the write-protection feature. Then, attempt to access the photos stored on the SD card.
Method 2. Reinsert the SD card
Should you encounter difficulties in accessing the SD card's content, it's prudent to consider the possibility of improper insertion. Address this by carefully reinserting the SD card into the designated slot of your device.
Ensure that you align the memory card with the label side facing upward and avoid applying excessive force while inserting it into the slot. This simple repositioning might resolve the issue at hand.
Method 3. Reboot the device
If you find yourself in a situation where the photos stored on your SD card fail to display on devices such as DSLR cameras, Android phones, or computers, initiating a device restart can be beneficial.
This course of action proves effective due to the potential accumulation of various logs, caches, and temporary files in the background, which could contribute to operational glitches.
Begin by closing all active programs and applications, subsequently proceeding to restart the device. This action serves to eliminate superfluous temporary files that might be impairing the system's overall performance and hindering the display of your desired images.
Method 4. Reveal hidden photos on the SD card
Instances may arise where the photos stored on your SD card become hidden due to the intrusion of a virus or connection to an infected computer. How to find lost pictures on SD card? Follow the steps outlining the process of recovering hidden photos:
Step 1. Connect the SD card to your computer.
Step 2. Access the Control Panel and navigate to "File Explorer Options."
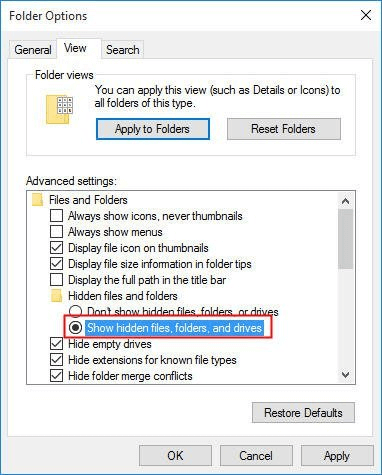
Step 3. Within the "View" tab, modify the settings as follows:
Step 4. Check the option for "Show hidden files, folders & drives."
Step 5. Uncheck the selection for "Hide protected operating system files". Confirm the adjustments by clicking "OK".
Step 6. Subsequently, the photos that initially disappeared from the SD card should become visible once again.
Method 5. Use PartitionAssistant Recovery
In cases where photos have vanished from your SD card due to deletion, formatting, corruption, and other factors, the PartitionAssistant Recovery offers a comprehensive solution. This robust software facilitates the recovery process, restoring missing photos while retaining their original dates and file names intact.
This versatile tool caters to a wide range of SD card types, including SDHC, SDXC, memory sticks, miniSD cards, microSD cards, and more. Its proficiency in handling diverse SD card formats enhances its efficacy in restoring lost data, making it popular for photo recovery endeavors.
Here are the steps on how to get back lost pictures on SD card:
Step 1. Install and launch PartitionAssistant Recovery. Choose the exact partition or disk where your data lost and click Scan.

Step 2. Then, the recovery tool start to scan and search. lt will execute the “Quickly Scan" first for finding your deleted data fast, and then execute the “Deep Scan" for searching other lost data.

Step 3. Once the scan is completed, all deleted files, recycle bins and other missing files will be displayed. Please select the file you would like to recover and then click "Recover".

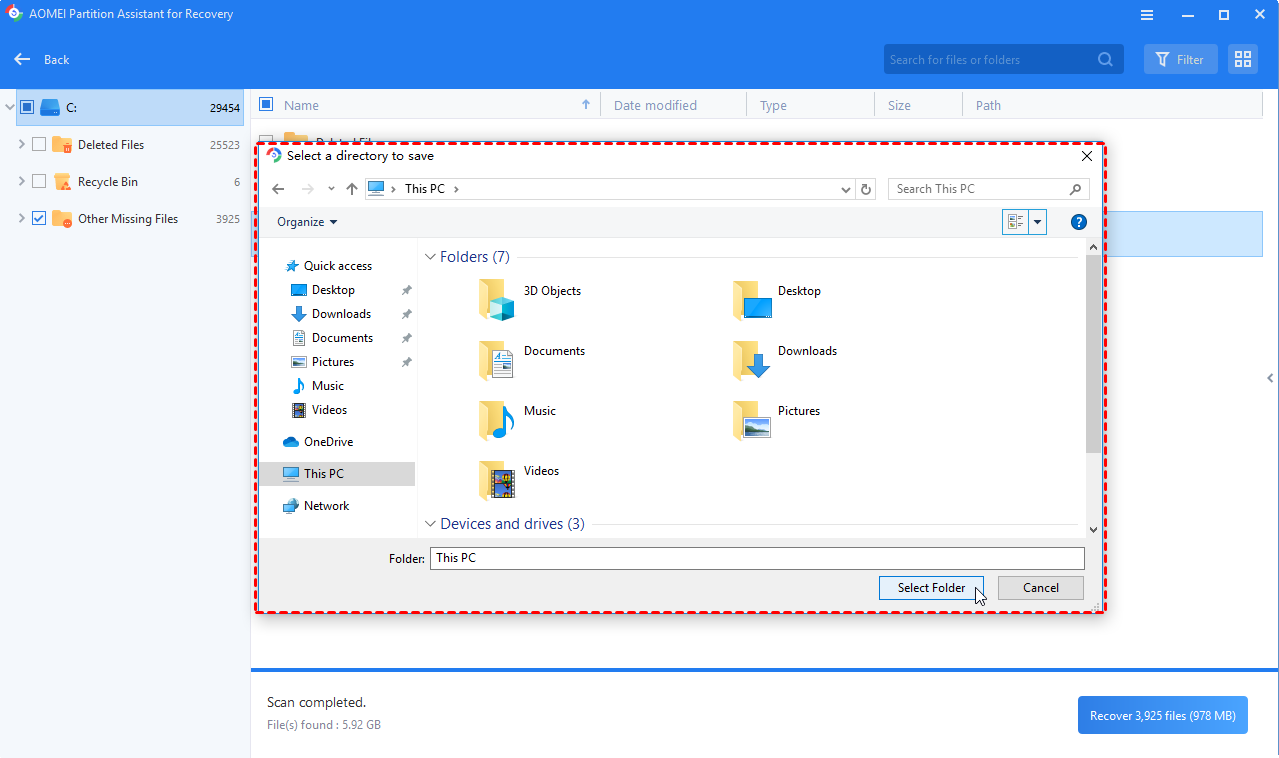
Step 4. Then, select a folder path to save your recovered files.
Step 5. Wait patiently for this process of recovering ends.
Method 6. Use the CHKDSK Command
For situations where lost photos from an SD card might stem from logical file system errors within your Windows PC, the CHKDSK (check disk) command serves as a system tool that can rectify such issues. Here's a concise guide to addressing SD card problems through the CHKDSK command:
Step 1. Make a note of the drive letter assigned to your SD card, visible in the drive list on your PC.
Step 2. Proceed by typing 'cmd' into the Windows Search box.
Step 3. Right-click on 'cmd' and opt for 'Run as Administrator.'
Step 4. Within the command prompt window, input “chkdsk :/f”. For instance, if your SD card is designated as drive d:, the input would be "chkdsk d: /f".
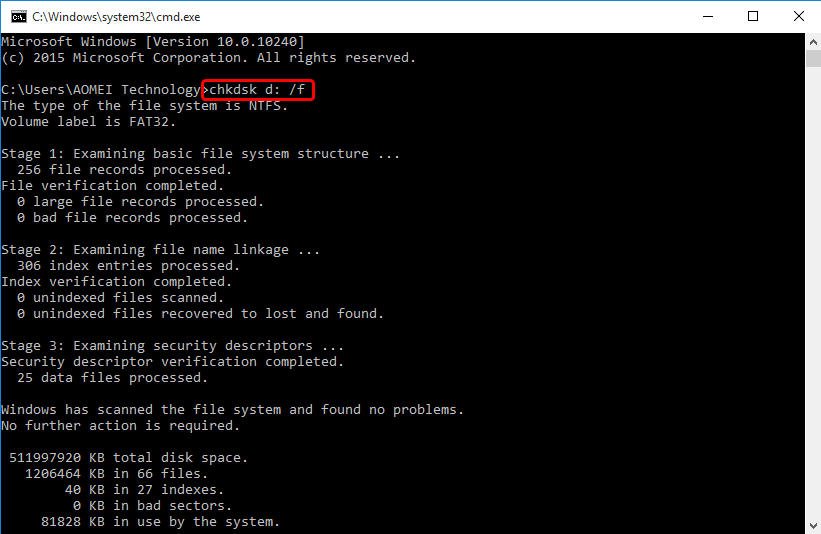
Step 5. Press "Enter" to execute the command.
Method 7. Employ Windows Troubleshooter
An alternative avenue for rectifying SD card errors involves the utilization of the Windows Troubleshooter, a feature adept at addressing problems linked to Windows hardware and drivers.
Outlined below are the steps to resolve the SD card errors:
Step 1. Begin by connecting your SD card to your PC.
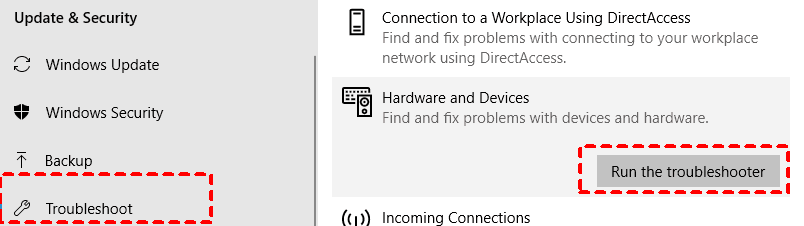
Step 2. Navigate through Start > Settings > Update & Security > Troubleshoot.
Step 3. Follow through by selecting the "Hardware and Devices" option, and then proceed to "Run the troubleshooter".
Step 4. Conclude the process by restarting your computer.
Conclusion
When faced with the challenge of recovering SD card lost pictures, the implementation of PartitionAssistant Recovery emerges as a secure and reliable method. This software-based approach offers a comprehensive solution for photos lost due to deletion, formatting, or corruption within the SD card.
However, it's also worth exploring alternative methods before resorting to software intervention. These methods are all presented above, you can give them a try.

