

How to Delete Windows Update Cache to Fix Update Failure?
Sometimes if you delete Windows Update cache, Windows update stuck or installation failure will be solved. In this post, you can learn how to clear update cache and other junk files from OS.
By Lucas / Updated on July 10, 2025
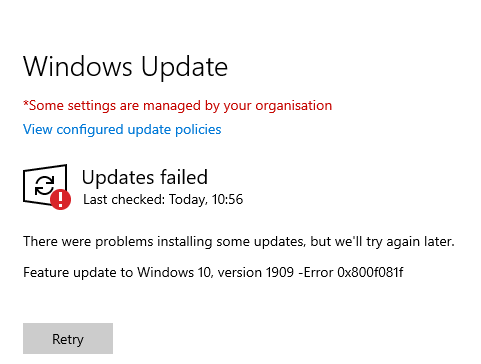
When you check for Windows updates, your system will automatically store all Windows update installation files, because these files might be useful if you need to back to the previous update. However, occasionally, flawed updates or corruption in the Windows update cache folder disrupt the entire process, resulting in Windows updates that are stuck downloading for hours or fail to install with various problems.
3 methods: Delete Windows update cache
Suppose you also have trouble with some updates not loading or installing on a Windows computer. Do you know that deleting the Windows update cache can fix most Windows update downloading and installation problems, for example, Windows updates stuck during downloading, installation failure with different errors, and more?
In fact, after you deleted the Windows update cache, old update files are removed and fresh update files are downloaded from the Microsoft server. So this method can resolve Windows update failures caused by faulty update files.
In this part, we’ll show how to clear Windows update cache in detailed steps, you can choose one or try all if one is not enough to fix the problem.
Method 1. Clear Windows update cache in File Explorer
The first method is the simplest one. You can directly delete Windows update cache files in File Explorer after changing the setting in the Services window.
Step 1. Please type File Explorer in the Search box to open it.
Step 2. Then find and right-click C drive to choose Properties.
Step 3. Click Disk Clean-up and click the “Clean up system files option”.
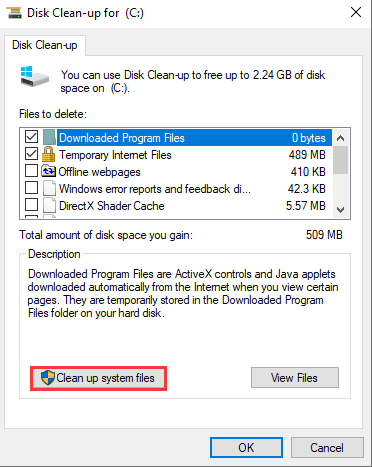
Step 4. Check the Windows upgrade log files and Temporary Windows Installation files boxes and click OK.
Step 5. Now, press the Windows and R keys at the same time to open the Run dialogue box. Type services.msc and click OK to open the Services application.
Step 6. Find Windows Update from the list of applications, and right-click to select Stop.

Step 7. Next, open File Explorer and go to C:\Windows\SoftwareDistribution\Download. Remove all the files in the folder.

After you have completed all of the instructions, please restart your computer. The next time Windows checks for updates, it will download fresh update files from the Microsoft server. This is most likely error-free; download and install without any issues.
Method 2. Delete Windows update cache via CMD
You may also clear the Windows Update cache from the command line, but you must be careful to execute all commands correctly.
Step 1. Type Command Prompt in the Search menu, then right-clicks it to choose Run as administrator to open it.
Step 2. Type net stop wuauserv and press the Enter key in the Command Prompt window.
Step 3. Now please type the following commands and press “Enter” after each:
• C:
• cd %Windir%\SoftwareDistribution
• del /f /s /q Download
Then you can reboot your computer and try to update again.
Method 3. Delete Windows update cache with Script
Another way to delete Windows update cache is to create a script.
Step 1. Open notepad and type:
@Echo On
net stop wuauserv
C:
cd %Windir%\SoftwareDistribution
Type del /f /s /q Download
pause
Step 2. Save the file as Cleardown.cmd on your desktop
Step 3. Right click on the Cleardown.cmd file and select run as administrator
When the script has finished, it will pause so you can see the output of what it has done.
How to Reset Windows update cache
If the above three ways can’t fix Windows update stuck or failure, you can also try to reset the Windows update cache components.
Step 1. Open the command prompt as administrator.
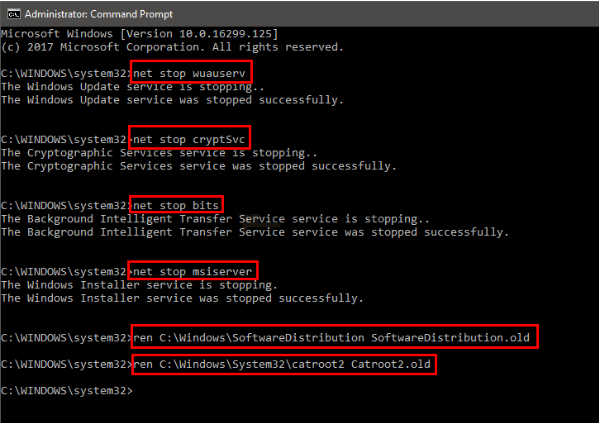
Step 2. We need to Stop the BITS, Cryptographic, MSI Installer and Windows Update Services. Please type the following commands and press the “Enter” after each command:
• net stop wuauserv
• net stop cryptSvc
• net stop bits
• net stop msiserver
Then run these 2 commands:
• ren C:\Windows\SoftwareDistribution SoftwareDistribution.old
• ren C:\Windows\System32\catroot2 Catroot2.old
Step 3. Run the following commands to start the BITS, Cryptographic, MSI installer, and Windows Update Services that you’ve disabled.
• net start wuauserv
• net start cryptSvc
• net start bits
• net start msiserver
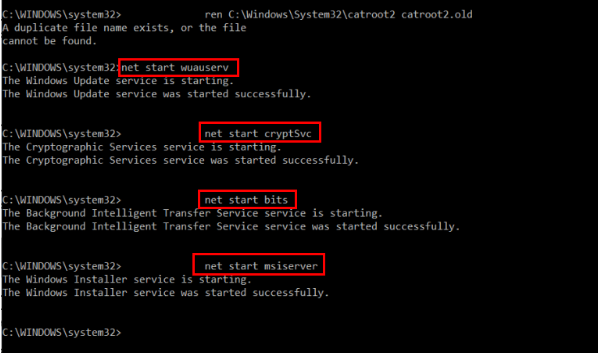
Then reboot your PC.
Further reading: Thoroughly clear system cache and RAM cache
After deleting the Windows update cache, you may fix the Windows update failed or downloading stuck problems. However, to keep a nice performance and health status of a computer, deleting other cache files is also a great method to avoid system stuck or excessive storage usage.
Windows system and all your programs will generate cache files. They can faster the data accessing speed when you run programs. But the short timeliness of cache files makes them outdated quickly. After a task is finished, they are useless, and then, they accumulate. Thus, you need to regularly clean cache files.
To help you conveniently delete all unnecessary cache files from your computer, here we recommend you AOMEI Partition Assistant Standard, a free disk and Windows PC manager, which supports Windows 11/10/8/8.1/7/XP.
With this tool, you don’t need to open each built-in tool to clean cache files one by one, the tool will scan all locations and filter all junk files for you. You can clean all junk files like cache, registry, and temp files with one click.
Free Up Disk Space To Keep Your PC Running Smoothly and Efficiently
Step 1. Initiate Clean Junk Files. Install and launch PartitionAssistant Cleanup. Click the "Clean Junk Files" tab.

Step 2. Start scan junk files. Click the "Scan Now" button to start the process of scanning junk files.

Step 3. After the scan process is finished. All system junk files (including recycle bin files, temporary files, log files, invalid shortcuts, and so on) and registry junk files (including DLL registry, system registry, and program registry) will be displayed.

Step 4. You can also click the button behind to view the junk files details.

Step 5. And, you can click the button behind to locate the file.

Step 6. Select junk files to start cleanup. By default, the program will select some junk files to clean up, for example, temporary files, log files, and so on. You can also manually check to select more or uncheck to deselect fewer listed junk files. Or, click "Select All" to select all junk files to clean up if you need to clean up all.
After selecting junk files that are not needed anymore, you can click the "Clean Now"button to start the cleanup.

Step 7. Cleanup completed. The process of the cleanup might take time, and the selected files will be cleaned up. After the process is finished, you will get a cleanup completed window displaying how many files you have cleaned and not yet cleaned.

To sum up
Now, do you know how to delete Windows update cache? Hope these 3 ways can help you clear Windows update cache files and fix Windows update stuck or failures.

