

How to Delete Windows Update Cleanup Files?
Is it safe to delete Windows Update Cleanup files? In this post, you can learn how to safely delete Windows Update Cleanup Files and clean up your PC.
By Lucas / Updated on July 11, 2025
Scenario: Can I delete Windows Update Cleanup files?
When using the utility Disk Cleanup, I find an option: cleanup system files. By default, the utility selected normal files like Downloaded Program Files, Temporary Internet Files, and Thumbnails, however, there are Windows Update Cleanup files that take up over 6GB. Can I delete Windows Update Cleanup to release some free space?
Is it safe to delete Windows Update Cleanup files?
Just like the case above, many users find the computer becomes extremely slow after a Windows update, and when they open Disk Cleanup to clean some files, the Windows Update Cleanup files take up several GB capacity on the drive, but they’re not sure whether be safe to delete them. And there are some other system files, can they be deleted?
Here, we’ll introduce more information about the files you find in the Disk Cleanup > Clean up system files.
▶ Windows Update Cleanup files
After you updated from one version of Windows to another or performed a big update to the same version of Windows, there's a Windows.old folder created by the system. That folder includes the files required to restore your computer to an earlier version of Windows.
Thus, if you do not want or need to return the Windows version, perform the cleanup and restore all of the space, which is normally 20 to 30 GB of disk space. If you're certain you won't revert to the previous version, it's perfectly safe to delete Windows Update Cleanup files.
▶ Windows Upgrade Log Files
Created by the Windows upgrade process, the Windows Upgrade log files can help you solve upgrade-related problems. If you don't have any such problems, simply erase them.
▶ System Error Memory Dump Files
BSOD is a well-known error. If your computer encounters a BSOD, the system will generate a memory dump file that will assist you in determining what went wrong. If you have previously resolved the BSOD problem, you can remove the System Error memory dump files.
▶ System Archived Windows Error Reporting
When software crashes, these error reports are generated to assist you in analyzing and resolving program issues. They will be forwarded to Microsoft, thus removing them will have no effect on your machine. However, you will not view these reports once they have been deleted.
▶ DirectX Shader Cache
Direct X Shader Cache is a cache system for storing shaders that can help improve app, game, and program performance and responsiveness. The graphics system creates files in this folder. It can reduce the length of time it takes for an image or video to render on the screen.
DirectX Shader Cache may get damaged or stacked up, resulting in excessive storage use. If you feel the DirectX Shader Cache is faulty or overly big, you can erase it. When finished, this folder will be permanently erased, but the Shader Cache will regenerate.
▶ Delivery Optimization Files
The Windows Update Delivery Optimization function allows you to receive or transmit Windows updates to adjacent PCs or devices in your network. This function allows you to receive the update more quickly. However, it will consume a significant amount of space on your computer's hard disk.
If these files consume a significant amount of disk space or you suspect that the Delivery Optimization Files are faulty, you can remove them. However, if you don't mind taking up disk space, you may retain them.
▶ Windows ESD Installation Files
The Windows ESD installation files are associated with the "Reset this PC" function. They allow you to reset your machine to its factory settings. If you delete these, "Reset this PC" will no longer function correctly. You must use a Windows installation media to do a factory reset on your machine.
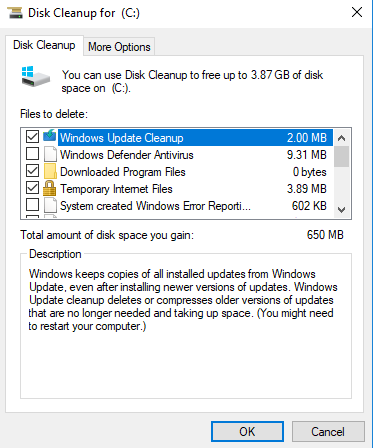
Delete Windows Update Cleanup files manually
Again, we’ll mention: if you’re sure you won’t revert to the earlier Windows, you can delete Windows Update Cleanup files.
Open "Disk Cleanup", and click "Clean up system files". Tick “Windows Update Cleanup” files, and other files you wish to clean according to your needs and click “OK”, they’ll be removed.
Bonus tips: Easily clean junk files on your PC with free PC cleaner
Excessive junk file accumulation will significantly affect your computer performance if you don’t regularly clear the system and disks. However, if you clean them by yourself, you’ll need to use several tools, and some files are hidden, you can’t thoroughly clean all junk files manually.
Here, we recommend a free tool, PartitionAssistant Cleanup is a free disk partition cleanup software trusted by millions worldwide. It's an excellent PC Cleaner utility which is specifically designed to be an effective junk file cleaner for PC, meticulously scanning your system to identify and remove a wide array of unnecessary files that can slow down your computer and occupy precious disk space.
Free Up Disk Space To Keep Your PC Running Smoothly and Efficiently
Step 1. Initiate Clean Junk Files. Install and launch PartitionAssistant Cleanup. Click the "Clean Junk Files" tab.

Step 2. Start scan junk files. Click the "Scan Now" button to start the process of scanning junk files.

Step 3. After the scan process is finished. All system junk files (including recycle bin files, temporary files, log files, invalid shortcuts, and so on) and registry junk files (including DLL registry, system registry, and program registry) will be displayed.

Step 4. You can also click the button behind to view the junk files details.

Step 5. And, you can click the button behind to locate the file.

Step 6. Select junk files to start cleanup. By default, the program will select some junk files to clean up, for example, temporary files, log files, and so on. You can also manually check to select more or uncheck to deselect fewer listed junk files. Or, click "Select All" to select all junk files to clean up if you need to clean up all.
After selecting junk files that are not needed anymore, you can click the "Clean Now"button to start the cleanup.

Step 7. Cleanup completed. The process of the cleanup might take time, and the selected files will be cleaned up. After the process is finished, you will get a cleanup completed window displaying how many files you have cleaned and not yet cleaned.

Ending lines
Now you know it’s safe to delete Windows Update Cleanup files in Disk Cleanup. If you want to deeply clean your system and disks, AOMEI Partition Assistant is a nice choice.

