[Full Guide] How To Access External Hard Drive On Mac
This guide provides step-by-step instructions to access external hard drives on Mac. It covers troubleshooting tips for drives that won't show up, ensuring your Mac recognizes your NTFS storage devices quickly.
By Irene / Updated on March 2, 2026
Many users look for ways to access an external hard drive on a Mac for compatibility reasons, especially when the drive is shared between macOS and Windows computers. This need usually arises because many external hard drives are formatted with the NTFS file system, which is developed by Microsoft for Windows. Windows systems can read from and write to NTFS drives without any restrictions, but macOS is designed to provide read only access by default. As a result, Mac users may be able to view files on the drive but cannot save new data or make changes unless they use a suitable third party solution or choose a more widely compatible format such as exFAT. A clear understanding of this difference helps users avoid confusion and ensures smoother file access across different operating systems.
How to access external hard drive on Mac for compatibility?
How do I access external hard drive on Mac? If you want to access an external hard drive on your Mac for compatibility, it is important to ensure the drive is connected properly and recognized by the system. macOS may only read certain formats by default, so following these steps helps you view and use your external drive smoothly.
Step 1. Plug the external hard drive into your Mac using the appropriate cable, such as USB-C, Thunderbolt, or USB-A with an adapter. Make sure the connection is secure.
Step 2. Look for the drive icon on your desktop or in the Finder sidebar under “Locations” or “Devices.” If the drive appears, you can start accessing files immediately.
Step 3. If the drive does not appear, open Finder and go to Finder > Settings (or Preferences). In the General tab, check “External disks” to show them on the desktop. In the Sidebar tab, check “External disks” under Locations to display them in Finder.

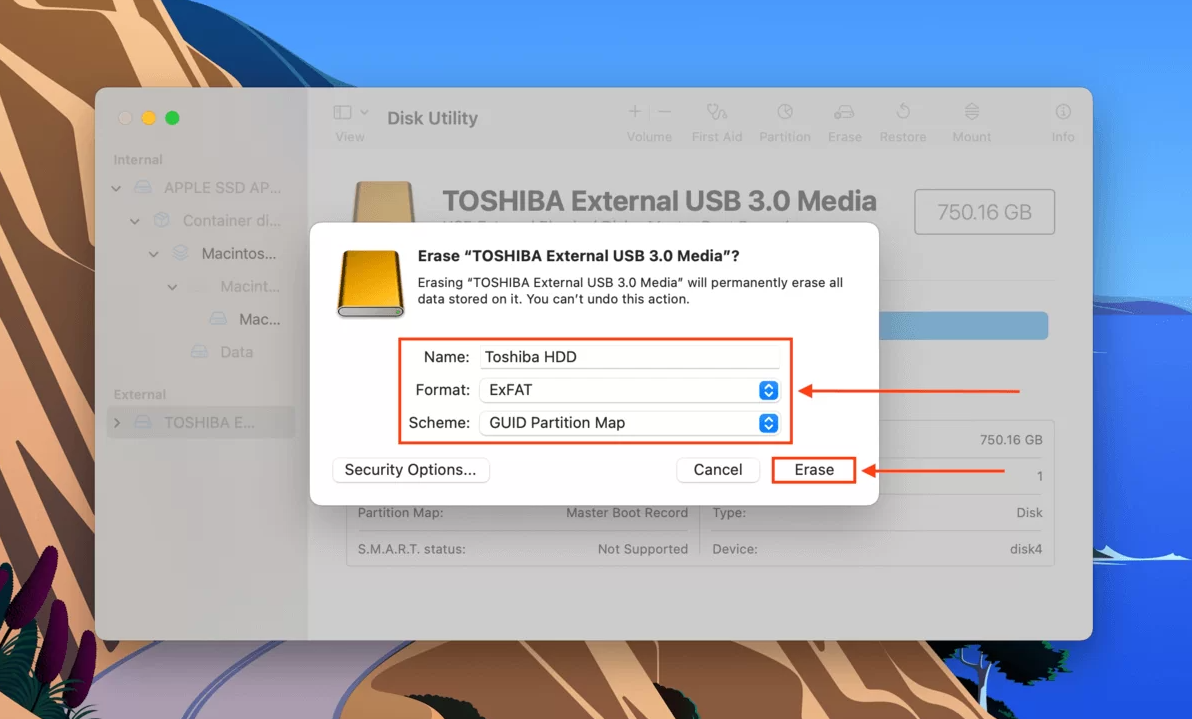
Step 4. If the drive is still not visible, open Disk Utility by pressing Command + Space and typing “Disk Utility.” Click View in the toolbar and select “Show All Devices.” Find your external hard drive in the sidebar. If it appears grayed out, select it and click Mount. If the drive shows as unreadable or “Uninitialized,” back up any important data first, then erase and format it to APFS or exFAT to make it compatible with Mac.
Step 5. Drag and drop files between your Mac and the external drive in Finder to move or copy files.
Step 6. Always eject the drive safely before unplugging. Right-click the drive icon and select Eject, or drag it to the Trash, which turns into an Eject symbol, to avoid data loss.
How to write to NTFS external hard drives on Mac?
Writing to NTFS external hard drives on a Mac can be difficult because macOS only allows read access by default. You can view files, but copying, editing, or deleting them is not possible without extra tools. PartitionAssistant NTFS for Mac solves this problem by providing full read and write access to NTFS drives directly on macOS, without reformatting.
The software lets you copy, edit, delete, rename, and move files easily, just like on a Windows PC. It works smoothly on both Intel and Apple Silicon (M1/M2) Macs and supports HDDs, SSDs, USB drives, SD and CF cards, as well as NTFS, FAT32, and exFAT file systems.
PartitionAssistant NTFS for Mac makes file transfers between Mac and NTFS drives simple, reliable, and safe. It is ideal for students, professionals, and families who need to share files, back up data, or migrate content from Windows to Mac.
Before we start, you need to configure Security Policy in iOS Recovery Mode.
Step 1. Run PartitionAssistant NTFS for Mac and connect your NTFS hard drive.
Step 2. The connected, removable, and external hard drives will be mounted and listed.

Step 3. Select the drive you want to operate and click "Open".
Step 4. Now you can copy files on your Mac and click "Paste Item" to copy the files to the drive.
Step 5. You can also copy, delete, and rename files on the drive.
Step 6. After all operations are complete, please click "Eject" to disconnect the external hard drive from your Mac.
Conclusion
Accessing and writing to external hard drives on a Mac has become much easier with the right approach and tools. By understanding the differences between macOS and Windows file systems, users can avoid common obstacles when working with NTFS drives. Following simple steps to connect, mount, and manage drives ensures smooth file access, while tools like PartitionAssistant NTFS for Mac allow full read and write capabilities without reformatting. This combination of careful setup and reliable software makes transferring, editing, and organizing files across Mac and Windows devices straightforward, secure, and efficient for both personal and professional use.
FAQs
🗨️ Why is my external drive not showing up on my Mac?
Your external drive may not appear if it is not properly connected, the cable or port is faulty, or the drive is formatted in a file system that macOS cannot read. It could also be hidden due to Finder settings or require mounting through Disk Utility.
🗨️ How do I get my external hard drive to show up on my computer?
Check the connection and try a different port or cable if needed. Open Finder preferences and ensure “External disks” is selected in both the General and Sidebar tabs. If the drive still doesn’t appear, use Disk Utility to mount it.
🗨️ How do I view the contents of an external hard drive?
Once the drive appears on your desktop or in Finder, simply click it to open and browse the files. You can also drag files to or from the drive as needed.
🗨️ How do I access my external hard disk?
Connect the drive, make sure it is recognized by Finder, and mount it if necessary using Disk Utility. After that, you can open the drive in Finder and manage files directly.

