What is NTFS-3G for Mac? Do You Need It?
NTFS-3G for Mac allows full read/write access to NTFS formatted drives on macOS. Read to know its function and why Partition Assistant NTFS for Mac is a simpler, superior alternative for Mac users.
By Irene / Updated on March 2, 2026
What is NTFS-3G for Mac?
NTFS-3G for Mac is a free, open-source driver that lets macOS read and write to NTFS-formatted drives. Normally, macOS can only read NTFS files and cannot copy, edit, or delete files on Mac. With NTFS-3G installed, this limitation is removed, giving your Mac full access to NTFS disks.
It is based on the NTFS-3G project, a well-established open-source NTFS driver that has been actively developed since 2006 and widely used across many operating systems. On macOS, NTFS-3G usually works together with MacFUSE and other supporting tools to mount and manage NTFS volumes properly.
NTFS-3G is a good choice for users who want a free solution to use NTFS drives on a Mac, especially when sharing external hard drives between macOS and Windows. However, the setup process can be complex and often requires tools like Homebrew or MacPorts. Performance may also be slower compared to paid NTFS for Mac software.
How to install and use NTFS-3G on Mac?
NTFS-3G is usually installed through command-line tools. The process involves several steps and may feel complex for non-technical users. Below is a general overview of how it works.
Step 1. Install Xcode Command Line Tools, which is required before using Homebrew. Open Terminal from Applications > Utilities, then run the command below and follow the on-screen prompts to complete the installation.
xcode-select --install
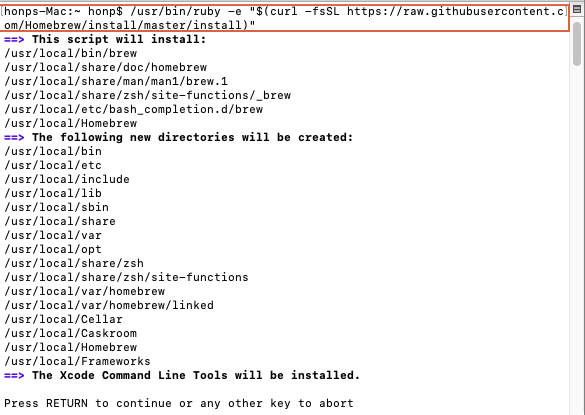
Step 2. Install Homebrew, a popular package manager for macOS. In Terminal, run the following command and follow any instructions shown, including adding Homebrew to your system PATH.
/bin/bash -c "$(curl -fsSL https://raw.githubusercontent.com/Homebrew/install/HEAD/install.sh)"
Step 3. Install macFUSE, which NTFS-3G needs to work on macOS. Use Homebrew to install it. During this process, macOS may ask you to allow system extensions in System Settings > Privacy & Security, and a restart may be required.
brew install --cask macfuse
Step 4. Install NTFS-3G. In Terminal, first tap the required Homebrew repository for some macOS versions, then install the NTFS-3G driver. This method is generally more reliable on modern macOS. Some guides may use a simpler command, but this approach is more robust.
brew tap gromgit/homebrew-fuse brew install ntfs-3g-mac
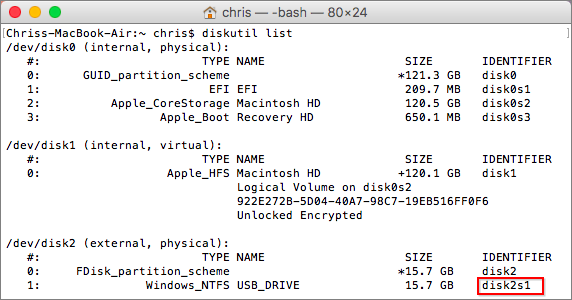
Step 5. Connect your NTFS drive to your Mac. Open Terminal and run the command diskutil list to list all disks. Find your NTFS drive and note its identifier, such as /dev/disk2s1. Also note the volume name or prepare a mount point.
Step 6. If the NTFS drive is already mounted as read-only, unmount it first. Replace LABEL_NAME with the drive name shown in Finder or Disk Utility.
sudo umount /Volumes/LABEL_NAME
Step 7. Mount the NTFS drive with full read and write access using NTFS-3G. Replace /dev/diskXsY with the disk identifier you noted earlier. This command creates a temporary NTFS folder under /Volumes and mounts the drive there. You will need to enter your administrator password.
sudo /usr/local/bin/ntfs-3g /dev/diskXsY /Volumes/NTFS -olocal -oallow_other
While NTFS-3G is free, this process requires multiple tools, Terminal commands, and system permissions. For users who prefer a faster and simpler solution without command-line setup, an all-in-one tool like PartitionAssistant NTFS for Mac offers an easier way to enable NTFS read and write support on macOS.
The best alternative: Use a handy tool for NTFS on Mac
PartitionAssistant NTFS for Mac is simpler and more reliable than NTFS-3G because it removes the technical barriers many Mac users face. NTFS-3G depends on open-source components and usually requires extra tools such as FUSE for macOS. Setup often involves Terminal commands and manual configuration, which feels unnatural on a Mac and can be confusing for non-technical users. On newer macOS versions and Apple Silicon Macs, this process may also cause compatibility issues or require unsafe workarounds that affect system security.
PartitionAssistant NTFS for Mac takes a different approach by focusing on ease and reliability. It works as a complete, ready-to-use application that integrates smoothly with macOS. After installation, NTFS drives work immediately in Finder, allowing you to read, write, manage, and delete files just like on a native Mac disk. There is no need for command lines, extra dependencies, or system changes. In daily use, it also delivers more stable performance and dependable data handling. With professional support included, PartitionAssistant provides a smooth, safe, and stress-free way to use NTFS drives on Mac.
Before we start, you need to configure Security Policy in iOS Recovery Mode.
Step 1. Run Partition Assistant NTFS for Mac and connect your NTFS hard drive.
Step 2. The connected, removable, and external hard drives will be mounted and listed.

Step 3. Select the drive you want to operate and click "Open".
Step 4. Now you can copy files on your Mac and click "Paste Item" to copy the files to the drive.
Step 5. You can also copy, delete, and rename files on the drive.
Step 6. After all operations are complete, please click "Eject" to disconnect the external hard drive from your Mac.
Conclusion
NTFS-3G for Mac is a free way to enable NTFS read and write access on macOS, but it requires multiple tools, Terminal commands, and careful setup. This can be time-consuming and difficult for many users, especially on newer macOS versions. If you want a quicker, safer, and more user-friendly experience, a dedicated solution like PartitionAssistant NTFS for Mac is a better choice, and it is also a free tool. It lets you use NTFS drives on your Mac easily and reliably, without technical steps, so you can focus on managing your files with confidence.
FAQs
❓ What is NTFS-3G Mac
NTFS-3G for Mac is an open-source driver that allows macOS to read and write files on NTFS-formatted drives. By default, macOS can only read NTFS files, but NTFS-3G removes this limitation.
❓How to install NTFS-3G on Mac M1
On an M1 Mac, NTFS-3G is usually installed using command-line tools. You need to install Xcode Command Line Tools, Homebrew, macFUSE, and then NTFS-3G itself. You may also need to adjust security settings in Recovery Mode to allow system extensions.
❓Is NTFS-3G free
Yes. NTFS-3G is completely free to use. It is an open-source project and does not require a paid license.
❓Is NTFS supported on Mac
macOS supports NTFS in read-only mode by default. This means you can open and copy files from NTFS drives, but you cannot edit, delete, or add files without extra software.
❓Why can't my Mac read NTFS
In most cases, macOS can read NTFS drives. If your Mac cannot read an NTFS drive, it may be due to drive errors, unsupported connections, missing drivers, or file system corruption. In some situations, the drive may not mount properly or may require third-party NTFS software to work correctly.

