How to Fix C Drive Changed to D Won't Boot Windows 10
It’s a frustrating thing to encounter Cdrive changed to Dwon't boot Windows 10. But don’t worry, after knowing the most common reason for this issue, you will get four methods to fix it.
By Hedy / Updated on April 22, 2025
Common reasons for C drive changed to D
If your C drive has changed to D, it can be confusing and may cause issues with your system. Here are some common reasons why this happens:
1. Windows is installed on the wrong drive
During a fresh Windows installation, you might have accidentally selected a different partition, causing Windows to assign a new drive letter to the system drive.
2. Drive letter assignment changed
Windows might have automatically reassigned drive letters due to changes in the boot order or partition configuration.
3. Hard drive or SSD reconnected
If you removed and reconnected your storage drives, Windows may have altered the drive letter assignments.
4. Corrupted Windows BCD (Boot Configuration Data)
A damaged bootloader or BCD file can cause incorrect drive letter mapping, leading to drive misidentification.
5. BIOS or UEFI settings changed
Changes in BIOS/UEFI settings, such as switching between AHCI and RAID mode, might cause Windows to reassign drive letters.
How to fix C drive changed to D won't boot Windows 10
If your Windows 10 PC fails to boot because the C drive has changed to D, the system cannot locate essential boot files. This issue may occur due to accidental drive letter changes, incorrect BIOS settings, or partition misalignment. Below are several methods to fix the problem and restore your system to a bootable state.
Method 1. Manually assigning the correct drive letter via Command Prompt
If the drive letter assignments are incorrect, you can manually reassign them using the Command Prompt in Windows Recovery Mode.
Step 1. Restart your PC and press F8, F11, or Shift + F10 (varies by manufacturer) to enter the Advanced Startup options.
Step 2. Click on Troubleshoot > Advanced options > Command Prompt.
Step 3. In Command Prompt, type:
▪ list volume
▪ select volume 7 (replace 7 with the drive letter that Windows currently has
▪ assign letter= M
▪ exit
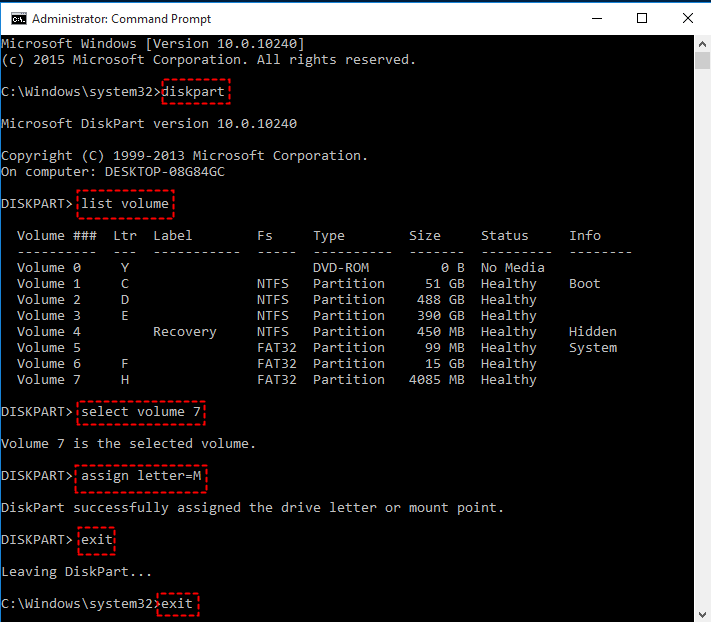
Step 4. Close the Command Prompt and restart to check if Windows boots properly.
Method 2. Rebuilding the Boot Configuration Data (BCD)
If the drive letter issue has corrupted the Boot Configuration Data (BCD), rebuilding it may fix the problem.
Step 1. Follow the same steps as in Method 1 to open Command Prompt.
Step 2. Type the following commands one by one:
bootrec /fixmbr
bootrec /fixboot
bootrec /scanos
bootrec /rebuildbcd

Step 3. If prompted, type Y (Yes) to add Windows to the boot list.
Step 4. Close the Command Prompt and restart your system.
Method 3. Fixing boot issues with AOMEI Partition Assistant
Cdrive changed to Dwon't boot Windows 10 can be incredibly frustrating, especially when you don't know what's causing the problem. That’s where AOMEI Partition Assistant comes in—a powerful and user-friendly disk management tool designed to tackle even the most stubborn boot failures.
It offers a wide range of features, including disk partitioning, OS migration, disk cloning, and more. One of its standout capabilities is its ability to fix various boot-related problems with just a few clicks, making it a lifesaver for users dealing with inaccessible systems.
Here are a few key features that help resolve boot problems:
✔ Rebuild MBR: If your system is showing errors like “Operating System Not Found” or “Missing Operating System”, it could be due to a damaged Master Boot Record (MBR).
✔ Boot Repair Tool (available in the WinPE version): This feature is designed to detect and repair Windows boot files automatically. It’s especially helpful when your PC fails to boot due to missing or corrupt BCD (Boot Configuration Data).
✔ Check Disk & Partition Errors: Sometimes, boot failures happen due to bad sectors or file system errors. AOMEI allows you to scan and fix these issues easily.
✔ Create Bootable Media: If your computer won’t start at all, you can use AOMEI to create a bootable USB or CD/DVD. Boot from this media to access your system and run repairs from outside the Windows environment.
Step 1. Install AOMEI Partition Assistant on a working PC and connect a USB drive with enough storage to this PC.
Step 2. Open this software and select the Boot Repair tool below the Recover section.

Step 3. Click the create a bootable disk option to create a WinPE Boot Repair USB drive.

Step 4. Plug the created drive into the non-booting computer, then enter the BIOS settings to change the boot order so that the computer boots from it. It will automatically load the Boot Repair tool and perform a scan of boot entries.

Step 5. Once the process completes, you will see all scan results, including system paths, system versions, and boot status. Select the repairable boot entries you want to repair and click the Repair button.
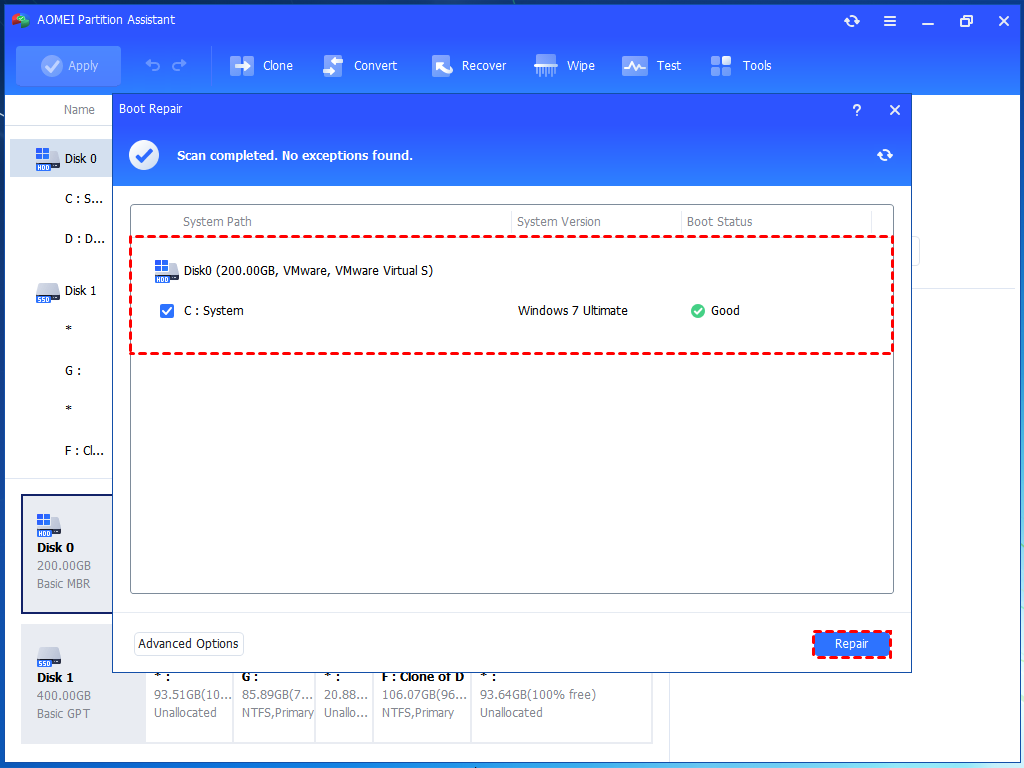
Step 6. Wait for the repair process to finish, then remove the bootable USB drive and boot the PC from the original system drive.

Method 4. Using System Restore to revert changes
If you recently modified partitions or installed software that altered the drive letter, a System Restore can revert Windows to an earlier state.
Step 1. On the Automatic Repair blue screen, choose "Advanced options".
Step 2. Navigate to "Troubleshoot" > "Advanced Options" > "System Restore".
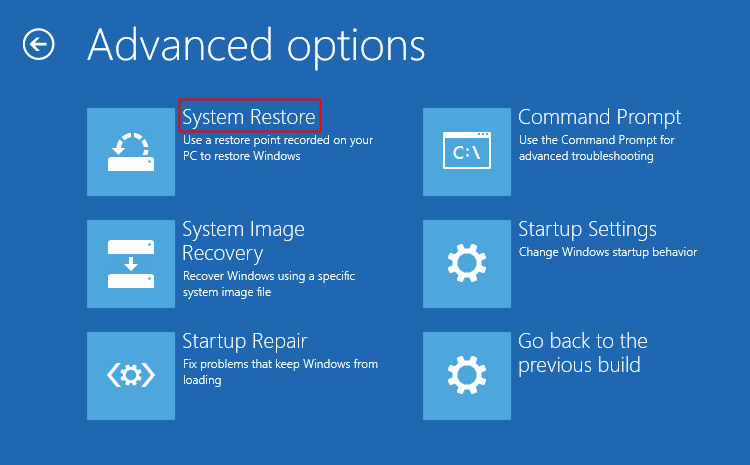
Step 3. Choose a restore point, click "Next" to restore your computer to a healthy state.
Step 4. Wait until the restore process finishes and then restart your computer.

Conclusion
When Windows refuses to boot because your C drive turned into D, don’t panic! There are several effective solutions to restore normal function, ranging from manually reassigning drive letters and rebuilding BCD to using advanced tools like AOMEI Partition Assistant or performing a System Restore. Promptly addressing the issue ensures your Windows 10 boots smoothly and your data remains secure.

