[Quickly Solved] Cannot Delete Partition in Windows 11, 10, 8, 7
Find “Delete Volume” greyed out in Disk Management? Get “Delete is not allowed…” in Diskpart? This post tells how to fix “cannot delete partition” problem in Windows 11, 10, 8, 7 effectively.
By AOMEI / Updated on May 12, 2023
Cannot delete partition in Windows 10
When you don’t want the data saved on a partition or want to claim unallocated space on a hard drive, you can choose to delete the partition in Windows 10 Disk Management. However, there are some occasions where you can find “Delete Volume” disabled and cannot delete the partition:

Case 1. Delete OEM/ Windows recovery partition
Recovery partition may take up several gigabytes of space and it’s not a bad choice to delete the recovery partition to free up disk space. However, as the recovery partition is hidden and protected, you won’t be able to delete it in Disk Management.
Case 2. Remove partition on USB flash drive or SD card
When your OS is Windows 10 version 1803 or later versions, you can delete partition on USB flash drive or SD card easily in Disk Management. If not, you won’t be able to get rid of the partition on USB flash drive or SD card or the flash drive or SD card is regarded as a removable device.
Case 3. Delete system boot partition
When you try to delete system C drive in Windows 10 Disk Management, “Delete Volume” greyed out. C drive contains OS boot files for booting and it is inevitable that you can’t remove it within Windows.
Easy solutions for cannot delete partition in Windows 10
When you fail to delete a partition in Windows 10 Disk Management, have a look at these two ways to delete a volume.
✔ Way 1. Using Diskpart
Diskpart, a command-line tool in Windows, enables you to create primary/ logical partition, convert FAT32 to NTFS without formatting, delete OEM recovery partition, and so on. In the beginning, press “Windows” + “R”, input “diskpart” and click “OK” to open the command-line utility. Then, run the following command:
▪ diskpart
▪ list disk: all the hard drives on your computer will be displayed.
▪ select disk n: n stands for the disk number of disk that contains the to-be-deleted partition
▪ list partition: all the partitions on the selected disk will be listed
▪ select partition n: n is the number of the partition you want to delete
▪ delete partition (override)
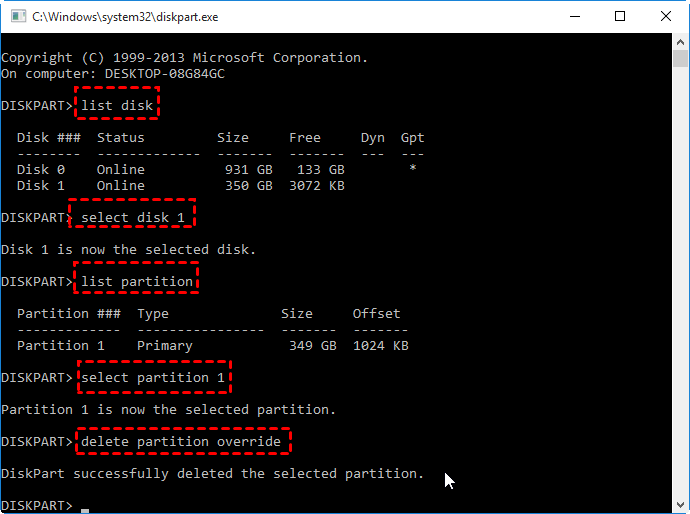
Note: To delete a partition on a USB drive, use “delete partition” command; to force delete a protected partition like OEM recovery partition, using “delete partition override” command.
When you need to delete OS-related partition, like system partition C or EFI partition, you cannot complete the takes via the steps above. If you want to remove partition C or EFI partition, boot the computer from the Windows installation/ repair disc and go to Command Prompt.
Step 1. Insert the installation CD/DVD into your computer.
Step 2. Reboot the computer, enter BIOS to boot from the CD/DVD.
Step 3. Specify a language, a time, a currency, and a keyboard
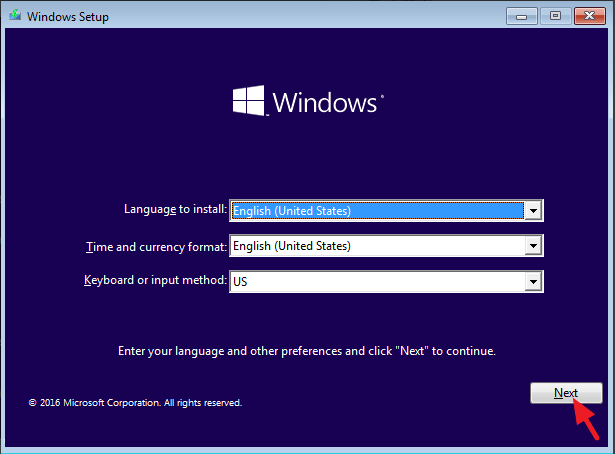
Step 3. Go to “Repair your computer” > “Troubleshoot” > “Advanced Options” > “Command Prompt”.
Step 4. In Command Prompt, type “diskpart” and hit Enter to run the Diskpart utility.
Step 4. Then, run these commands to delete the partition that you don’t need:
▪ list disk
▪ select disk n
▪ list partition
▪ select partition m
▪ delete partition
✔ Way 2. Using a GUI third-party
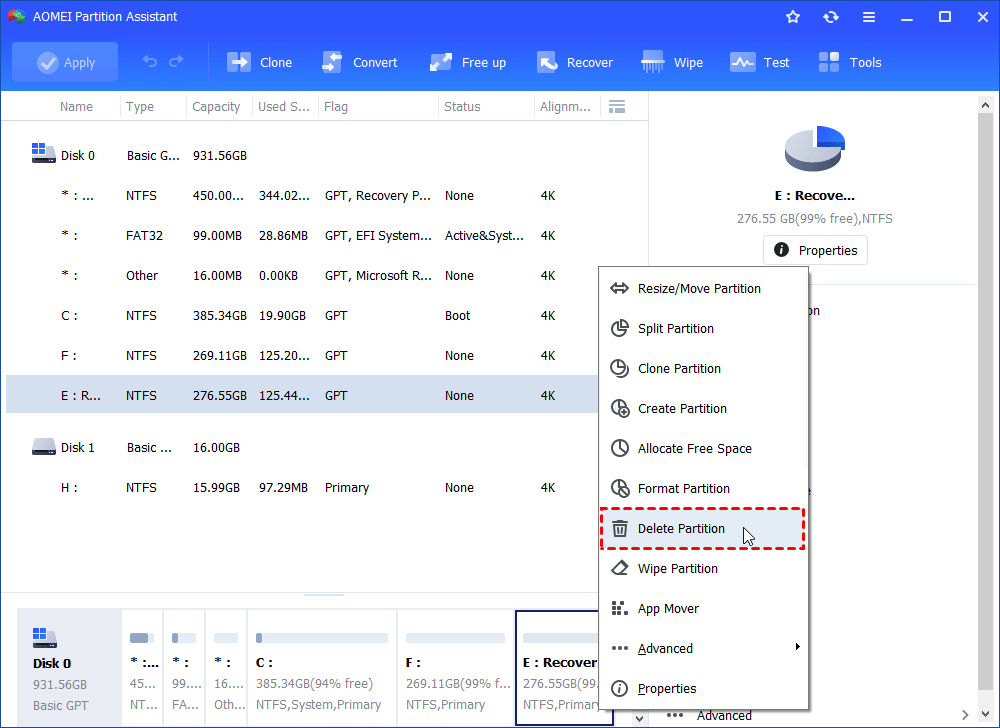
If you want to delete a partition in Windows 10 more intuitively, or there is no Windows installation disc for removing OS-related partitions, you can try a third-party GUI partition manager, AOMEI Partition Assistant Standard. With a user-friendly and concise user interface, it’s easy to operate. With it, you can remove a hidden recovery partition, system partition, or delete a partition on a USB drive effortlessly.
If you need to help your friend's to delete partition remotely, you can use remote desktop software to connect to the remote comptuer and then run PA to delete the partiton.
Step 1. Install and run the software. In the main interface, you can see all disks and partitions on your computer. Right-click the partition that you want to remove, and choose “Delete Partition”.
✍ Extra step for remove system partition: To delete system partition, insert a USB into PC, use the tool to create a bootable USB drive; reboot PC and enter BIOS to boot from the USB; then you’ll be in the main interface of AOMEI Partition Assistant Standard and you can select “Delete Partition”.
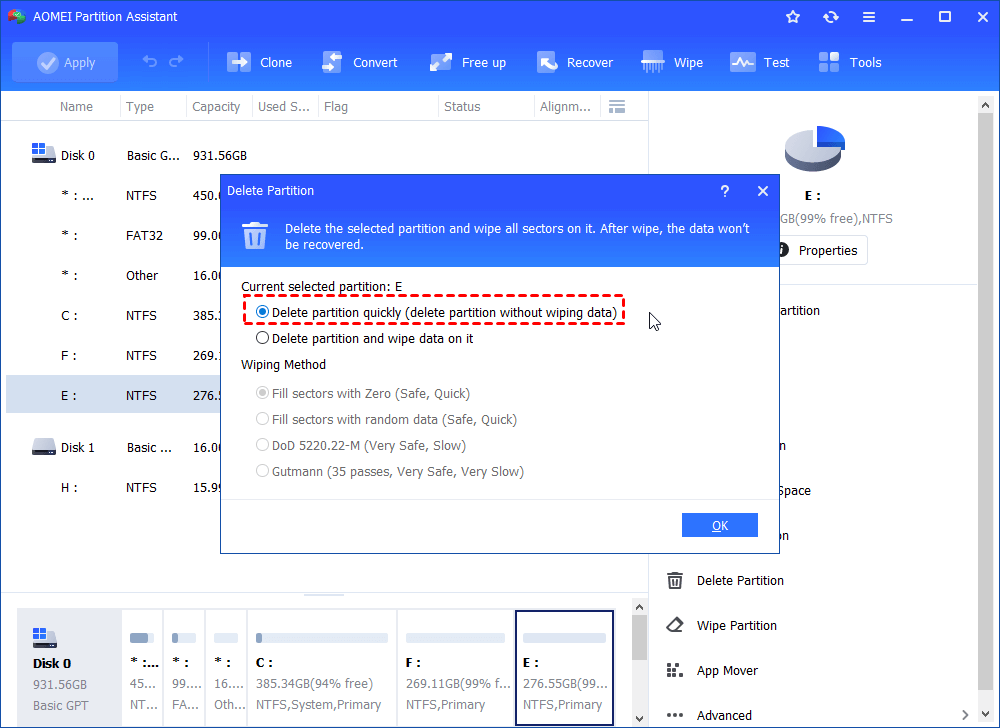
Step 2. In the small pop-up window, choose “Delete partition quickly (delete partition without wiping data)” and click on OK.
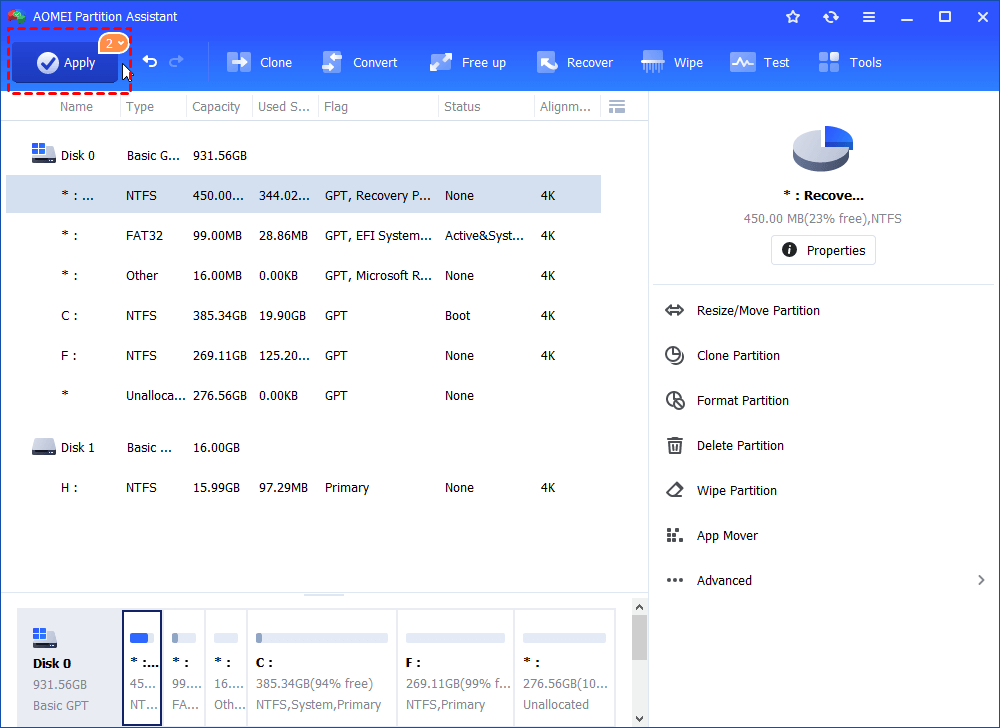
Step 3. Get back to the main interface; click “Apply” and “Proceed” to perform the operation.
Notes:
▪ AOMEI Partition Assistant Standard can wipe partition, wipe hard drive as well; to wipe SSD securely, you can use AOMEI Partition Assistant Professional.
▪ AOMEI Partition Assistant Standard can help you to delete a partition easily when you cannot delete a partition in Windows 10 Disk Management; And the tool is also can be used in Windows 11/8.1/8/7, XP, and Vista.

