How to Delete Recovery Partition in Windows 11/10/8/7 Safely?
Learn how to safely delete recovery partition to reclaim disk space since Windows 7/8/10/11 has one or more recovery partitions on a disk, which takes much space.
By AOMEI / Updated on May 12, 2023
What is a recovery partition on Windows PC?
The recovery partition is a dedicated area on the hard drive that allows Windows to restore itself to its factory settings in case of a critical system failure, eliminating the need to reinstall the entire operating system. There are two types of recovery partitions: Windows recovery partitions and computer manufacturer's recovery partitions (On some computers, it is labeled as OEM reserved partition).
Windows recovery partition allows you to boot into Windows recovery environment (WinRE) to restore your computer when problems happen, while the recovery partition created by PC manufacturer contains an image of everything pre-installed along with the operating system, therefore, it allows you to press a specific key (usually F9 for HP and F12 for Dell) to recover your computer to the factory default settings.
Is it safe to delete recovery partition?
Usually, a Windows 10 recovery partition needs 450-1GB space on your disk, while an OEM recovery partition requires 7-20GB. If you see a few gigabytes recovery partition in Disk Management, it is definitely included by computer manufacturers such as Dell, HP, and Lenovo.
Since the recovery partition may take much space, many users want to delete the recovery partition, But once it’s removed, Windows RE and the factory default settings are inaccessible. Thus, it is unsafe to delete the recovery partition, unless you make a recovery disk with your USB drive before you removed the recovery partition.
Why are there multiple recovery partitions on the disk?
Another situation is that many users see there is more than one recovery partition on the system disk, and they don't know which recovery partition is removable.
During a Windows upgrade to the next version, the upgrade programs will check the available space on your system reserved partition or recovery partition. If there's insufficient storage space available, it will create a new recovery partition. This is why you may have multiple partitions in Windows 10/11, particularly if you're using Insider Builds.
To prevent Windows from creating another recovery partition during future upgrades, you can increase the size of your system recovery partition before initiating the upgrade process. This will allow for more storage space and reduce the likelihood of needing to create additional recovery partitions.
To locate this Windows recovery partition, you can type “reagentc /info” (without quotes) in an elevated command prompt.
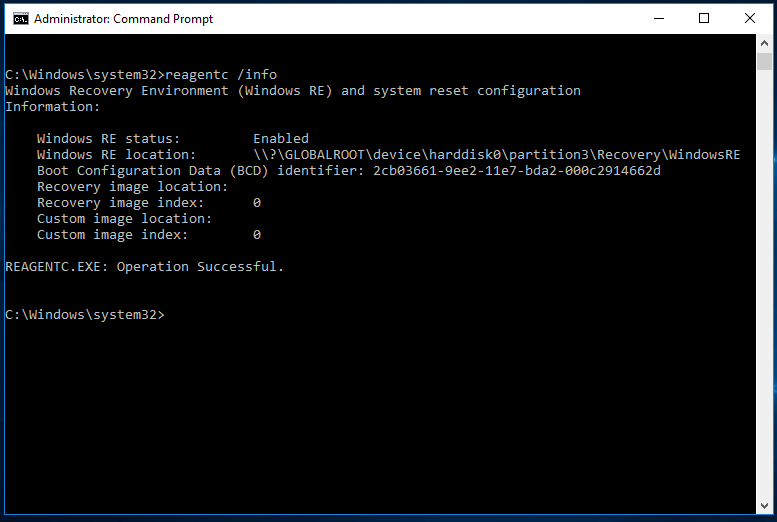
Note: from the screenshot above, this “harddisk0\partition3” does not mean the third partition on Disk 0. You can use type the following commands on another command prompt:
• diskpart
• list disk
• select disk 0
• list partition
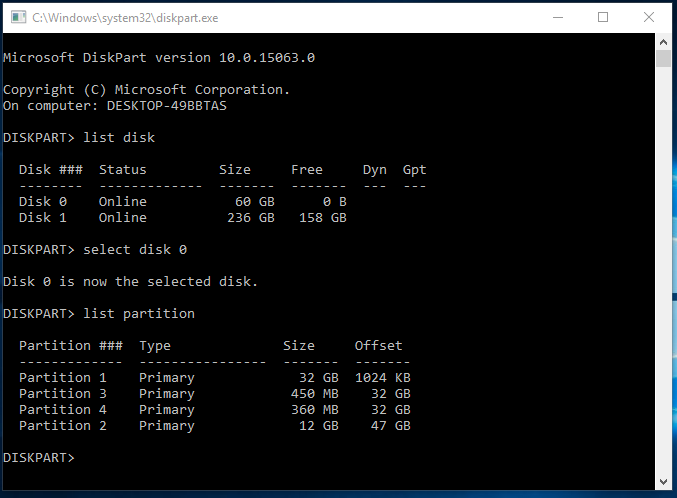
From my end, the second partition is the current Windows recovery partition that you should keep if you want to use the recovery options. Once you have decided which recovery partition to delete, it is easy.
How to delete recovery partition
Once we've checked the target recovery partition, we can start to remove recovery partition on Windows. From this part, you can learn how to delete recovery partition with Windows built-in tools and third-party tool that can avoid system limitations.
Way 1. Remove recovery partition with Diskpart
As you know, you are not allowed to delete recovery partition in Windows Disk Management, but you use Diskpart.exe to delete partitions from command prompt. You can use the following steps to remove recovery partition with diskpart:
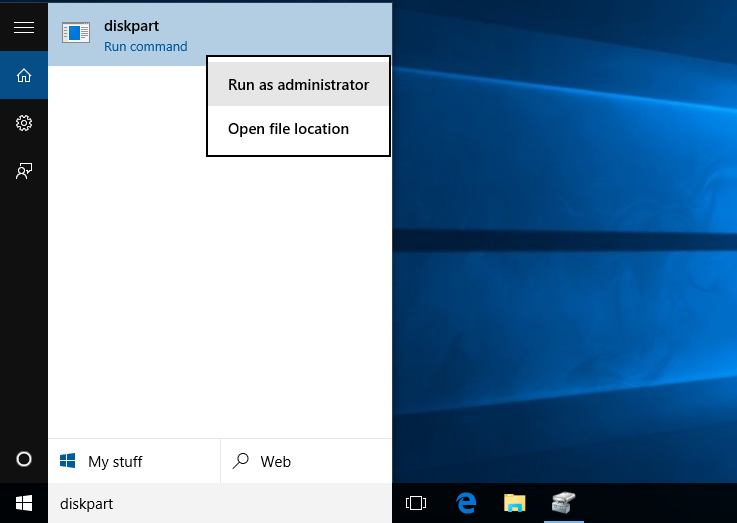
Step 1. Type "diskpart.exe" in the search box, in the listed results, right-click on Diskpart and select Run as administrator.
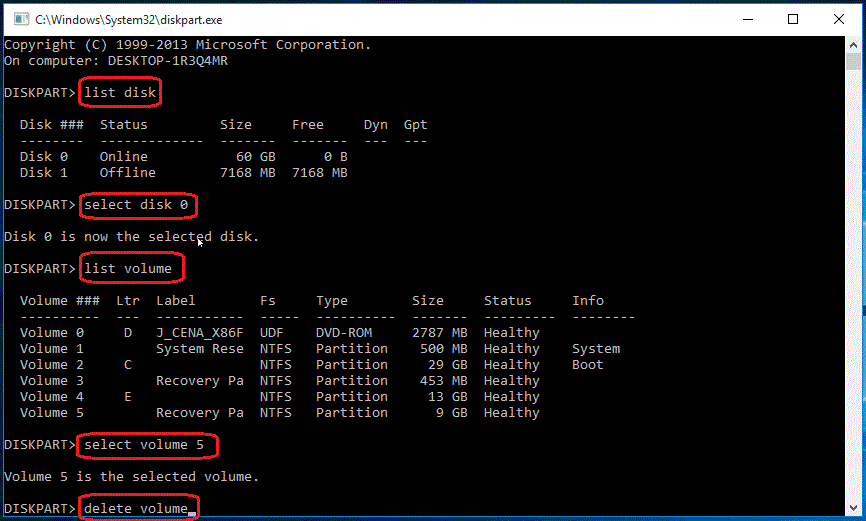
Step 2. At a Diskpart prompt, type in "list disk" to display all the disks. Each disk on your computer will be listed with a disk number.
Step 3. Specify the disk that contains the recovery partition by typing in "select disk n", in which "n" should be replaced with the disk number listed before.
Step 4. Type in "list volume" to list all the partitions on the selected disk with all the partition labels, so you can determine which one is the recovery partition to be deleted. If you want to see the partition type, use "list partition" command instead.
Step 5. Specify the partition you want to delete using the volume number, like this: "select volume 3".
Step 6. Type in: "delete volume".
Without a clear interface to show you display the details of each partition, there are chances that you may delete inappropriate partitions. What’s worse, this operation cannot be canceled or undo. For those who are not familiar with Diskpart, the best choice to get rid of recovery partition should be using third-party partition manager software.
Way 2. Delete recovery partition with AOMEI Partition Assistant
AOMEI Partition Assistant Standard is a completely free program that allows you to delete recovery partition and reclaim the storage space without a scratch. Let’s see how to delete recovery partition using AOMEI Partition Assistant.
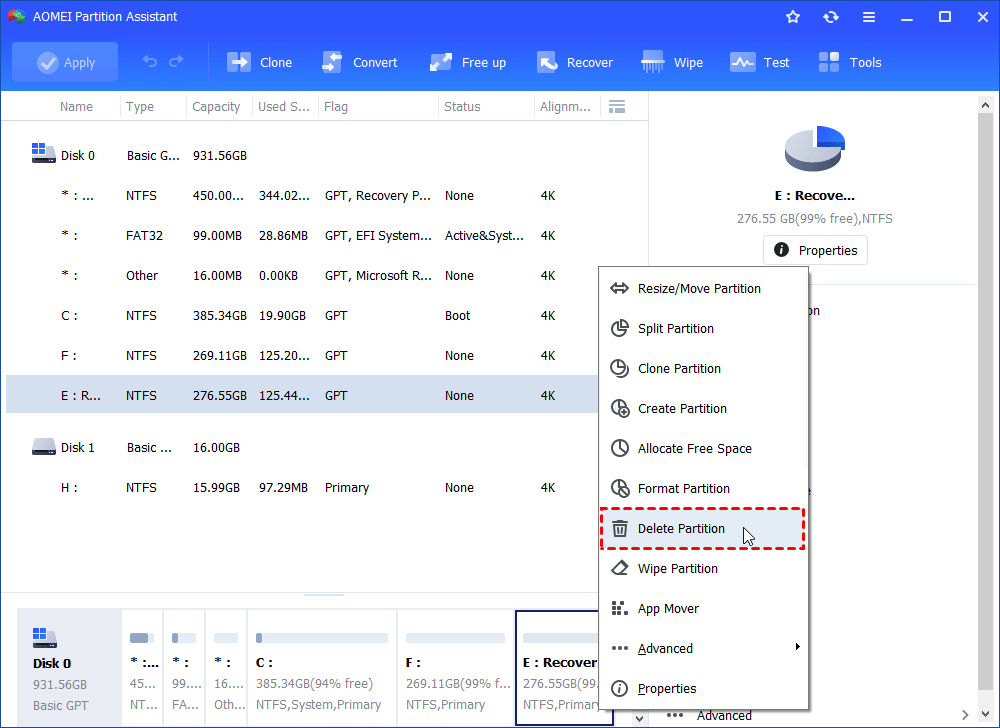
Step 1. Download this freeware. Install and open it. Right-click on the recovery partition you want to delete and select "Delete Partition", and then click “OK”.
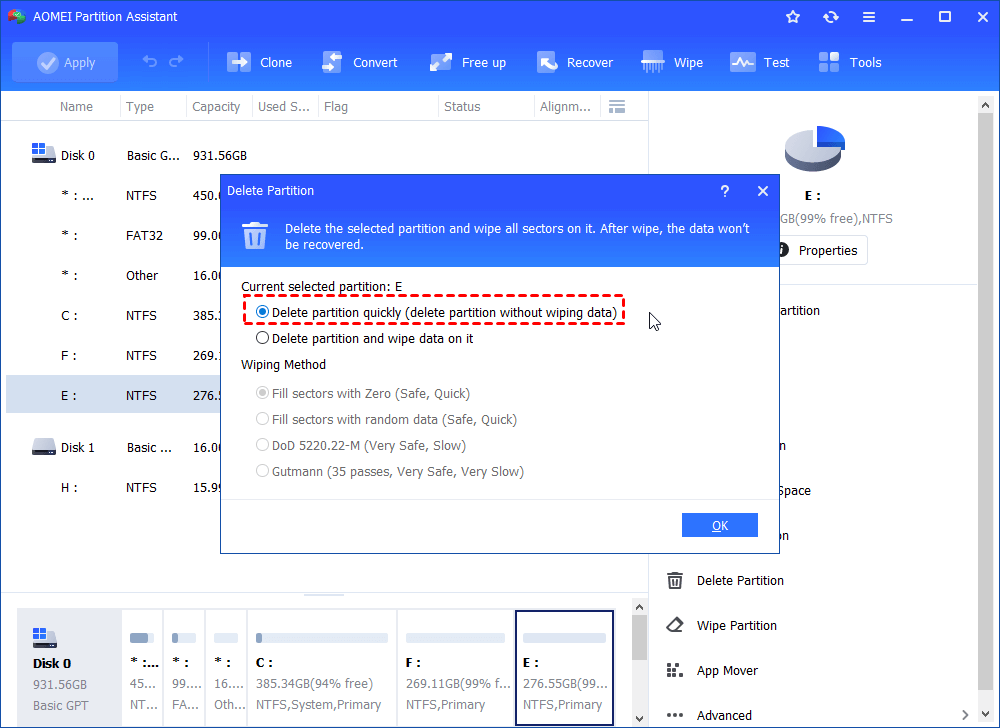
Step 2. Select a method to remove the recovery partition and click “OK”.
Step 3. The recovery partition will be displayed as an unallocated space. Make sure that is the partition you want to get rid of and click "Apply" to make the operation in process.
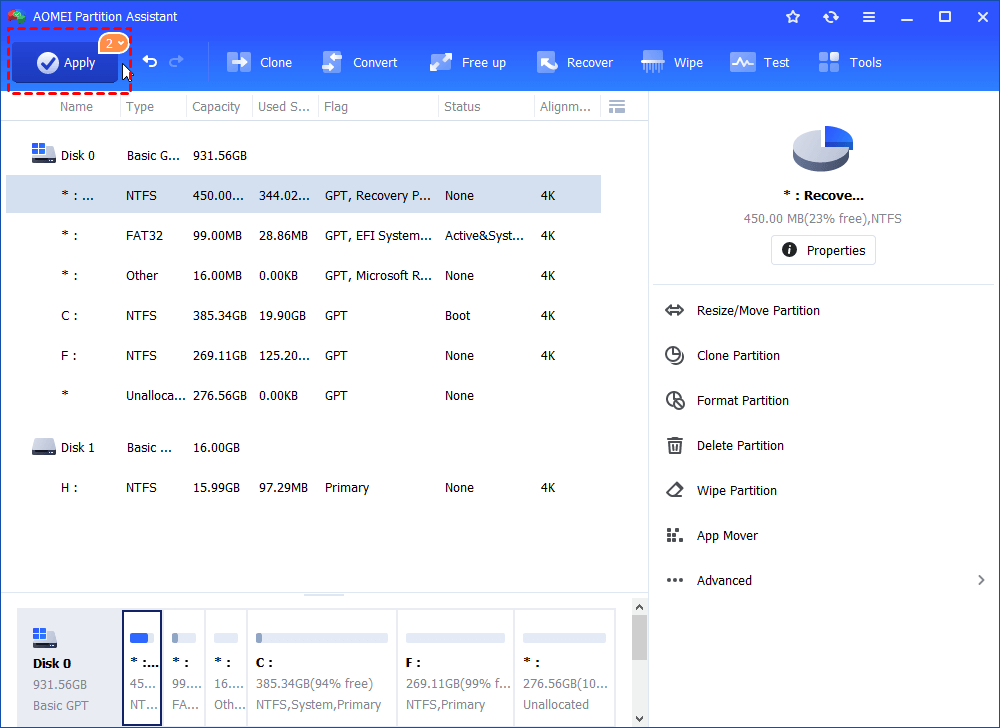
In a few seconds, you will have recovery partition deleted.
Further reading: How to safely extend C drive space without deleting recovery partition?
Due to space constraints, many users prefer to erase the recovery sector. OEM recovery partitions often take up a lot of disk space, and Windows OS may build new recovery partitions following system updates. With the several handy functions of AOMEI Partition Assistant, you can increase C drive capacity without jeopardizing the deleting operation of recovery partitions, since Recovery partitions are essential for installing WinRE or restoring factory default settings. You can avoid potential difficulties by expanding the C drive without erasing the recovery sector.
You can upgrade to the Professional Edition of this program to transfer free space from other partitions on the same disk to the destination device. If the D drive has adequate free space, this utility can readily share part of it with the overcrowded C drive using simple processes. What's more, if you find that your C drive stores some large working tools or video games, this tool can help you move these installed apps to another drive without reinstalling programs and losing setting data.
Trick 1. Allocate free space from a partition to C drive
Step 1. Launch AOMEI Partition Assistant, right-click the partition from which you want to allocate free space, and select "Allocate Free Space".

Step 2. Type in the size of the free space which you want to share from the D partition and this free space will be directly added to the destination partition.

Step 3. Click "Apply" to execute this operation. In the pop-out window, you can see how much time it will cost you to finish this operation.

Trick 2. Move big installed apps from C drive to another location
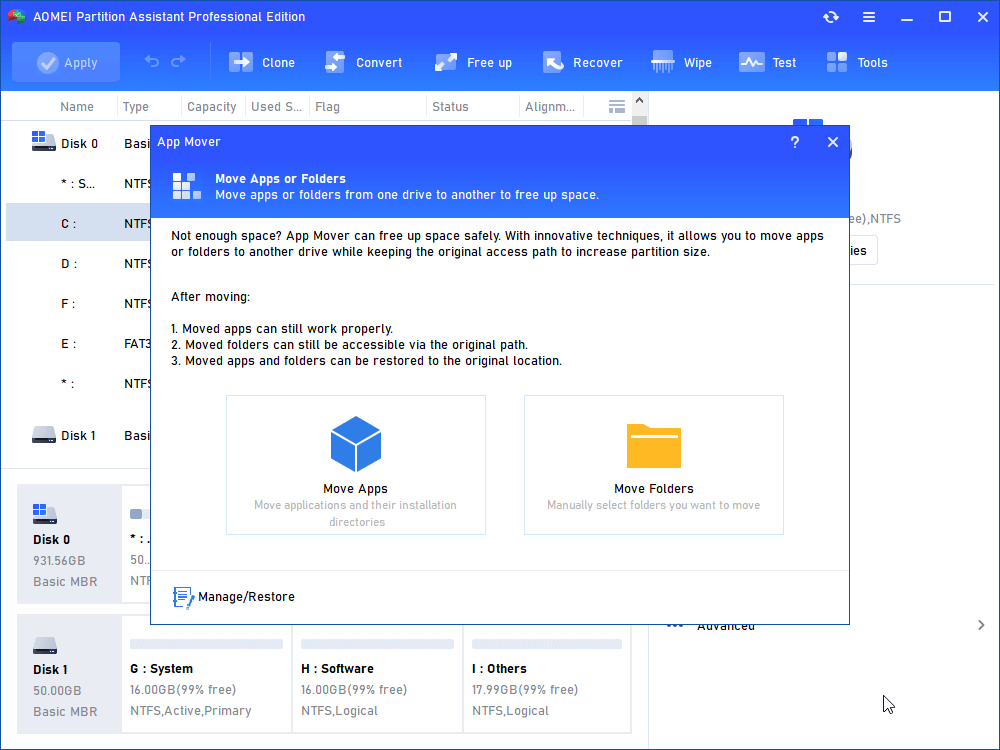
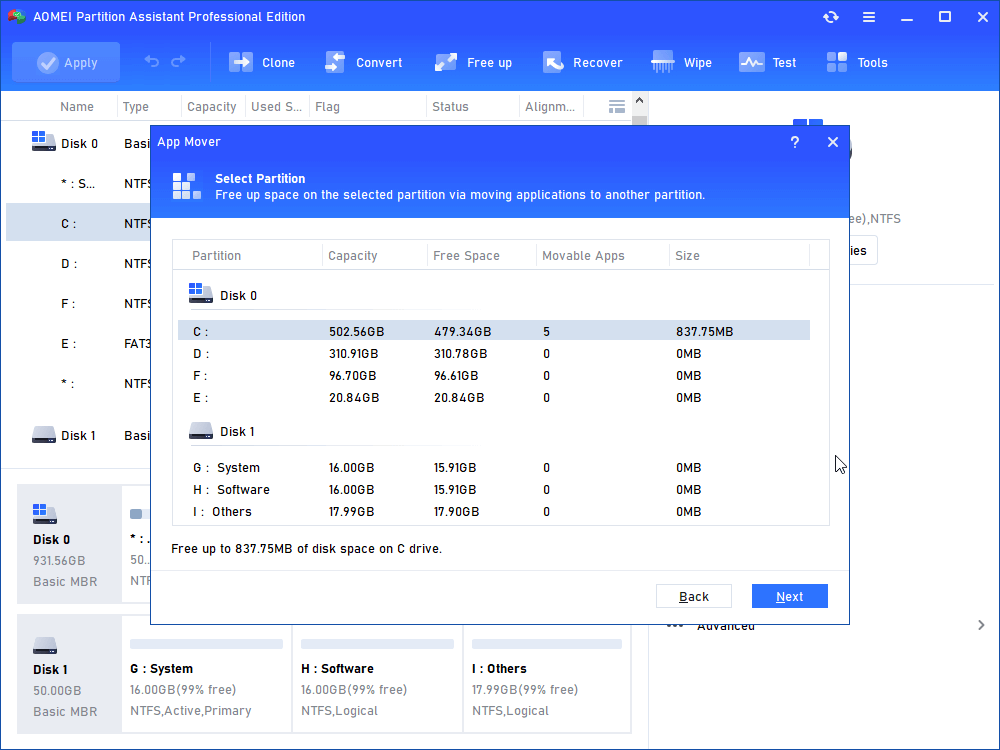
Step 1. Launch Partition Assistant, click “Free up” on the top toolbar, then select the “App Mover” feature.

Step 2. In the new window, click “App Mover”. If you want to move folders, you can choose "Move Folders".
Step 3. In the new window, you will see all partitions, and the number and size of installed programs on every partition will also be displayed. Select one partition that you want to move applications from and click "Next".
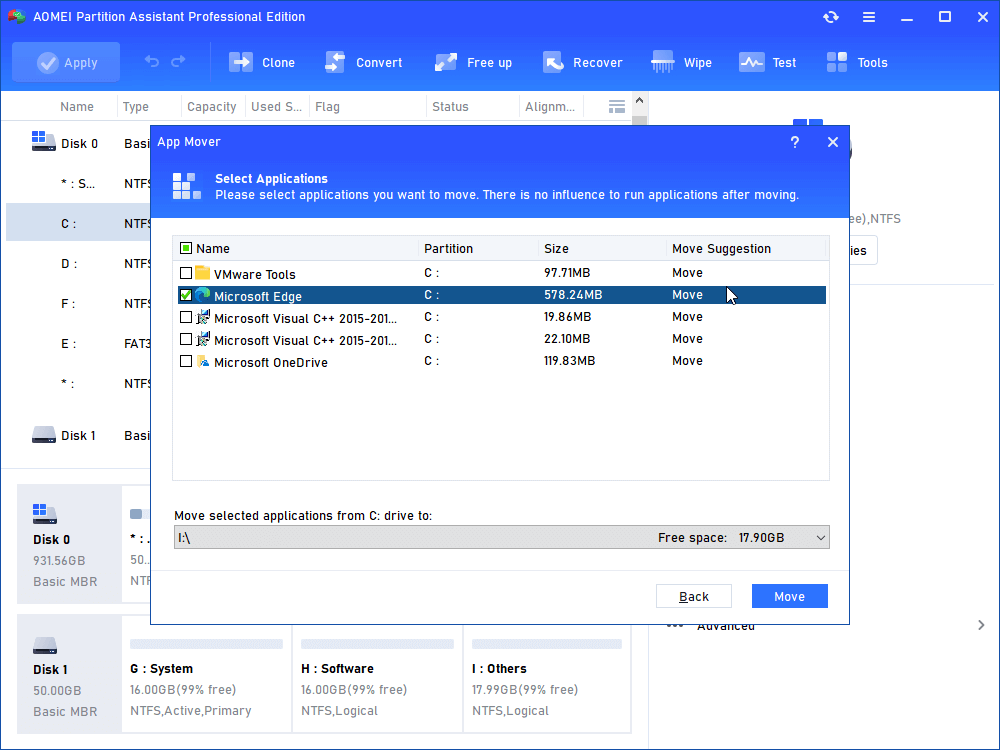
Step 4. Choose the applications you want to move and select the target location, then click "Move".
Step 5. In the pop-up window, you need to confirm forcibly closing running applications when moving starts. Click "OK" to begin the process.
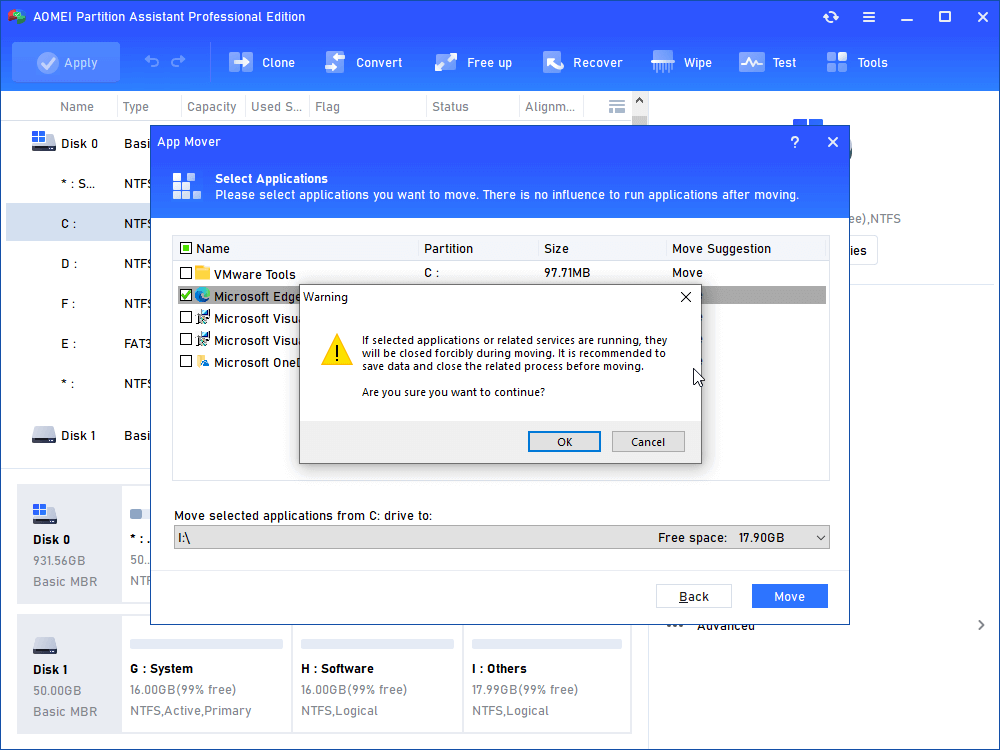
Warning: To ensure the apps run properly during the moving, please don't move or delete files by yourself in the source and target directories. Just leave it all to the software.
To wrap up
If you want to safely delete recovery partition in Windows 10, then this article can help you execute this job. But if you want to remove recovery partition because your disk doesn't have enough space and this situation affects normal usage, then you can turn to AOMEI Partition Assistant for better space plans.
Besides all mentioned functions, AOMEI Partition Assistant also can be used to clone hard drive, clean disks completely, test disk speed, data-safe file system converter, etc. And there is the Server Edition for WIndows Server 2025/2022/2019/2016/2012(R2)/2008(R2)/2003 users to efficiently manage their devices.

