Ways to Initialize Disk Windows 10 and Common Disk Initialization Errors
In this article, you can learn how to initialize disk in Windows 10 via CMD and PowerShell. Besides, we will also teach you how to fix several common disk initialization errors effectively.
By AOMEI / Updated on September 26, 2023
Initialize Disk to MBR or GPT in Windows 10?
When you add a brand new disk to your computer and it does not show up in File Explorer, you need to initialize it before using it. Besides, only initializing a disk won’t make the disk usable. You also need to further partition and format the drive, which will surely erase all your disk data. In the process of disk initialization, you have to make a choice between MBR and GPT partition styles. The following table explains the main differences between those two disk types and helps you make a wise final decision.
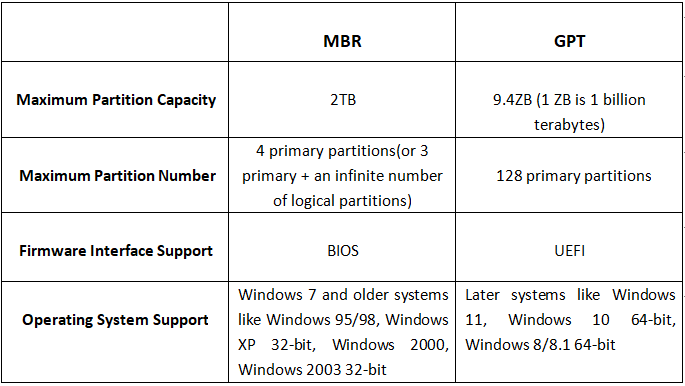
In one word, compared with MBR, GPT is a relatively new partition style. It breaks out the partition and disk size limitation of MBR, being able to support 2TB+ hard drive and hold up to 128 primary partitions. However, all editions (except Windows XP 32-bit) can read and use GPT for data storage, but only 64-bit Windows versions (starting from Windows Vista 64-bit) can use GPT as the system disk. And both all 32-bit and 64-bit Windows versions are data and system compatible with MBR. So, choose one based on your personal requirement.
How to initialize disk Windows 10?
To initialize disk in Windows 10, you can use Disk Management: in the search box on the taskbar, type “disk management”, select and hold Disk Management, then select “Run as administrator” and “Yes”. In the Disk Management, right-click the disk you need to initialize, and then click ”Initialize Disk”.
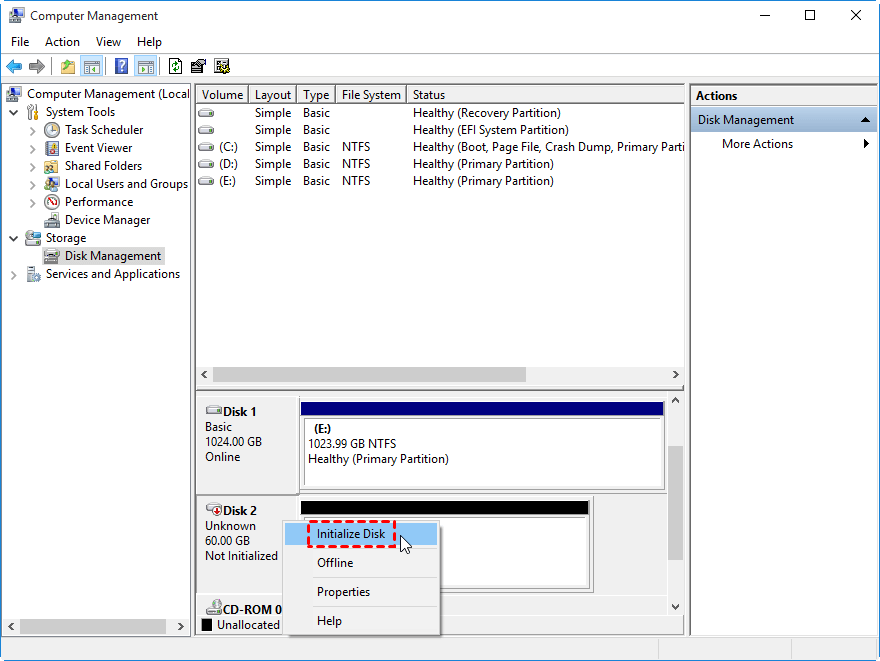
If the disk is listed as ”Offline”, first right-click it and select ”Online”, ensure you select the correct disk and the required partition style. Besides, you can also use CMD and PowerShell to initialize disk in Windows 10. Below are the specific steps:
▌1. Initialize disk via Command line
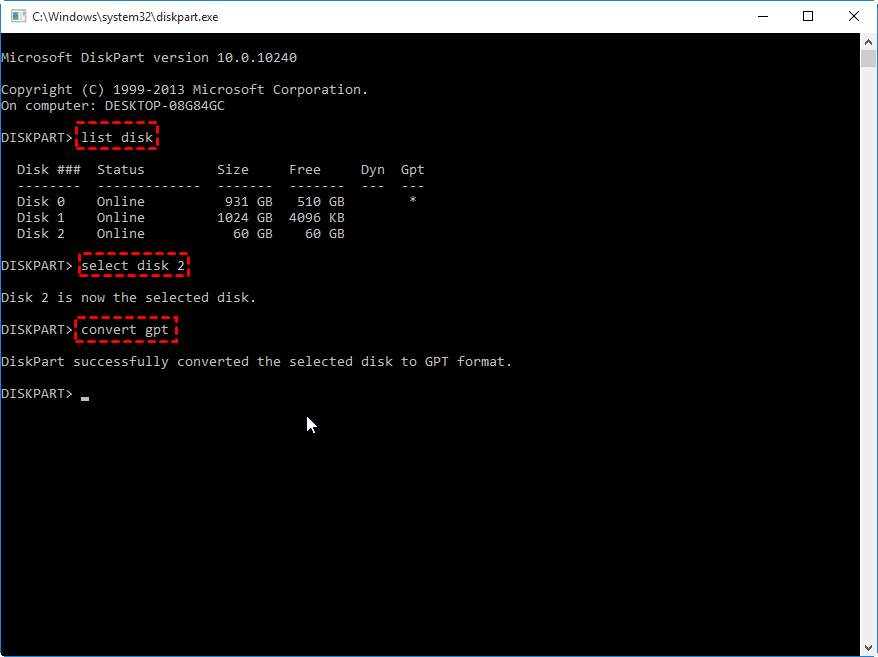
Press Windows key and R key at the same time, input “cmd” and hit on Enter to open Command Prompt window. Execute the following commands in turn and press Enter after each one:
▶diskpart
▶list disk
▶select disk #
▶convert gpt: if you want to initialize disk to MBR, input “convert mbr” instead.
▌2. Initialize disk using PowerShell
Click Search box and input “powershell”, then right-click the “Windows PowerShell” icon and select “Run as administrator” to launch PowerShell window. Type in “get-disk” and press “Enter” to check all disk recognized by the current OS. The uninitialized disk is shown as “RAW”. Then type in “initialize-disk n” (n represents the number of the disk you need to initialize) and press Enter.

Note: This command will initialize the target disk as GPT by default. To initialize disk to MBR, you need to add the "PartitionStyle" parameter: "Initialize-Disk n –PartitionStyle MBR".
As mentioned above, after initializing the disk, you also need to format the partition and then store data on it.
Common disk initialization errors and solutions
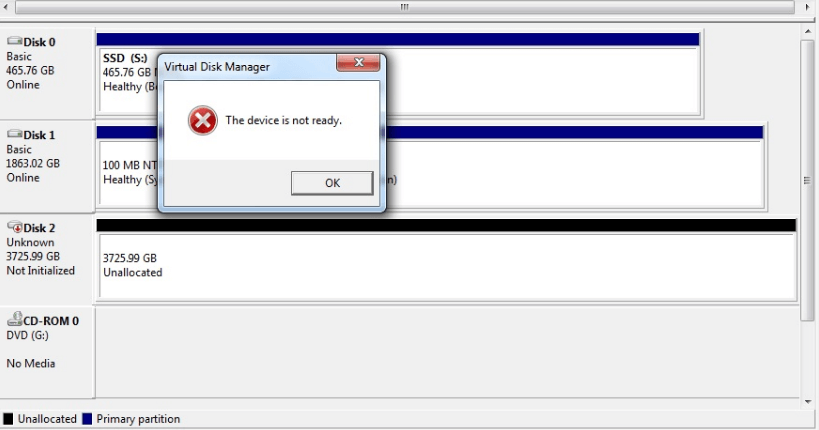
In general, the above methods can help initialize disk in Windows 10, 8, 7 successfully. But sometimes, you might be unable to initialize disk and receive some errors such as “Initialize disk device not ready”, “Initialize disk the system cannot find the file specified”, “Initialize disk incorrect function” and more. Here we would like to share you with several workable solutions for your reference.
▌Solution 1. Check the drive connection
To check whether the error is caused by loose connections or damaged computer USB ports, first disconnect the storage device and reinsert it into your computer correctly via the same USB ports. If the error is fixed, the device or the related USB port is damaged. If the error still persists, try another USB port. If your device can be accessed now, the original USB port must be damaged and causes this problem. However, if this method does not work, either, connect your device to another computer to check if this error is caused by the computer. If the problem does not disappear, go for the next solution.
▌Solution 2. Check CMOS setup
Reboot your computer and long press the F2, Del or other specific key to enter CMOS settings. Navigate to the BIOS Features Setup and check if the Virus Warning is disabled. If it is enabled, change it to Disabled. Then you can try to initialize the disk again with any method listed above.
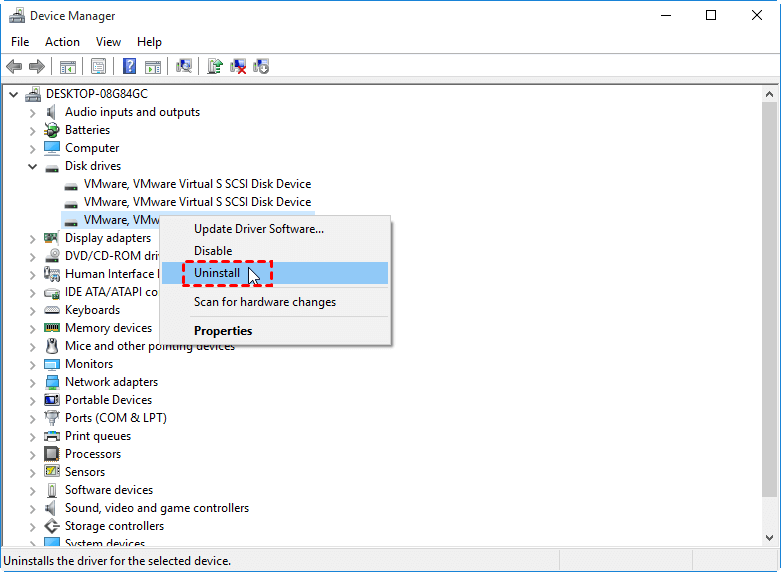
▌Solution 3. Uninstall and reinstall the USB controller driver
Right-click “This PC/My computer”, click on “Manage”>”Device Manager”. Expand the “Disk Driver” and on the right pane to find out the device that is not ready. Right click it and choose “Uninstall”, unplug the drive, reboot your computer, and then reconnect the disk to check the “Initialize disk device not ready” “Initialize disk the system cannot find the file specified”, “Initialize disk incorrect function” errors has been solved.
▌Solution 4. Check drive for file system errors
Double-click “This PC/My computer” to open File Explorer. Right-click the drive and select “Properties”. Click “Tools” tab and “Check” or “Check Now” option under the Error checking to check the possible file system errors. Finally, click ”Scan and repair drive” and then restart your computer to make the changes available.

▌Solution 5. Recover lost partition on the unallocated space
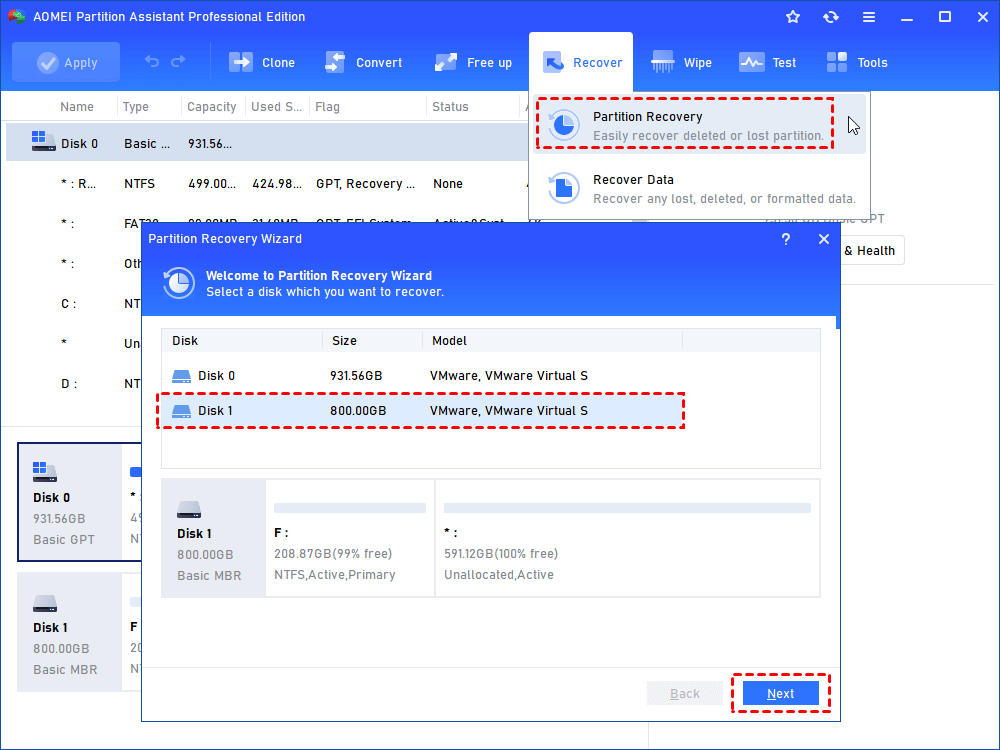
If all the solutions won’t make any difference and the disk is shown as "disk unknown not initialized" and the partition has become "unallocated" space, you can use the AOMEI Partition Assistant Professional to recover lost partition.
Step 1. Install and launch AOMEI Partition Assistant Professional. Click "Recover" > “Partition Recovery”, and select the disk that contains the lost partition. Click “Next”.
Step 2. Here you can select the recommended method “Fast Search” to find out the lost partition. If it fails, then switch to the “Full Search” instead.

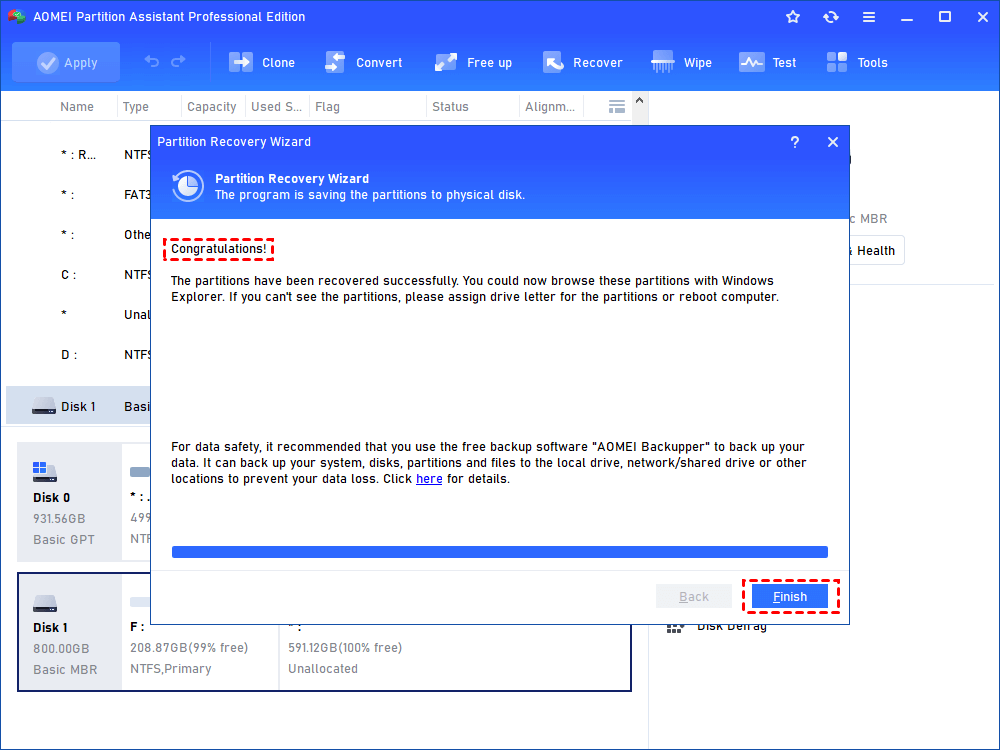
Step 3. Select the lost partition and click ”Proceed”.

Step 4. Click ”Finish” to exit this window after you see the congratulations message.
You can also recover lost data if there is important file have deleted by accidentally.
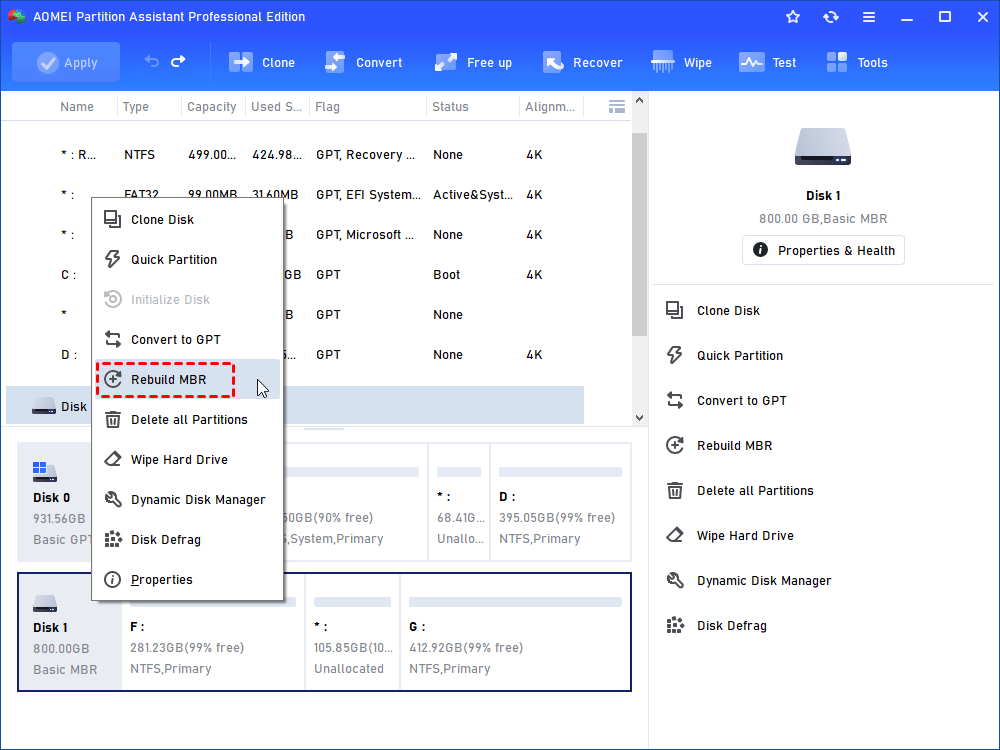
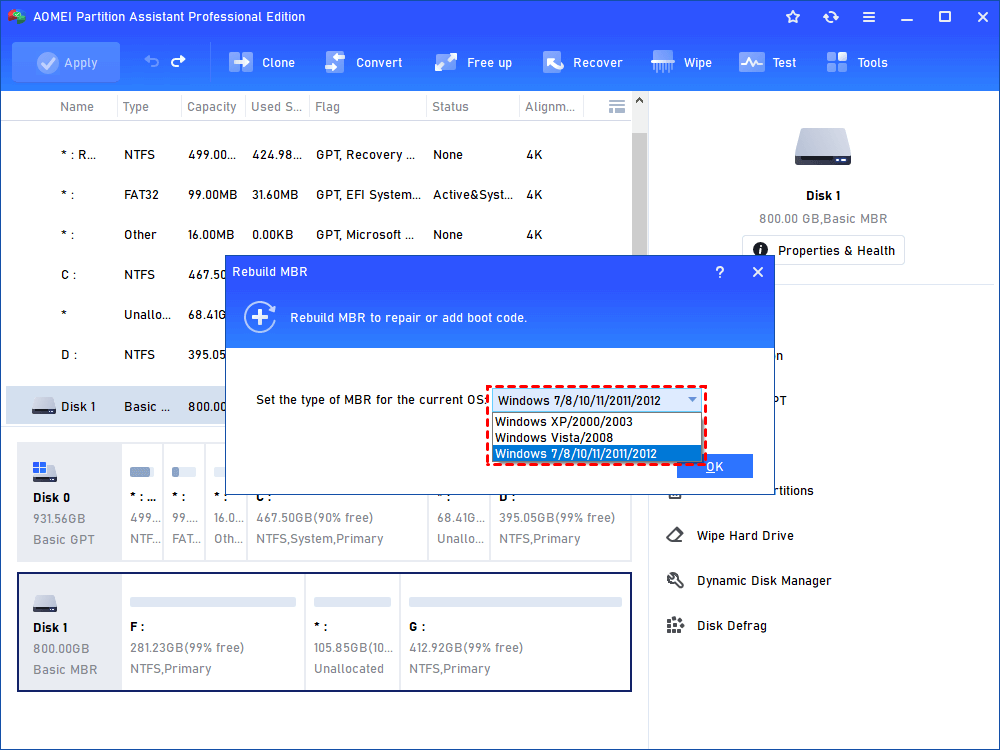
▌Solution 6. Rebuild MBR
MBR (Master Boot Record) is a special type of boot sector at the beginning of the hard drive. It provides the hard disk partition information, used by the operating system to visit this disk and access inside data. If it is damaged, the disk might be shown as “not initialized” and cannot accessed any longer. Then, you can use the above software to rebuild MBR to solve this issue.
Step 1. Launch AOMEI Partition Assistant Professional. Right-click the target disk and select “Rebuild MBR”.
Step 2. Choose the proper MBR type according to the current operating system and click on “OK”.
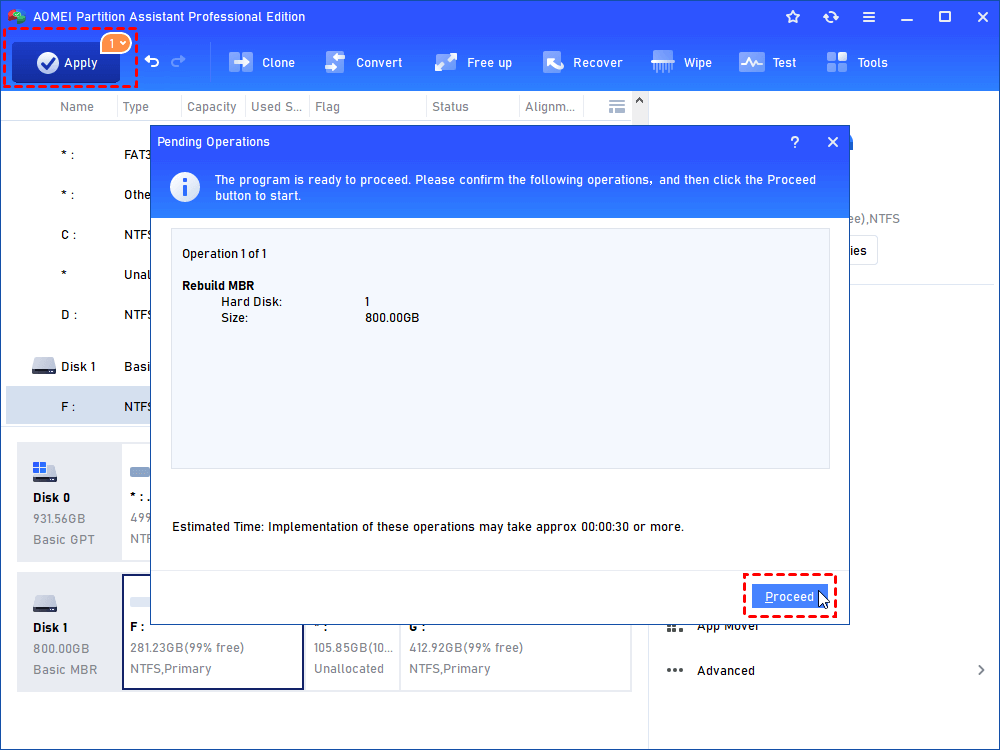
Step 3. Back to the main interface, click on “Apply” and “Proceed” to commit the pending operation.
Summary
In summary, you can use Windows built-in Disk Management, CMD and PowerShell to initialize disk in Windows 10. If you cannot initialize disk as usual and meet the above errors “Initialize disk device not ready”, “Initialize disk the system cannot find the file specified”, “Initialize disk incorrect function”. please try the previous methods to address those problems.

