[Tutorial] Downgrade Windows 11 to Windows 10
This post tells you how to download from Windows 11 to Windows 10 or aother Windows version when you find out that Windows 11 is not suitable for you.
By AOMEI / Updated on June 6, 2024
Can I downgrade Windows 11 to 10?
Almost all new PCs sold in the retail channel now have Windows 11 preloaded. The hardware was engineered to function with Microsoft's most recent operating system, and most consumer devices do not provide the option to install the older Windows 10. PCs designed for the enterprise sector may include this feature, although the cost of these business-class PCs is often greater.
However, many people experience malfunctions, some of which create major problems. As a result, while Windows 11 provides a new experience, many users miss Windows 10. Can you then downgrade Windows 11 to Windows 10, or even install it on a newly purchased PC? Of course, you can!
If you want to downgrade Windows 11 to Windows 10 on an old PC 10 days after you upgraded. Windows allows you to back to a previous version of Windows, you can downgrade your operating system within 10 days from Windows Settings using Windows. old folder. And if you pass this 10-day limit, you can also reinstall a Windows 10.
But, if you have a new Windows 11 PC, you should reconsider if you truly want to do this. When you install Windows 10, you may have difficulties and device incompatibilities, which may be much more inconvenient than any troubles you have with Windows 11.
How to: downgrade from Windows 11 to an old version
If you have decided to downgrade Windows 11 and need assistance to complete the operation, two step-by-step guides are listed in the following content and you can choose one correspondingly.
Downgrade from Windows 11 to Windows 10 within 10-day rollback period
The downgrading process is pretty straightforward if you’ve upgraded to Windows 11 in the past 10 days. If it’s been longer than 10 days, then the process is slightly more complicated as you’ll need to clean install the previous operating system (i.e Windows 10) to uninstall Windows 11.
If you upgrade to Windows 11 from a previous version of Windows, you can downgrade your operating system within 10 days from Windows Settings using Windows. old folder. Here are the detailed steps.
Warning: This way won’t damage your data. Nevertheless, it’s still recommended to back up all important files before the downgrade.
Step 1. Click “Start” and choose “Settings”.
Step 2. In the “Settings” window, click “Update & Security” and “Recovery”.
Step 3. Then click “Get Started” under “Go back to Windows 10 or Go back to Windows 7.
Step 4. Choose why you are downgrading Windows 11 among server reasons or you can write your causes under the “tell us more” box.
Step 5. Click “Next” to continue and wait for the process to complete. During the process, your PC can restart several times.
Step 6. Once the downgrade is finished, log in to your previous Windows account, reinstall your apps and recover your files.
Downgrade OS to Windows 10, 8.1, or 7 from bootable media
If you never had an older version on your computer before Windows 11 installation or it has been more than 10 days, you won’t be able to downgrade to a previous version in Windows Settings. Then, you roll back to an old operating system by performing a clean install.
What you should pay attention to is that this way will cause data loss on your computer. Now, let’s walk through the process. Take installing Windows 10 as an example.
Stage 1. Make a Windows 10 bootable media for installation.
If you have a Windows 10 installation CD/DVD, you can start the process from Stage 2.
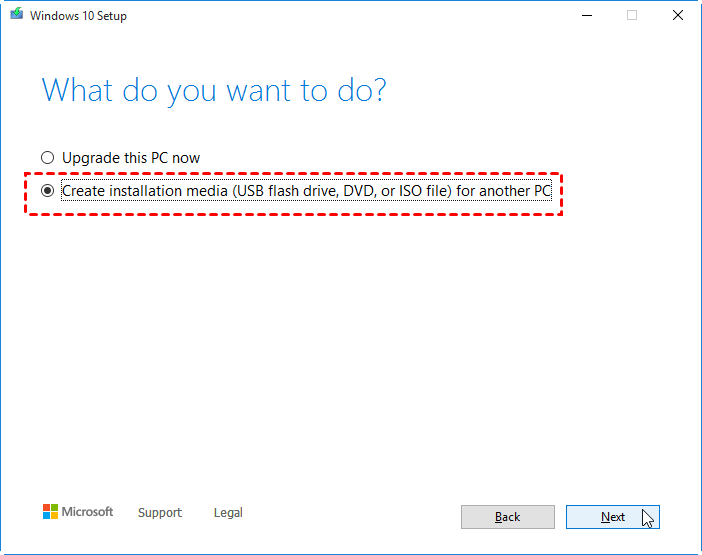
Step 1. Insert a USB drive into your computer. Download the Windows Media Creation Tool from Microsoft and run it.
Step 2. Choose “Create installation media” and click “Next”.
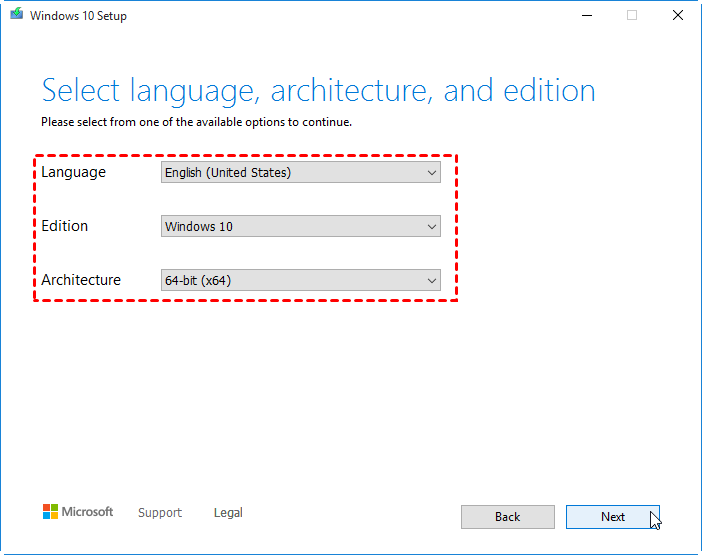
Step 3. Select language, architecture, and edition and click on “Next”.
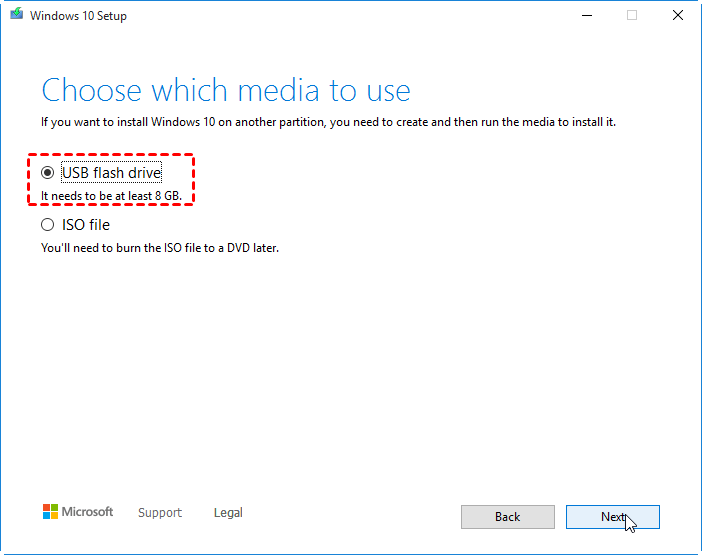
Step 4. Choose “USB flash drive” under “Choose which media to use” and then click “Next”.
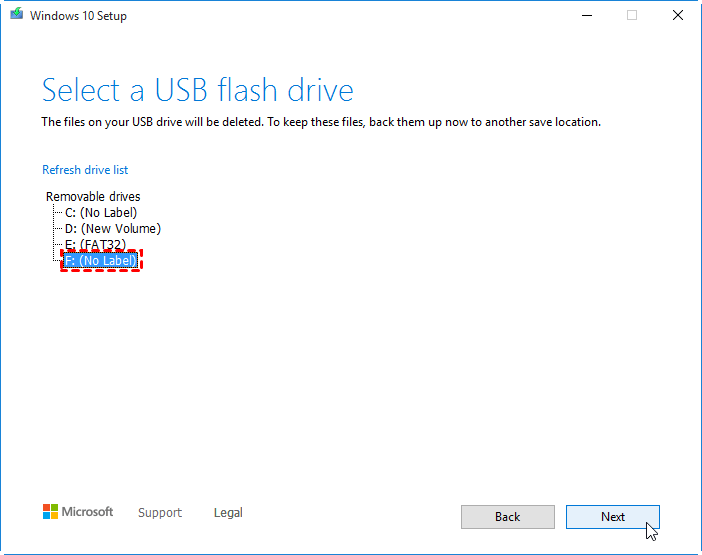
Step 5. Choose the USB drive from “Removable drives” and then click “Next”. Then, wait for the process to complete.
Stage 2. Boot your computer from the Windows 10 bootable USB or CD/DVD
Step 1. Insert the Windows 10 bootable media to your computer. Tap the functional key (typically, F1, F2, ESC or DEL key) while restarting the computer to enter BIOS Setup utility.
Step 2. Go to Boot menu and set the installation USB or CD/DVD as the first boot device.
Step 3. Save and exit from BIOS. Then, the computer will boot from the USB or CD/DVD.
Stage 3. Install Windows 10 on your computer hard drive
Step 1. Once your computer starts again, press any key to start and then click “Install Now” to start Windows Setup.
Step 2. Enter your Windows product key. This is the product that came with the Windows CD. Or you have it in your email when you registered for your Microsoft account.
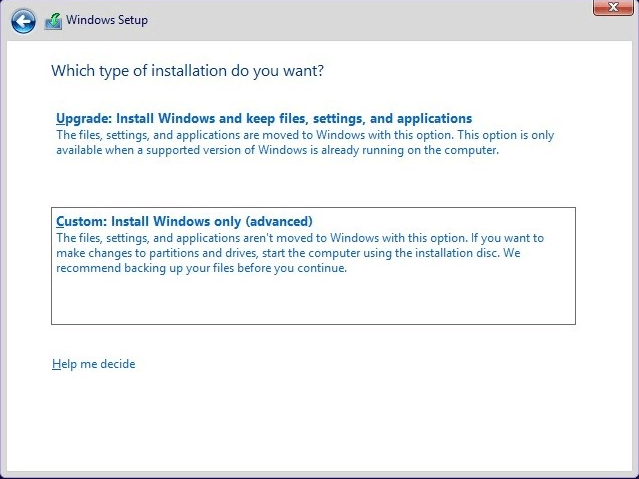
Step 3. Agree to the license terms, click “Next” and choose “Install Windows only”.
Step 4. Choose a primary drive where you need to install Windows 10 and click “Next”.
Step 5. Wait for Windows 10 to install. Once it’s completed, your PC will reboot again.
Step 6. Enter BIOS to choose the computer hard drive as the first boot device.
Step 7. Customize your Windows 10 and log in to your computer account.
Step 8. Wait until Windows 10 get settings and start screen ready. Then, you can use Windows 10 on your computer.
Further reading: Clone the current hard drive for backup
In case of data loss caused by Windows 11 downgrade error, it’s recommended to back up all essential files and folders before the operation. You can clone your existing computer hard drive to an external hard drive to get a copy.
Preparations:
▪ Connect an external hard drive to your computer. Its capacity should exceed the used space of your hard drive in use.
▪ Download hard drive cloning software, AOMEI Partition Assistant Professional.
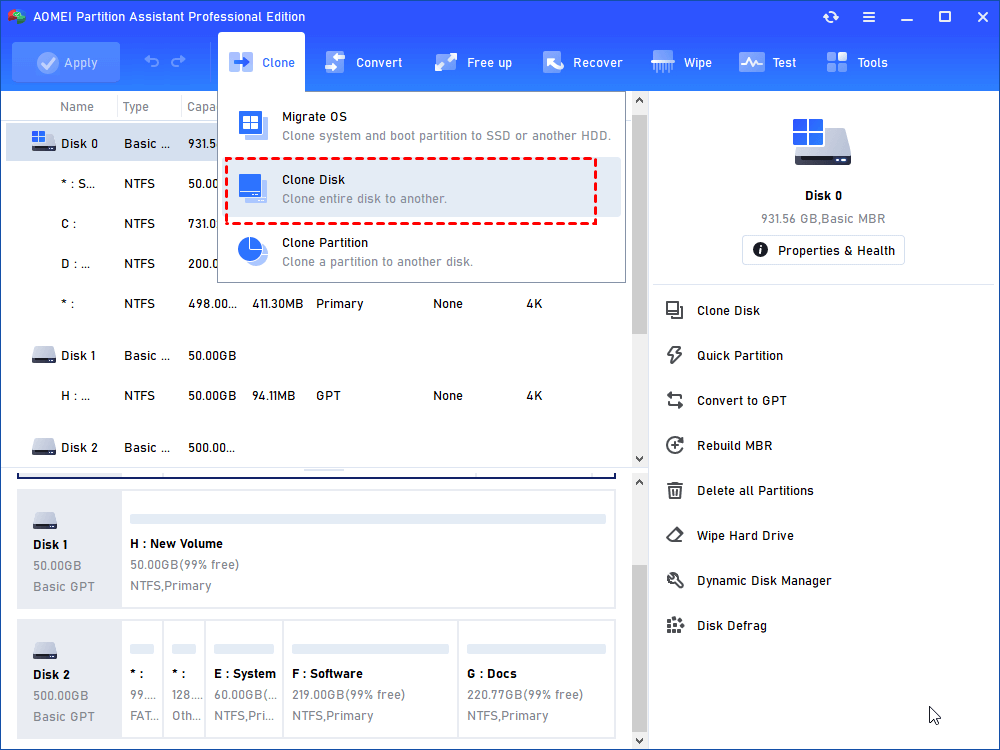
Step 1. Install and run the tool. Go to “Clone” > “Clone Disk”.
Step 2. Choose the hard disk that you need to clone as the source disk and click "Next".
Step 3. Select the destination disk to store the data on the source disk, and then click "Next".
Step 4. Then, you can check the source and destination disk in the next window or change to “Sector to Sector clone”, and click the "Confirm" button to continue if there is no problem.
Step 5. At last, click "Apply" and "Proceed" in the main interface to start cloning the hard drive.
To sum up
If you regret upgrading to Windows 11, you can try the solutions in this post to downgrade to Windows 10. We suggest you make a backup no matter for upgrading or downgrading. AOMEI Partition Assistant will help you keep your data and disk safe.
Besides backup service, this handy tool also can help you create a Windows 11 to go USB, you can directly run this Windows 11 USB on any PC, even on a Mac, to enjoy Windows 11 without any effects on your current system.
FAQs about downgrade Windows 11
Is it possible to downgrade Windows 11 without losing data?
Answer: Downgrading may involve reinstalling the operating system, so it's crucial to back up data before starting the process. However, some downgrade methods may allow data retention. It's recommended to follow a backup strategy to prevent data loss.
Are there any risks associated with downgrading Windows 11?
Answer: Downgrading may lead to data loss if not done carefully. Users should be aware of potential risks, such as compatibility issues with hardware or software that may arise after the downgrade.
Can I downgrade Windows 11 to an older version, like Windows 8.1 or Windows 7?
Answer: The downgrade process is typically supported for the immediate previous version, such as Windows 10. Downgrading to older versions may not be straightforward and may not be officially supported by Microsoft.

