How to Create Windows 11 Bootable USB [2026 Step-by-Step]
Windows To Go Creator can help you make a bootable USB from Windows 11 ISO file. After that, you can boot Windows 11 from it anywhere and anytime.
By AOMEI / Updated on December 29, 2025
Creating a Windows 11 bootable USB drive allows you to boot Windows 11 from USB and install Windows on another computer. This article will give a detailed solution for creating a bootable USB.
How to make USB bootable for Windows 11?
With the rise of third-party software, you can create Windows 11 bootable USB by yourself. Some people may know that Microsoft's built-in Windows To Go can create a bootable USB, but they don't know that Windows To Go does not support Windows 11. For some supported systems, a USB flash drive or external hard drive certified by Microsoft is also required.
Fortunately, the third-party tool breaks this restriction, not only supports all Windows system but also can use any device.
Guide 1. Preparations before Making USB Bootable
First, get your USB ready for bootable USB.
1️⃣You need to prepare a 13 GB or larger USB drive (The USB 3.0 drive is recommended because of its faster read and write speed). And all data on this USB will be erased, please make a backup in advance.
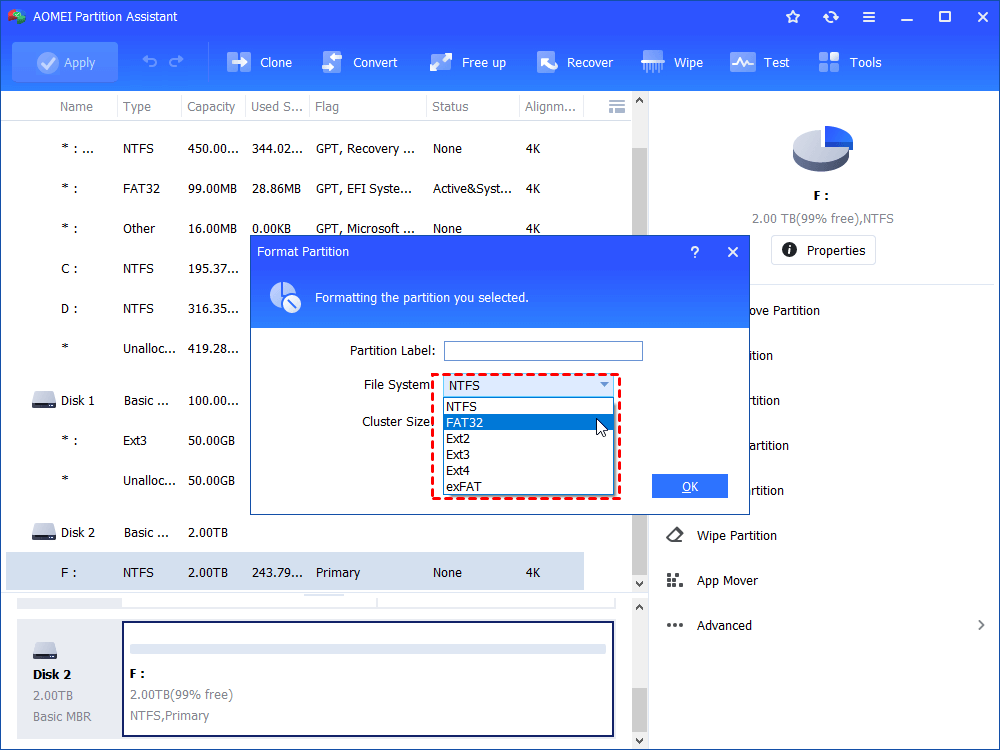
2️⃣What format should a bootable USB be for Windows 11? Ensure that the USB drive is formatted as FAT32 and uses the GPT partition style, as this is required for UEFI booting. When Disk Management and CMD can't format USB larger than 32 GB to FAT32, you can use a third-party formatting tool - AOMEI Partition Assistant, a stable formatting utility. It can format 64/128/256 GB USB to FAT32.
Right-click on the target hard disk and select the "Format Partition" option, select FAT32 and click "Apply" to submit the pending operation. Formatting can be easily done in just three steps.
3️⃣If you plan to create a brand-new system, you need to download Windows 11 ISO file:
https://www.microsoft.com/en-us/software-download/windows11
Guide 2. Create Windows 11 bootable USB step by step
In this part, we will provide two solutions to introduce how to create bootable Windows 11 USB. Creating a bootable USB can be complicated if you are not a professional; we need to choose trusted third-party software. Of course, you can also opt for a manual command prompt.
Method 1. Using Professional Bootable USB Creator Tool
AOMEI Partition Assistant Standard is a powerful disk partition management software (compatible with Windows 10/8.1/8/7, XP and Vista). In addition to Windows 11, it can also create a bootable USB for Windows 10/8/7, and the operation methods are the same. More importantly, AOMEI Partition Assistant Standard also supports to resize the size of your partition, Wipe hard drive, etc.
Please note: Windows 11 only supports UEFI boot mode. If you want to install Windows 11 directly on your computer, please make sure your system disk is GPT disk, otherwise please convert MBR to GPT without data loss.
Next, I will show you the detailed steps to create a Windows 11 bootable USB drive.
Step 1. Plug the USB drive into a USB 3.0 port on the computer. Make sure it is detected by your PC.
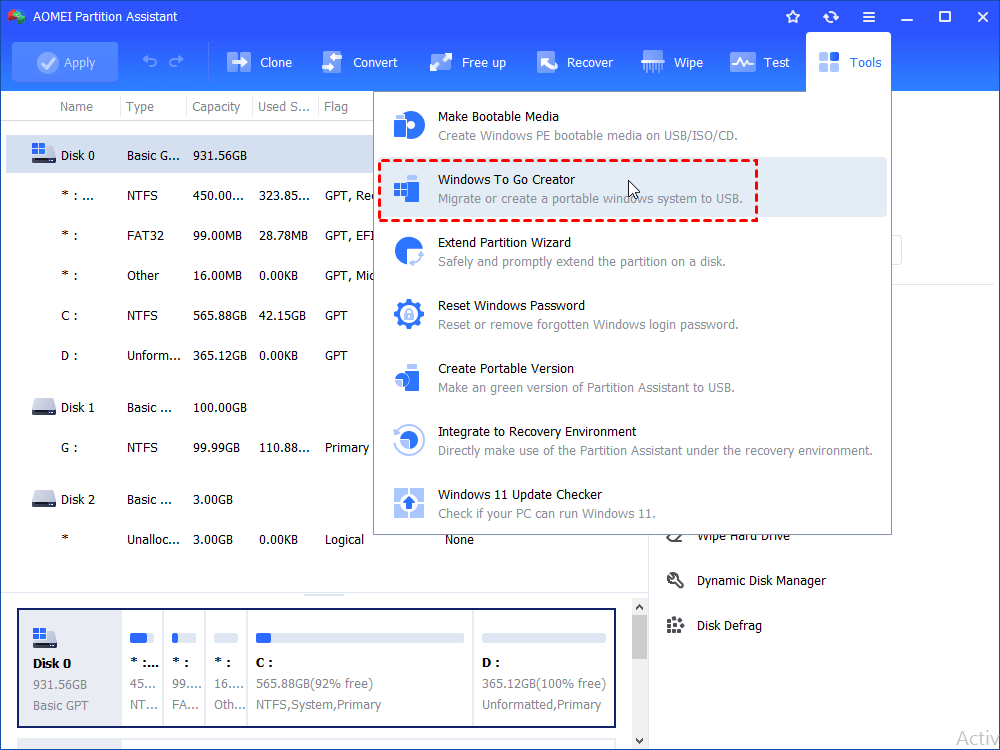
Step 2. Install and launch AOMEI Partition Assistant Standard. Then, click “Windows To Go Creator” from the "Tools" menu.
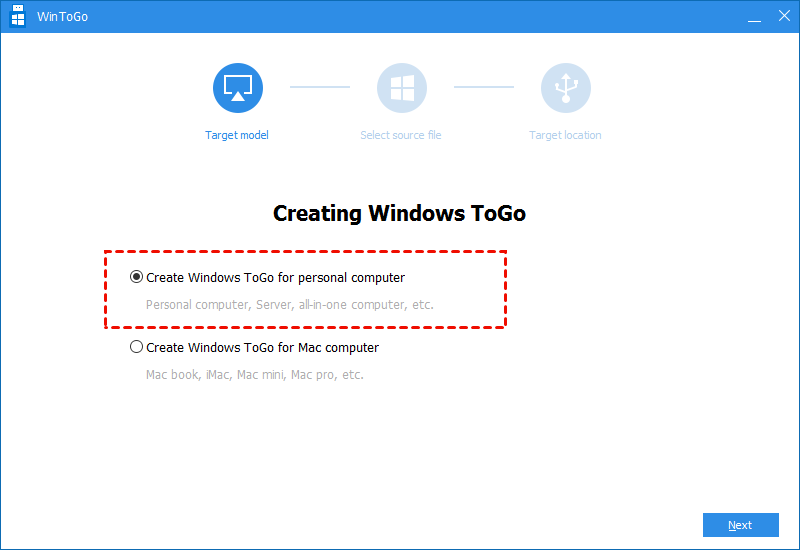
Step 3. Choose “Create Windows To Go” for personal computer and click “Next”.
Step 4. Choose the first option “Create Windows To Go with system disc/ISO”. Click the folder icon to select ISO manually. After that, click “Next” to continue.
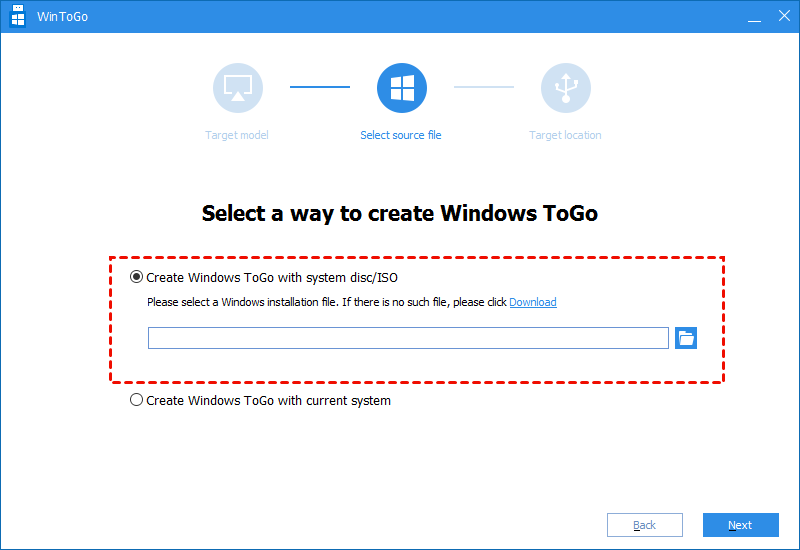
Tip: If you want to choose the second option Create Windows To Go with current system, please upgrade to AOMEI Partition Assistant Professional.
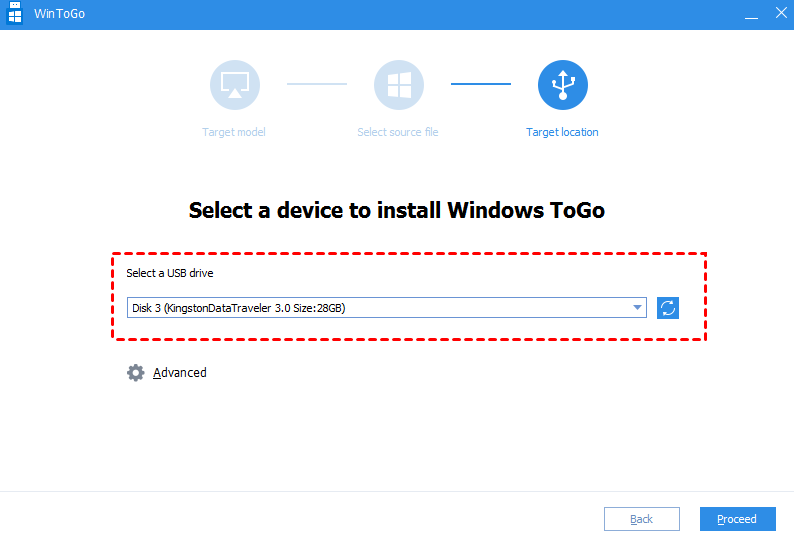
Step 5. Select a USB drive as target and click “Proceed”.
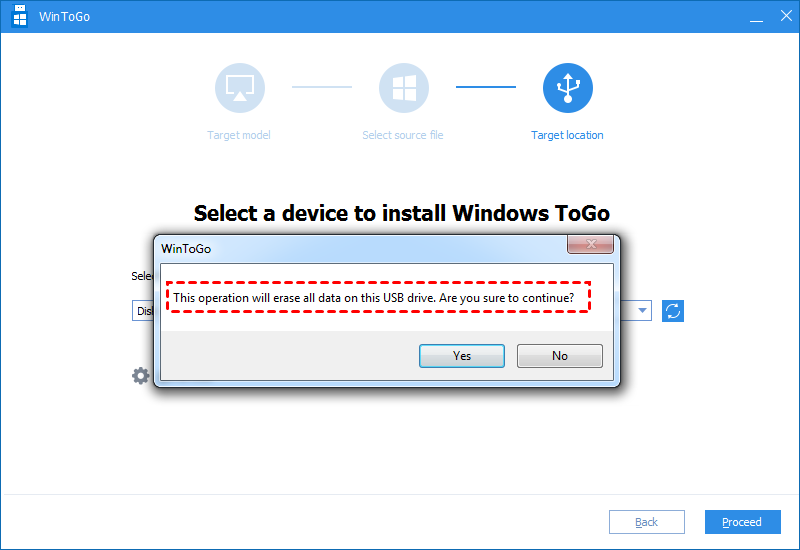
Step 6. Read the prompt carefully, and then click “YES”.
The above is the whole process of using Windows To Go Creator to create Windows 11 bootable USB. It only takes a few simple steps to help you solve your troubles. If you are using Windows Server, like Server 2008, Server 2012, Server 2016, Server 2019, you can turn to AOMEI Partition Assistant Server.
Method 2. Create Windows 11 Bootable USB with Command Prompt
But you can also create a Windows 11 installation media and use this USB drive to install Windows 11 on other computers. The following is a guide on how to create a bootable Windows 11 USB via the Diskpart command prompt:
Note: It is essential to prepare a 3.0 USB and download the Windows 11 ISO file from the official website after it is released.
Step 1. Insert the USB into the USB port of the computer to ensure that the computer can detect it.
Step 2. Click on the start bar on the desktop and enter “CMD”, then right-click and select “Run as administrator” to open Command Prompt.
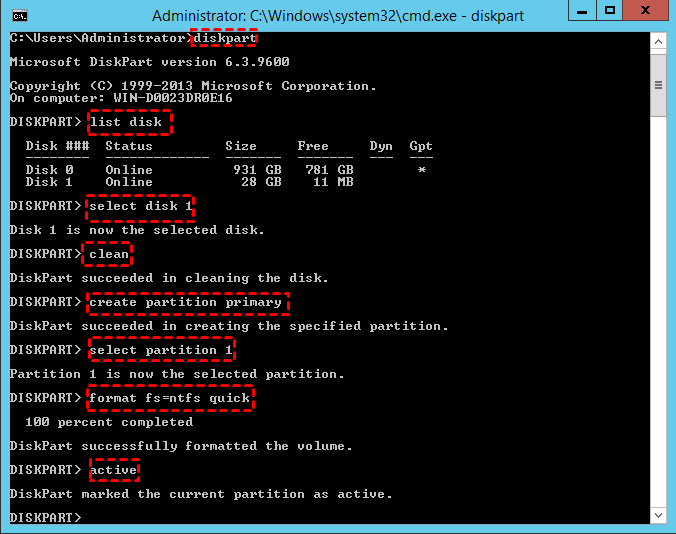
Step 3. Type “diskpart” and press Enter. Then type the following instructions.
●list disk
●select disk X. (X is your USB drive letter)
●clean
●create partition primary
●select partition 1
●format fs=ntfs quick(if you want to create UEFI bootable USB, type “format fs=fat32 quick”).
●active
Step 4. Finally, type “exit” and hit enter to close diskpart.
Step 5. Type “xcopy X1:\*.* X2: /s/e/f” in the Command Prompt (X1 is the drive where the ISO file is located, X2 is the drive letter of the USB), and then press Enter.
Step 6. Type “X1:\Boot\Bootsect /NT60 X2: /force /mbr” to write the boot loader to your USB drive.
Now, you should already know how to create a bootable USB, which allows you to open Windows 11 directly on other computers without installation. If you think this method is complicated, try AOMEI Partition Assistant - which provides a one-stop service for Windows computers, including formatting hard drives, creating bootable USB and changing the boot order.
Bonus Tip: How to Boot and Install Windows 11 from Bootable USB
After that, you need to insert this USB into a new PC, and boot from it, and follow the installation instructions to complete the installation of Windows 11.
Guide 1. How to Boot from USB on Windows 11
When your computer fails to boot, you need to access the BIOS to boot Windows 11 from USB.
Step 1. Connect the bootable USB drive to the correct USB port. Boot your laptop by pressing the power button and click the appropriate boot menu key to access BIOS setup.
Step 2. Find the boot order option and move the bootable USB drive you want to boot from to the top of the list.
Guide 2. How to Install Windows 11 from Bootable USB
Here we will install the system using Windows 11 Bootable USB.
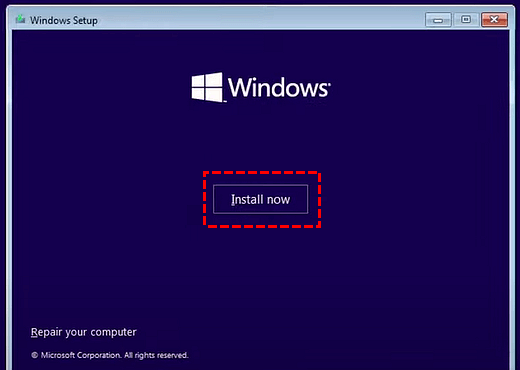
Step 1. Restart your computer and install Windows 11 according to the Windows setup window.
Step 2. Select the language etc., click Next and click Install Now.
Step 3. Select the "I don't have a product key" option and select the version you want to install. Follow the prompts to complete the Windows
Why create Windows 11 bootable USB?
Windows 11 is the biggest change for Microsoft in the past ten years, the window interface is designed with rounded corners, and the taskbar is centered. Win 11 not only created a new system featuring "modern, refreshing, clean, and beautiful" for users, but also added many new features that you didn't expect.
However, due to Windows 11 is more focused on keeping users' data safe, its system requirement is different from the previous Windows system. The purpose of creating a Windows 11 bootable USB is that you can use it by plugging in the USB if the PC does not meet the Windows 11 installation conditions, because the bootable USB is extremely portable and compatible, almost every computer has a USB slot.

