How to Download and Install Windows 11 for Free?
Windows 11 is so powerful that many computer users can’t wait to upgrade their machines to it. However, most people haven’t ever performed any OS upgrade and so, they have no idea how to download and install Windows 11. In this post, 2 easy and explicit ways will be given to help get it done.
By AOMEI / Updated on May 12, 2023
How can I download and install Windows 11?
“As you all know, Microsoft’ latest OS Windows 11 is coming soon. I’m so excited about those new features, for example, the optimized UI. However, I have never been through any OS upgrading process and so, I have no idea where I can download Windows 11 and how to install it on my PC. Is there anybody who can make a brief introduction?”
New features of Windows 11
Windows 11 is already around the corner which is going to be released in October 5th. Windows 11 includes a slew of new features. So, here, in the following contents, I listed all features you may use after installing Windows 11.
1. A new, more Mac-like interface.
2. Integrated Android apps.
3. Microsoft Teams integration.
4.Xbox tech for better gaming.
5. Better visual desktop support.
6. Easier transition from monitor to laptop, and better multitasking.
7. Widgets.
Now, you see, compared with Windows 10, Windows 11 is much more powerful and user-friendly. It’s time to download and install Windows 11 to have a try. But how? Don’t worry, in the following post, the top 2 ways for Windows 11 download and install are given along with their step-by-step guides.
How to download and install Windows 11 free upgrade early?
Windows 11 is attractive but you have to wait until October 5th to meet the standard version. However, if you can’t wait until then, you can switch to the Release Preview in Windows 10 today and get the free Windows 11 upgrade early.
Here, you’ll learn how to download and install Windows 11 upgrade early.
1) Use Microsoft’s PC health app to see whether your PC is compatible with Windows 11.
2) If your PC supports Windows 11, you must register as a Windows Insider over at Microsoft’s site to get the Windows 11 upgrade early.
3) On your current Windows 10 PC, follow “Settings” > “Update & Security” > “Windows Insider Program”.

4) Hit the “Get Started” button and link the Microsoft account used to sign up to be a Windows insider.
5) When prompted to pick your insider settings, select the Release Preview ring.
6) Reboot your computer after confirming and agreeing to Microsoft’s terms.
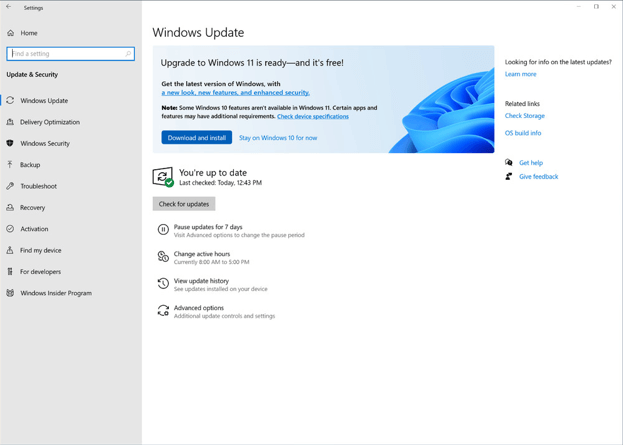
7) Head back into “Settings” > “Update & Security”, and you should see a new banner with the optional update to Windows 11.
8) Hit the “Download and Install” button and follow the onscreen guide to get Windows 11 early.
How to download and clean install Windows 11?
Generally speaking, cleaning install Windows has many benefits. For example, spyware and registry files get cleared efficiently and it brings faster startup due to lack of startup programs and applications. So, here, you’ll learn to download and clean install Windows 11 in the easiest way.
Part 1. Download the Windows 11 ISO
1. Head to Windows 11 Insider Preview ISO download page.
2. Scroll down to the “Select edition” section at the bottom of the page.
3. Select the version of Windows 11 you want to install in the dropdown menu.
4. Select the desired language and hit “Download”.
Part 2. Burn the Windows 11 ISO to a bootable USB stick
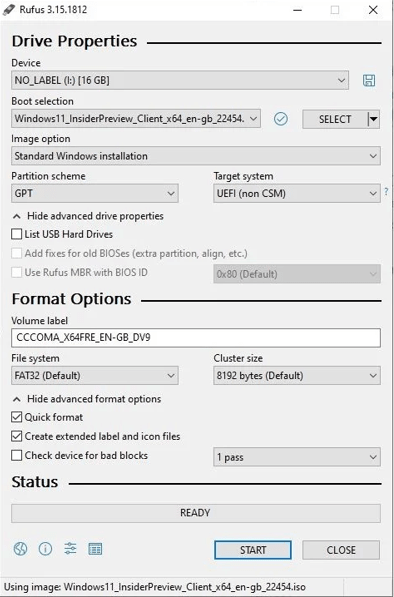
Once the ISO download is completed, you need to create a bootable Windows 11 USB flash for installation. There’re a plenty of tools you can choose to create a bootable ISO, but in this example, let’s take Rufus.
A USB stick with at least 8GB free space is also required. The USB will be completed wiped during the burning process. In this case, you’d better take a backup of it before proceeding.
1. Plug the USB stick.
2. Launch Rufus
3. Hit the “Select” button, navigate to the location of your Windows 11 ISO file and select it.
4. Rufus is going to update the drive and burning properties automatically. Hit “Start” once you’re ready to go ahead.
The ISO burning process may take several minutes, so, be patient.
Part 3. Install Windows 11 using the bootable USB
When you come to this part, everything becomes easier for you just need to follow the onscreen guide to get it done.
1. Now, ensure the computer where you’re installing Windows 11 is switched off to begin with. Plug the Windows 11 installation media.
2. Boot your PC and enter BIOS by tapping the BIOS/UEFI entry key.
3. In the BIOS/UEFI settings, set the USB stick into the primary boot position.
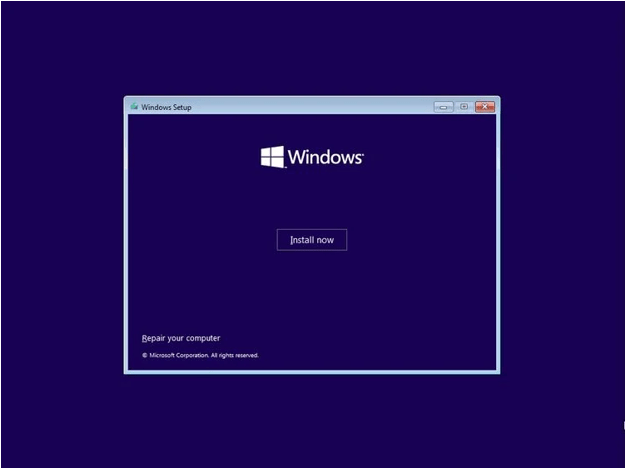
4. Save and exit BIOS/UEFI. Your PC will restart. Afterwards, you’ll boot into the Windows 11 installation process.
5. When the OS installation begins, select “Install Now”. On the next screen, select “Custom” to proceed. You’ll also be asked for a Windows product key. If you don’t currently have one, you can input it later.
6. Next, you should preset the drive where Windows 11 is installed. After that, click on “Next’.
7. The Windows 11 installation will start.
Best way to partition a hard disk after Windows 11 installation
After succeeding in installing Windows 11 and booting into the OS, you may find there is only one disk, namely the C drive, which is the system drive on your PC. If you leave it alone, then, everything will be installed to the C drive and over time, issues like C drive full occurs which can cause much trouble including constant system crashes and slow speed.
So, how to create more partitions for your PC? Of course, many people would think of the Windows built-in program utility Disk Management with which, they can shrink the C drive first and then, use the created unallocated space to create another volume. And if they want to create more than one partitions, they should repeat this step which seems literally tedious and complex. Luckily, this time, I’ll introduce a much easier software utility, AOMEI Partition Assistant Professional, with which, you can create up to 6 partitions at once with the “Quick Partition” feature.
Step 1. Install and launch AOMEI Partition Assistant Professional.
Step 2. Select the disk you want to create more partitions on and right-click on it. Select “Quick Partition".
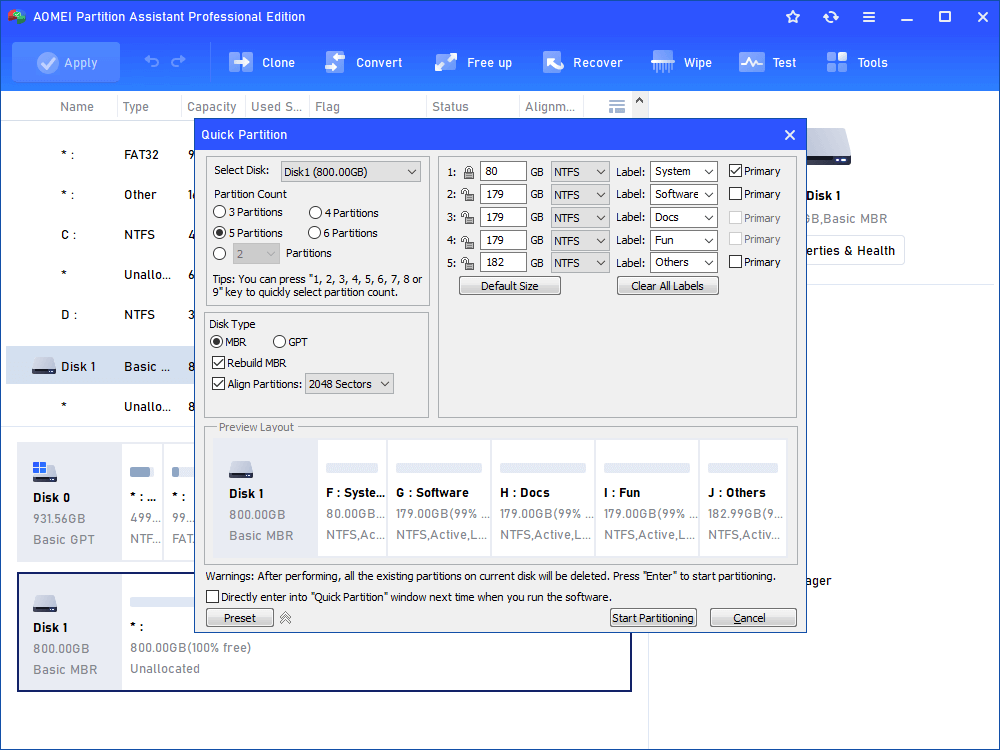
Step 3. Then, in the popup window, you can preset the partition count and file systems.
Step 4. Hit “Start Partitioning” to start the portioning process.
It won’t be long before the process gets completed. If you only want to create one partition every time, you can try the feature of “Split Partition”.
Conclusion
What’s the best way to download and install Windows 11? Hopefully, you’ve gotten the very answer after going through the entire tutorial. This time, 2 practical ways are provided and you can select either of them based on your own requirements. Meanwhile, in the final part of the article, a third-party software utility AOMEI Partition Assistant Professional is introduced for Windows 11 partitioning. If you want to use this software on Servers, please try the Server Edition.

