How to Fix Windows 11 Disk Usage 100%?
How to fix Windows 11 disk usage issue if your PC becomes literally slow? What’s the possible culprit? In this post, 8 ways will be given so that you can reduce disk usage in Windows 11/10/8/7 on your own.
By AOMEI / Updated on June 5, 2024
What’s disk usage and how to check it?
Don’t confuse Windows 11 disk usage with disk storage which is a common mistake made by users. Disk usage is the percentage of the disk in use by the system. For example, some part of a disk may be used to run an app or perform disk read/write tasks. On the contrary, Disk Storage is the amount of data that can be stored on the disk.
Performance of a system can be drastically influenced by disk storage. Usually, disk storage should be less than 15% (a momentary increase shouldn’t be worried about). However, if the high disk usage lasts for a period of time, then, it’s likely to affect the system’s performance and your work.
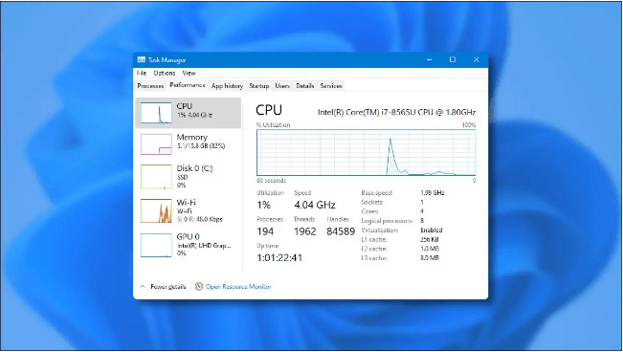
How to check disk usage? Just launch “Task Manager” by hitting “Ctrl + SHIFT + ESC” simultaneously. Under the “Process” tab, locate the “Disk” column, and you’ll notice the percentage.
Possible causes to Windows 11/10/8/7 high disk usage
High disk usage of Windows 11 brings so much inconvenience and before we figure out some ways to fix it, you should first understand what causes this issue. Here, several major causes are listed.
1. Too many startup program exist.
2. Windows 11 is infected with virus or malware.
3. Drivers are outdated.
4. Too many apps and software are running at the same time.
5. Certain services are taking up storage of the disk.
How to fix Windows 11 disk usage?
Windows 100% high disk usage is a headache in terms of what mentioned above. Now, it’s high time that we found some proper solutions to fix it. But before going further, please first try rebooting the PC and disabling anti-virus software to see whether the issue will be fixed. If they don’t work, please read on for more practical solutions will be provided.
Way 1. Run virus scan
It could be virus or malware that causes Windows 11 high disk usage. Running a full OS scan is likely to resolve the issue. Windows has its built-in Windows Security which is as effective as third-party anti-virus software.
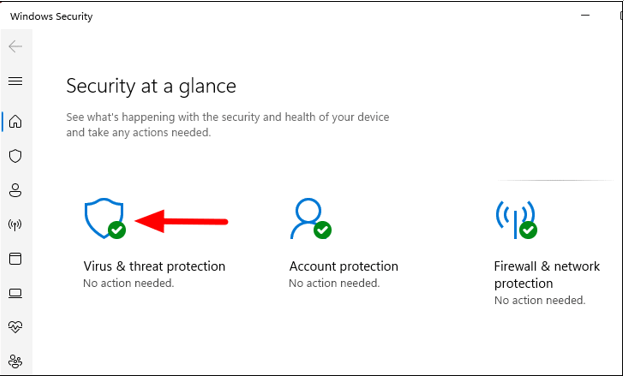
1. Search for “Windows Security” in the Start Menu and then select the result to run the app.

2. In the window of “Windows Security”, select “Virus & threat protection”.
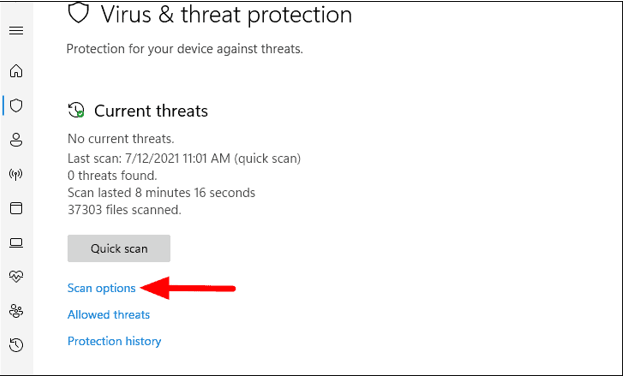
3. Then, click on “Scan options” to see all types of scans available on the system.
4. Select “Full scan” and then, hit “Scan now”.
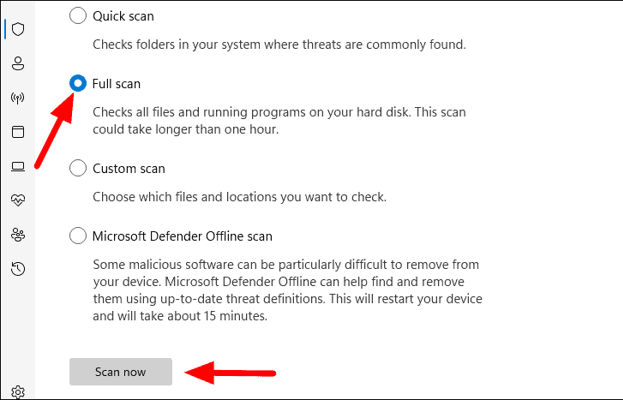
The scan will start immediately and it may take several minutes to complete it. Once completed, you’ll be informed whether there’s any virus detected and what actions you should take to kill the virus.
Way 2. Reset virtual memory
Virtual memory is a portion of your hard drive and is also taken as extension of your PC’s physical memory. It sometimes can become another cause to Windows 11 high disk usage. In this case, it’s imperative to reset virtual memory.
1. Press “Windows + I”.
2. From the Windows Settings app, select “System”.
3. Hit “About” in the left list.
4. Scroll down and select “Advanced system settings”.
5. Hit “Settings” under “Performance”
6. Select the “Advanced” tab in the popup window.
7. Hit “Change” in the Virtual memory segment.
8. Uncheck the bot “Automatically manage paging file size for all drives”.
9. Tick “Customize size” and set the maximum size to a larger number.
Note: There’s no need to set a very big number and you just need to keep it about 1.5 times the size of your RAM.
10. Once done, hit “Set” and then, hit “OK” for confirmation.
11. Shut down all windows and press “Win + R” to launch the “Run” dialog.
12. In the box, type “temp” and hit “OK”
13. Hit “Ctrl + A” to select all folders and files in “Temp”.
14. Delete them all.
15. Once done, restart your Windows 11 computer and check whether the problem is resolved.
Way 3. Turn off Windows 11 notification and tips
When using Windows 11, you may often notice notification and tips pop up on the lower right of the desktop. This feature is quite practical for users to keep track of system and application updates. However, it can also be a cause to Windows 11 disk 100 usage. In this case, you might as well turn off Windows 11 notification and tips.
1. Launch the “Settings” app and select “Notification” under the “System” tab.
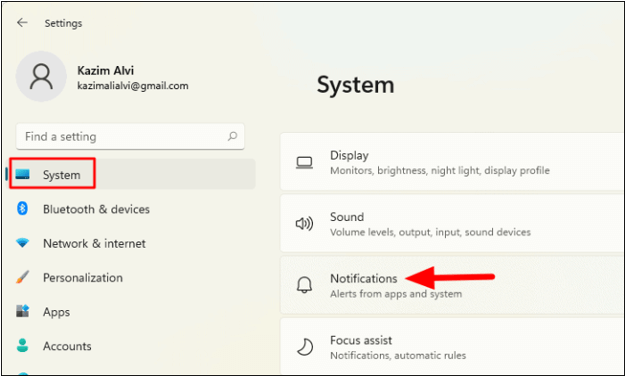
2. Scroll down and uncheck the option “Get tips and suggestions when I use Windows”.
Now, check whether the high usage issue is resolved.
Way 4. Reset the power plan to high performance
If you’re one a “balanced” power plan, you can lower the disk usage by switching to “High performance” although it will consume power more quickly and discharge your computer sooner.
1. In the Start Menu, search for “Choose a power plan” and select the relevant search result to launch the power setting app.
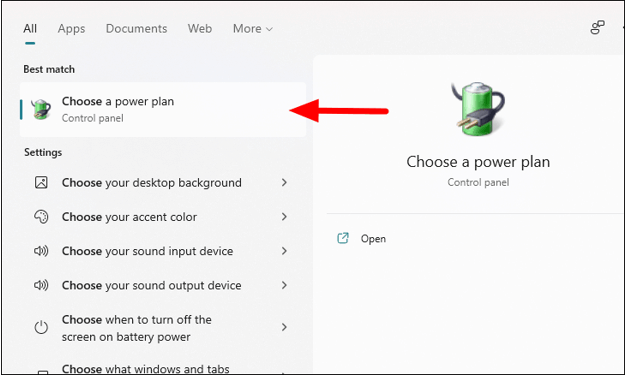
2. Now, select “High performance”.

Way 5. Turn off Windows search
Windows Search is one of the core services that index the data stored in a PC. It basically renders a quicker proceeding in searching whenever you need to look for something in the operating system. Many PC users notice higher disk usage with Windows Search enabled. So, in the following content, we’ll focus on how to disable this service.
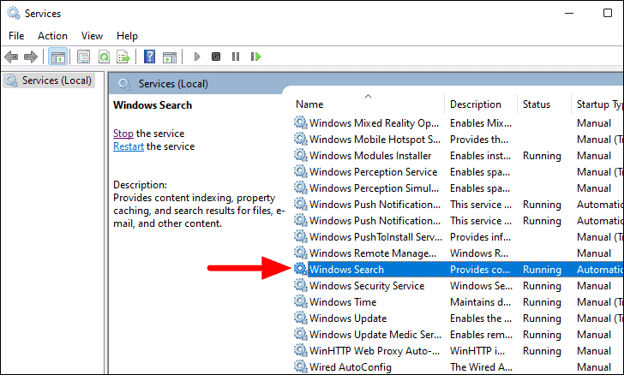
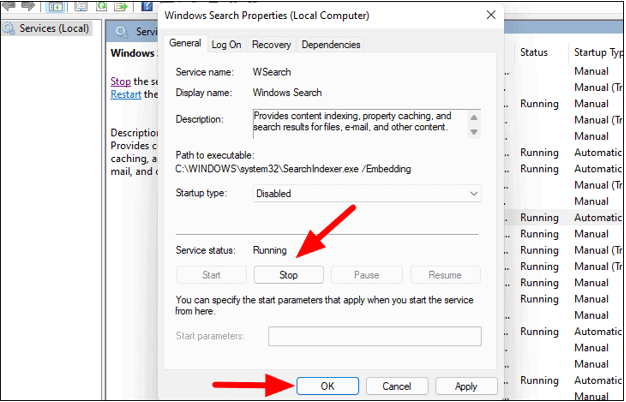
1. To turn off the Windows Search service, run the “Services” app, scroll down and locate the “Windows Search” service. Double-click on it to launch its properties.
2. In “Windows Search Properties”, open the “Startup type” dropdown menu and select “Disable”.
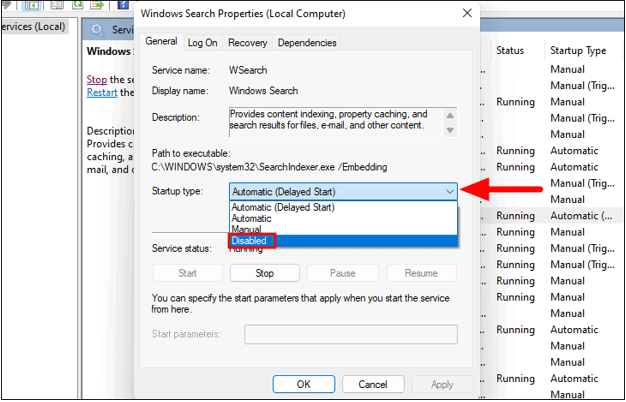
3. Next, hit “Stop” under “Service status” and then, hit “OK” at the bottom to save the changes.
Way 6. Perform a clean boot
A “clean boot” launches Windows 11 with a minimal set of drivers and startup programs so that you can tell whether a background program is interfering with your programs or games. Clean boot gives you much control over which services and programs run at startup to help isolate the cause of the issue.
1. Search for “system configuration” in the “Start” menu and run the app by selecting the search result.

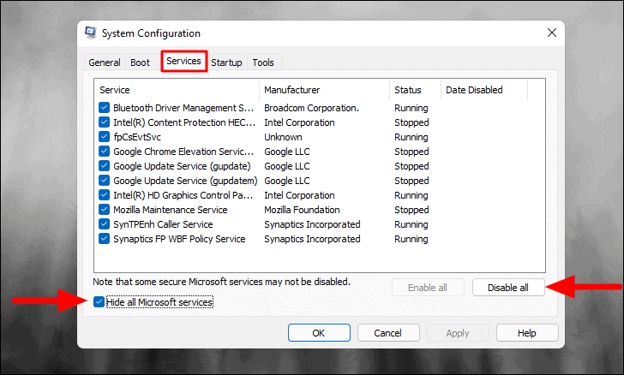
2. Next, navigate to the “Services” tab. Tick the option “Hide all Microsoft services” and hit “Disable all”. All additional services except those required by the OS will be disabled.
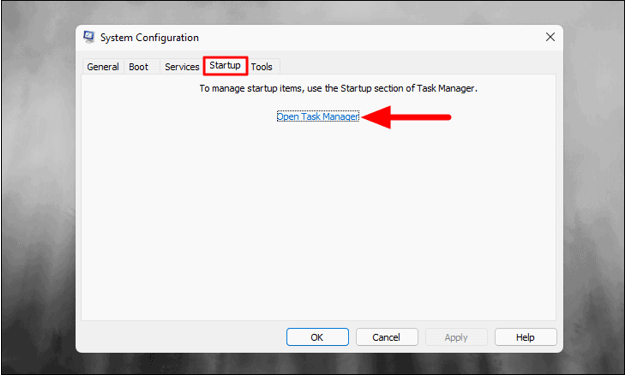
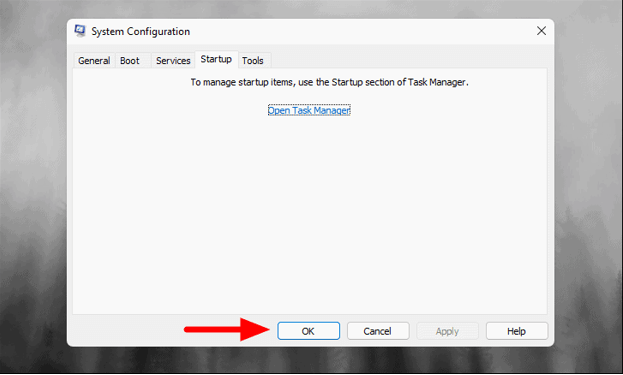
3. Now, navigate to the “Startup” tab and hit “Open Task Manager” to launch Task Manager”.
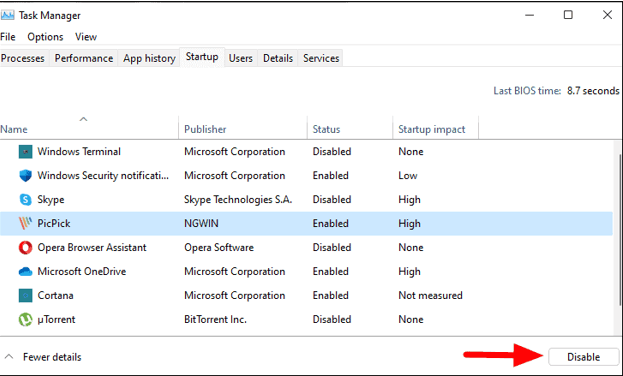
4. Then, you’ll go to the “Startup” tab of Task Manager. Now, select all the programs you think will cause Windows 11 high disk usage. After that, click on “Disable” and quit Task Manager”.
5. Now, hit the “OK” button at the bottom of the “System Configuration” window to save the changes.
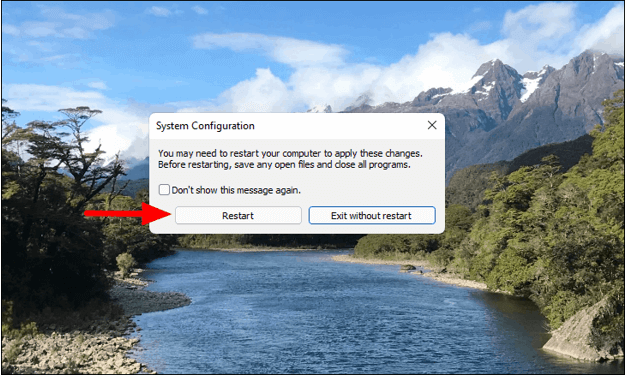
6. At last, hit “Restart” to reboot the OS.
Way 7. Uninstall all browsers with Control Panel
Another effective way is to uninstall all browsers, except Edge and IE, from control panel. Browser uninstallation is a good way to isolate the issue caused by plugins. Or you’ll need to remove the plugins one by one from each browser. Adobe Flash and Shockwave Player are usually the culprits of Windows 11 100% disk usage.
After the browser uninstallation, please delete the files containing “temp”, “%temp”, and “prefetch”. Then, reboot the OS and check whether the issue has been fixed. If it does, wait 10 ~15 mins to make sure it won’t reoccur and after that, you can reinstall those deleted browsers.
Way 8. Upgrade the HDD or SSD to a bigger one
If you keep encountering the issue of Windows 11 high disk usage no matter what you do, maybe the hard drive is indeed too small. Therefore, you might as well replace the HDD or SSD with a bigger one. AOMEI Partition Assistant Standard helps clone a hard drive to a lager one without the need to reinstall all your apps, programs, and even the OS after the disk replacement. Apart from this feature, with this very freeware, you can perform other operations including partition clone and hard disk wiping.
Note:
1. The Standard Edition only supports MBR data disks clone, if you wish to clone MBR system disk, MBR to GPT, GPT to MBR, GPT to GPT, please upgrade to the Professional Edition.
2. If you clone MBR system disk to GPT or GPT system disk to MBR, you need to enter BIOS to change the boot mode between Legacy BIOS and UEFI.
How to fix Windows 11 disk usage 100%, try the best disk management freeware to replace your old hard drive with a larger one!
Step 1. Open the installed AOMEI Partition Assistant Professional, click "Clone" in the main interface, and select "Clone Disk".

Step 2. Choose the hard disk that you need to clone as the source disk like SSD and click "Next".

Step 3. Select the destination disk to store the data on the source disk, and then click "Next".

Step 4. Then, you can check the source and destination disk in the next window or change to "Sector to Sector clone", and click the "Confirm" button to continue if there is no problem.

Here, you can also click the "Settings" button to adjust the partition size on the destination disk or tick "4k alignment" to Optimize the performance of SSD if the target disk is an SSD drive.

Tip: If you want to clone Windows to a smaller drive, the "Clone without resizing partitions" button will be greyed out. Then, a Note about how to boot OS from the destination disk will pop up. Read and keep it in mind.
Step 5. After returning to the main interface, check the pending operation and click "Apply" and "Proceed" to commit the operation.

Conclusion
How to fix Windows 11 disk usage 100%? There can be a plenty of causes to high disk usage on Windows 11, so, in this post, I listed the top 8 ways that are most likely to help resolve the problem. Once upon a time, I also ran into this issue and what helped me out is AOMEI Partition Assistant mentioned in method 3. The high disk usage issue occurred because the SSD I used was too small. So, I replaced it with a larger one. I cloned the whole old SSD to the new one with the AOMEI software so I needn’t reinstall all the applications and OS. My problematic PC was on Windows and if yours are on Server, you need to try the Server edition.

