How to See What Motherboard Model I Have for Windows 11?
Read to know how to see what motherboard I have in Windows 11. You can also learn how to bypass the Windows 11 requirements if your device can’t meet them when upgrading the system.
By Irene / Updated on January 21, 2025
Can you find motherboard model for Windows 11?
Windows 11 introduced several new features and improvements, including enhanced backup capabilities, better tools like the updated Snipping Tool with OCR, and a more reliable system experience with the 2023 updates. Alongside these enhancements, Microsoft eased some hardware restrictions based on user feedback, but your computer still needs to meet the minimum requirements to run Windows 11.
One critical component is the motherboard, which houses key parts like the CPU, RAM, graphics card, and storage. If your computer doesn’t support TPM 2.0—a requirement for Windows 11—you may need to replace the motherboard. Knowing your motherboard model is crucial when upgrading hardware to ensure compatibility. The compatibility of motherboards generally depends on their chipset series. Below is a guide for major motherboard brands:
ASUS
Intel: All models except the 100 series support TPM 2.0.
AMD: 300 series and newer motherboards support TPM 2.0.
Gigabyte (GIGA)
Intel: Supported chipsets include X299, C621, C232, C236, C246, 200, 300, 400, and 500 series.
AMD: Supported chipsets include TRX40, 300, 400, and 500 series.
MSI
Intel: Support starts from the 100 series.
AMD: Only 300 series and newer motherboards support TPM 2.0.
Can you check motherboard model for upgrading Windows 11 from Windows 10? Thankfully, you can easily check your motherboard details without opening your PC case. Whether you're troubleshooting hardware issues or planning upgrades, we’ll explain four simple methods to find your motherboard model in Windows 11. Read on to discover these quick and effective ways to get the information you need!
How to see what motherboard I have for Windows 11?
Here are 3 simple ways to check your motherboard: using CMD, System Information, Windows PowerShell. Let’s look at each method step by step.
Option 1. Check motherboard model for Windows 11 via PowerShell
How to check what motherboard I have for Windows 11? To easily check your motherboard model in Windows 11, follow these steps using Windows PowerShell:
Step 1. Open the search box, type "powershell", right-click Windows PowerShell, and select "Run as administrator."
Step 2. Enter the command: Get-WmiObject win32_baseboard | Format-List Product,Manufacturer,SerialNumber,Version and press Enter.
This will display your motherboard's model, manufacturer, serial number, and version.
Option 2. Find motherboard model for Windows 11 by System Information
To find your motherboard model in Windows 11, you can use the system information.
Step 1. Press Win + R to open the Run dialog, type msinfo32, and click OK to open the System Information window.
Step 2. In the window that appears, look for the Baseboard section. You will find details like Baseboard Manufacturer, Baseboard Product, and Baseboard Version.

Option 3. Use CMD to check motherboard for Windows 11
Using Command Prompt (CMD) to check your motherboard is a simple method. Here’s how to do it:
Step 1. Click the search button, type command prompt, right-click on the tool, and select Run as administrator.
Step 2. In the CMD window, type: wmic baseboard get product,manufacturer,version,serialnumber. Then press Enter. You’ll see details about your motherboard.

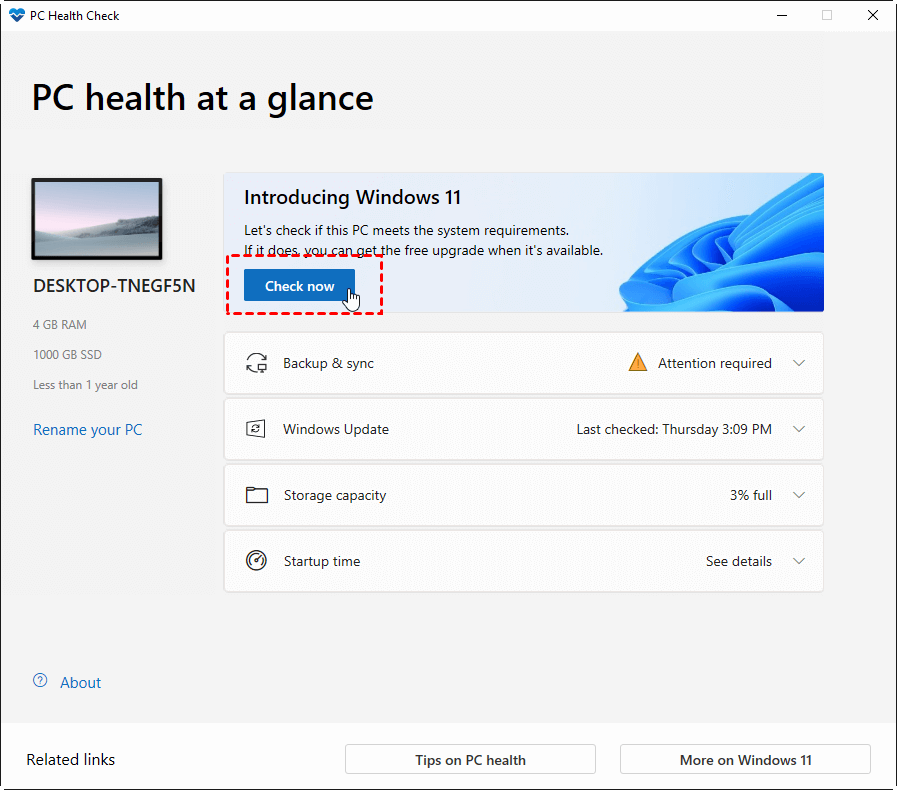
Note: If you want to get more information to meet the Windows 11 requirements for system upgrading, you can use Microsoft PC Health Check Tool. The Microsoft PC Health Check Tool verifies system compatibility for Windows 11 by checking the processor, memory, storage, TPM 2.0, UEFI firmware with Secure Boot, graphics card with DirectX 12 support, display resolution, internet connection, and Microsoft account.
How to meet or bypass Windows 11 requirements?
To upgrade to Windows 11, your motherboard must support certain hardware requirements, including TPM 2.0 and UEFI firmware with Secure Boot. What should you do if your device can't meet the Windows 11 requirements? AOMEI Partition Assistant offers various solutions.
Solution 1. Meet Windows 11 upgrading requirements
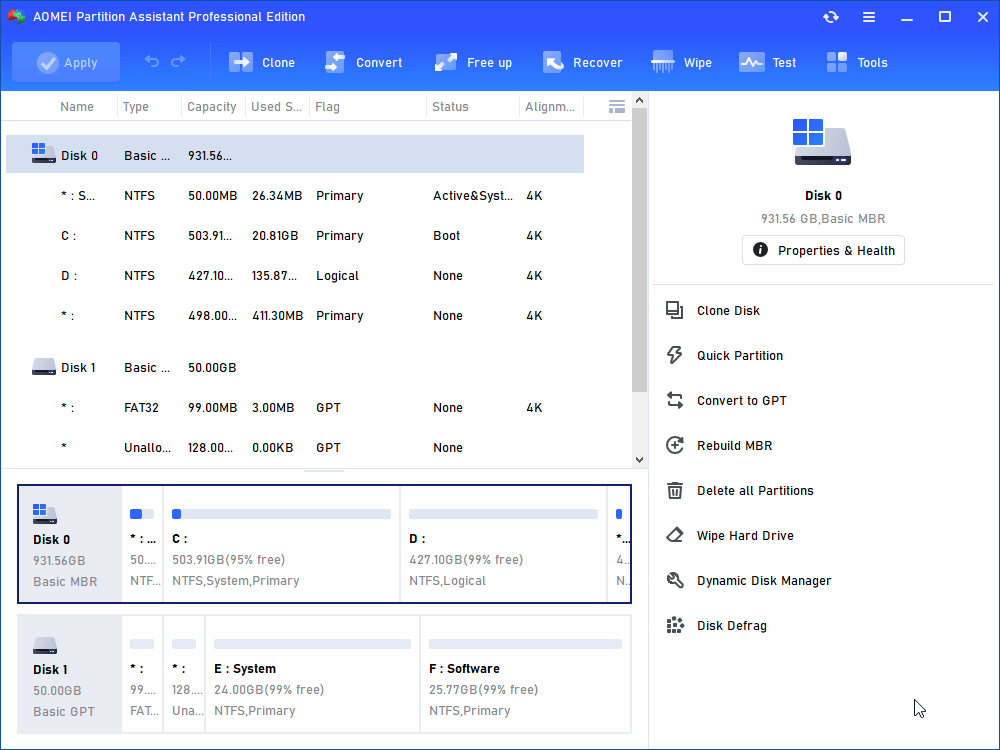
Since UEFI (Unified Extensible Firmware Interface) is a key requirement for upgrading to Windows 11, you need to ensure that your motherboard supports it. UEFI works with the GPT partition scheme, while BIOS uses MBR. If your system disk is currently using MBR, you’ll need to convert it to GPT.
Windows tools like Diskpart and Disk Management can help with this conversion, but they require you to delete all partitions on the disk first, as they only work with empty disks. This might seem inconvenient, but there’s an easier solution. With AOMEI Partition Assistant, you can convert your system or data disk from MBR to GPT without deleting any partitions or reinstalling the operating system. It’s quick and hassle-free.
The Best Windows Disk Partition Manager and PC Optimizer
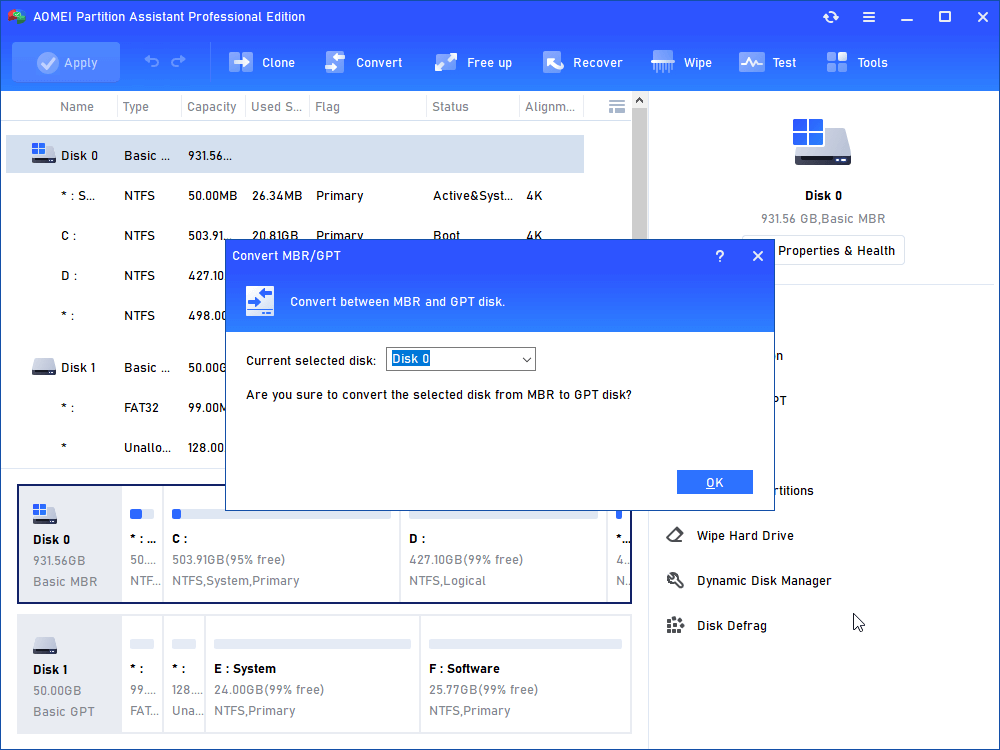
Step 1. Launch AOMEI Partition Assistant. Right-click the system disk and choose "Convert to GPT".
Step 2. Click "OK" to confirm your operation.
Step 3. Click on "Apply" to commit the pending operation.
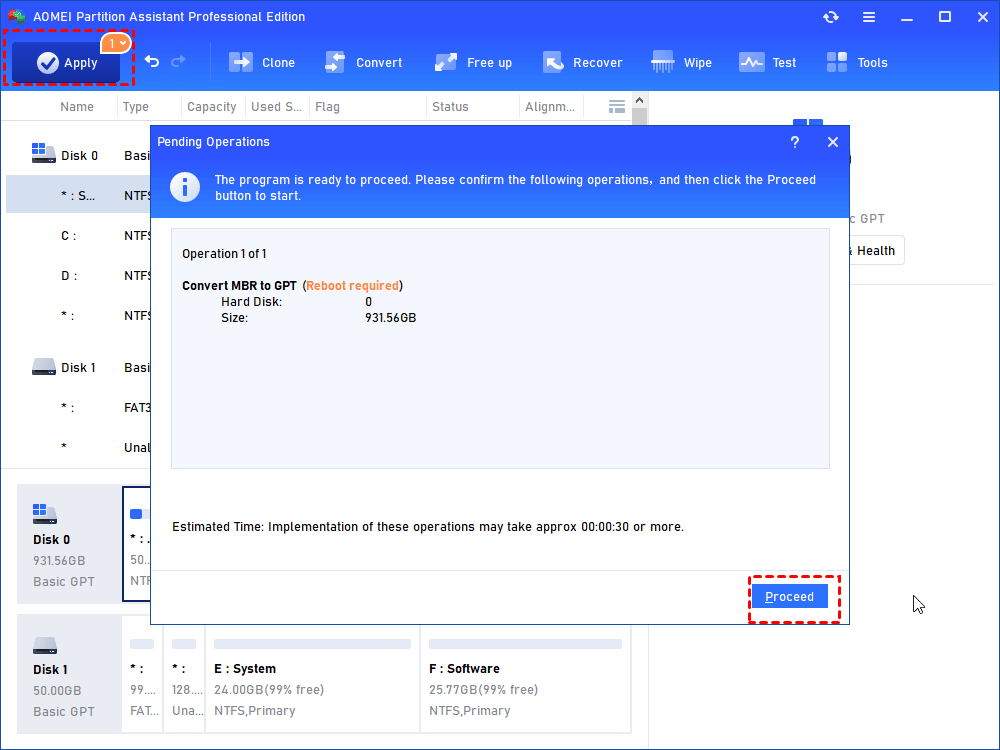
After converting MBR to GPT successfully, don't forget to change BIOS to UEFI to ensure the Windows 11 can run normally and smoothly.
Solution 2. Bypass Windows 11 requirements
To ensure system compatibility and avoid the issues that come with disabling TPM 2.0 and Secure Boot, upgrading to AOMEI Partition Assistant is a practical solution. Its "Windows To Go Creator" feature lets you bypass all Windows 11 requirements by creating a bootable USB. This allows you to use and enjoy Windows 11 without upgrading your hardware, even if your device shows the message, "This PC doesn't meet requirements for Windows 11."
The Best Windows Disk Partition Manager and PC Optimizer
- Before proceeding, please ensure the following:
- Ensure that the size of the USB or external hard drive has a capacity of at least 13GB.
- Kindly please notice that the creation process will erase all data. It is important to back up all your important data in advance.
Step 1. Connect the USB to your computer and wait for it to be detected by your device. If the USB is not detected, refer to the provided solutions for troubleshooting.
Step 2. Open the installed AOMEI Partition Assistant Professional. Click "All tools" and then select "Windows To Go Creator" as shown in the picture.

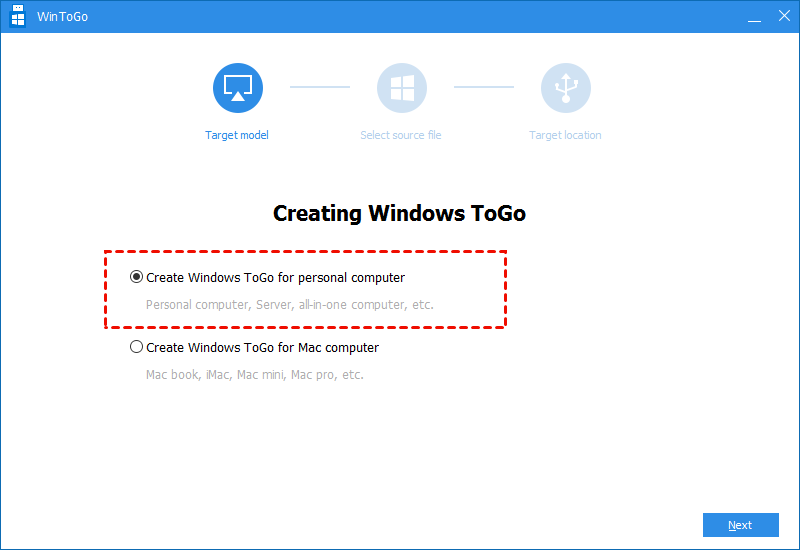
Step 3. Click “Create Windows To Go for personal computer” and “Next”. If you are a Mac computer user, you can choose the second option, “Create Windows To Go for Mac computer”.
Step 4. Choose the option "Create Windows To Go with system disc/ISO". The Windows 11 ISO file will be automatically detected, or you can manually select the target file by clicking the folder icon. Afterward, click "Next" to proceed.

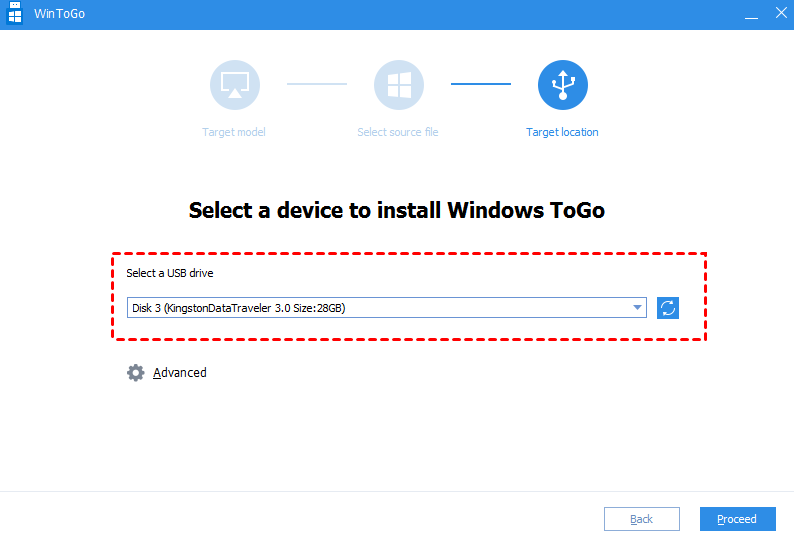
Step 5. Choose the USB drive as the target and select the “Proceed” button to continue.
Step 6. At this point, you will receive a notification informing you that all data on the USB will be erased. Select the option "Yes" to proceed. Then you can disconnect the USB and attempt to boot it on another computer. If you are unsure about the booting process, you can continue following the steps provided below.

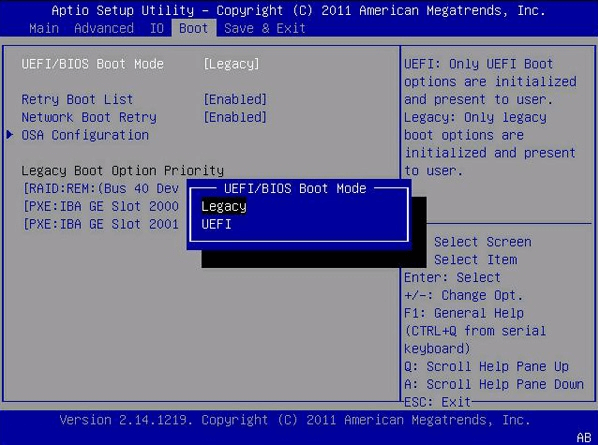
Step 7. Connect the Windows 11 To Go USB drive to your computer. Boot the device and press a specific key to enter BIOS/UEFI.
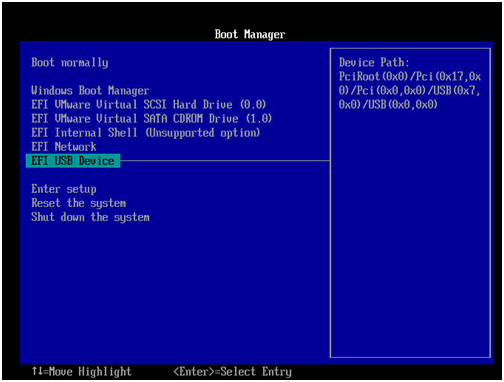
Step 8. Choose USB Device and press the “Enter” key to boot from the Windows 11 bootable USB.
Conclusion
How to see What motherboard I have for Windows 11? This article provides multiple easy methods, like using PowerShell, CMD, or System Information, to check your motherboard details without opening your PC case.
If your system doesn’t meet the requirements, tools like AOMEI Partition Assistant offer solutions to either convert your disk to meet UEFI and GPT standards or bypass the requirements entirely. With these tools and methods, you can efficiently upgrade or optimize your system for Windows 11, even on older hardware. If you are a Windows Server user, you can choose the AOMEI Partition Assistant Server edition.

