[9 Ways] How to Optimize Windows 11 for Gaming?
How to optimize Windows 11 for gaming since the OS comes with several different Windows 11 gaming features. To have a good gaming experience, this time, 6 methods will be provided to help make full use of Windows 11 for better gaming performance.
By AOMEI / Updated on June 30, 2026
Help, Windows 11 gaming performance is really bad!
I upgraded my PC to Windows 11 once this OS was published. I have no idea what Windows 11 means for gamers but what shocks me most are the new gaming features – Xbox Game Pass, Auto HDR, and DirectStorage. It’s said that they bring both good performance and quality. However, things are different for me. After the installation of Windows 11, FPS in most of my games drops evidently. How come? How to optimize Windows 11 for gaming? Can anyone help?
What’re the new Windows 11 gaming features?
It’s great to hear Windows 11 has finally been published. Windows 11 comes with so many astonishing features like the new Mac-like interface, widgets, and Microsoft Teams integration. But among them, what impresses most are its 3 new gaming features. With them, you can have a much better gaming experience, enjoying higher frame rate, shorter load times, and better graphics.
Xbox game pass
The new game pass app is a replacement for the Windows 10 Xbox app. It enables its users to buy, manage, and remove games. It’s pretty easy to handle and you can enjoy the benefits of Xbox Live Gold, E Play, and play cloud games once you join Xbox Game Pass Ultimate.
Auto HDR
Technically speaking, Auto HDR is an algorithmic tool designed to turn on the high dynamic range to have the best visual experience. This technology has been applied to many Steam games, PS4Pro, and PS5. It’s able to enhance games based on Dx11 or higher that previously only used SDR. Moreover, Auto HDR improves contrast ratio and color accuracy and brings a wider color gamut.
If you want to enable Auto HDR on Windows 11, you must first have a monitor that supports HDR. With such a monitor and Windows 11 installed, you can enjoy better color and image quality in video games without making any manual adjustments.
DirectStorage
Another Windows 11 technology from Xbox Series is DirectStorage, which allows loading games’ assets directly to GPU instead of CPU. This won’t affect the performance of the processor and prevents the CPU from being bogged down. By using DirectStorage, you will experience a much higher load speed.
Additionally, many 3A video games, such as GAT6, Cyberpunk 2077, and Battlefield 6, list Windows 11 as the recommended operating system. Overall, Windows 11 is absolutely the first choice for the future gaming environment.
How to optimize Windows 11 for gaming?
Many people complain after upgrading to Windows 11, in-game fps drops like what they’ve been through when Windows 10 came. This is mostly because people didn’t correctly preset the Windows 11 gaming settings. If you want to optimize your gaming PC for low latency and peak performance, you may find the answers in the following tutorial, where 9 feasible ways for Windows 11 gaming optimization are provided.
Way 1. Turn on the game mode in Windows 11
Windows 11 gets a new and improved gaming mode to help boost performance while gaming. So, if you’re a video game lover who owns a Windows 11 PC or laptop, here’s how you can enable and use the game mode.
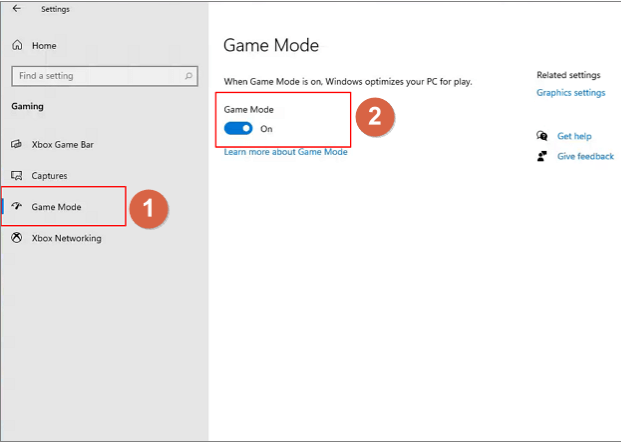
1. Hit the Windows icon in the lower left corner of the desktop and select “Settings”.
2. On the left side bar, go to the section below “Gaming” and select “Game Mode”
3. Toggle Game Mode on.
Way 2. Enable Auto HDR
As mentioned above, HDR bring better graphics to games. You can easily tell the differences after enabling Auto HDR. As what its name suggests, if you already have a monitor that supports HDR, HDR will be automatically turned on once Windows 11 is installed. If you have no HDR monitor, go purchase one.

Way 3. Turn on high performance mode for the battery plan
To make games on Windows 11 run more smoothly or to enjoy higher frame rates, enabling the high performance mode in the power settings to make GPU and CPU work to their full ability is a necessary step.
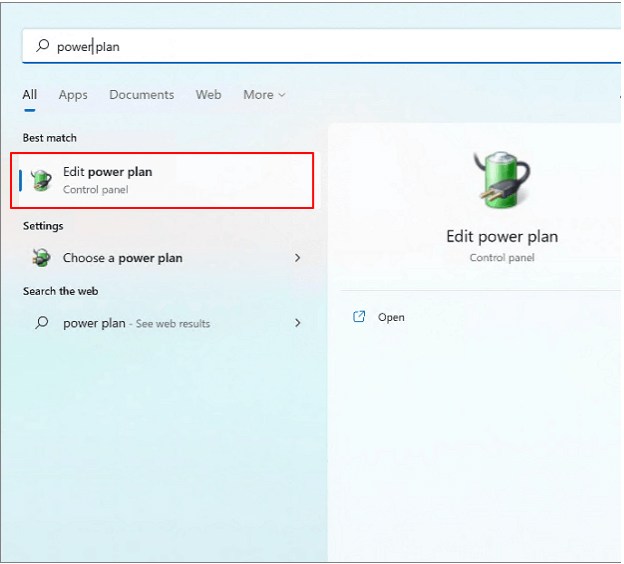
1. In the search bar, type “power plan”.
2. Click on “Edit Plan Settings” and select “Power Options” at the top.
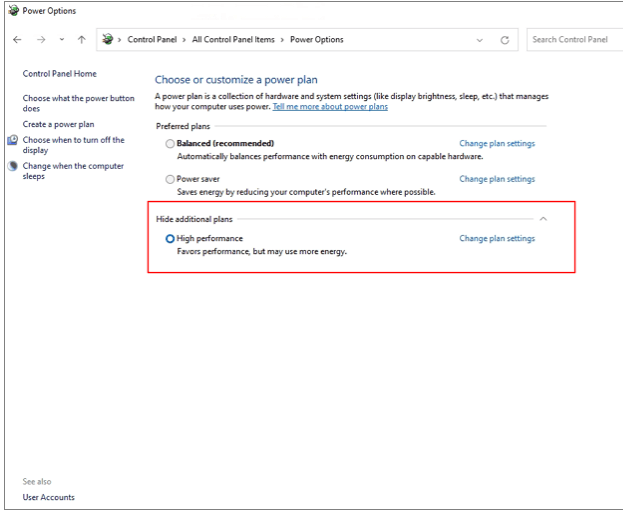
3. Check “High performance” in the following window.
Way 4. Allocate more space to the C drive
To have enough storage space in the system drive is importantly no matter it’s on Windows 10 or Windows 11. If the C drive is full, the computer gets slow and game performance sucks. In this case, the best way is to allocate some free space to the C drive which is the system drive. Some people may think of Windows 11 disk management to get it done. However, although Disk Management is a free tool, it’s not recommended. It has some inevitable shortcomings. For example, it only supports resizing partitions in NTFS and RAW and it only supports merging a partition with a piece of contiguous space on its right side.
To make everything easier, I recommend AOMEI Partition Assistant Standard which is free from these limits. By using it, you can merge a piece of unallocated space no matter where it is to the C drive. Also, you can perform disk managing operations including disk format, hard drive wiping, and partition deletion. This software is totally free and contains no bundleware at all.
Note: If there’s already a piece or multiple pieces of unallocated space on your hard drive, jump to Step 4 directly; Or else, create one with this tool.
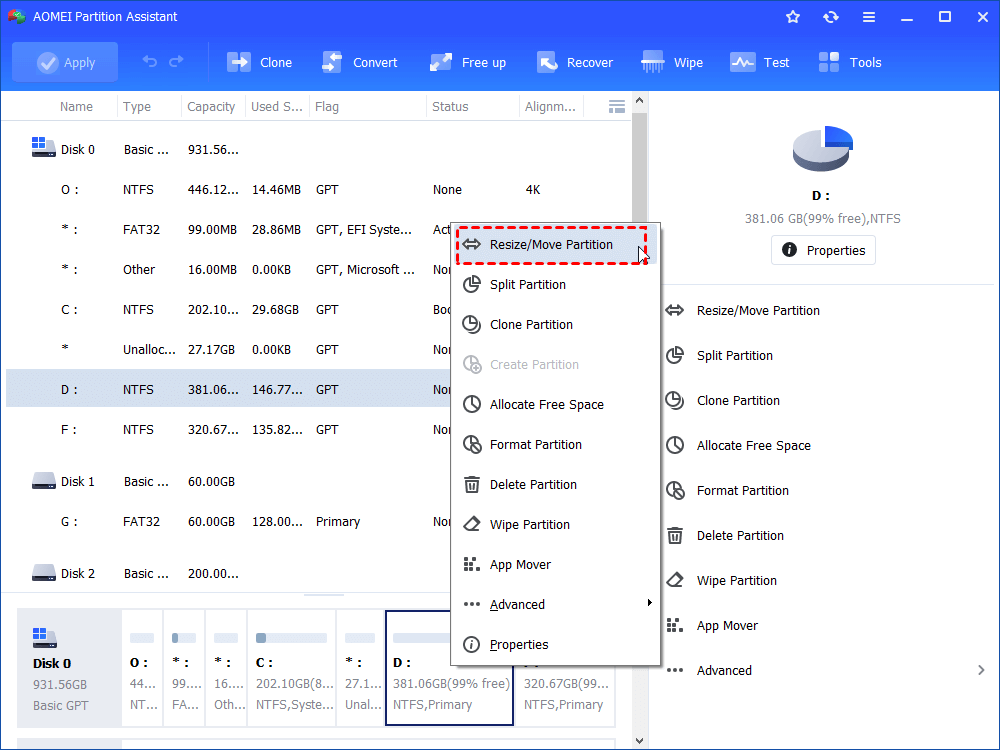
Step 1. Install and launch AOMEI Partition Assistant Standard, right-click on the disk (even the encrypted partition is available)you want to create unallocated space from and select “Resize/Move Partition”.
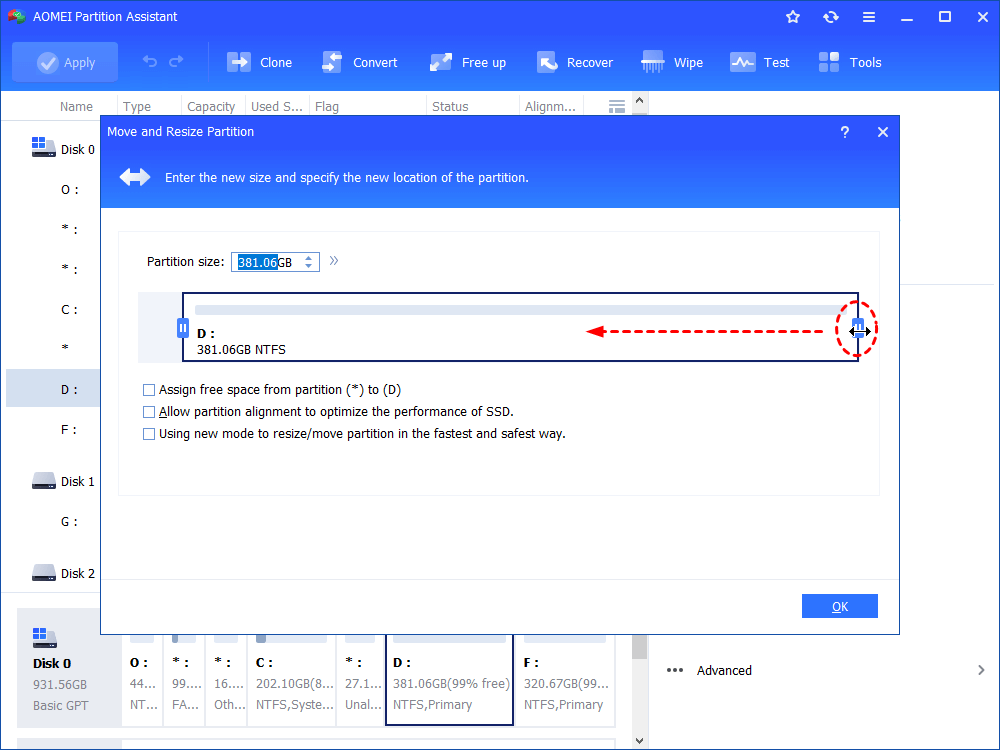
Step 2. Move the ring on both sides of the green bar to adjust the size of the unallocated space. After finished, click on “OK” to proceed.
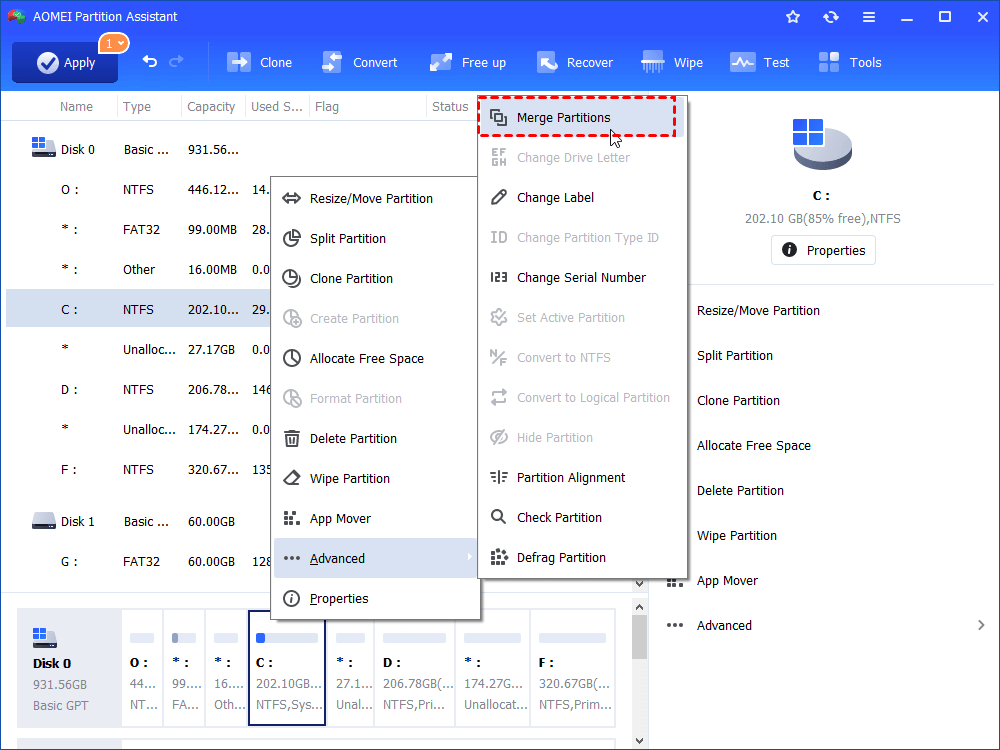
Step 3. Now, a piece of unallocated space is created and you can see it on the man interface. Right-click on the C drive and select “Merge Partitions.
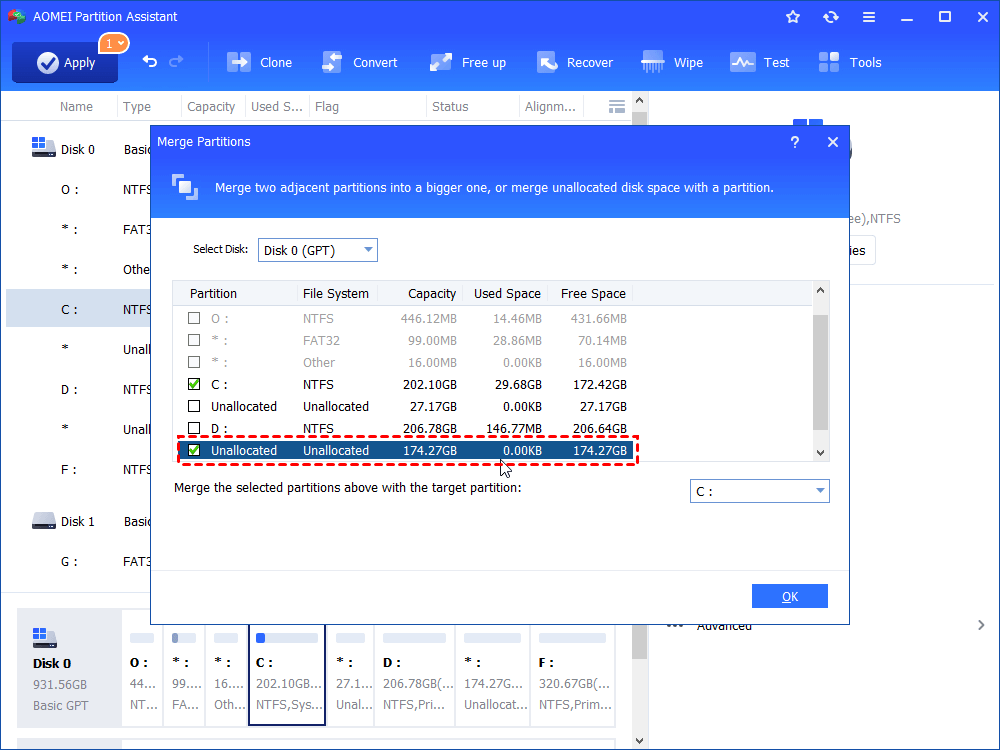
Step 4. Tick the unallocated space and hit “OK”.
Step 5. Hit “Apply” on the upper left of the interface, and hit “Proceed” to commit the operation.
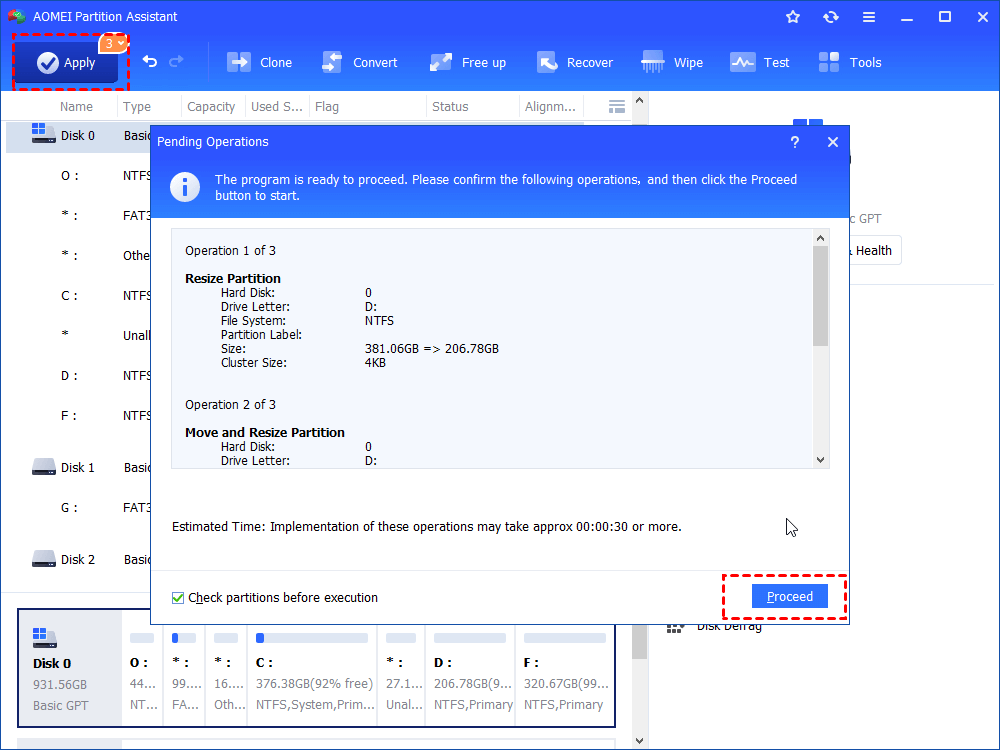
Wait a few seconds before it’s done.
Way 5. Close startup apps
Normally, startup apps don’t affect Windows 11 gaming performance in a negative way, but this heavily depends on the type of the apps that you are running. To make your system start faster, you can disable these apps and thus, a small performance boost is given. Read on to learn how to shut down startup apps.
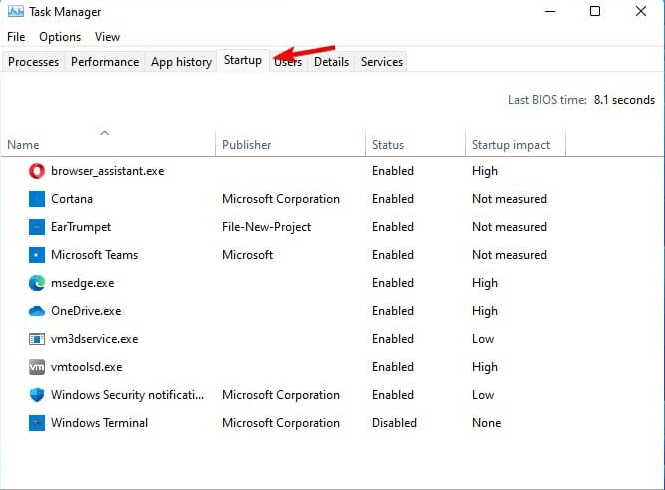
1. Press Ctrl + Shift + Esc simultaneously to launch Task Manager
2. Navigate to the Startup tab.
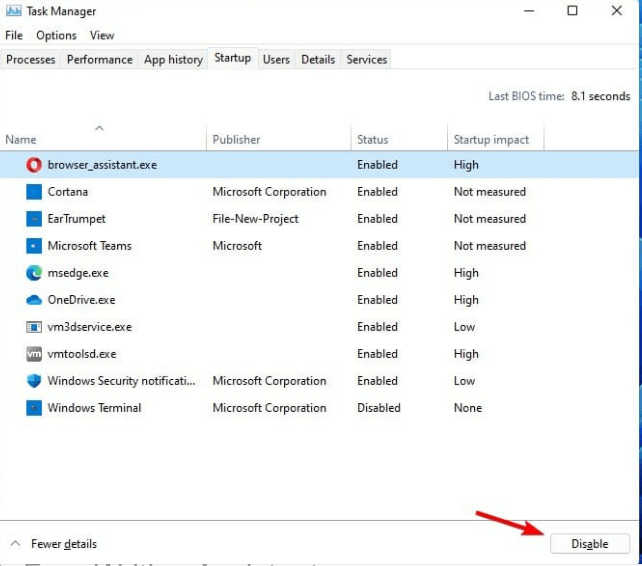
3. Select all the startup apps you don’t need and hit “Disable” to stop them.
Way 6. Disable resource-intensive applications
Some resource-intensive applications bring higher CPU utilization and memory usage which makes games running slow. By disabling them, you can boost up the games a little bit.
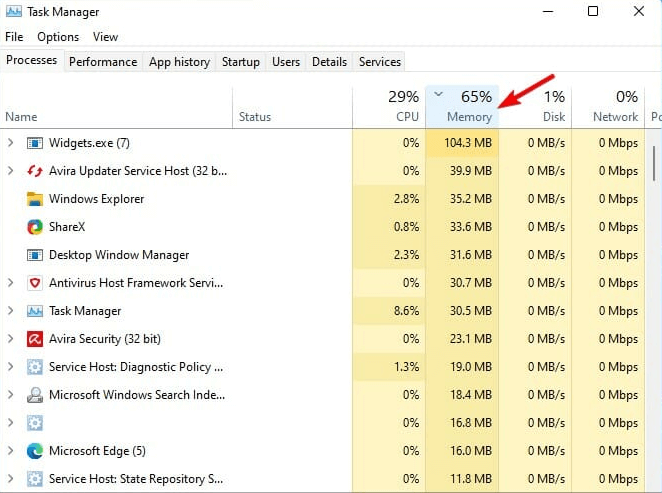
1. Hit Ctrl + Shift +Esc to launch Task Manager.
2. Then, click on “CPU” or “Memory” to sort apps by usage.
3. Select the program that you no longer need and hit “End task”.

4. Repeat the steps above to put an end to all unimportant programs
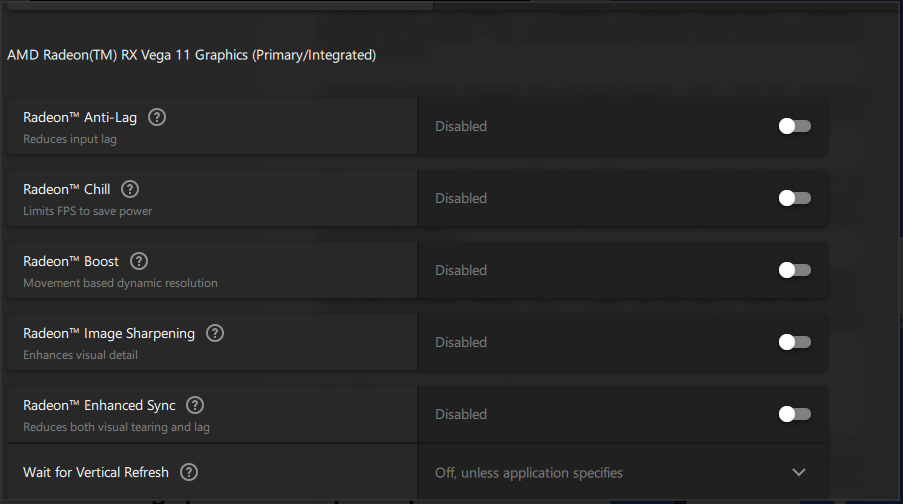
Way 7. Use dedicated GPU software
By using dedicated GPU software for NVDIA and AMD GPUS, you can make changes to graphics settings to make the card work better.
1. Run the GPU card software.
2. Go to the “Settings” section.
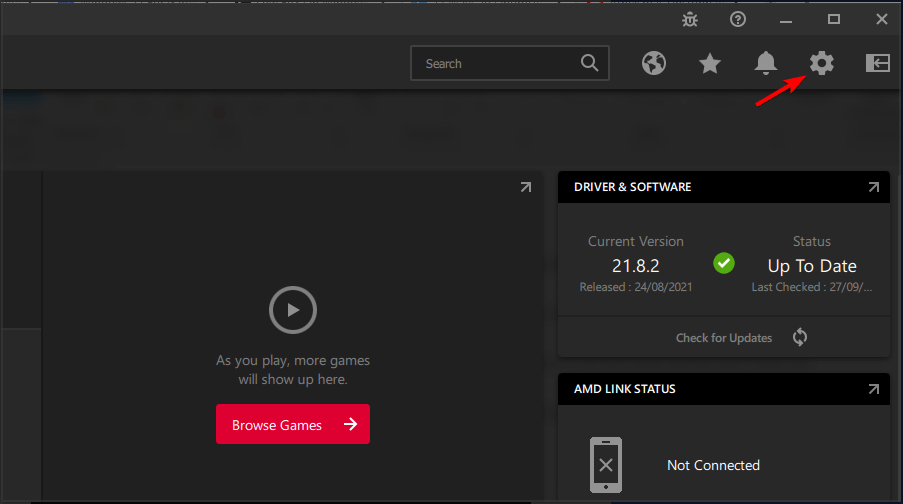
3. Select one presets or manually adjust the settings on your own.
Way 8. Update the GPU driver
If the version of your GPU driver is too old, GPU may not work well on some latest games. To fix it, you should update the GPU driver to the latest version so that it can work on the games more efficiently.
1. Go to the GPU’s manufacture’s site.
2. Go to “Download” or “Drivers” section.
3. Select the model of your GPU and then, hit “Search”.

4. Hit the “Download” button to download the latest drivers.
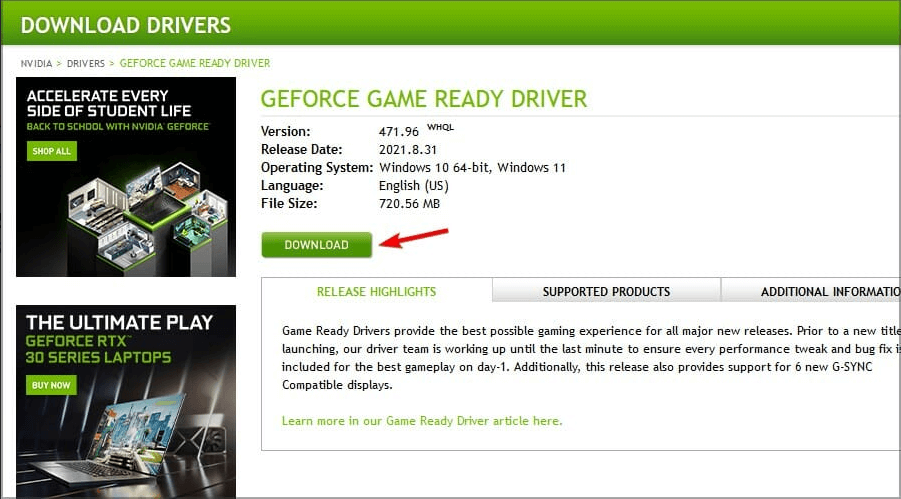
5. Once the software is fully downloaded, run the setup file to launch the installation.
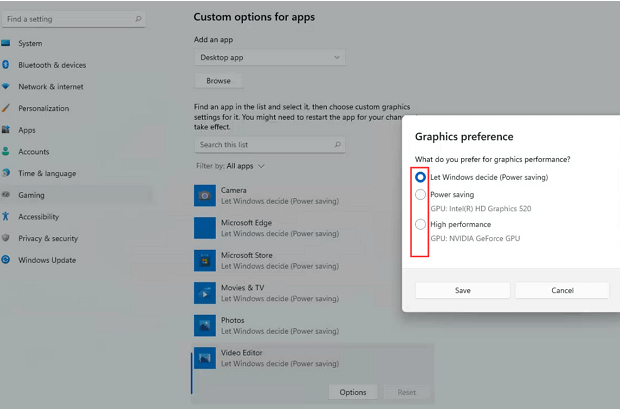
Way 9. Use Per-App GPU selection settings.
On your laptop, there’ll be 2 types of GPUs, namely an iGPU and a dGPU. Generally, when you play again, the dGPU is what you should choose. However, if you choose the iGPU, the game performance can suck a lot. How to select the dGPU? Follow the tutorial below.
1. Click on the Startup Menu icon and follow the path “Settings” > “Gaming” > “Game Mode”.
2. Under “Related Settings”, hit “Graphics”.
3. On the Graphics Performance window, you’ll be asked to select a GPU for your apps and add new apps to the list. By default, Windows automatically assign a GPU to each app. However, you can change it manually.
4. The Power Saving option will be allotted to those apps that don’t require graphics performance and the “High Performance” option works for games and GPU-centric software.
Does Windows 11 run games better than Windows 10?
If you are a video gamer and are still hesitating., we highly recommend you to upgrade your OS from Windows 10 to Windows 11 because Auto HDR make your games look more vibrant and colorful and meanwhile, Direct Storage helps your GPU and the SSD hard drive communicate faster.
Conclusion
How to optimize Windows 11 for gaming? In this post, you’ve not only learnt what Windows 11’s new gaming features are, but also, learnt the top 9 ways to make Windows 11 work for your games better. I encountered fps drop after upgrading to Windows 11 and later, I found that was due to insufficient storage in the C drive. So, as the tutorial said, I used AOMEI Partition Assistant Standard to enlarge my C drive and it worked well, the games have run pretty well until now. If you want to try other features of this powerful software including free space allocation and OS to SSD migration, you can upgrade to the Professional edition.
FAQs about optimizing Windows 11 for gaming
What are the key factors affecting game performance on Windows 11?
Game performance can be influenced by various factors such as hardware specifications, system resources, graphics settings, background processes, and driver compatibility. Addressing these aspects can significantly enhance gaming performance.
How can I check if my Windows 11 PC meets the recommended system requirements for gaming?
Navigate to the "Settings" menu, select "System," and click on "About." Here, you can find information about your PC's specifications. Cross-reference these with the recommended requirements provided by the game developers.
Are there specific Windows 11 settings I should adjust to improve game performance?
Yes, optimizing settings such as power options, graphics settings, and background applications can have a significant impact on game performance. Adjusting these settings can be done through the "Settings" menu and the "Graphics Performance Preference" settings.
Are there built-in tools in Windows 11 to optimize game performance?
Yes, Windows 11 includes the Game Mode feature, designed to optimize system resources for gaming. To activate Game Mode, press Win + G to open the Game Bar, then click on the settings icon and toggle the Game Mode switch.
How can I monitor my system's performance while playing games on Windows 11?
Use the Task Manager or third-party tools like MSI Afterburner or HWMonitor to monitor system performance. Keep an eye on CPU and GPU usage, temperature, and memory usage to identify potential bottlenecks.

