How to Fix Acer Preparing Automatic Repair Issue
Wondering how to how to resolve the Acer preparing automatic repairissue? On this page, seven easy and effective are introduced with step-by-step guide.
By Hedy / Updated on March 3, 2026
When you power on your Acer laptop (like an Acer Aspire, Nitro, Predator, or Swift) and see a screen that says:
“Preparing Automatic Repair”
followed by
“Diagnosing your PC…”
That’s Windows trying to fix startup errors automatically using the Windows Recovery Environment (WinRE).
This doesn’t mean your device is broken — it means Windows detected a problem that could be caused by software corruption, hardware hiccups, driver conflicts, or failed updates.
The problem is that on many Acer laptops this process gets stuck in a loop — constantly rebooting back into the same “Preparing Automatic Repair” message. This is known as an Automatic Repair Loop.
7 ways to fix Acer preparing automatic repairissue
If your Acer laptop is stuck on “Preparing Automatic Repair”, don’t panic. This issue is common on Windows 11/10 devices and is usually caused by corrupted system files, failed updates, disk errors, or boot configuration problems.
Below are 7 proven ways to fix the Acer Preparing Automatic Repair issue, starting from the simplest solutions to more advanced repairs.
Fix 1. Try refreshing or resetting your Acer laptop
If your Acer laptop gets stuck on “Preparing Automatic Repair” in Windows 11, you can resolve it by refreshing or resetting your system.
To start, forcefully shut down the laptop by pressing the power button three times. The system will reboot automatically 2–3 times and display the boot repair options. From there, select Troubleshoot, then choose either Refresh or Reset this PC to restore your laptop and fix the issue.
Fix 2. Run Boot Repair
When your Acer laptop gets stuck on the “Preparing Automatic Repair” screen, it usually means Windows boot files are damaged, the BCD is corrupted, or the system partition has errors. Instead of reinstalling Windows and risking data loss, you can use the Boot Repair feature in AOMEI Partition Assistant to fix the issue quickly and safely.
AOMEI Partition Assistant is a professional disk and partition management tool designed for Windows 11/10/8/7. Its Boot Repair feature is specially built to:
📍 Fix corrupted boot files
📍 Repair damaged BCD (Boot Configuration Data)
📍 Rebuild MBR (Master Boot Record)
📍 Correct boot sector errors
📍 Solve system startup failures
It provides a user-friendly graphical interface, making it much easier than using complicated Command Prompt commands like bootrec /fixmbr or bootrec /rebuildbcd.
Step 1. On a functioning computer, install AOMEI Partition Assistant and connect a USB drive with sufficient storage.
Step 2. Launch the software and navigate to the Boot Repair tool under the Recover section.

Step 3. Choose the Create Bootable Disk option to generate a WinPE Boot Repair USB drive.

Step 4. Insert the USB drive into the computer that won’t boot. Enter the BIOS and adjust the boot order to prioritize the USB drive. The system will automatically load the Boot Repair tool and begin scanning the boot entries.

Step 5. When the scan completes, you’ll see detailed results, including system paths, versions, and boot status. Select the boot entries that can be repaired and click Repair.

Step 6. Allow the repair process to finish. Once done, remove the USB drive and restart the computer, booting from the original system drive.

Fix 3. Troubleshoot in Safe Mode
Safe Mode loads only the essential system components, making it a useful tool for troubleshooting minor issues that trigger the “Preparing Automatic Repair” loop on your Acer laptop. Follow these steps to enter Safe Mode:
Step 1. Restart your PC by pressing the Power button. As soon as the Windows logo appears, press it again. Repeat this process until the system enters the Windows Recovery Environment (WinRE).
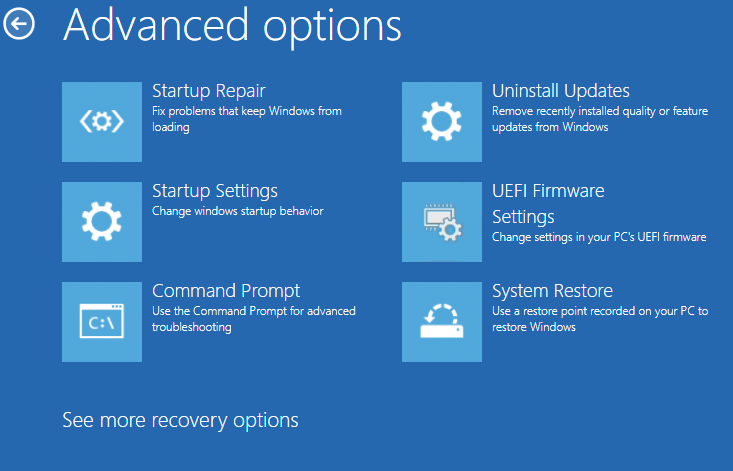
Step 2. On the Advanced Startup screen, select Troubleshoot, then click Advanced Options.
Step 3. Navigate to Startup Settings.
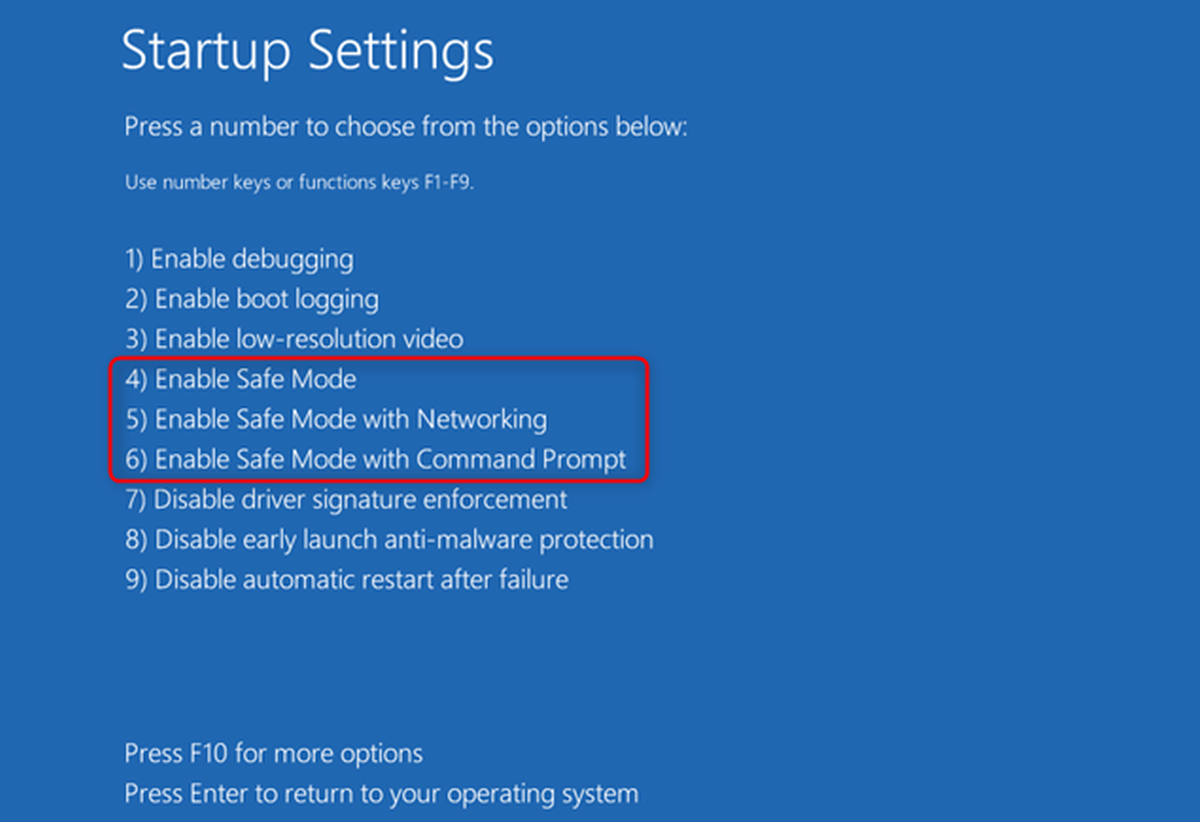
Step 4. In the Startup Settings window, click Restart.
Step 5. After the system restarts, a list of options will appear. Press F5 to enable Safe Mode with Networking, giving you access to essential troubleshooting tools while maintaining internet connectivity.
Fix 4. Repair MBR and restore BCD file
The MBR (Master Boot Record) and BCD (Boot Configuration Data) are essential for your system to boot properly. They store critical boot information and firmware configuration. If either is corrupted, your Acer laptop may get stuck on the “Preparing Automatic Repair” screen. Rebuilding them can resolve the issue.
Step 1. Connect a Windows recovery disk to your PC and boot into recovery mode.
Step 2. Restart your system and enter the BIOS settings by pressing the designated key. From the BIOS, set the recovery media as the primary boot device under the Boot tab.
Step 3. When prompted, click Repair your computer instead of proceeding with Windows installation.
Step 4. Navigate to Troubleshoot → Advanced Options → Command Prompt.
Step 5. In the Command Prompt, type the following commands one by one, pressing Enter after each:
Bootrec /fixmbr
Bootrec /fixboot
Bootrec /ScanOS
Bootrec /RebuildBcd

Step 6. Close the Command Prompt and restart your PC, booting from the primary drive. Your system should now bypass the automatic repair loop and start normally.
Fix 5. Update or reinstall drivers
A black screen during the Acer Automatic Repair loop can sometimes result from outdated or faulty graphics drivers. Updating or reinstalling these drivers often resolves the issue.
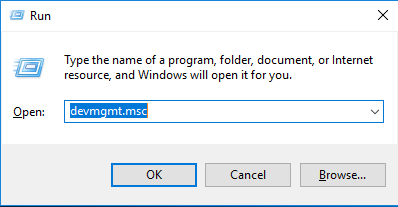
Step 1. Boot your system into Safe Mode, open the Start menu, and launch Device Manager by pressing Windows + R, typing devmgmt.msc, and hitting Enter.
Step 2. Expand Display Adapters, right-click your current graphics driver, and select Uninstall driver to remove the outdated software.
Step 3. Visit your system manufacturer’s website and download the latest compatible graphics driver for your model.
Step 4. Run the downloaded setup file to reinstall the driver, then restart your Acer laptop. This should resolve the black screen and allow your system to boot normally.
Fix 6. Turn 'Early Launch Anti-Malware Protection' off
The Early Launch Anti-Malware (ELAM) feature protects your system from threats by blocking third-party drivers during startup. However, it can sometimes trigger the “Acer Automatic Repair couldn’t repair your PC” error. Disabling ELAM may help resolve the issue.
Step 1. Restart your Acer laptop and select Advanced Options from the blue recovery screen.
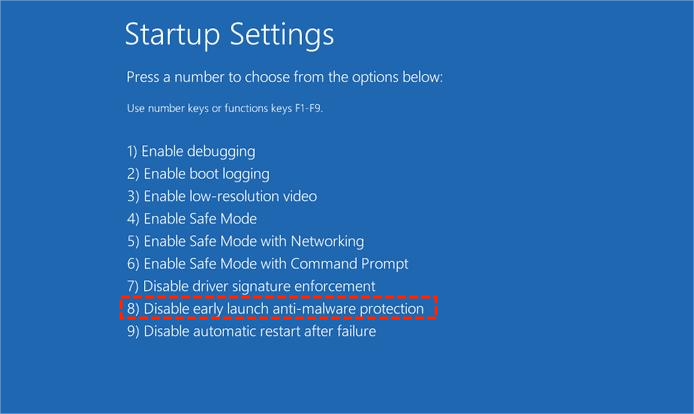
Step 2. Go to Troubleshoot → Advanced Options → Startup Settings.
Step 3. After the system restarts, a list of options will appear. Press the key corresponding to Disable Early Launch Anti-Malware Protection to turn it off and allow your system to boot normally.
Fix 7. Rebuild the Windows Registry
A corrupted Windows Registry, often caused by malware or disk errors, can trigger the Acer laptop “Preparing Automatic Repair” loop in Windows 10 or 11. Restoring the Registry to its default state can resolve these issues.
Step 1. On the Automatic Repair screen, select Advanced Options.
Step 2. Navigate to Troubleshoot → Advanced Options → Command Prompt.
Step 3. Choose your user account and enter the password when prompted.
Step 4. In the Command Prompt, execute the following command to restore the Registry:
C:\Windows\System32\config\regback* C:\Windows\System32\config\
Step 5. When asked to select entries to restore, type All and press Enter.
Step 6. Restart your laptop. Your system should now bypass the automatic repair loop if the Registry corruption was the cause.
FAQs
What does Acer preparing automatic repair mean?
It indicates Windows detected a startup problem. The system automatically scans for issues like corrupted files, failed updates, or disk errors to attempt a repair before fully booting.
Why won’t my Acer laptop go past preparing automatic repair?
This usually happens due to corrupted system files, disk errors, malware, or failed Windows updates. The repair loop occurs when Windows can’t fix the problem automatically.
How long does it take if Acer preparing automatic repair then black screen?
It varies—usually 10–60 minutes—but a black screen often signals a failed repair, hardware issue, or display problem, requiring manual troubleshooting or system recovery to resolve.
Conclusion
Getting stuck on “Preparing Automatic Repair” on your Acer laptop can feel frustrating, but it’s usually fixable without replacing your device. From resetting Windows and using Safe Mode to repairing boot files with tools like AOMEI Partition Assistant, these seven methods cover both simple and advanced solutions. Work through them step by step, and in most cases, you’ll successfully break the automatic repair loop and restore normal startup.

