How to Create Windows Server 2019 Windows To Go?
If you want to create a Windows Server 2019 Windows To Go but don't know how to do it, this article will provide a professional tool to help you create a Windows Server 2019 bootable USB.
By AOMEI / Updated on December 4, 2024
Why create Windows Server 2019 Windows To Go?
People's expectations for "bring your own device" are becoming more and more stringent as time passes. Because you can use a familiar operating system or your own private operating system on multiple computers, increasing job efficiency.
The differences between Windows To Go and standard Windows installation
Windows To Go is basically the same as a standard Windows installation, except for the following conditions:
☞ Internal disks are offline: To ensure data security, when Windows To Go starts, the hard disk on the host is offline.
☞ Trusted Platform Module (TPM) is not used: When BitLocker drive encryption is used, the pre-operating system startup password will be used to ensure security.
☞ Hibernate is disabled by default: In order to enable Windows To Go to move freely between computers, Windows To Go disables hibernation by default, but you can restart it.
☞ Windows Recovery Environment is not available: You can re-image using a new image of Windows.
☞ Refreshing or resetting a Windows To Go workspace is not supported: The manufacturer's standard resetting to the computer is disabled.
☞ Upgrading a Windows To Go workspace is not supported: Windows To Go cannot perform system updates.
After understanding the difference between the two, now I will tell you what is the most suitable Windows to go tool to create a Windows Server 2019 bootable USB.
Use third-party utility to create Windows Server 2019 bootable USB
In order to meet the needs of users, Microsoft released a new feature called Windows To Go. But it only targets Windows 8/8.1 Enterprise Edition, Windows 10 Enterprise Edition and Education Edition. This feature allows users to boot Windows 10/8/8.1 from certain storage devices (USB flash drives and external hard drives certified by Microsoft).
But Microsoft has stopped the development of Windows To Go in 2019. And after the update in May 2020, Windows 10 will no longer have the Windows To Go function. So if you want to use Windows To Go, you need not only a supported system, but also a USB flash drive or external hard drive certified by Microsoft.
Therefore, it is a wise choice to use a third-party tool to create a Windows Server 2019 bootable USB. The advantage of this is that there is no need to use expensive storage devices certified by Microsoft, and it is suitable for different Windows systems.
AOMEI Partition Assistant Server is a powerful disk partition management software (it compatible with Windows 10/8.1/8/7, and Windows Server 2025/2022/2019/2016/2012). It is very convenient to use it to create Windows To Go Windows Server 2019, the GUI allows you to understand fully at a glance, the whole process only requires a few clicks with the mouse. Even if you are a non-technical person, you can do it independently.
PS.: Please download and try it first.
How to create Windows Server 2019 Windows To Go step by step?
Next, I will show you the detail steps to create Windows Server 2019 bootable USB drive.
Things You Need to Prepare:
1. You need to prepare a 13 GB or larger USB drive(The USB 3.0 drive is recommended because of its faster read and write speed.)
Note: All data on this USB will be erased, please make a backup in advance.
2. If you plan to create a brand-new system, you need to download Windows Server 2019 ISO file.
Step 1. Plug the USB drive into a USB 3.0 port on the computer. Make sure it is detected by your PC.
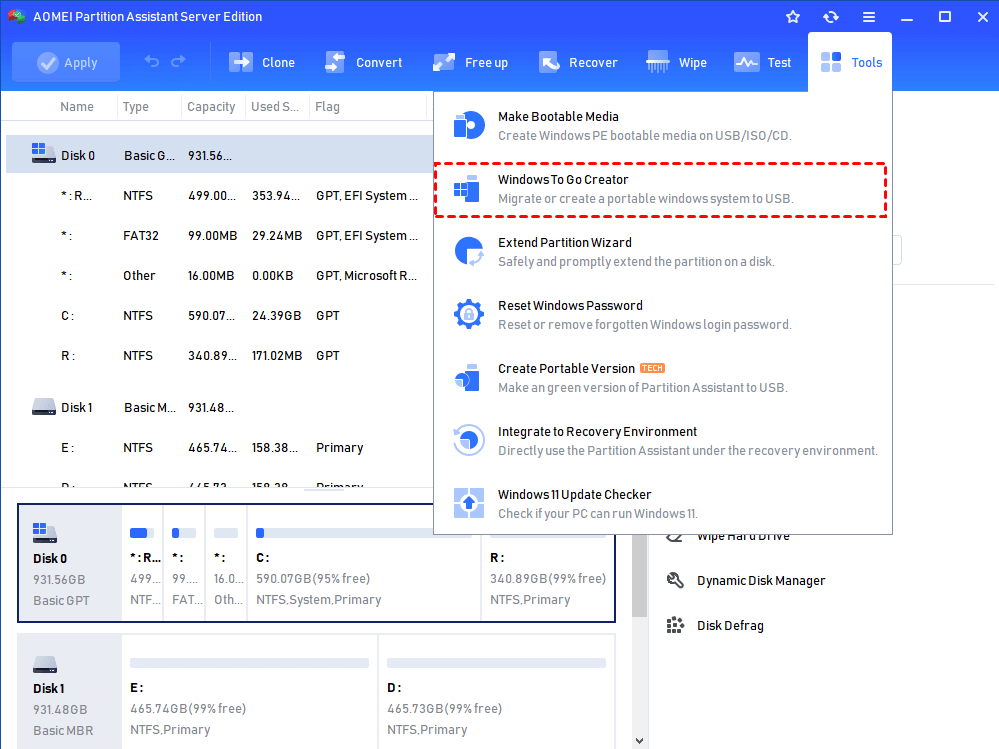
Step 2. Install and launch AOMEI Partition Assistant Pro. Click “Tools” in the top toolbar, and choose “Windows To Go Creator”.
Step 3. Choose the first option "Create Windows To Go with system disc/ISO". Click the folder icon to select ISO manually. After that, click "Next" to continue.
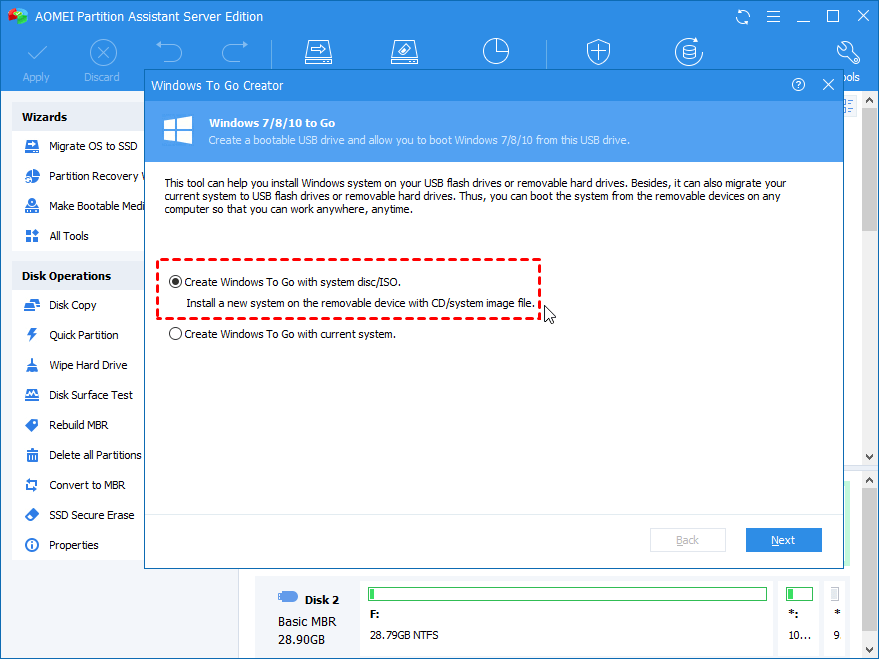
PS.: If you want to create the system currently in use, please select the second option.
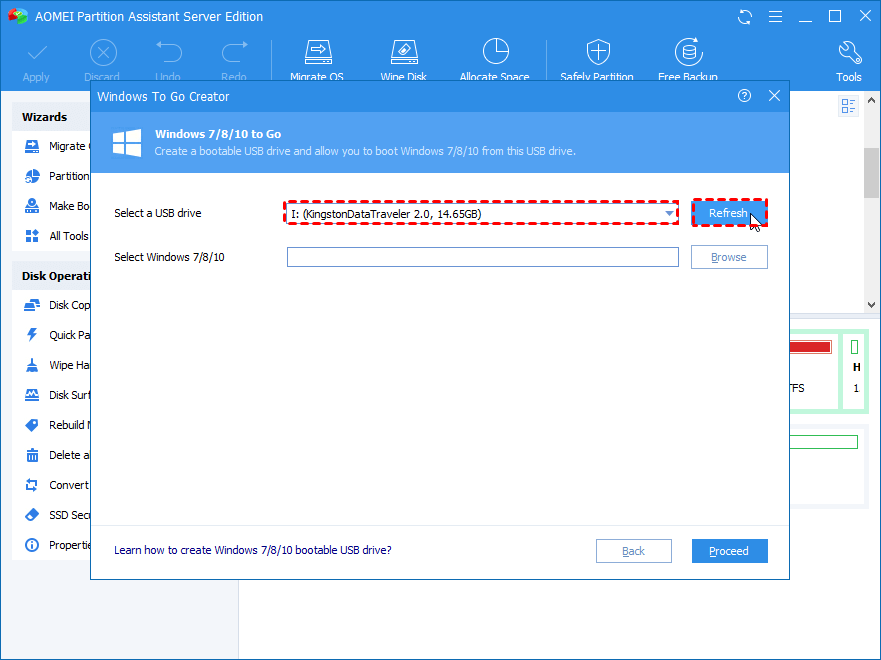
Step 4. Select the target USB drive in here.
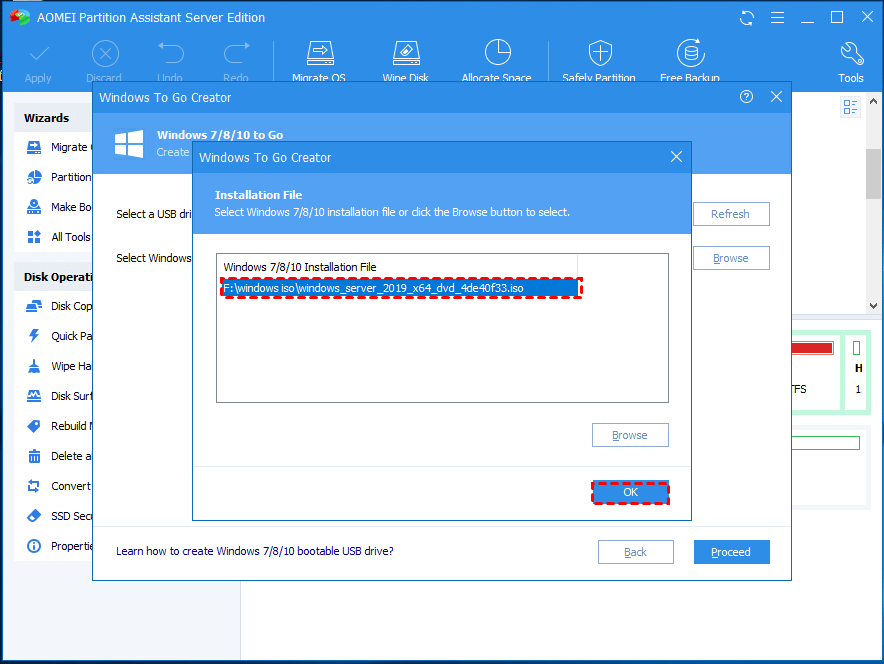
Step 5. Then click "Browse” to select Windows Server 2019 ISO and select “OK”.
Step 6. Then you will see some backup tips, after reading carefully, click “Proceed”.

This is how to use third-party software to create Windows Server 2019 Windows To Go. It is also applies to Windows Server 2008, 2012, 2016 and other Windows systems.
Further reading: Install Windows server 2019 on USB
The above method is to create a portable Windows Server 2019 USB, which can be started directly without installation. However, you can also create a Windows Server 2019 installation media. The specific operation is as follows:
Similarly, you first need to prepare a USB flash drive over 8GB (if important files need to be backed up in advance) and Windows Server 2019 ISO File.
Step 1. Insert the USB into the USB port of the computer to ensure that the computer can detect it.
Step 2. Click on the start bar on the desktop and enter “CMD”, then right-click and select “Run as administrator” to open Command Prompt.
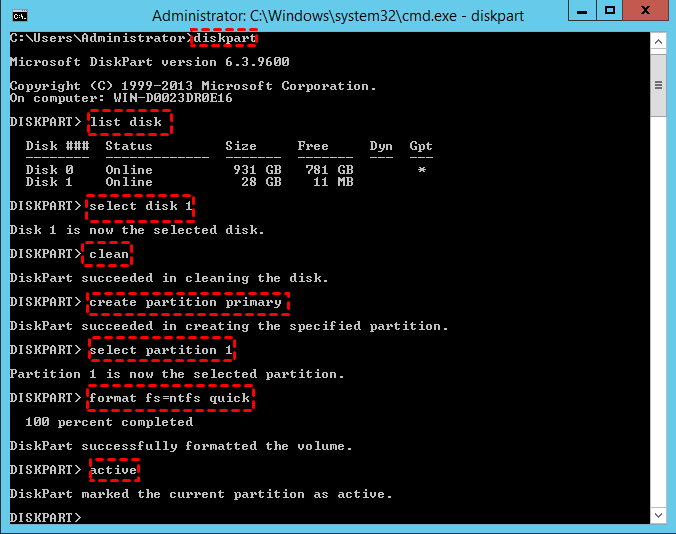
Step 3. Type “diskpart” and press Enter. Then type the following instructions.
●list disk
●select disk X. (X is your USB drive letter)
●clean
●create partition primary
●select partition 1
●format fs=ntfs quick(if you want to create UEFI bootable USB, type “format fs=fat32 quick”).
●active
Step 4. Finally type “exit”and hit enter to close diskpart.
Step 5. Type “xcopy X1:\*.* X2: /s/e/f” in the Command Prompt (X1 is the drive where the ISO file is located, X2 is the drive letter of the USB), and then press Enter.
Step 6. Type “X1:\Boot\Bootsect /NT60 X2: /force /mbr” to write the boot loader to your USB drive.
After the above steps, you have created a Windows Server 2019 installation media, and you can install Windows Server 2019 on USB on different computers. This method is also suitable for installing other Windows systems.
How to boot Windows Server 2019 from USB?
After creating the Windows Server 2019 bootable USB, how do you boot from the computer? Proceed as follows:
Step 1. After inserting the USB, start the computer. When the computer is loading, follow the prompts on the screen to start the shortcut and enter the BIOS.
Step 2. In the BIOS settings, select the “Boot” option, and then select “Change boot order”.

Step 3. In the boot sequence, select your USB drive, then save and exit the BIOS. Boot, your computer exits from USB.
From what has been discussed above, this article introduces you to what is Windows To Go, how to use the Windows To Go tool to create Windows To Go Windows Server 2019 and how to install Windows Server on USB. I believe that creating a Windows bootable USB will no longer be a problem for you in the future.

