How to Free Format Partition or Force Delete OEM Partition?
What is OEM partition and is it safe to be deleted? This tutorial will answer you with sharing how to free format partition or force delete OEM partition with ease.
By Irene / Updated on January 24, 2025
What is an OEM partition?
An OEM (Original Equipment Manufacturer) partition is a reserved section of your computer's hard drive created by the manufacturer. It contains recovery tools and system information needed to restore your computer to its factory settings. These partitions are typically hidden and labeled as "OEM Partition" in disk management tools. They are particularly useful if your computer experiences a serious issue, especially if you don't have recovery media or installation disks.
OEM partitions usually occupy a few hundred megabytes to around 1GB of disk space. While helpful, their usefulness depends on whether you have other recovery options or prefer to handle system issues differently.
Should You Delete the OEM Partition?
You can delete an OEM partition, but it’s important to weigh the pros and cons before deciding. Here are some common reasons why you might want to remove it:
- Free Up Disk Space: OEM partitions can use up valuable storage that you might need for other purposes.
- No Longer Needed: If you’ve already created recovery media or have another reliable backup, the OEM partition might not be necessary anymore.
- Clean Installations: If you prefer to perform a clean installation of your operating system, the OEM partition may feel redundant.
- Simplify Disk Management: Removing unused partitions can make managing your storage more straightforward.
- Improve System Performance: A simpler disk layout can reduce complexity and potentially improve performance.
- Personal Preference: Some users simply prefer a clean, streamlined disk structure without extra partitions.
Deleting the OEM partition will remove your ability to restore the system to factory settings using the built-in recovery tools. If you ever need a factory restore, you might have to contact the manufacturer for recovery media, which isn’t always guaranteed to be available.
Is It Safe to Delete an OEM Partition? Yes, it’s safe to delete an OEM partition, but you should take precautions. Before removing it, consider cloning the partition to an external drive. This way, you’ll have a backup if your system encounters issues later. Being prepared ensures you won’t lose critical recovery tools if something goes wrong.
How to free format partition or force delete OEM partition?
Can I delete the OEM partition? Yes, you can. If you want to know how to do that, you can read this section to learn how to free format partition or force delete OEM partition easily and effectively.
1. Force delete OEM partition
AOMEI Partition Assistant is a user-friendly and powerful disk management tool that makes removing an OEM partition in Windows 11, 10, 8, or 7 effortless. With its intuitive graphical interface, this software simplifies complex tasks, allowing you to handle partitions with ease. Whether you need to delete a hidden recovery partition, a system partition, or a partition on a USB drive, AOMEI Partition Assistant can manage it quickly and effectively.
This tool is not just for removing partitions; it also provides a wide range of features to manage and optimize your disk. You can create, format, resize, move, hide, or wipe partitions effortlessly. If you’re running into the issue of “cannot delete a protected partition without the force parameter set,” AOMEI Partition Assistant offers a straightforward solution, ensuring the partition is removed without unnecessary complications.
The Best Windows Disk Partition Manager and PC Optimizer
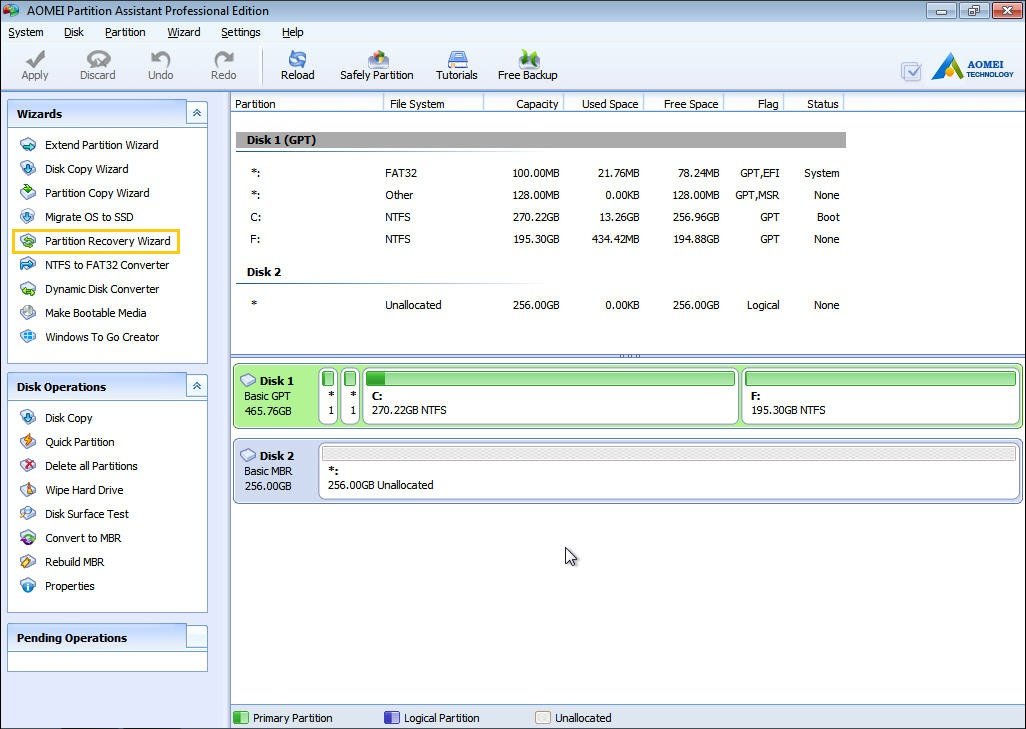
Step 1. Install and run AOMEI Partition Assistant Professional, on the main console, right-click the OEM partition and choose “Delete Partition” at the drop-down menu.
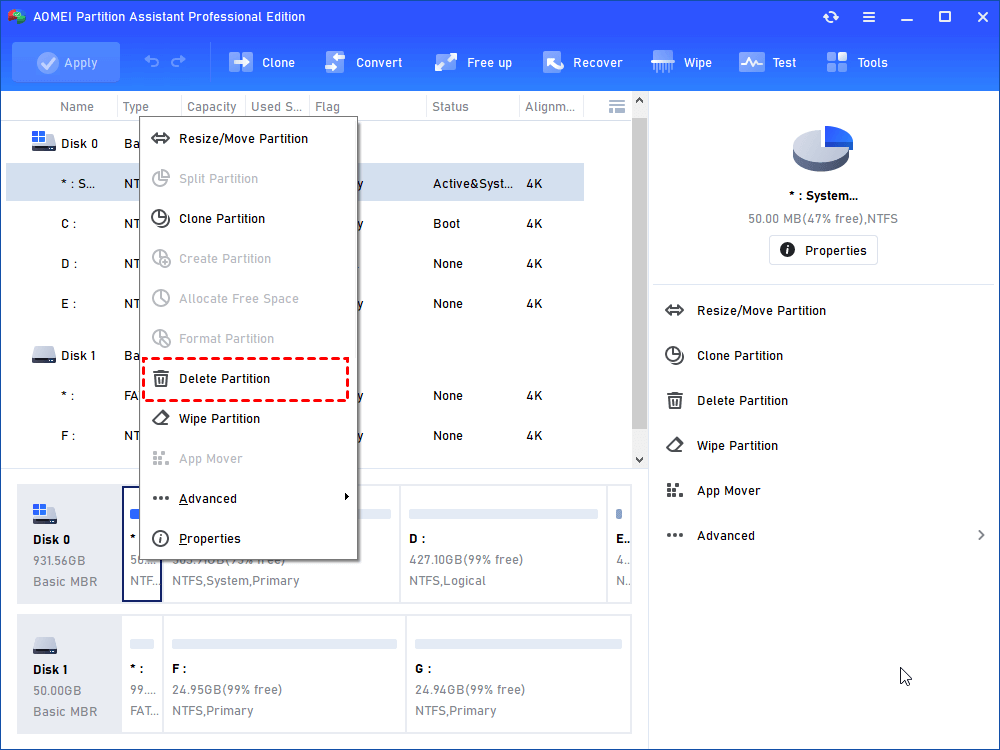
Step 2. Select a method to delete the OEM partition. “Delete partition quickly (Recommended)” or “Delete partition and prevent data recovery, it will take more time”. Then hit “OK”.

Step 3. Click “Apply” to confirm this deletion if you have checked.
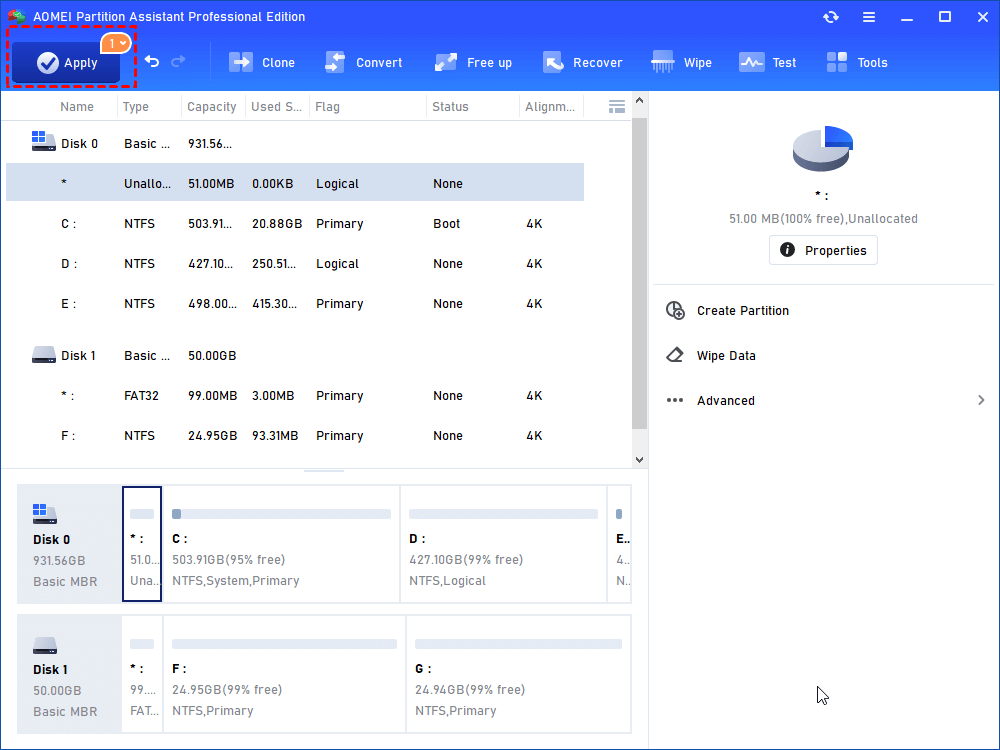
After a few seconds, you will find the OEM partition has been removed successfully.
Note: If you are good at command lines, you can also delete health OEM partition with Diskpart as well.
Press “Windows key + R” to open Run box, and type “cmd” on the box. Then press Enter. When the Command Prompt is open, type “diskpart” on it and press Enter to open “DiskPart” utility. Then run the following commands one by one:
●select disk (choose the disk that contains the OEM partition)
●list partition
●select partition (select the OEM partition)
●delete partition override

2. Free format OEM partition
AOMEI Partition Assistant also allows you to free format OEM partition as well.
Step 1. Right-click the OEM partition and select “Format Partition”.
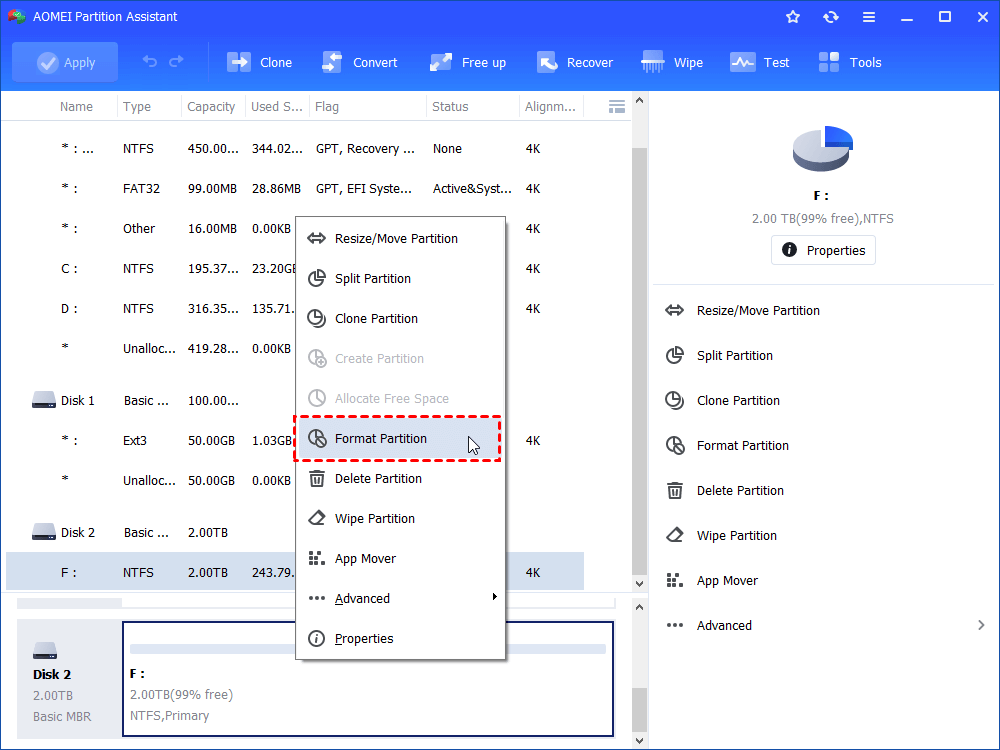
Step 2. In the window, select “FAT32” file system. You can see the “Ext2, Ext3, Ext4, NTFS and exFAT” file systems are also available for your selection.
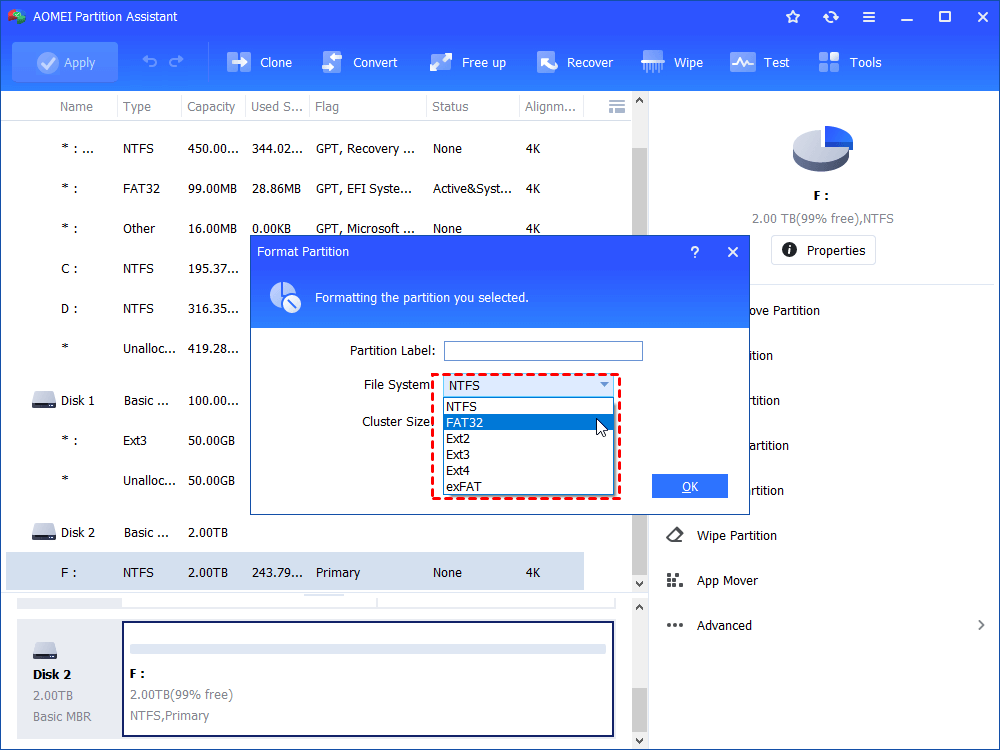
Step 3. Click “Apply” and “Proceed” to commit the pending operation.
Further reading: What to do if you regret free format partition or force delete OEM partition?
If you want to still keep the OEM partition to restore your system to factory settings, don’t worry—there’s a solution. AOMEI Partition Assistant can help you restore a deleted OEM partition and recover any lost data, even from a formatted partition, on Windows 7, 8, 10, and 11.
The Best Windows Disk Partition Manager and PC Optimizer
Case 1. Recover deleted or lost partition
Step 1. Run the software, on the main interface, choose “Partition Recovery” under the Recover tab, and select a disk that you want to recover list in the pop-up window.
Step 2. Choose a search method and hit “Next”.

Step 3. The program will list all the lost partitions, tick the lost partition and click “Proceed”.

After a while, you will see that partition again and restore system to factory settings if needed. This software also allows you to allocate free space to expend the system drives or other partitions.
Case 2. Recover deleted or lost data from a formatted partition
If you want to recover data after formatting the OEM partition, AOMEI Partition Assistant also offers Recover Data feature. It allows users to recover over 1000+ types of files, such as Word, Excel, PPT and other Office files, video, etc., even if you encounter permanent deletion, accidental format, system crashes, or virus and malware attacks.
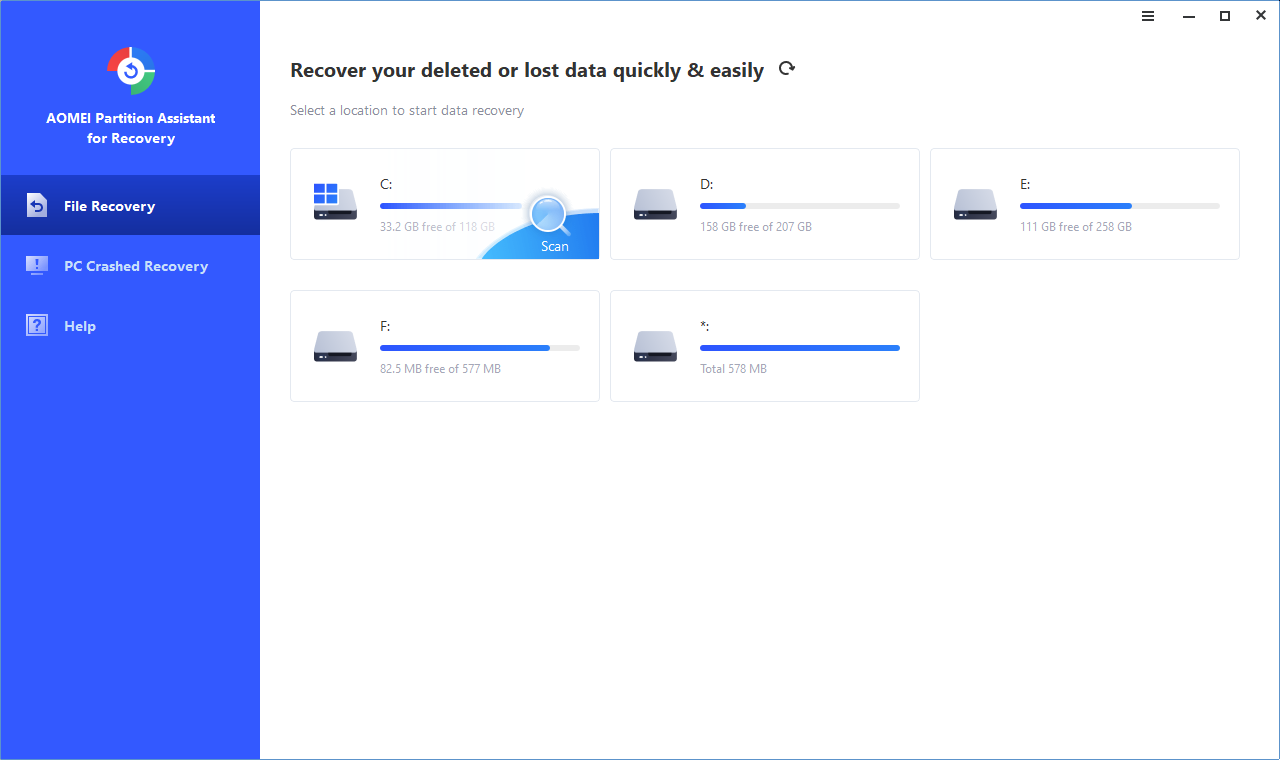
Step 1. Install and launch AOMEI Partition Assistant. In the Main Tab, please click "Recover"> "Recover Data".

Step 2. The Recover Windows Data tool will pop up. Please select the partition location to start data recovery and click "Start Scan".
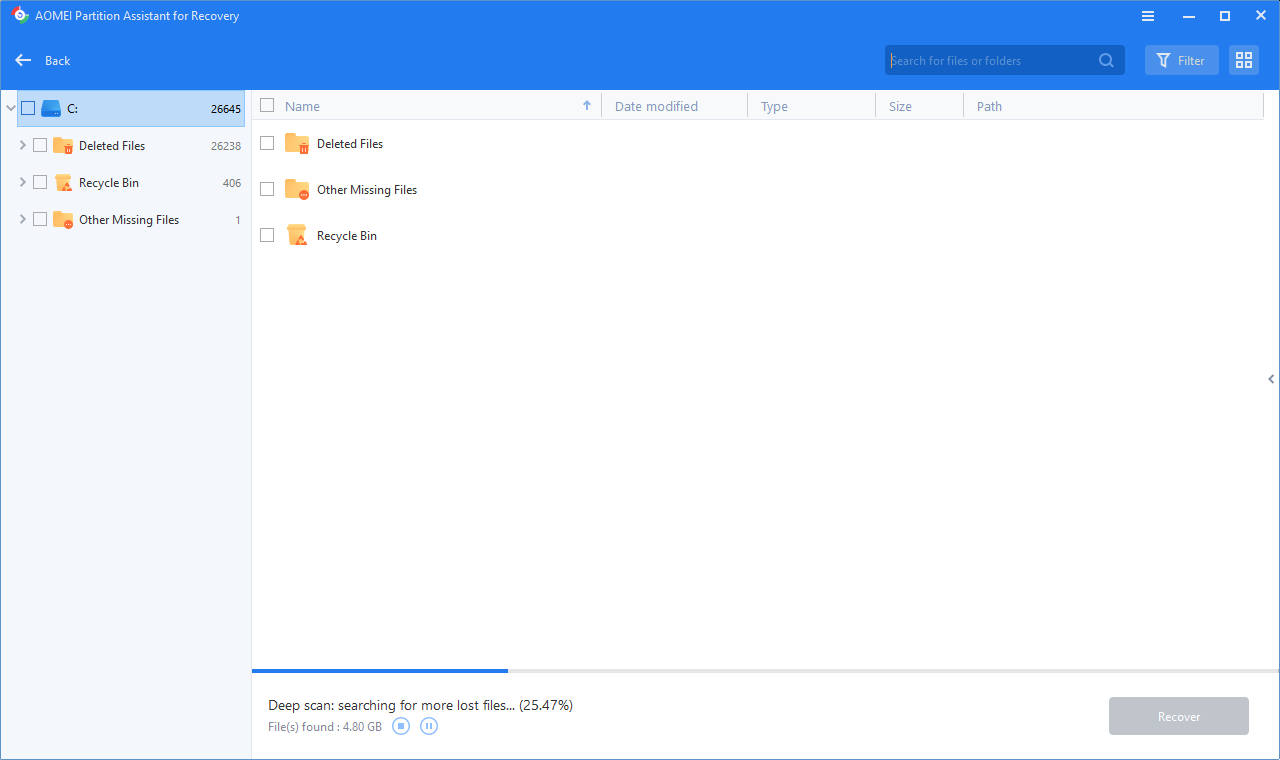
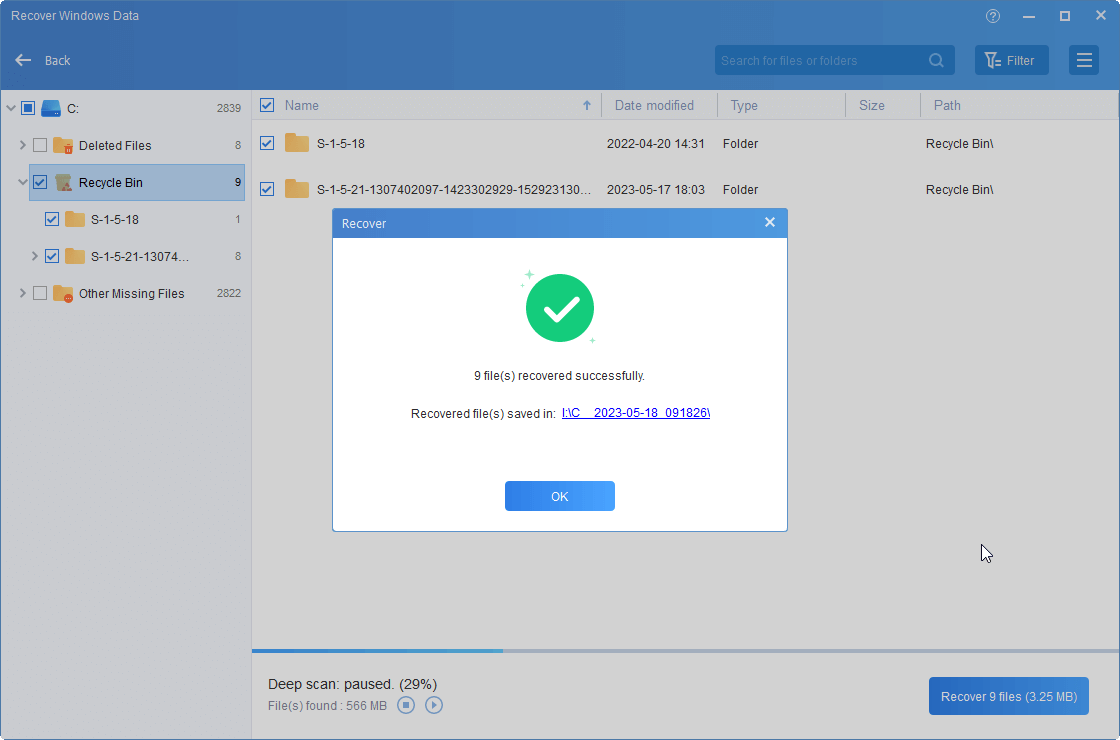
Step 3. Once the scan is completed, all deleted files, recycle bin, and other missing files will be displayed. Please select data you would like to recover and then click "Recover".
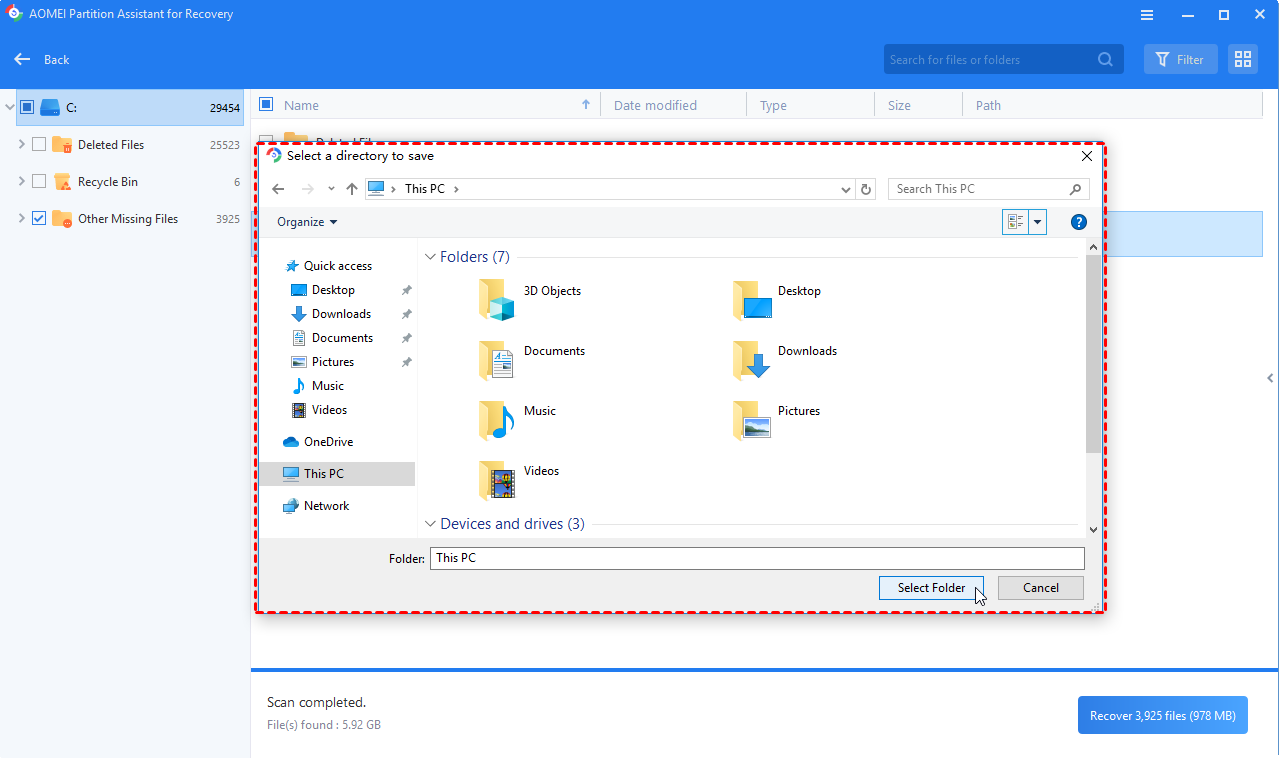
Step 4. Please select a folder path on your PC to save the recovered data.
Step 5. The recovery progress will start and data will be saved to the path you select once the recovery process is successful.
Conclusion
For free format partition or force delete OEM partition, AOMEI Partition Assistant makes this process simple, offering reliable options for managing partitions, restoring deleted ones, and recovering lost data. Its user-friendly design and powerful features make it an ideal tool for optimizing your disk while ensuring your data remains secure and accessible. If you are a Windows Server user who want to format or remove an OEM partition, you can choose the AOMEI Partition Assistant Server edition.

