How to Change BitLocker to Use Password Instead Windows 10
How to change BitLocker to use password instead Windows 10? In this post, we’ll show you four effective methods to change password easily.
By Hedy / Updated on September 12, 2025
What is BitLocker?
BitLocker is a full-disk encryption tool built into Windows 10. It protects your data by encrypting the entire drive, so even if someone steals your hard drive, they won’t be able to access your files without the proper credentials. BitLocker can use TPM (Trusted Platform Module) or passwords to unlock drives, offering flexibility depending on your security needs.
By default, BitLocker uses TPM to authenticate users. TPM is a small chip on your motherboard that securely stores cryptographic keys. With this method, you often won’t notice BitLocker at all—it automatically unlocks when you log in to Windows. While convenient, this approach may feel less secure for users who prefer manual password entry.
Why change BitLocker to use password instead?
Changing BitLocker to use a password instead of other authentication methods (like TPM-only or USB key) can have several practical advantages. Here’s a detailed breakdown:
1. Portability and flexibility
TPM-only authentication ties BitLocker to the specific device. If the motherboard or TPM module fails, accessing the drive becomes difficult. Password authentication allows you to unlock the drive on any compatible system without relying on hardware components.
2. Enhanced security control
TPM can automatically unlock the drive at startup, which is convenient but reduces the need for user interaction. Using a password adds a layer of user-controlled security, meaning someone needs to know the password to access the encrypted data. This is useful if the device is stolen or lost.
3. Recovery scenarios
If hardware changes or firmware updates interfere with TPM, the system may require the BitLocker recovery key to access the drive. With a password, you can avoid hardware dependency issues because the password itself is sufficient to unlock the drive.
How to change BitLocker to use password instead Windows 10
This section will walk you through four effective methods to update your BitLocker password, boosting your device's security.
Method 1. Change BitLocker password from File Explorer
One of the easiest methods to update your BitLocker password is via File Explorer. This approach lets you quickly locate and manage encrypted drives with minimal hassle. Here's how to do it:
Step 1. Press Windows + E to open File Explorer.
Step 2. Right-click on the BitLocker-encrypted drive you want to update, and choose Change BitLocker password from the context menu.
Step 3. Enter the old password, then set your new password and click Change password.
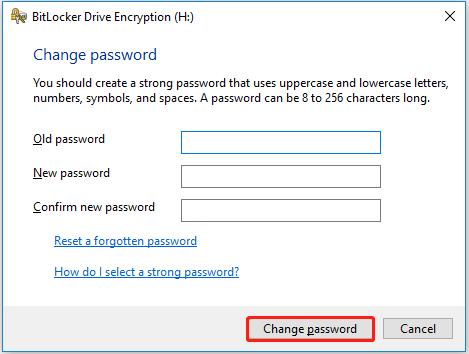
Step 4. Once you see the confirmation that the password has been successfully changed, click Close to exit.
Method 2. Change password using BitLocker Control Panel
You can also update your BitLocker password through the Control Panel, which offers a simple and intuitive interface—perfect for those who prefer not to use command-line tools. Here's how to do it in Windows 11:
Step 1. Press Windows + S, type Control Panel, and open it from the search results.
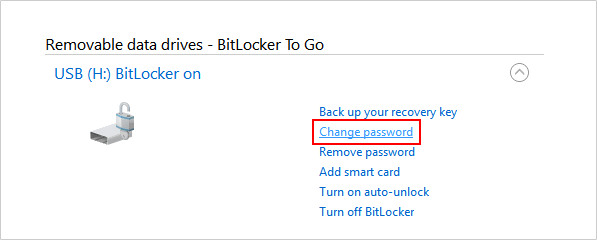
Step 2. Select BitLocker Drive Encryption.
Step 3. Click on the encrypted drive you wish to modify, then choose Change password.
Step 4. Enter your old password, then follow the prompts to set a new one. Once done, click Close.
Method 3. Change BitLocker password via Command Prompt
To change your BitLocker password more efficiently in Windows 11, using Command Prompt is a great option—especially if you're comfortable with the command line. With just one simple command, you can update your password. Follow these steps:
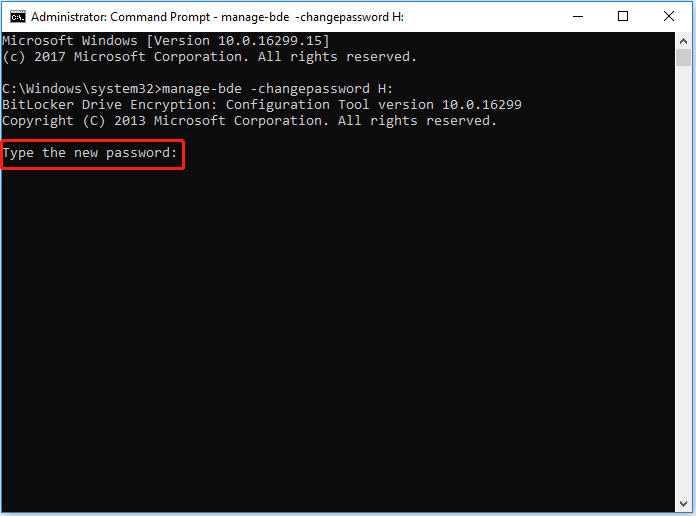
Step 1. Type cmd in the search box, then right-click and select Run as Administrator.
Step 2. Enter the following command, replacing X with your drive letter:
manage-bde -changepassword X:
Step 3. When prompted, enter and confirm your new password.
Step 4. After the process finishes, close the Windows Terminal (Admin).
Method 4. Change BitLocker to use password in an easier way
Looking for a simpler way to change your BitLocker password? You can streamline the process using an all-in-one BitLocker management tool.
AOMEI Partition Assistant is a user-friendly disk management software for Windows. It makes BitLocker encryption and management a breeze, even on the Home edition of Windows and other supported versions.
✍ Why choose AOMEI Partition Assistant:
✔️ Wide compatibility: Works with most Windows versions, including Windows 11/10/8/7, and even Windows 11/10 Home.
✔️ Easy-to-use: Its intuitive interface ensures anyone—regardless of technical experience—can manage BitLocker with ease.
✔️ Versatile features: Simplifies encryption and management of BitLocker in just a few clicks.
Step 1. Download and install AOMEI Partition Assistant first. Open Partition Assistant and click the Tools tab to select BitLocker.

Step 2. Locate the encrypted drive where you want to change the password and click the Change password option.
Step 3. Here you can choose to use a password or recovery key to update the drive password. If you choose Use password to change drive password, enter the old password, set a new one, confirm it, and then click Modify button.
Step 4. Once the modification is successful, a window writing Password changed successfully will appear.
Conclusion
It's important to update your BitLocker password regularly, especially in situations where data security could be compromised. Wondering how to change your BitLocker password in Windows 11? In this guide, we've covered three effective methods to do so.
For a more streamlined experience, we also recommend using AOMEI Partition Assistant. This versatile tool not only simplifies the password change process but also gives you greater control over your drives. It can help you resolve various other drive-related issues, such as extending disk volumes or cloning hard drives.

