How to Choose Which Drive Windows Is Loaded from
Confused how to choose which drive Window is loaded from? Find out how to choose which drive Windows is loaded from, fix boot issues like 'GPT disk computer wont boot', & manage boot entries easily.
By Lucas / Updated on April 30, 2025
Many computer users find that multiple hard drives or SSDs installed in their systems provide ample space for data, games, and applications, but it can sometimes lead to confusion about which drive contains your operating system and, more importantly, how to choose which drive Windows is loaded from.
This is a common question especially after installing a new drive, cloning your system, or dealing with boot issues. Understanding how to select the correct boot drive is crucial for ensuring your computer starts correctly and efficiently.
This article will guide you through checking your current boot drive and the various methods available for selecting how to choose which drive Windows is loaded from.
How to Check Which Drive Windows is Loaded From
You can straightforwardly check which disk is your current boot drive. This helps confirm your system's configuration or troubleshoot why it might be booting from an unexpected location.
1. Check through Disk Management
Step 1. Right-click on the Start button and select "Disk Management".
Step 2. In the Disk Management window, look at the list of disks (Disk 0, Disk 1, etc.).

Step 3. Locate the partition where your Windows installation resides (usually marked with the Windows logo or labeled "System", "Boot", "Page File", "Crash Dump", "Primary Partition").
Step 4. The disk number associated with this partition is your current boot drive. For example, if the C: drive (where Windows is installed) has the "Boot" status listed and is on "Disk 0", then Disk 0 is your boot drive.
2. Check using the System Information tool
Step 1. Press Windows Key + R, type msinfo32, and press Enter. In the System Information window, navigate to "System Summary" (which is usually the default view).
Step 2. Look for the "Boot Device" entry. This entry will show you the path to the device Windows is booting from, which corresponds to your boot drive.
While it might show a complex device path, you can often infer the drive based on its type or ID, or cross-reference it with Disk Management.
Step 3. Checking your current boot drive is the first step in understanding your system's configuration before you attempt to change it or choose which drive Windows is loaded from if you have multiple options.
Choose Which Drive Windows is Loaded From (On Multi-Disk PC)
Having multiple drives in your PC is common for expanding storage or running multiple operating systems. However, when you have multiple potential bootable drives, your computer needs to know which one to start from.
This is often necessary after installing a new operating system on a separate drive when troubleshooting boot issues, or if you want to experiment with different configurations.
Method 1: Using BIOS/UEFI Settings (The Traditional Way)
The Basic Input/Output System (BIOS) or Unified Extensible Firmware Interface (UEFI) is the first software that runs when you turn on your computer. It initializes hardware and starts the bootloader, which in turn loads the operating system.
You can access these settings during the very early stages of the boot process to specify the boot order – the sequence in which your computer checks drives for a bootable operating system.
Step 1. Restart your computer
Step 2. As the computer starts, watch for a message on the screen indicating which key to press to enter Setup or BIOS/UEFI. Common keys include Del, F2, F10, F12, or Esc. You usually need to press this key repeatedly as soon as the manufacturer's logo appears.
Tip: The exact key varies depending on your motherboard manufacturer (ASUS, Gigabyte, MSI, Dell, HP, Lenovo, etc.). If you miss the window, just restart and try again.
Step 3. Once inside the BIOS/UEFI, the interface will vary significantly. Use the arrow keys, Enter key, and sometimes the mouse (in UEFI) to navigate. Look for menus titled "Boot", "Boot Order", "Boot Priority", "System Configuration", or similar.
Step 4. Within the Boot menu, you should see a list of recognized bootable devices, which will include your hard drives, SSDs, USB drives, and optical drives. They might be listed by their manufacturer name or model number.
Step 5. You will need to change the order of these devices so that the drive containing the Windows installation you want to boot from is listed first. There are usually instructions on the screen for how to change the order (e.g., using +/-, F5/F6, or drag-and-drop in some UEFI interfaces). Move the desired Windows drive to the top of the boot list.
Step 6. Once the boot order is set correctly, navigate to the "Exit" or "Save & Exit" menu.
Step 7. Select "Save Changes and Exit" or a similar option. Confirm your choice when prompted.
Your computer will restart and should now attempt to boot from the drive you placed first in the boot order.
Considerations when using BIOS/UEFI:
▍UEFI vs. Legacy BIOS: Modern systems use UEFI, which is generally more user-friendly and supports larger disks (gpt disk computer won't boot issues can sometimes stem from trying to boot a GPT disk in Legacy BIOS mode). Older systems use Legacy BIOS. The interface and options might differ. Ensure your boot mode setting (UEFI/Legacy) is compatible with the way Windows was installed on the target drive. A Windows installation on a GPT disk typically requires UEFI boot mode.
▍Secure Boot: UEFI systems often have Secure Boot enabled. This security feature helps prevent malicious software from loading during startup. While usually fine, sometimes changing boot options requires temporarily disabling Secure Boot, though this is less common just for changing drive order.
▍Complexity: BIOS/UEFI interfaces can be complex and intimidating for new users, with many settings that, if changed incorrectly, can cause boot problems.
Method 2: Using the Boot Menu (One-Time Boot)
Most computers also offer a "Boot Menu" that allows you to select a boot device for the current startup only, without permanently changing the boot order in the BIOS/UEFI. This is useful for temporarily booting from a recovery USB drive or another OS drive without altering your primary boot configuration.
Step 1. To access the Boot Menu, you typically press a different key during startup than the one for entering BIOS/UEFI Setup. Common keys include F12, F10, Esc, or F9.
Step 2. Again, watch the screen during startup for the specific key prompt (e.g., "Press F12 for Boot Menu").
Step 3. From the boot menu, you can select the desired drive with the arrow keys and press Enter. The computer will then boot from that drive for this session.
While using the Boot Menu is convenient for one-off boot selections, it doesn't change the default boot order. To permanently choose which drive Windows is loaded from, you'll need to modify the settings in the BIOS/UEFI as described in Method 1. This is how you would permanently choose boot disk windows 10 if you have multiple Windows installations.
Further reading: Easily and Quickly Manage Windows Boot Drive Without Entering BIOS
While BIOS/UEFI offers complete control over the boot process, it requires restarting your computer and navigating potentially complex menus. For users who find this inconvenient or intimidating, or for those who frequently need to adjust boot options, a dedicated software solution provides a much easier way to manage your boot entries directly from within the Windows operating system.
This is particularly useful when you have multiple operating systems installed, are troubleshooting boot issues related to various drives (like when a gpt disk computer won't boot due to boot entry problems), or want a more user-friendly way to choose boot disk Windows.
One such powerful and reliable tool is AOMEI Partition Assistant. AOMEI Partition Assistant is a comprehensive disk and partition management software designed to simplify complex disk operations for Windows users. While it's widely known for its abilities to resize, merge, split, clone, and migrate partitions and disks, it also includes a highly useful feature for managing UEFI boot options without needing to access the “UEFI BIOS Boot Options Manager” function.
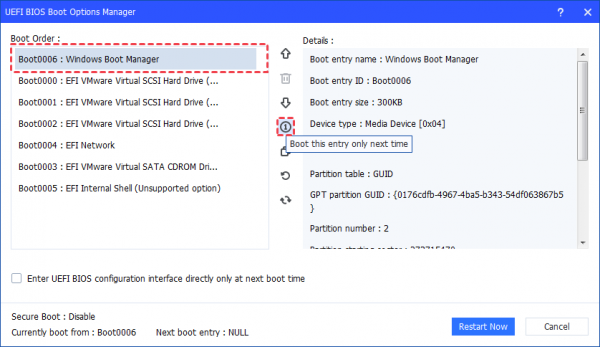
The UEFI Boot Manager offered by AOMEI Partition Assistant provides a graphical interface within Windows to view, modify, delete, and arrange UEFI boot entries.
Step 1. Install AOMEI Partition Assistant, click “Tools” in the top menu, and choose “UEFI BIOS Boot Options Manager” function.

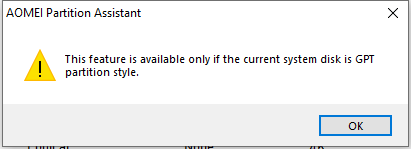
If your system drive is an MBR one, after you click the tool you will get a message that the feature is available only if the current system disk is GPT partition type.
On a GPT drive, the UEFI Boot Options Manager will pop up. In this interface, all UEFI boot orders on your computer will be displayed and you can manage them.
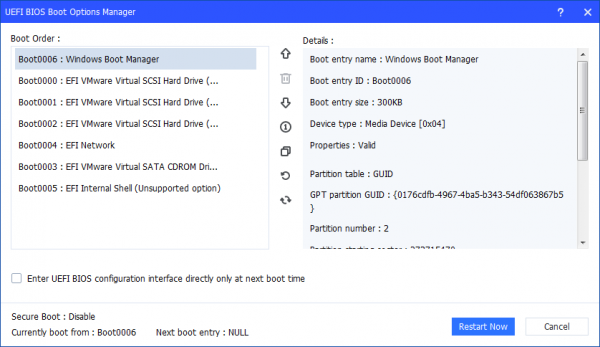
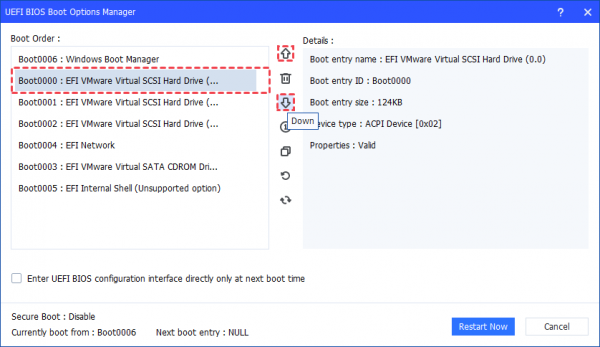
1. How to change boot options
Click a boot option and click the button up and down to change the boot sequence of your computers.
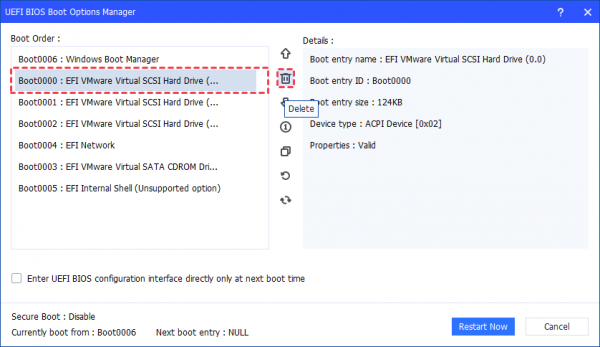
2. How to delete boot options
Click a boot option that is not available or unnecessary to delete the boot option. Please be cautious before you delete a boot option. For system boot and security, it will be unable to delete the current boot option.
3. How to enable one-time boot entry
Click a boot option and click the button to enable a one-time boot entery. Once you click the option, the computer will boot from this entry only the next time system startup. After the PC boots from the entry once, the PC will boot from the defaulted first entry.
Ending
Navigating the boot process of a computer with multiple drives can seem complex, but understanding how to choose which drive Windows is loaded from is a fundamental skill for any PC user. For those seeking a more convenient and less technical approach to how to choose which drive to boot to, especially when dealing with UEFI systems and multiple boot entries, software like AOMEI Partition Assistant offers a powerful alternative.
Beyond boot management, AOMEI Partition Assistant is a versatile tool for all your disk and partition needs, offering features like cloning, migrating OS to SSD, cleaning junk files, and much more, making it a handy utility for maintaining a healthy and efficient Windows computer.

