Managing Virtual Storage: How to Mount VHDX File in Windows 11 and 10
Discover the easiest ways for how to mount VHDX in Windows 10 and 11. Explore step-by-step tutorials using Disk Management and AOMEI Partition Assistant to manage virtual drives efficiently.
By Lucas / Updated on January 20, 2026
VHD and VHDX are incredibly versatile tools for modern PC users. They allow you to create a self-contained file that acts exactly like a physical hard drive, making them perfect for testing new software, running secondary operating systems, or organizing massive backups. However, knowing how to mount VHDX x file in Windows is the essential first step to accessing the data stored within these virtual containers.
Whether you are a developer or a casual user, understanding the nuances of virtual disk mounting can save you a significant amount of time. This article will guide you through the native Windows shortcuts and introduce professional management software to handle more complex tasks like creation and cloning.
More about VHD & VHDX Files in Windows
Before diving into the "how-to," it is important to understand why these files are used and what mounting actually does. Mounting a virtual disk essentially tells your operating system to treat a single file as a readable and writable volume.
The VHDX format, specifically, is the modern standard used in Windows 8, 10, and 11, offering better power-failure resilience and supporting capacities up to 64TB. Users often search for instructions on how to mount a VHDX file in Windows 11 to recover files from a system image or to use a virtual drive for isolating sensitive data. By mounting these files, you bypass the need for physical hardware, allowing for a more flexible digital workspace.
How to Mount.VHDX Files in Windows 10 and 11 Using Native Tools
Here are 3 solutions to mount VHDX in Windows PC.
Way 1. The File Explorer Shortcut
For most users, the quickest answer for how to mount .vhd files in Windows 10 is through File Explorer. Simply locate your .vhd or .vhdx file, right-click it, and select "Mount." Windows will automatically assign a drive letter, and the contents will appear in "This PC" just like a USB flash drive. In Windows 11, you may need to click "Show more options" to see the Mount command if it doesn't appear in the condensed context menu.
Way 2. Using Disk Management
If the right-click method fails, you can use the Disk Management utility. This is the preferred method for those wondering how to mount a VHD in Windows 10 when they need to specify certain parameters.
Step1. Right-click the Start button and select Disk Management.

Step 2. Click on Action in the top menu bar. Select Attach VHD.
Step 3. Browse to your file location and click OK. The disk will then appear in the lower pane, where you can initialize it or assign a new drive letter if it doesn't show up automatically.
💡 Troubleshooting: Why Virtual Disks Fail to Mount
Sometimes, following the standard steps for how to mount VHDX file in Windows 11 leads to errors like "The disk image isn't initialized" or "The file is in use." These issues can prevent your virtual drive from appearing.
Common causes include the VHD file being stored on a drive with a different file system or the file being set to "Read-Only" attributes. Additionally, if the Virtual Disk Service (VDS) is disabled in your Windows Services settings, the mounting process will fail. Ensuring your host drive is formatted as NTFS and checking your system permissions can often resolve these basic connectivity hurdles.
Way 3. VHD Management with AOMEI Partition Assistant
While Windows' native tools are sufficient for simple mounting, they often lack advanced features like cloning or easy creation interfaces. For a more robust experience, AOMEI Partition Assistant is the go-to solution for power users.
AOMEI Partition Assistant is a comprehensive disk management utility that simplifies partition resizing, disk conversion, and virtual disk handling. As a professional-grade SEO tool for storage, its dedicated "Virtual Disk" function that provides a streamlined workflow that outperforms the clunky Disk Management console. Under this function, users can choose to create a new VHD or attach an existing one with just a few clicks.
If you need a new virtual environment, AOMEI makes the creation process intuitive:
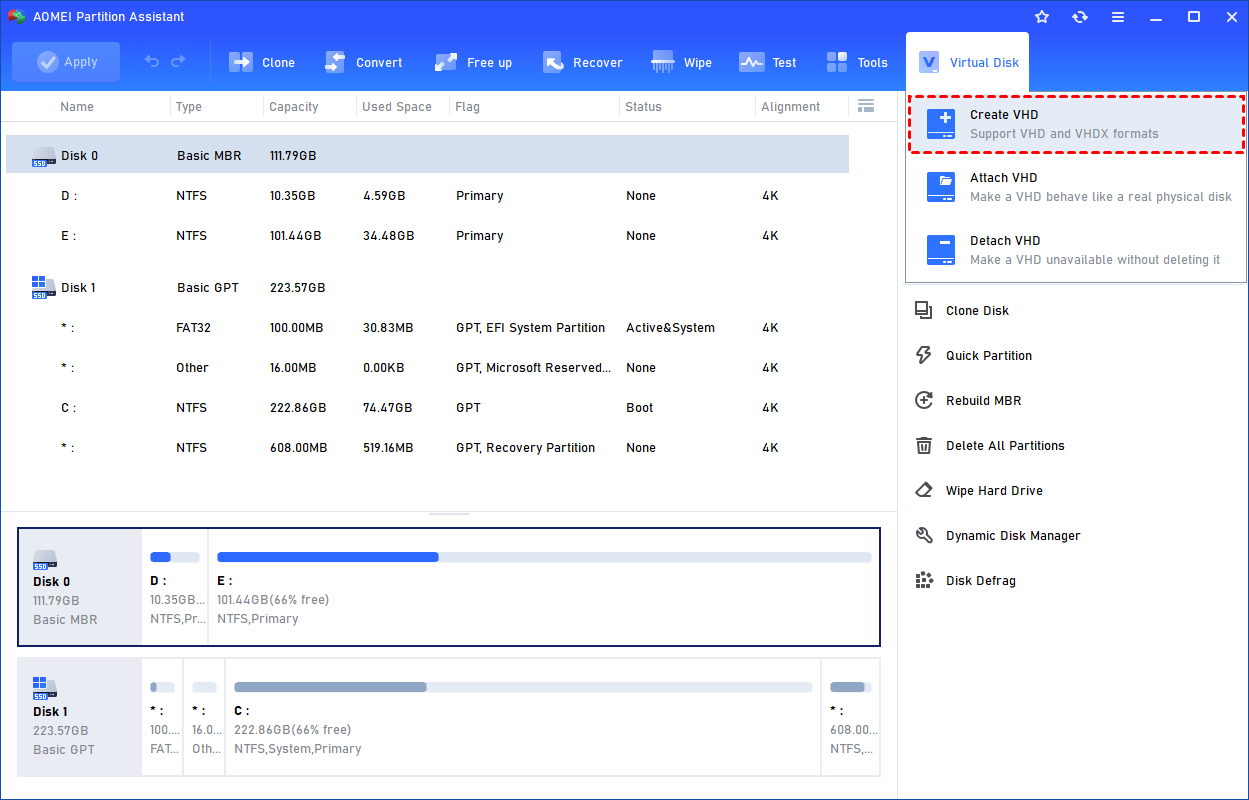
Step 1. Click the tab "Virtual Disk", you will see 3 options available for VHDs: create VHD, attach VHD, and detach VHD. Select the "Create VHD" option after clicking the "Virtual Disk" tab.
Step 2. You can specify the virtual disk location and size.
Optionally, you can click the "Advanced" option to set the virtual hard disk format and type. (By default, the VHDX format and the Dynamically expanding type are checked.)
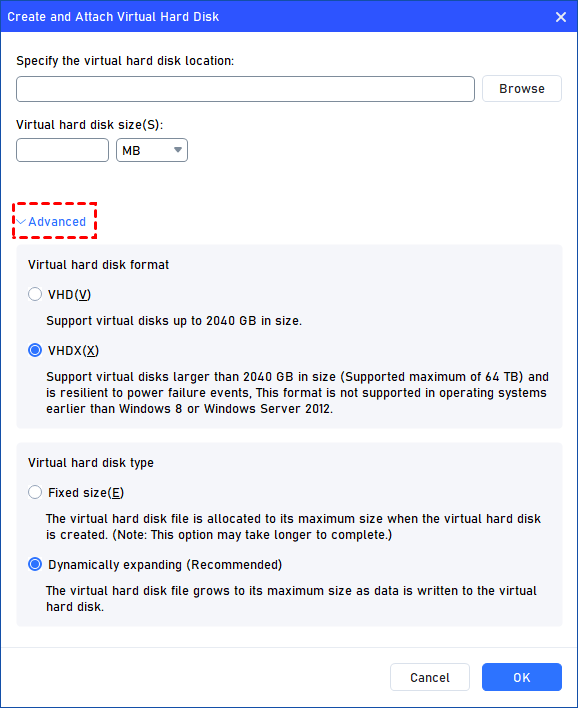
Virtual hard disk format: VHD and VHDX are supported.
For VHD, it supports virtual disks up to 2040GB in size.
For VHDX, it supports virtual disks larger than 2040GB in size. (Up to 64TB) This format is not supported in operating systems earlier than Windows 8 or Windows Server 2012.
Virtual hard disk format: Fixed size and Dynamically expanding are supported.
For a fixed size, the virtual hard disk file will be allocated its maximum size when it is created. So it will take much longer to create.
For Dynamically expanding, the virtual hard disk file will grow to its maximum size as data is written to it. (Recommended)
Click "Browse" to select a location to create the VHD. Please enter a file name for the virtual disk and click "Save".
Step 3. Once the virtual disk location and size are set up, you can click "OK" to start creating the VHD.

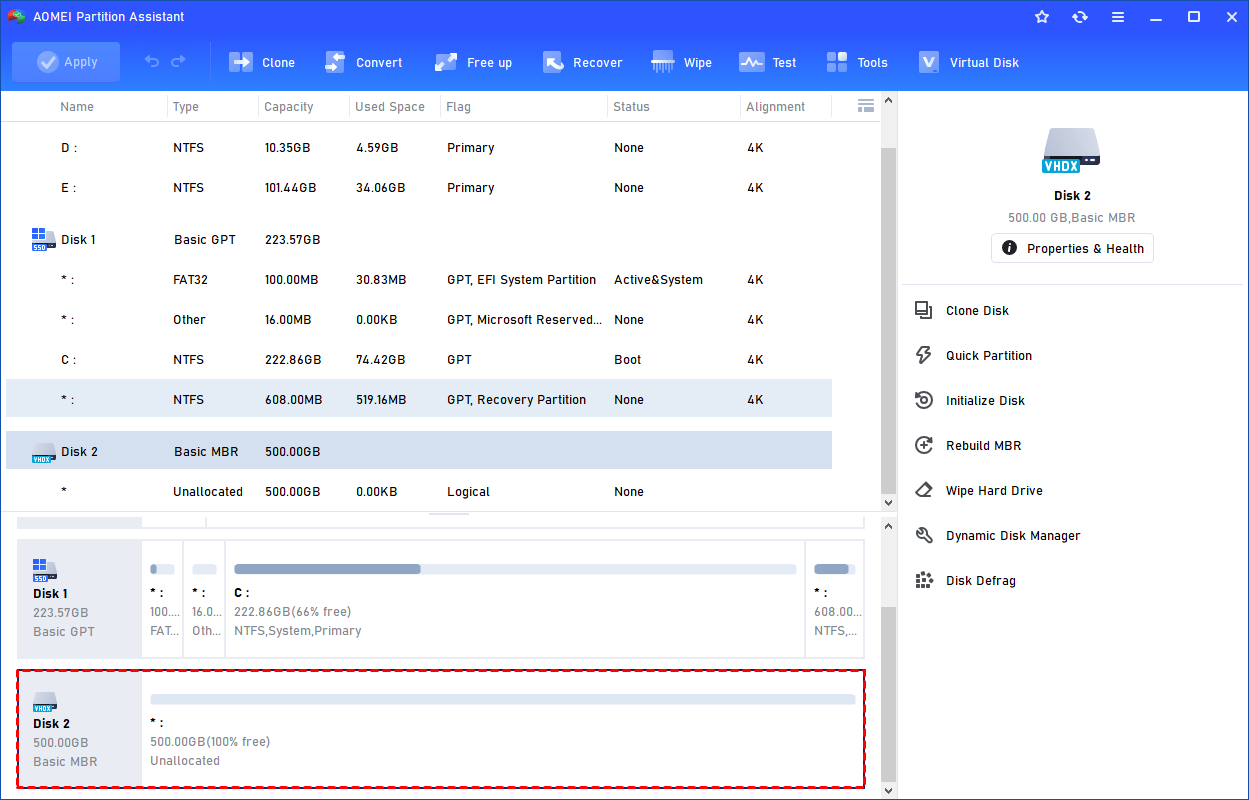
Step 4. After the reload process is finished, you will see that the VHD has been created successfully. It will be attached automatically.
Other Handy Functions: AOMEI Partition Assistant isn't just for virtual disks. It also includes functions like Resize/Move Partition, Merge Partitions, etc. These tools ensure that once you know how to mount VHDX file in Windows, you have the power to manage that data effectively.
Ending
Mastering how to mount VHDX file in Windows is a fundamental skill for anyone looking to leverage the power of virtual storage. Whether you use the quick File Explorer method or the more detailed Disk Management approach, accessing your data is straightforward. For users who require more than just simple mounting—such as the ability to clone a VHD or create a new VHDX with customized parameters—AOMEI Partition Assistant provides a professional, reliable, and user-friendly platform to manage all your virtual and physical disk needs.
FAQs
Q1: What is the difference between VHD and VHDX?
A: VHD is the older format with a 2TB limit. VHDX is the newer format introduced with Windows 8, supporting up to 64TB, better performance, and protection against data corruption during power failures.
Q2: How do I unmount or "eject" a VHDX file?
A: In File Explorer, simply right-click the mounted drive letter and select "Eject." This safely detaches the virtual disk from your system.
Q3: Why can't I mount a VHDX file in Windows 7?
A: Windows 7 natively supports .vhd files, but does not support the .vhdx format. To open a VHDX on Windows 7, you would need to use a tool like AOMEI Partition Assistant to convert or manage the file.
Q4: Can I mount a VHDX file located on a network drive?
A: Yes, you can. However, performance will depend on your network speed. You must have full read/write permissions for the folder where the VHDX file is stored.
Q5: Is it safe to clone a VHD to my main system drive?
A: Yes, as long as the target drive has enough space. Using AOMEI Partition Assistant's "Clone Disk" feature ensures that all partitions and boot data are transferred accurately.

