How to Mount VHDX File in Windows 11
Are you struggling to manage virtual drives? Discover how to mount, create, and delete VHDX files in Windows 11. Use AOMEI Partition Assistant for advanced Virtual Disk and Clone Disk features.
By Lucas / Updated on February 4, 2026
VHDX format is at the forefront of this shift, offering high capacity (up to 64 TB) and corruption resilience. Whether you are looking for a Windows 11 VHD download to test a new operating system safely or you want to create a secure, encrypted container for your private files, mastering virtual disks is essential.
However, a VHDX file is just a file until the operating system reads it. To access the data inside or install programs onto it, you must "mount" it so it appears as a drive letter (like E: or F:). This guide provides a comprehensive walkthrough on how to mount VHDX file in Windows 11. We will cover native Windows methods and introduce a professional disk management tool that simplifies the entire lifecycle of virtual disks, from creation to deletion.
Understanding VHDX and Why Mounting Matters
Before diving into the "how-to," it is important to understand the "what." A VHDX file mimics a physical hard drive. When you simply store it on your SSD, it is dormant data. Mounting it—often called "Attaching"—tells Windows to treat this file exactly like a physical hard drive plugged into a SATA or USB port.
This process is crucial for developers testing software, IT professionals managing system images, or users who want to create VHD Windows 11 environments for sandboxing. However, managing these disks can sometimes be clumsy with built-in tools, leading to errors when trying to modify or remove them later.
How to Windows Tools to Mount VHDX in Windows 11
Windows 11 provides two primary built-in methods to handle virtual disks. While effective for basic tasks, they lack advanced management features.
Method 1: Using File Explorer
The quickest way to access a virtual disk is through the standard File Explorer interface.
Step 1. Navigate to the folder containing your .vhdx file.
Step 2. Double-click the file. Alternatively, right-click it and select Mount.
Windows will automatically assign a drive letter, and a new window will open showing the contents of the virtual disk.
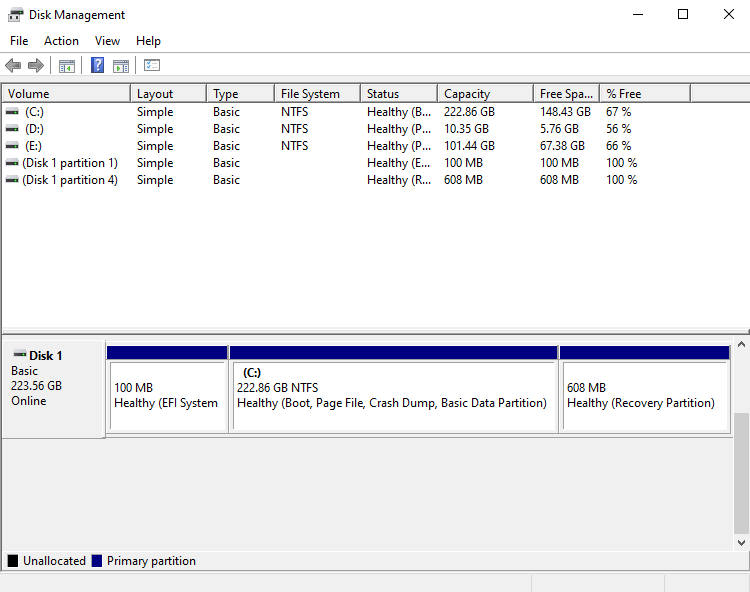
Method 2: Using Disk Management
For more control, such as assigning a specific letter, use the Disk Management console.
Step 1. Right-click the Start button and select Disk Management.
Step 2. Click on the Action tab in the top menu.
Step 3. Select Attach VHD.
Step 4. Browse for your file and click OK. The disk will appear in the volume list, usually as a blue-icon drive.

Try a third-party tool to manage your VHD/VHDX file and disks in Windows 11
While native tools work for simple mounting, they often fall short when you need to manage the disk's lifecycle, resize partitions within the VHDX, or clone a physical system into a virtual one. This is where AOMEI Partition Assistant shines.
AOMEI Partition Assistant is a handy computer management software designed to handle every aspect of disk partitioning and virtualization. It features a dedicated "Virtual Disk Management" toolkit that centralizes all operations. Instead of jumping between File Explorer and Disk Management console, you can create, attach (mount), and detach virtual drives in one cohesive interface.
1. How to Mount VHDX File in Windows 11 (Attach)
If you have a VHDX file and need to access it to modify files or perform partition operations:
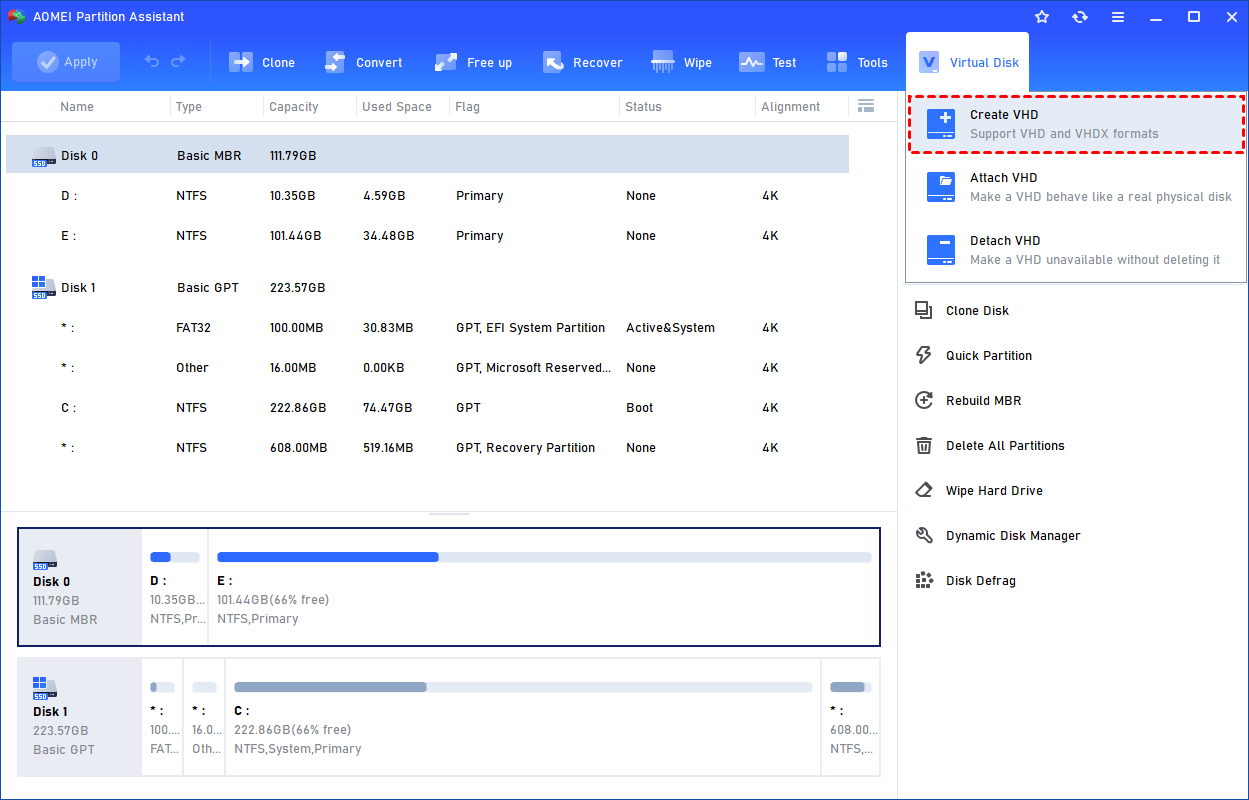
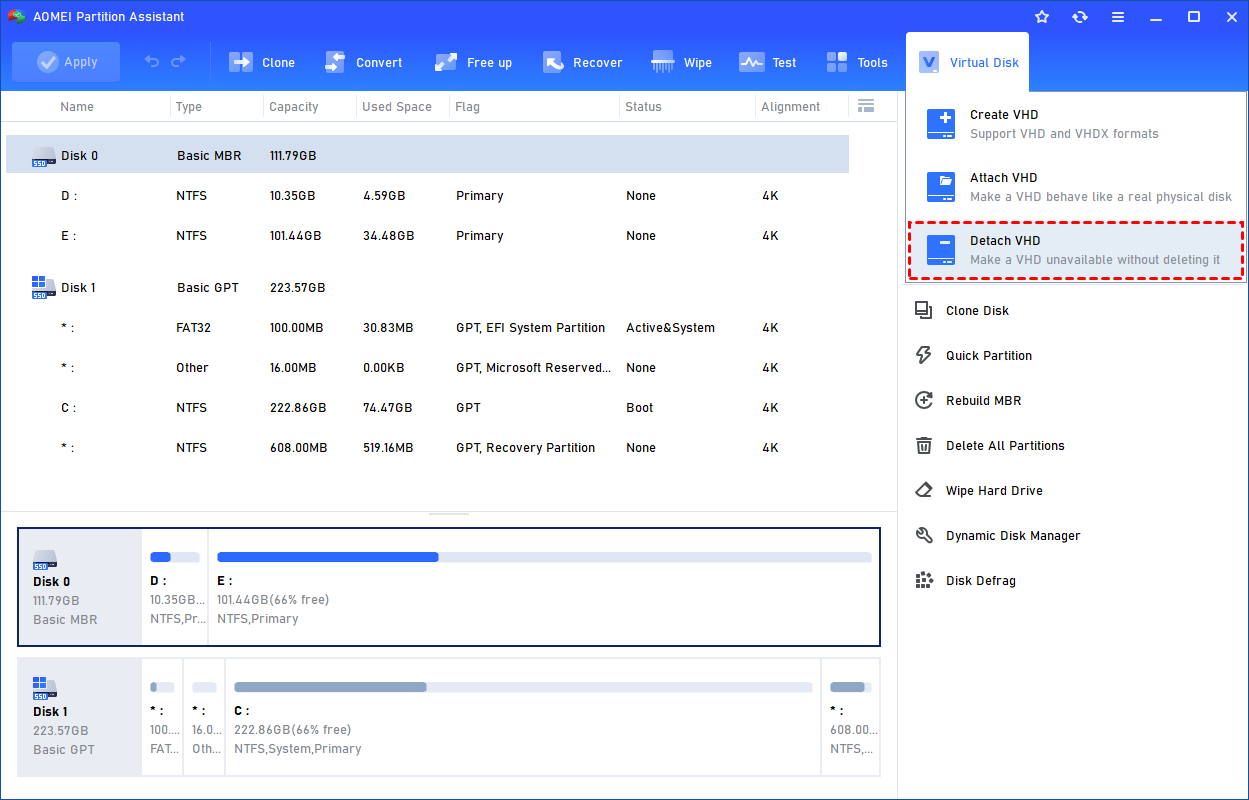
Step 1. Download and open AOMEI Partition Assistant. Look at the top toolbar, click on "Tools", and select the "Virtual Disk" option from the drop-down menu.
Step 2. A pop-up window will appear with options to "Create a new VHD" or "Attach VHD". Select "Attach VHD".
Step 3. Browse to the location of the vhdx file that cannot be opened in VirtualBox.
Step 4. Click "OK".
Once attached, the virtual disk will appear in the main interface alongside your physical drives. The software will instantly mount the drive. It will appear in the main interface as a local disk, allowing you to resize, format, or partition it using AOMEI’s advanced tools.
2. How to Create VHD in Windows 11
If you need a new virtual environment:
Step 1. Click the tab "Virtual Disk", you will see 3 options available for VHDs: create VHD, attach VHD, and detach VHD. Select the "Create VHD" option after clicking the "Virtual Disk" tab.
Step 2. You can specify the virtual disk location and size.
Optionally, you can click the "Advanced" option to set the virtual hard disk format and type. (By default, the VHDX format and the Dynamically expanding type are checked.)
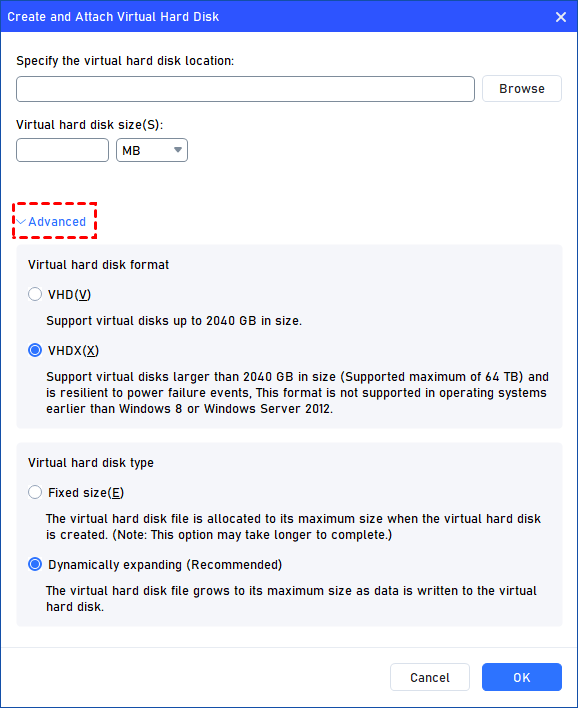
Virtual hard disk format: VHD and VHDX are supported.
For VHD, it supports virtual disks up to 2040GB in size.
For VHDX, it supports virtual disks larger than 2040GB in size. (Up to 64TB) This format is not supported in operating systems earlier than Windows 8 or Windows Server 2012.
Virtual hard disk format: Fixed size and Dynamically expanding are supported.
For fixed size, the virtual hard disk file will be allocated its maximum size when it is created. So it will take much longer to create.
For Dynamically expanding, the virtual hard disk file will grow to its maximum size as data is written to it. (Recommended)
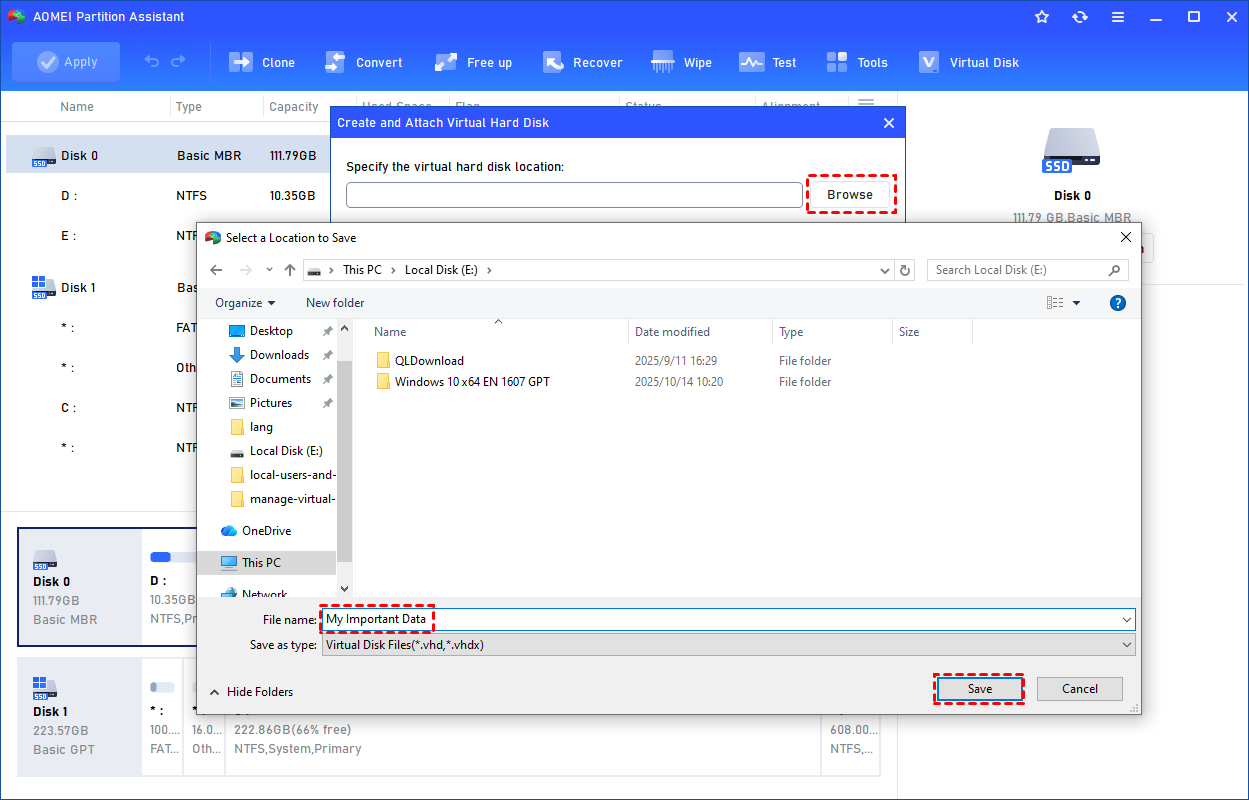
Click "Browse" to select a location to create the VHD. Please enter a file name for the virtual disk and click "Save".
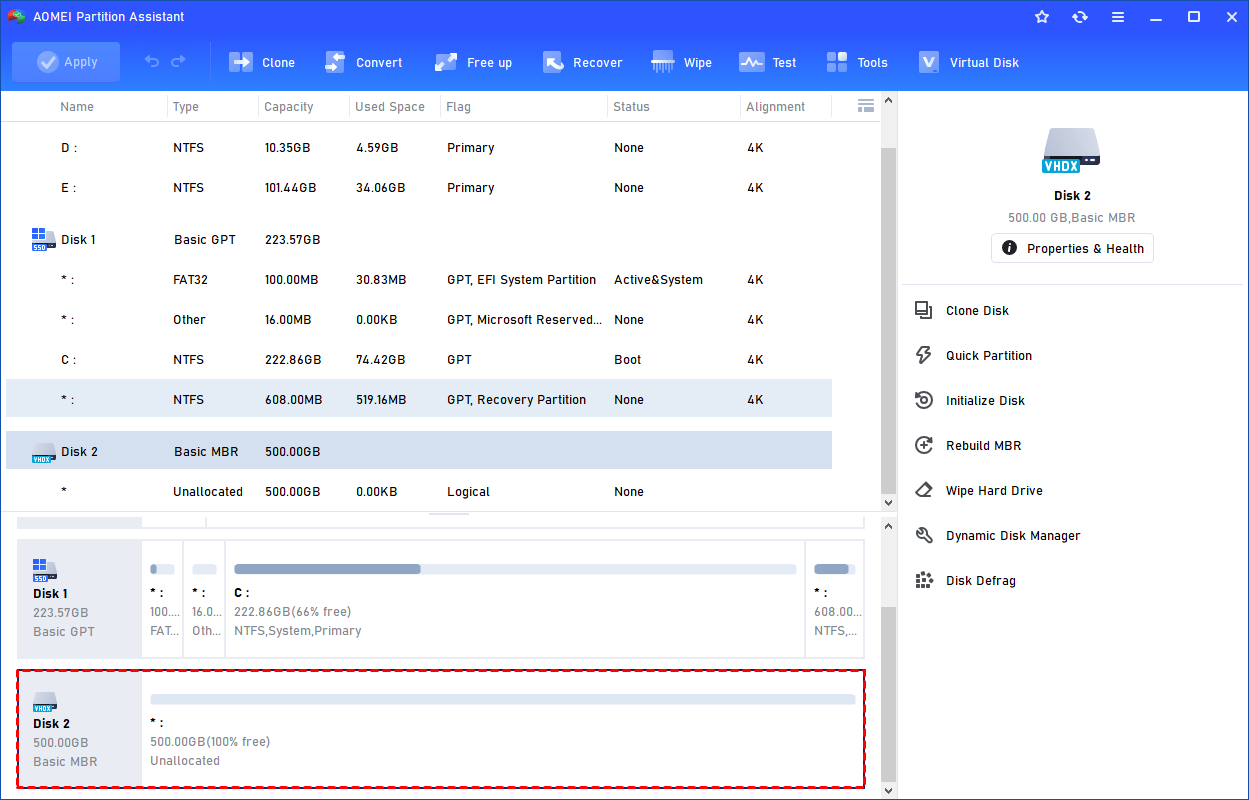
Step 3. Once the virtual disk location and size are set up, you can click "OK" to start creating the VHD.

Step 4. After the reload process is finished, you will see that the VHD has been created successfully. It will be attached automatically.
3. How to Delete VHDX File in Windows 11 (Detach & Remove)
Users often struggle to delete these files because Windows locks them while they are mounted. AOMEI ensures a clean disconnection.
To learn how to delete vhdx file in windows 11 safely, you must first detach it.
Step 1. Click Detach VHD. You can right-click the attached VHD in Partition Assistant and select the "Detach VHD" option to detach it.
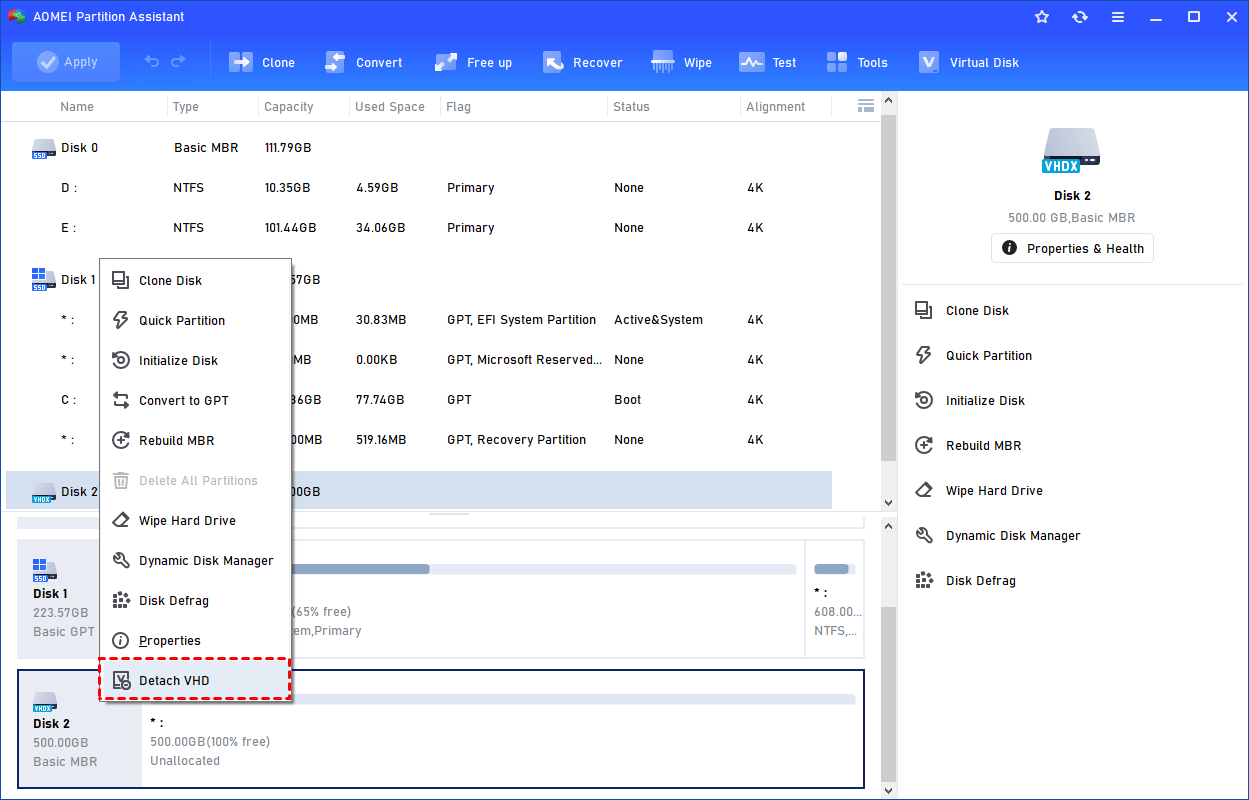
Or, you can select the "Detach VHD" option after clicking the"Virtual Disk" tab.
Step 2. Select the Virtual Disk to Detach. You can select and deselect the virtual disk(s) and click the "Detach" button to start detaching the VHD(s).
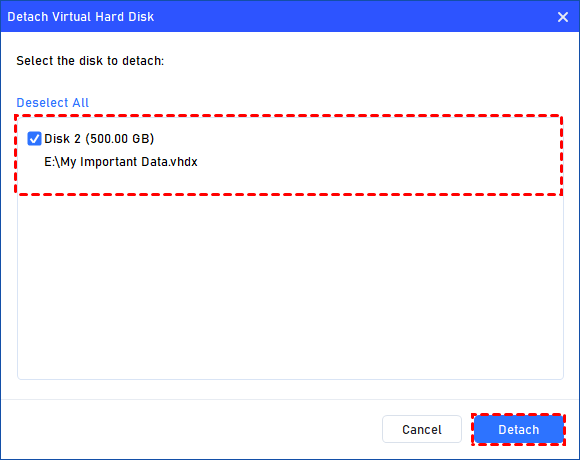
Step 3. Detach VHD Successfully. Once the process is finished, you will see that the VHD(s) have been removed successfully.
Bonus Feature: Clone Physical Disk to VHDX
AOMEI Partition Assistant’s "Clone Disk" feature is a powerhouse. It allows you to clone a physical hard drive directly into a virtual disk.
Scenario: You want to back up your entire physical PC to a VHDX file to run on another machine.
Method: Attach an empty VHDX using the steps above. Then, use the "Clone Disk" wizard to copy your physical system drive (Source) to the attached VHDX (Destination). This creates a perfect, bootable virtual replica of your physical computer.
To Sum Up
Virtual Hard Disks are powerful assets for modern computing, offering flexibility for testing and backups. Knowing how to mount VHDX file in Windows 11 is the key to unlocking this potential. While Windows provides basic tools like Disk Management, they can be cumbersome to use regularly.
AOMEI Partition Assistant Professional offers a superior, centralized solution. With its dedicated Virtual Disk Management features, you can create, mount, and detach drives with ease. Furthermore, its advanced Clone Disk functions seamlessly bridge the gap between physical and virtual hardware. Whether you need to create VHD Windows 11 environments or safely remove old ones, AOMEI Partition Assistant is the authoritative choice for efficient disk management.
FAQs
Q1: What is the difference between VHD and VHDX?
A: VHD is the older standard with a maximum capacity of 2TB. VHDX is the modern format used in Windows 8 and later (including Windows 11). It supports up to 64TB, has better performance, and protects against data corruption during power failures.
Q2: Can I mount a VHDX file created in Windows 10 on Windows 11?
A: Yes, VHDX files are fully backward and forward compatible between Windows 10 and Windows 11. You can freely move and mount them between these operating systems.
Q3: How do I delete a VHDX file that says it is "open in System"?
A: This error means the disk is still mounted. You cannot delete it while it is active. Use AOMEI Partition Assistant's "Virtual Disk Management" to Detach the drive first. Once detached, the system lock is removed, and you can delete the file.
Q4: Can AOMEI Partition Assistant convert a physical disk to VHDX?
A: Yes. You can create a new VHDX, attach it, and then use the "Clone Disk" feature in AOMEI Partition Assistant to copy your physical drive's contents (partitions and OS) directly into the virtual disk.
Q5: Is it safe to store critical data on a VHDX file?
A: Yes, VHDX is a robust format. However, like any file, it can be deleted or corrupted. It is recommended to keep backups of your VHDX files on a separate physical drive or cloud storage.

