How to Convert Physical Disk to VHDX: The Ultimate P2V Guide for Windows
Need to virtualize your PC? Discover the steps to convert physical disk to VHDX. We explain P2V migration and how to use AOMEI Partition Assistant to clone disks to virtual files.
By Lucas / Updated on January 23, 2026
Whether for creating robust backups, testing software in sandboxed environments, or migrating legacy systems to modern servers, the need to virtualize physical hardware is more prevalent than ever. At the center of this process is the VHDX file format—the modern virtual hard disk standard for Windows.
If you are looking to convert physical disk to VHDX, you are performing a process known as Physical-to-Virtual (P2V) migration. This guide will explore why this conversion is essential, how it differs from other migration types, and provide a step-by-step authoritative tutorial on achieving this using professional disk management software.
Why Convert Physical Disk to VHDX?
Before diving into the "how," it is crucial to understand the "why." VHDX (Virtual Hard Disk v2) is the successor to the older VHD format. It offers superior resilience against power failures and supports massive capacities up to 64TB.
The primary reason to convert physical disk to VHDX is to create a portable, bootable clone of your physical machine. This allows you to run your exact computer setup inside a virtual machine (VM) on a different computer. This is essential for:
Disaster Recovery: If your physical hardware fails, the VHDX file can be booted instantly on a Hyper-V server.
System Testing: Administrators can test Windows updates on the virtual clone before applying them to the physical machine.
Legacy Preservation: Converting an old Windows 7 or XP machine to VHDX allows you to keep accessing old software on modern Windows 10/11 hardware.
While many administrators are familiar with P2V and V2V migration in VMware, the VHDX format is specific to the Microsoft ecosystem (Hyper-V). However, understanding the principles of a P2V converter—software that translates physical sectors into virtual files—is a key to managing any virtual environment effectively.
Perfect P2V Converter Solution — AOMEI Partition Assistant
While Microsoft provides a basic tool called Disk2vhd, it lacks advanced partition management features and often requires manual configuration. For a seamless experience that integrates disk management with virtualization, AOMEI Partition Assistant Professional is the superior choice.
AOMEI Partition Assistant Professional is an all-in-one disk management toolkit. Unlike standard P2V converters that simply snapshot a drive, AOMEI offers a specialized "Virtual Disk" module combined with a powerful "Clone Disk" engine. This unique combination allows you to create a virtual container (VHDX), mount it as if it were a real drive, and then bit-copy your physical system directly into it. This ensures a 1:1 copy that is accurate and bootable.
Features of AOMEI Virtual Disk Management:
- Create: Generate VHD or VHDX files instantly with custom sizes.
- Attach: Mount virtual disks to the Windows system so they appear as physical local drives.
- Detach: Safely disconnect the virtual drives when operations are complete.
Part 1. Create a VHD in your PC
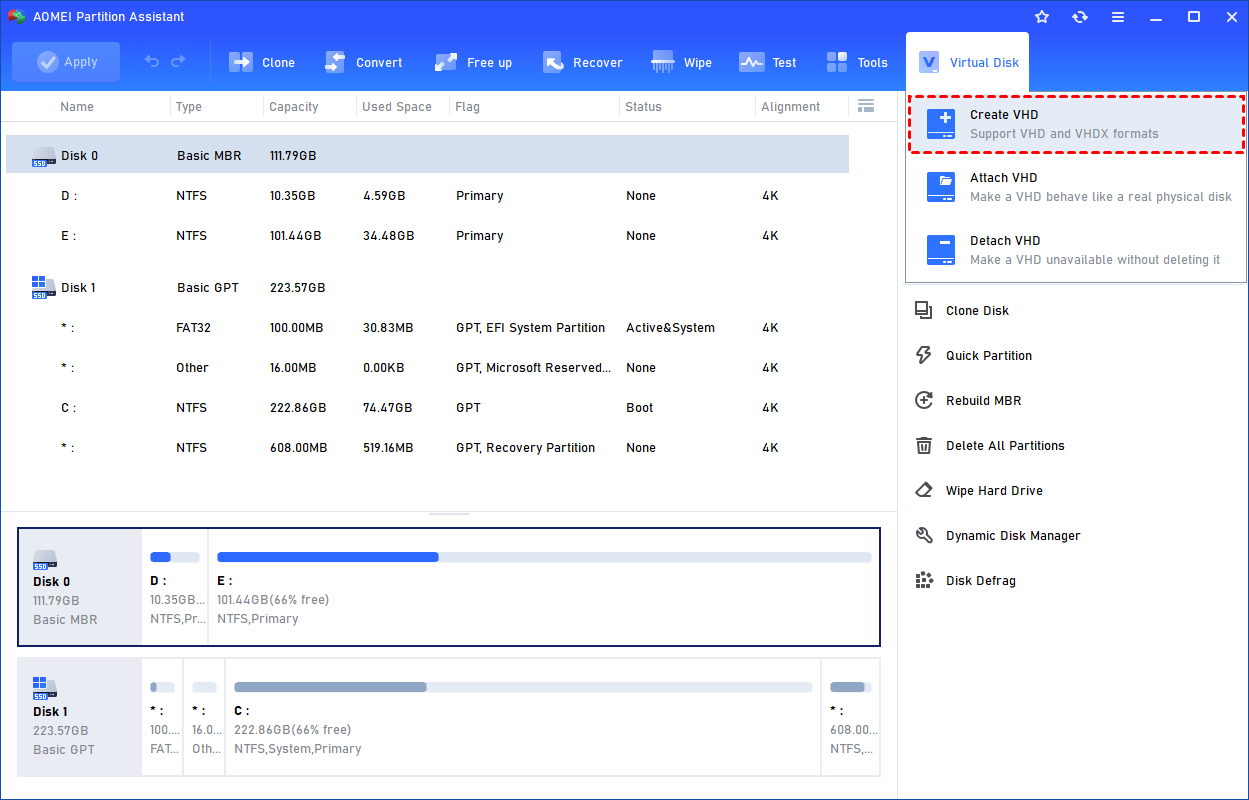
Step 1. Click the tab "Virtual Disk", you will see 3 options available for VHDs: create VHD, attach VHD, and detach VHD. Select the "Create VHD" option after clicking the "Virtual Disk" tab.
Step 2. You can specify the virtual disk location and size.
Optionally, you can click the "Advanced" option to set the virtual hard disk format and type. (By default, the VHDX format and the Dynamically expanding type are checked.)
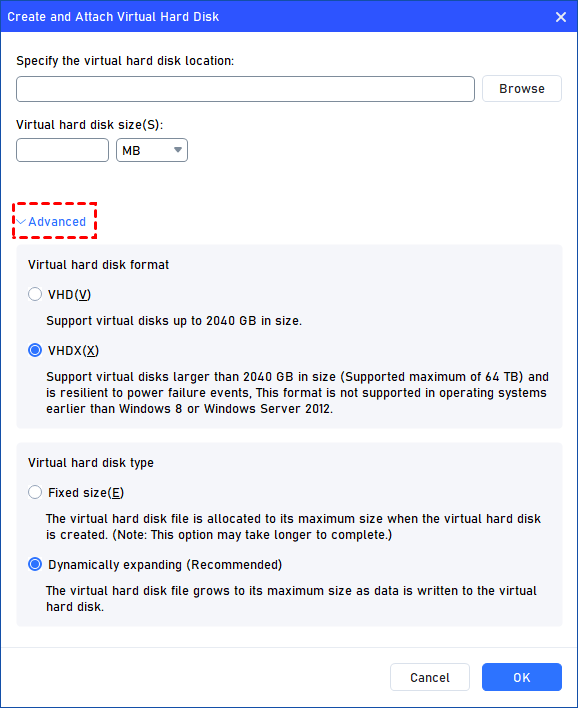
Virtual hard disk format: VHD and VHDX are supported.
For VHD, it supports virtual disks up to 2040GB in size.
For VHDX, it supports virtual disks larger than 2040GB in size. (Up to 64TB) This format is not supported in operating systems earlier than Windows 8 or Windows Server 2012.
Virtual hard disk format: Fixed size and Dynamically expanding are supported.
For fixed size, the virtual hard disk file will be allocated its maximum size when it is created. So it will take much longer to create.
For Dynamically expanding, the virtual hard disk file will grow to its maximum size as data is written to it. (Recommended)
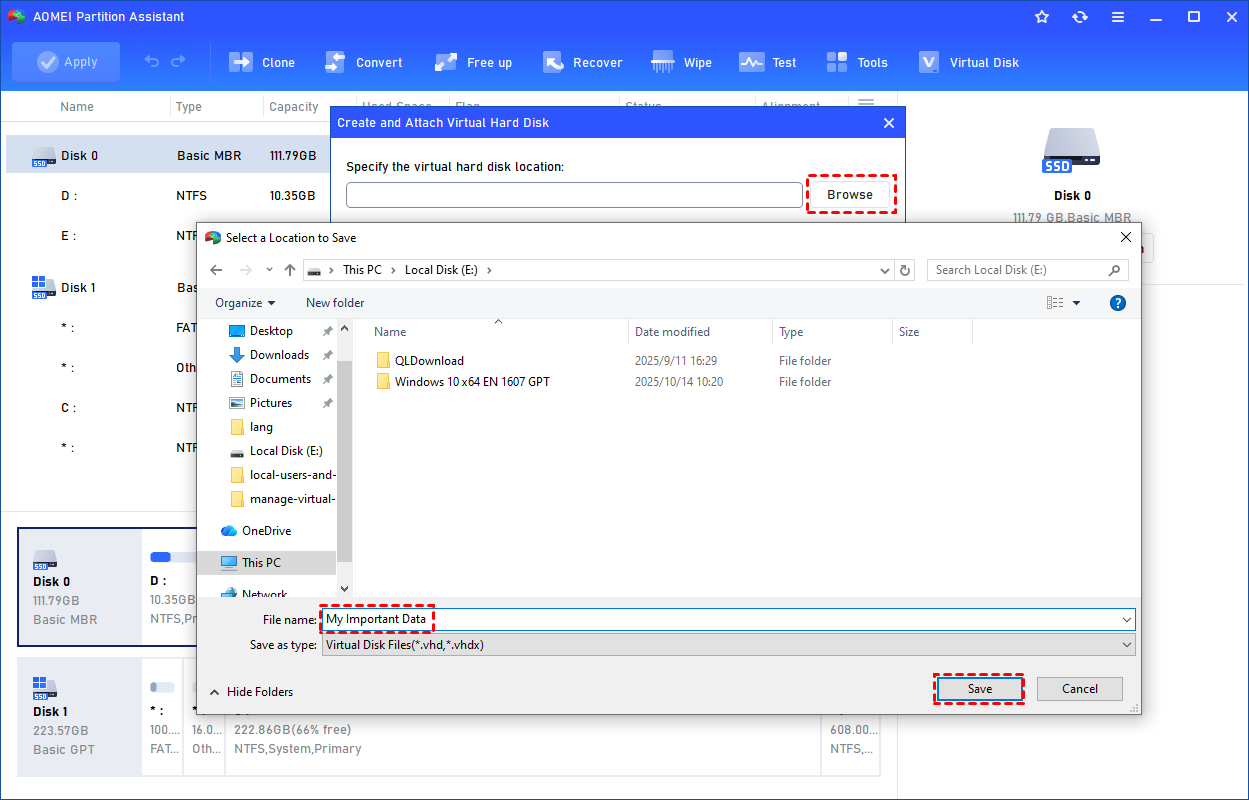
Click "Browse" to select a location to create the VHD. Please enter a file name for the virtual disk and click "Save".
Step 3. Once the virtual disk location and size are set up, you can click "OK" to start creating the VHD.

Step 4. After the reload process is finished, you will see that the VHD has been created successfully. It will be attached automatically.
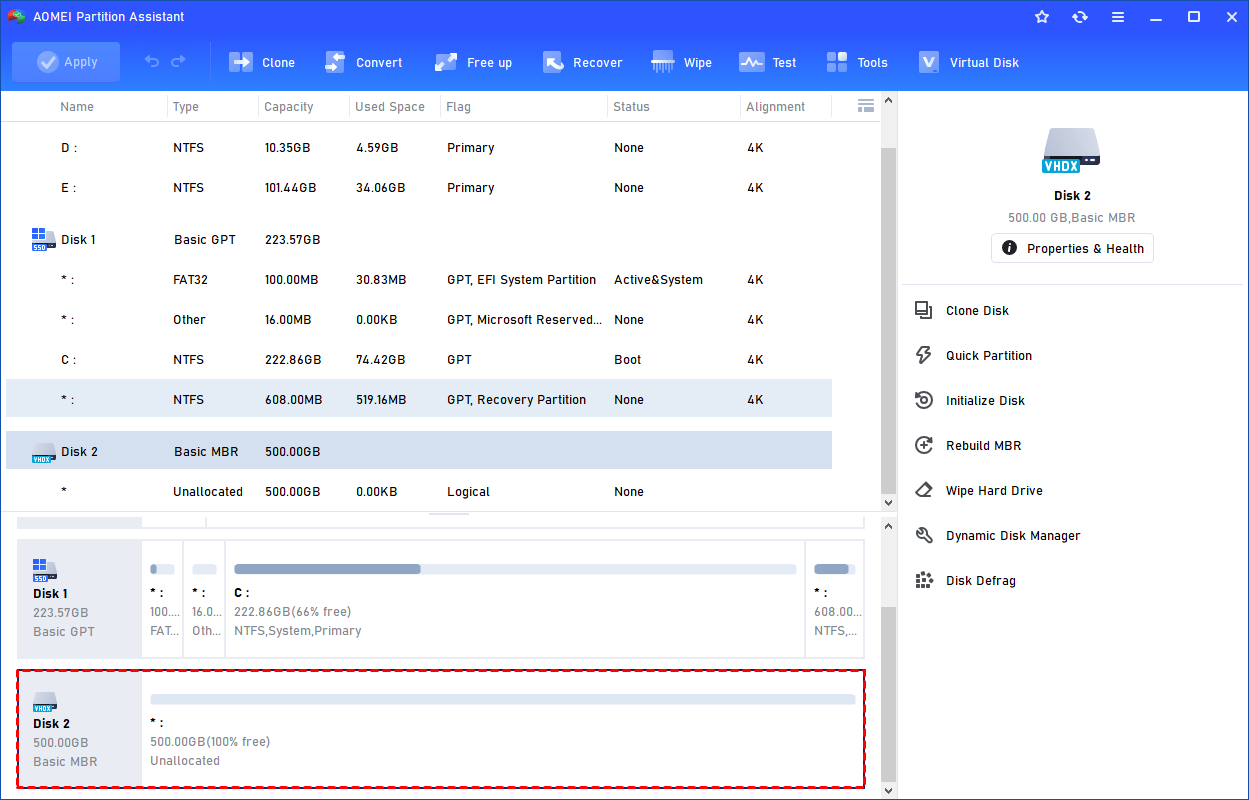
You can also view the VHD in Windows Disk Management.
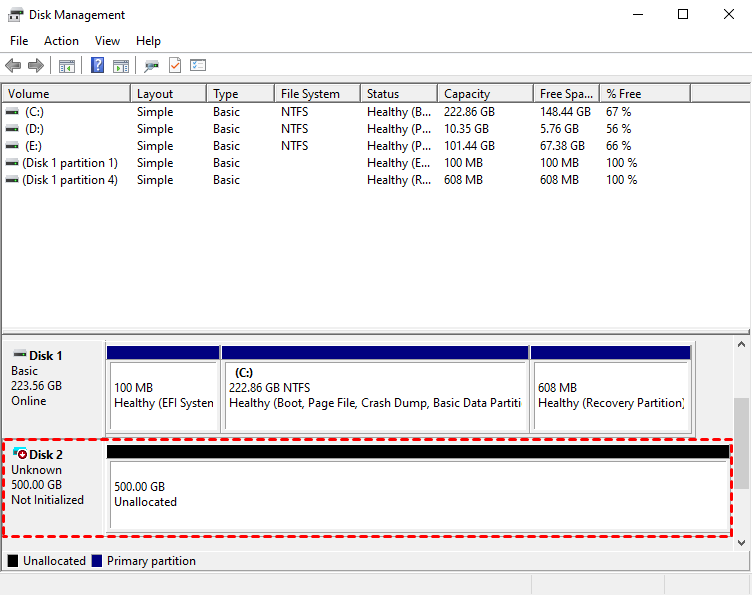
The created VHD will be uninitialized, so it is empty without any data or a file system. To make it useful, you need to initialize the disk, create a partition, and assign a drive letter.
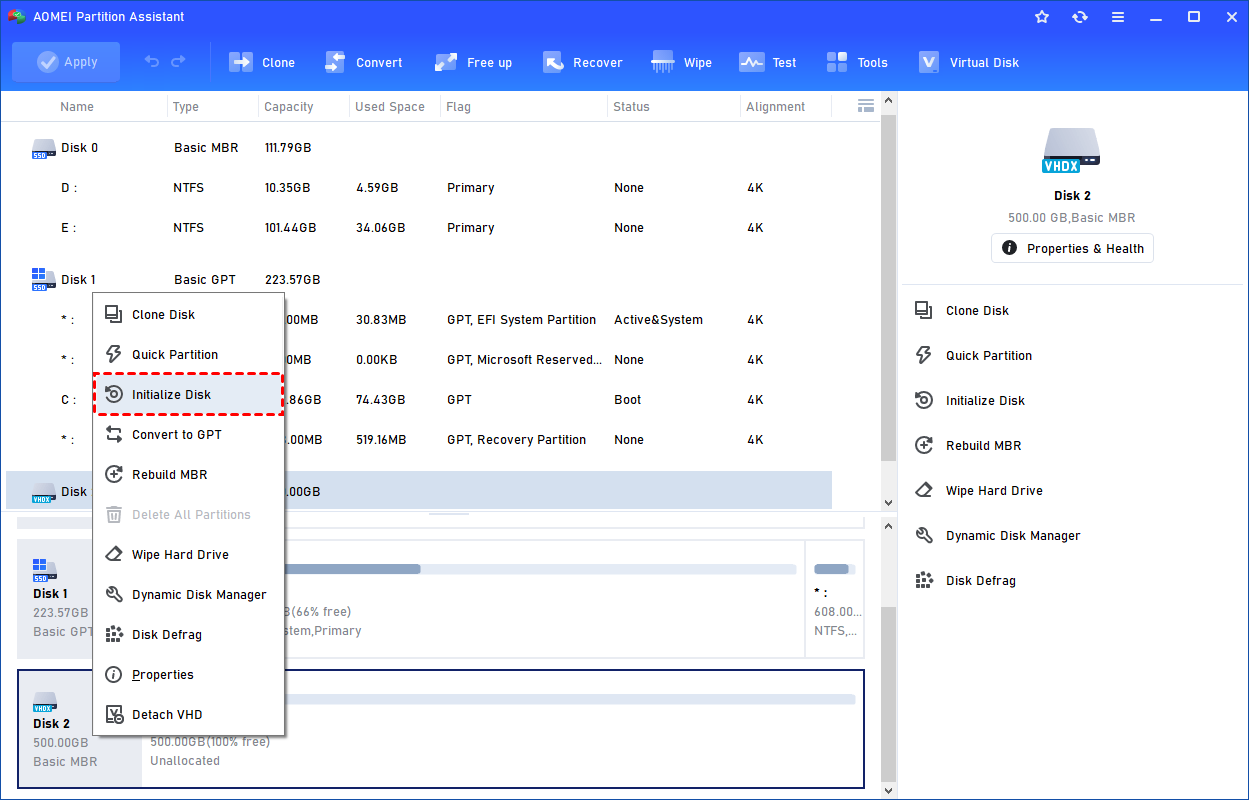
You can initialize the drive in Partition Assistant.
Part 2. Clone the host disk to VHD
Before cloning a VHD to a physical disk, it must be attached so that Windows can treat it like a real drive. Once mounted, the VHD shows up in Disk Management with all its partitions and data available.
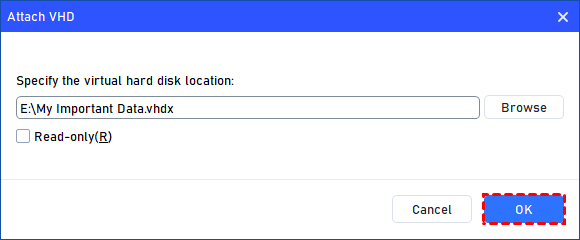
Step 1. Select the "Attach VHD" option after clicking the"Virtual Disk" tab.

Step 2. Click "Browse" to locate the location where the .vhd or .vhdx file is saved. Select the .vhd or .vhdx file you want to attach and click "Open" to attach it.

Step 3. Once the virtual file is selected, you can click "OK" to start attaching the VHD.
Step 4. Once the process is finished, you will see that the VHD is attached successfully. Now, click "Clone" in the main interface, and select "Clone Disk".

Step 5. Choose the host hard disk that you need to clone as the virtual disk and click "Next".

Step 6. Select another drive as the destination disk, and then click "Next".

Step 7. Then, you can check the source and destination disk in the next window or change to "Sector to Sector clone", and click the "Confirm" button to continue if there is no problem.

Here, you can also click the "Settings" button to adjust the partition size on the destination disk or tick "4k alignment" to improve the reading and writing speed of the SSD.

Step 8. You can preview the disk cloning operation by viewing the "Pending Operations". To commit the "Pending Operations", please click "Apply" and "Proceed".

Tip: Why Not Use VMware for VHDX?
You might wonder about P2V and V2V migration in VMware. VMware utilizes the .vmdk format, not .vhdx. While VMware vCenter Converter is a popular p2v converter, it creates files meant for VMware Workstation or ESXi.
If your goal is to stay within the Microsoft ecosystem (using Hyper-V built into Windows 10/11 Pro), converting directly to VHDX using AOMEI Partition Assistant is much more efficient than creating a VMware file and then trying to convert it again. It reduces the risk of data corruption that occurs during multiple conversion passes.
To Sum Up
Virtualization is a powerful asset for data safety and system management. Learning how to convert physical disk to VHDX empowers you to create versatile backups and test environments. While the process sounds complex, modern software simplifies it significantly.
AOMEI Partition Assistant Professional stands out as a premier solution. By integrating Virtual Disk creation and Disk Cloning into a single interface, it acts as a highly effective p2v converter. Whether you are migrating a server or just backing up your personal laptop, using the right tools ensures your data makes the transition from physical to virtual safely and accurately.
FAQs
Q1: What is the difference between VHD and VHDX?
A: VHD is the older format with a maximum size limit of 2TB. VHDX is the newer format introduced with Windows 8; it supports up to 64TB, has better performance, and includes protection against data corruption during power failures.
Q2: Can I boot from the VHDX file created by AOMEI Partition Assistant?
A: Yes. If you cloned your system drive to the VHDX, it contains the operating system and boot sectors. You can attach this VHDX to a Virtual Machine in Hyper-V, or use the Windows "Native Boot" feature to boot the physical computer from the VHDX file.
Q3: Can I use this VHDX file in VMware Workstation?
A: VMware natively uses .vmdk files. However, modern versions of VMware Workstation can often mount and run VHDX files, though performance may be better if you convert it to VMDK first. AOMEI implies a focus on the Microsoft/Hyper-V ecosystem for VHDX.
Q4: Does the conversion process delete my physical data?
A: No. When you convert physical disk to vhdx using the cloning method, the software reads data from your physical disk and writes it to the virtual file. Your physical disk remains untouched and fully functional.
Q5: What if the VHDX file is smaller than my physical disk?
A: You can clone a larger physical disk to a smaller VHDX as long as the used data on the physical disk fits into the VHDX. You should use the "Clone Disk Quickly" method in AOMEI Partition Assistant, which only copies used sectors.

