

[Answered] Can I Remove Windows Error Reporting Files?
Can I remove Windows error reporting files? This guide explains what these files are used for and walks you through the proper methods to clear Windows Error Reporting files from your system.
By Hedy / Updated on January 21, 2026
Windows includes a built-in feedback system that automatically creates error reports when software or hardware issues occur. These reports are stored locally for a short time and then transmitted to Microsoft, where they are analyzed to help identify root causes and deliver fixes through future updates. Over time, however, these files can accumulate and consume a significant amount of disk space.
Although users can usually remove these files using the Free Up Space feature, there are situations where standard cleanup options fail. In such cases, System Queued Windows Error Reporting files may grow to several gigabytes, making manual intervention necessary. This guide explains how to remove excessively large WER files when they refuse to be deleted through normal methods.
When an error report is submitted, Windows Error Reporting immediately checks Microsoft’s servers for a known solution. If a fix already exists, it is returned to the system without delay. If the issue is still being analyzed or no solution is available, Windows notifies the user and may request additional diagnostic details to assist further investigation.
Can Iremove Windows error reporting files?
Yes, you can safely remove Windows Error Reporting (WER) files in most cases.
Windows Error Reporting files are created when apps or system components crash. They store logs and diagnostic data used to analyze errors or send reports to Microsoft. These files are not required for normal system operation, so deleting them will not harm Windows or affect performance.
Removing WER files can free up disk space, especially if large crash dumps have accumulated. You can delete them using Disk Cleanup, Storage Sense, or manually from folders like C:\ProgramData\Microsoft\Windows\WER.
However, keep a few things in mind:
⚠️ Once deleted, the error details cannot be reviewed for troubleshooting.
⚠️ If you are actively diagnosing crashes, it’s better to keep them temporarily.
⚠️ The files may reappear, as Windows recreates them when new errors occur.
For most users, especially on systems with limited storage, removing Windows Error Reporting files is safe and recommended as part of routine system maintenance.
How to remove Windows error reporting files
Windows Error Reporting (WER) collects information about system crashes, application failures, and unexpected shutdowns. Over time, these reports can accumulate and consume valuable storage. Removing them does not affect system stability.
Method 1. Delete Windows error reporting files via settings
To remove Windows Error Reporting files through Settings, follow these steps:
Step 1: Open Settings on your system, navigate to Storage, and select Free Up Space Now.
Step 2: Locate System-created Windows Error Reporting files and check only this option, leaving all other items unselected.
Step 3: Click Remove Files to permanently clear all Windows Error Reporting files from your computer.
Method 2. Delete Windows reporting files via Disk Cleanup
To delete Windows Error Reporting files using Disk Cleanup, follow these steps:
Step 1: Type Disk Cleanup in the taskbar search and open the Disk Cleanup: Drive Selection window. Choose your system drive and click OK.
Step 2: In the list of cleanup options, select all the items you want to remove, then click Clean up system files in the lower-left corner.
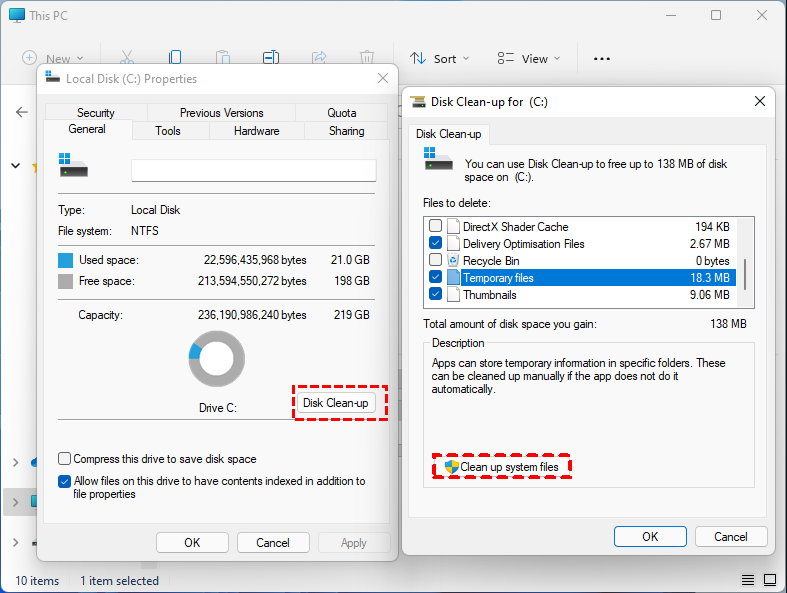
Step 3: You’ll be prompted to select the system drive again—choose it and click OK. From the list, check System-created Windows Error Reporting files and press OK.
A confirmation dialog will appear. Confirm your choice to delete the selected files, and Disk Cleanup will remove them from your system.
Method 3. Deleting the Windows reporting files manually
If the previous methods don’t work, you can manually delete System Windows Error Reporting files. Removing them directly from their folders can sometimes allow Disk Cleanup to recognize and delete them afterward. Here’s how to do it:
Step 1: Press Windows + R to open the Run dialog. Enter the following command and press Enter:
%ALLUSERSPROFILE%\Microsoft\Windows\WER\ReportQueue
Step 2: If the folder does not open, try this alternative path:
%USERPROFILE%\AppData\Local\Microsoft\Windows\WER\ReportQueue
Once the folder opens, delete all subfolders and files inside. Afterward, empty your Recycle Bin. Finally, restart your computer and open Disk Cleanup. You should now see the Windows Error Reporting files available for deletion.
Method 4. Deleting the Windows reporting files via disk cleaning tool
PartitionAssistant Cleanup is a versatile disk management tool that not only helps you manage partitions but also includes a powerful cleanup feature to optimize your system. One of its practical uses is removing Windows error reporting files, which can accumulate over time and occupy significant disk space. These files, generated by Windows to log system errors and system crashes, are often safe to delete once they have served their purpose.
Using PartitionAssistant Cleanup, you can quickly locate and delete these system error reports without navigating complex system folders. The tool ensures the cleanup is safe, efficient, and complete, helping you reclaim disk space and maintain a smoother system performance. Unlike manual deletion methods, this approach reduces the risk of accidentally removing critical system files.
With just a few clicks, PartitionAssistant Cleanup makes Windows error reporting file cleanup straightforward and stress-free, giving your PC a noticeable performance boost while keeping your system tidy.
Free Up Disk Space To Keep Your PC Running Smoothly and Efficiently
Step 1. Download, install, and open PartitionAssistant Cleanup. From the main interface, select the Clean Junk Files option to begin.

Step 2. Click Scan Now to start scanning your system for unnecessary files. The software will analyze your computer thoroughly to identify junk data.

Step 3. Once the scan is complete, a detailed list of detected junk files will appear. This includes system junk files such as temporary files, recycle bin data, log files, invalid shortcuts, and more, as well as registry junk files like DLL entries, system registry items, and program registry remnants.

Step 4. To review specific items, click the corresponding button next to each category to view detailed information about the detected junk files.

Step 5. If needed, use the Locate option to find the exact location of any listed file on your system.

Step 6. By default, commonly safe-to-remove items—such as temporary files and log files—are preselected. You can manually adjust the selection by checking additional items or deselecting files you wish to keep. To remove everything, choose Select All.
After selecting junk files that are not needed anymore, you can click the "Clean Now"button to start the cleanup.

Step 7. The cleanup process may take a few moments, depending on the number of files selected. Once completed, a summary window will appear, showing how many files were successfully removed and which, if any, were not cleaned.

FAQs
📍 How often should I delete WER files?
You can delete Windows Error Reporting (WER) files periodically, such as monthly or when disk space is low. Frequent deletion isn’t necessary unless storage or system performance is affected.
📍 Can WER files be recovered after deletion?
Once WER files are deleted, they are generally not recoverable through standard Windows tools. Recovery might be possible with specialized file recovery software, but success isn’t guaranteed.
📍 Do WER files slow down my computer?
WER files themselves don’t significantly slow your system. Only massive accumulations consuming disk space or interfering with storage-intensive tasks may slightly affect performance.
📍 Are third-party cleanup tools better than Windows built-in options?
Third-party tools may offer advanced scanning, scheduling, or deeper cleanup. Windows built-in tools are safe and sufficient for most users. Choice depends on convenience and specific cleanup needs.
📍 Will deleting WER files fix my system errors?
No, deleting WER files only removes stored error reports. It doesn’t repair system errors, crashes, or software issues. They must be addressed through troubleshooting, updates, or repair utilities.
Conclusion
In summary, Windows Error Reporting files are useful for diagnostics but unnecessary for daily operation. When they accumulate and consume excessive disk space, removing them is both safe and beneficial. Whether you use built-in Windows tools, manual deletion, or a third-party utility like AOMEI Partition Assistant, regular cleanup helps reclaim storage, improve performance, and keep your system running efficiently.

