

[Answered] Can I Remove Window Installer Files?
Free up disk space by safely cleaning the huge Windows Installer folder. Our guide shows you how to use Windows Settings, Disk Cleanup, and professional tools to remove unnecessary installer files and optimize your system.
By Lucas / Updated on September 29, 2025
What Is the Windows Installer Folder and Is It Safe to Clean?
If you've ever gone hunting for files to delete to free up disk space, you've likely stumbled upon a massive folder located at C:\Windows\Installer. Seeing it take up gigabytes of precious storage, your first instinct might be to delete its contents. Stop! Manually deleting files from this folder can cause serious problems for your system.
So, what is this folder, and why is it so large? More importantly, is there a safe way to clean it? This guide will explain everything you need to know and show you several safe methods to remove Windows Installer files that are no longer needed, helping you reclaim valuable disk space without breaking your programs.
About the Windows Installer Folder
Before attempting to clean it, it's crucial to understand the purpose of the C:\Windows\Installer directory. This folder acts as a cache for installer files (.msi) and patch files (.msp) from applications installed on your computer.
Windows keeps these files for several important reasons:
Repairing Applications: If a program becomes corrupted, you can use its installer file from this cache to repair it.
Modifying Installations: When you want to add or remove features from an existing program, the system accesses these files.
Uninstalling Software: The uninstall process often relies on the original .msi file to properly remove an application.
Deleting these files directly can lead to failed uninstalls, errors when trying to update software, and broken applications. The key is to remove only the orphaned files—those left behind from old or improperly uninstalled programs—and this must be done using safe, approved methods.
How to Remove Windows Installer Files Safely
Now that you understand the risks, let's explore the correct ways to clean up this folder. Below are four solutions, from simple built-in tools to more advanced techniques, that can help you free up space without compromising your system's stability.
Solution 1. Make Use of Windows Settings
The most user-friendly and automated way to handle system cleanup is through the built-in Windows Storage settings. The Storage Sense feature can intelligently identify and remove unnecessary temporary files, including some old installer files, without any risk.
This is the recommended starting point for most users.
Step 1. Press the Windows key + I to open the Settings app.
Step 2. Go to System and then click on Storage.
Step 3. Allow Windows to scan your drive. You'll see a category called Temporary files. Click on it.
Step 4. Windows will scan for files that can be safely removed. Ensure that "Windows Update Cleanup" and "Temporary files" are checked.
Step 5. Click the Remove files button at the top to begin the cleanup.

Solution 2. Run Disk Cleanup
Disk Cleanup is the classic Windows utility for freeing up disk space. It can identify and delete a variety of system files, including outdated installer packages, that are no longer required by the operating system. This manual tool gives you a bit more control over what gets deleted.
Step 1. Click the Start button, type Disk Cleanup, and press Enter.
Step 2. Select your primary drive (usually C:) from the dropdown menu and click OK.
Step 3. In the next window, click the Clean up system files button. This is a crucial step that allows the tool to scan for deeper system files, like old Windows update installers.
Step 4. After another scan, you will see a list of files to delete. Check the box for "Windows Update Cleanup" and any other large temporary file categories.
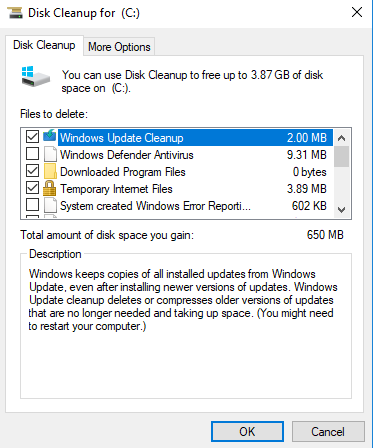
Step 5. Click OK and then Delete Files to confirm.
Solution 3. Try a Professional File Cleaning Tool
While Windows tools are helpful, they don't always perform the deepest clean. For a more thorough and powerful solution, a professional tool like PartitionAssistant Cleanup is highly recommended. It is specifically designed to conduct a deep scan of your system to find and eliminate all kinds of junk files, including orphaned registry entries and residual installer files that built-in utilities might miss.
Beyond simple junk cleaning, PartitionAssistant Cleanup also includes specialized tools to find other space-wasters, such as the "Delete Large Files" and "Duplicate File Finder" functions. This makes it an all-in-one solution for comprehensive disk management and cleanup.
Free Up Disk Space To Keep Your PC Running Smoothly and Efficiently
Step 1. Install and launch PartitionAssistant Cleanup. Click the "Clean Junk Files" tab.

Step 2. Click the "Scan Now" button to start the process of scanning junk files.

Step 3. After the scan process is finished. All system junk files (including recycle bin files, temporary files, log files, invalid shortcuts, and so on) and registry junk files (including DLL registry, system registry, and program registry) will be displayed.

You can also click the button behind to view the junk files details.

Step 4. And, you can click the button behind to locate the file.

By default, the program will select some junk files to clean up, for example, temporary files, log files, and so on. You can also manually check to select more or uncheck to deselect fewer listed junk files. Or, click "Select All" to select all junk files to clean up if you need to clean up all.
Step 5. After selecting junk files that are not needed anymore, you can click the "Clean Now"button to start the cleanup.

The process of the cleanup might take time, and the selected files will be cleaned up. After the process is finished, you will get a cleanup completed window displaying how many files you have cleaned and not yet cleaned.

Solution 4. Run Commands in CMD (For Advanced Users)
Warning: This method is intended for technically proficient users who are comfortable with the Command Prompt. Incorrect use can potentially harm your system.
For advanced users, it's possible to use command-line tools to identify orphaned installer files. Windows includes a utility called Windows Management Instrumentation Command-line (WMIC) that can interact with the Windows Installer database. You can use it to find patches that are no longer linked to any installed application. While Microsoft has deprecated some older tools like MsiZap.exe, the principle of identifying orphaned patches remains a valid (though complex) technique.
This method does not directly delete files but helps identify what could be removed, often requiring a third-party script or tool for safe removal. For most users, Solutions 1, 2, and especially 3 are far safer and more effective.
To Sum Up
The C:\Windows\Installer folder is a critical system directory that should never be manually tampered with. However, over time, it can accumulate orphaned and unnecessary files that waste valuable disk space. By using safe methods, you can effectively clean it out.
For easy, automated cleaning, Windows Settings and Disk Cleanup are great starting points. For the most thorough and powerful results, a dedicated tool like PartitionAssistant Cleanup offers a superior deep-cleaning experience. Advanced users might explore command-line options, but for the vast majority, sticking to trusted graphical tools is the wisest choice for a healthy and efficient PC.

