

How to Use Command Line Find Duplicate Files on Windows PCs
This post will share guidance on using command lines to find duplicate files. Besides, here is a facile solution to help you easily and safely find and remove duplicate files.
By Irene / Updated on July 8, 2025
Many people unknowingly end up with duplicate files on their computers. These duplicate files can consume much more disk space than you might think and cause the computer to slow down. When users become aware of this issue and its negative effects, they often seek ways to clean up their computers. One effective approach is to use a specific command line to find duplicate files and remove them.
If you're familiar with this, you can choose either CMD (Command Prompt) or PowerShell on your Windows computer. In the following guide, we'll show you the steps for both options, showing you how to use these commands to efficiently remove those redundant files.
2 options of using command line to find duplicate files
In this section, we will show you how to use CMD and PowerShell to find duplicate files. However, it's important to be cautious because entering the wrong commands can potentially lead to data loss or other irreversible issues. Kindly please be careful about each command line you input.
If you're interested in exploring safer and more effective methods, you can click here to jump directly to that particular section by using a handy tool.
111
Option 1. Use CMD to find duplicate files
Trying CMD to find duplicate files requires patience. This method is suitable for finding specific file types such as pictures, audio, and documents with clear and correct expansion name.
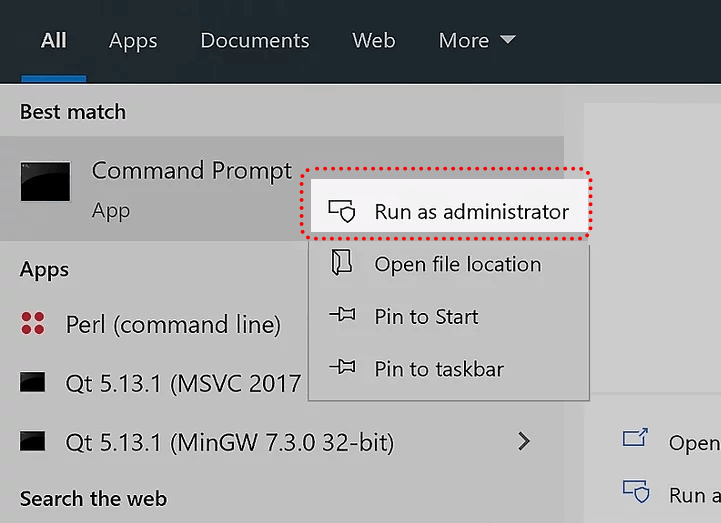
Step 1. Open CMD as an administrator. To do this, click on Start, then type "cmd" into the search bar, and choose “Run as administrator”.
Step 2. Type this command into CMD: "dir /s /b *.extension". Replace ".extension" with the type of files you want to find duplicates of. For example, if you're looking for duplicate JPG files, type "dir /s /b *.jpg".
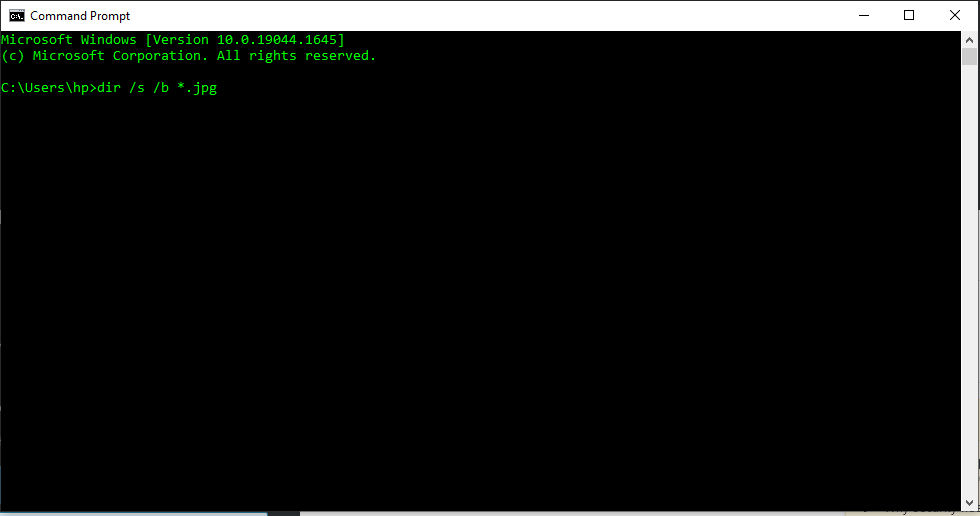
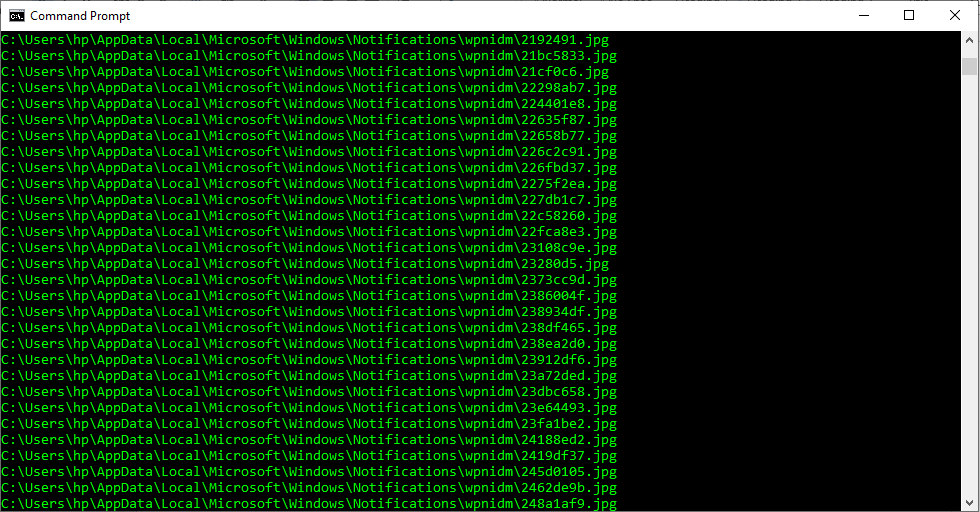
Step 3. Press Enter. CMD will begin scanning for duplicate files, and it will display the results with duplicated files in a list.
- You can also find duplicate files using the “WMIC FINDSTR” command:
- Open CMD and type "FINDSTR /?" to see all options for the "FINDSTR" command.
- Type "FINDSTR /I /C:WINDOWS *.jpg" to search for all JPEG images in the WINDOWS folder.
- The results will show all the JPEG images in the WINDOWS folder, with duplicates highlighted in red.
▌To remove duplicate files in a specific folder, follow these steps:
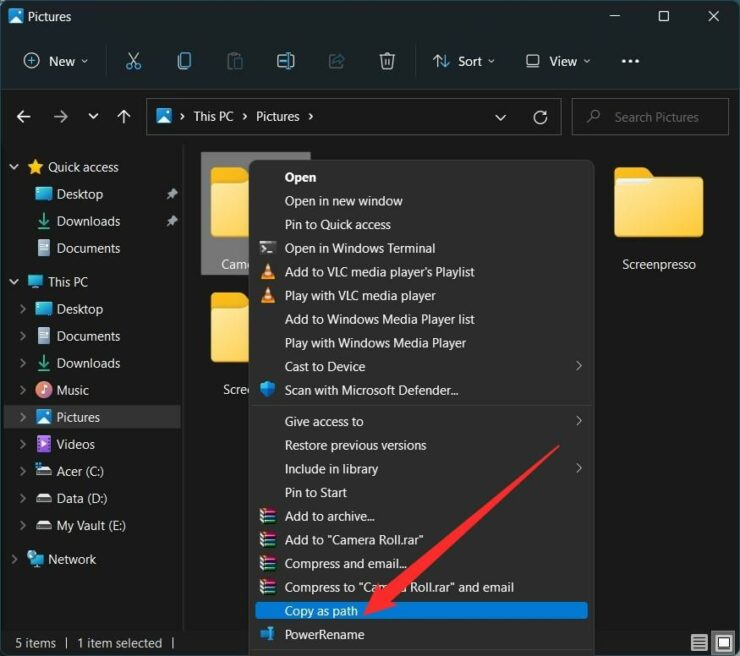
Step 1. Open the folder using File Explorer.
Step 2. Right-click on the folder you want and select "Copy as path".
Step 3. Open Command Prompt. Type "del /s /f *.duplicate" and hit Enter. This command will remove all duplicate files in the current folder and its subfolders.
For a more advanced file deletion, you can use wildcard characters with this command. Just type "rmdir /s /q DirName", and it will delete all folders in "DirName" and its subfolders.
Option 2. Utilize PowerShell to find duplicate files
Using PowerShell to find duplicate files can be much difficult and complex than CMD. Kindly please be careful about each command you input.
▌Stage 1. Use Get-FileHash cmdlet to check duplicate files
The Get-FileHash cmdlet in PowerShell is for file checksum. This hash can be used to identify a file uniquely. We will utilize the hash value to identify duplicate files in this post. The command's syntax is as follows:
Get-FileHash -Path file_path -Algorithm hashing_algorithm
You need to type a specific storage path of the files you want to search. E.g: Get-FileHash -Path 'D:\ISO\WinPE.iso' -Algorithm SHA512
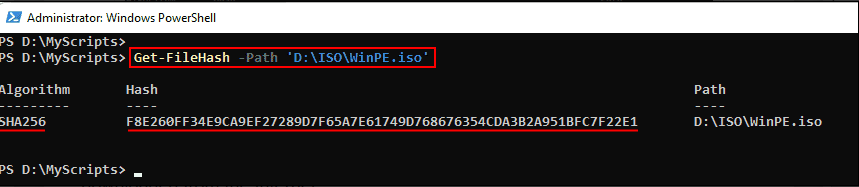
If you don't specify a special way to check files, the computer will use the default method, SHA256, which is usually good enough. This method ensures files are intact, especially when downloaded from the Internet. We use a tool called Get-FileHash, combined with Get-ChildItem, to quickly check files one by one.
To find identical files, they must have the same size. Different-sized files cannot be identical. By focusing only on files with the same size, we speed up the process. You just need to adjust the file path based on the Get-FileHash result.
$srcDir = "D:\ISO Files" (Here, change the path based on your case)
Get-ChildItem -Path $srcDir -File -Recurse | Group -Property Length `
| where { $_.Count -gt 1 } | select -ExpandProperty Group | Get-FileHash `
| Group -Property Hash | where { $_.count -gt 1 }| foreach { $_.Group | select Path, Hash }
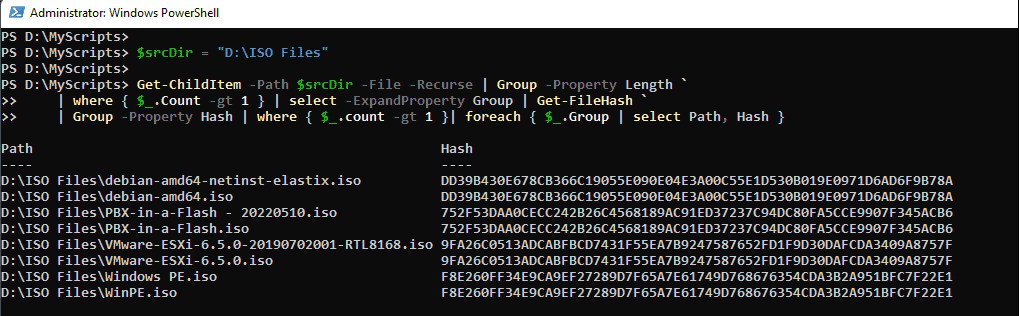
You can see this command that groups files that are the same size and then send those files to Get-FileHash to determine their hash.
▌Stage 2. Delete duplicate files with PowerShell
After we find duplicate files with PowerShell, we should deal with them appropriately. It is not advisable to eliminate duplicates immediately while working with essential files. You can instead relocate them to another directory, most likely on a separate disc with adequate free space. With our new command, this is simple. Simply feed the output of the above operation to the Move-Item cmdlet.
# Define source directory
$srcDir = "D:\ISO Files" (Here, change the path based on your case)
# Define destination directory
$targetDir = "E:\DuplicateFiles\$(Get-Date -Format 'yyyyMMdd')" (This is where those target files will be stored )
# Create destination directory
if(!(Test-Path -PathType Container $targetDir)){ New-Item -ItemType Directory -Path $targetDir | Out-Null }
# Move duplicate files to a different location
Get-ChildItem -Path $srcDir -File -Recurse | group -Property Length | where { $_.Count -gt 1 } `
| select -ExpandProperty Group | Get-FileHash | group -Property Hash `
| where { $_.Count -gt 1 }| foreach { $_.Group | select -Skip 1 } `
| Move-Item -Destination $targetDir -Force -Verbose
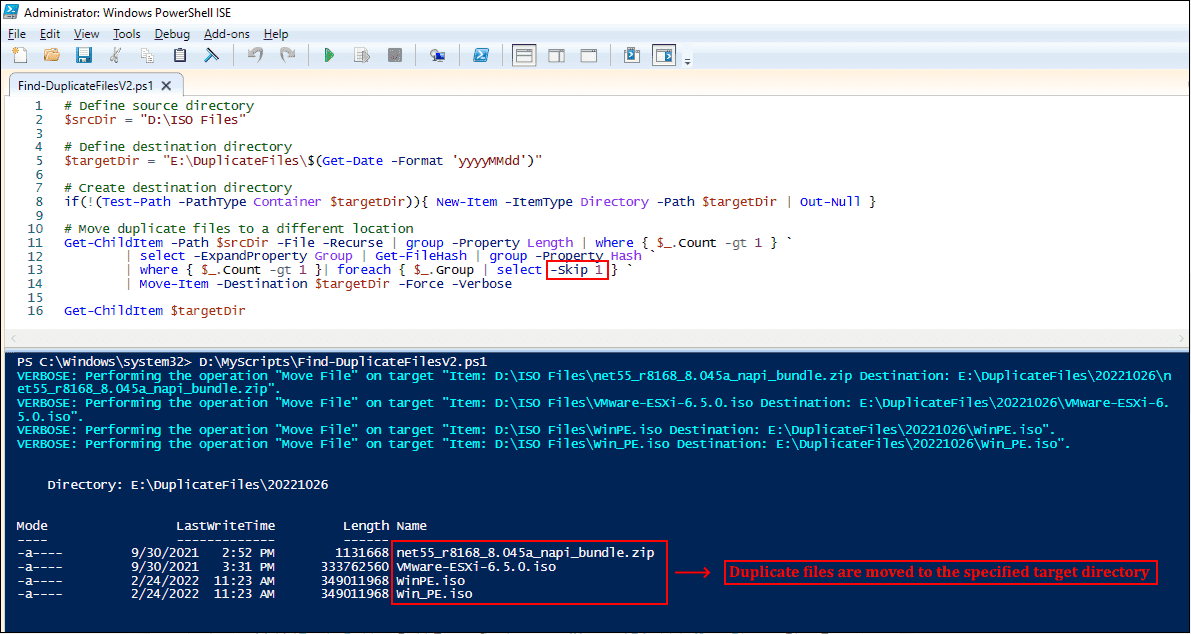
The point you need to notice is that we used -Skip 1 to leave one file in the source directory while moving other duplicates to the specified target directory. Once moved, you can manually review them later on and remove them, if necessary. If you're working on a huge source directory with millions of files, it is a good idea to avoid using the -verbose parameter with Move-Item.
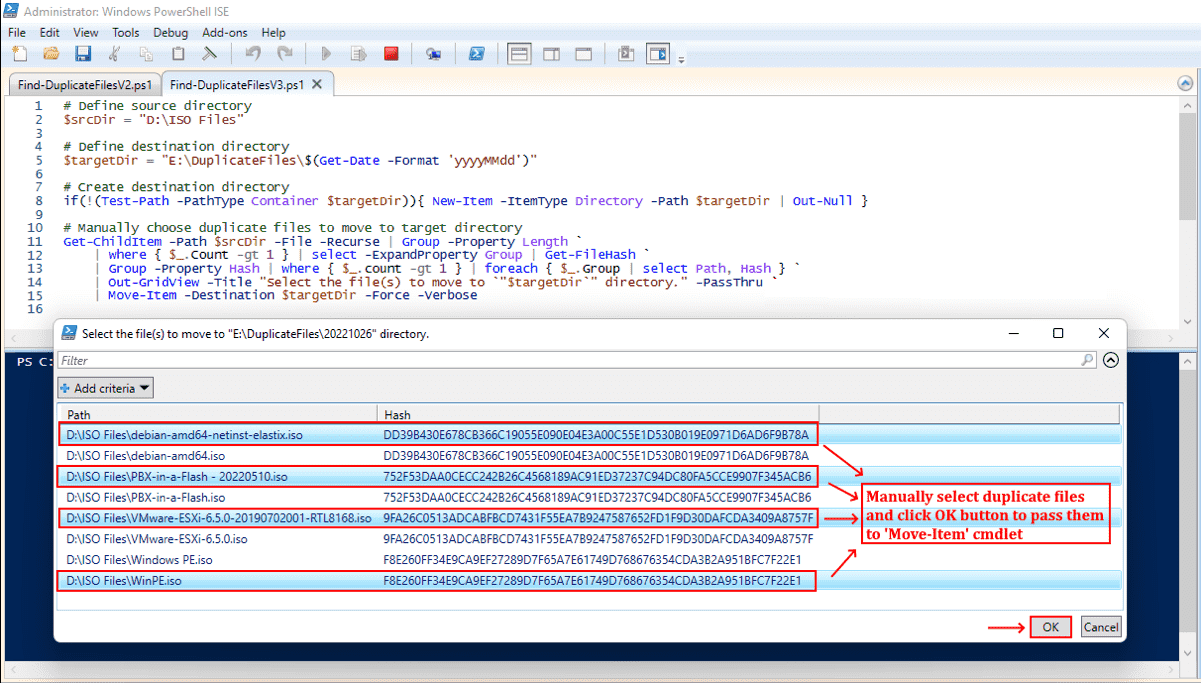
If your directory contains a few files, you may wish to choose which to relocate and which to leave in the source directory manually:
# Define source directory
$srcDir = "D:\ISO Files"
# Define destination directory
$targetDir = "E:\DuplicateFiles\$(Get-Date -Format 'yyyyMMdd')"
# Create destination directory
if(!(Test-Path -PathType Container $targetDir)){ New-Item -ItemType Directory -Path $targetDir | Out-Null }
# Manually choose duplicate files to move to target directory
Get-ChildItem -Path $srcDir -File -Recurse | Group -Property Length `
| where { $_.Count -gt 1 } | select -ExpandProperty Group | Get-FileHash `
| Group -Property Hash | where { $_.count -gt 1 } | foreach { $_.Group | select Path, Hash } `
| Out-GridView -Title "Select the file(s) to move to `"$targetDir`" directory." -PassThru `
| Move-Item -Destination $targetDir -Force -Verbose
If you have backed up your files, you can also directly move the duplicate files with PowerShell:
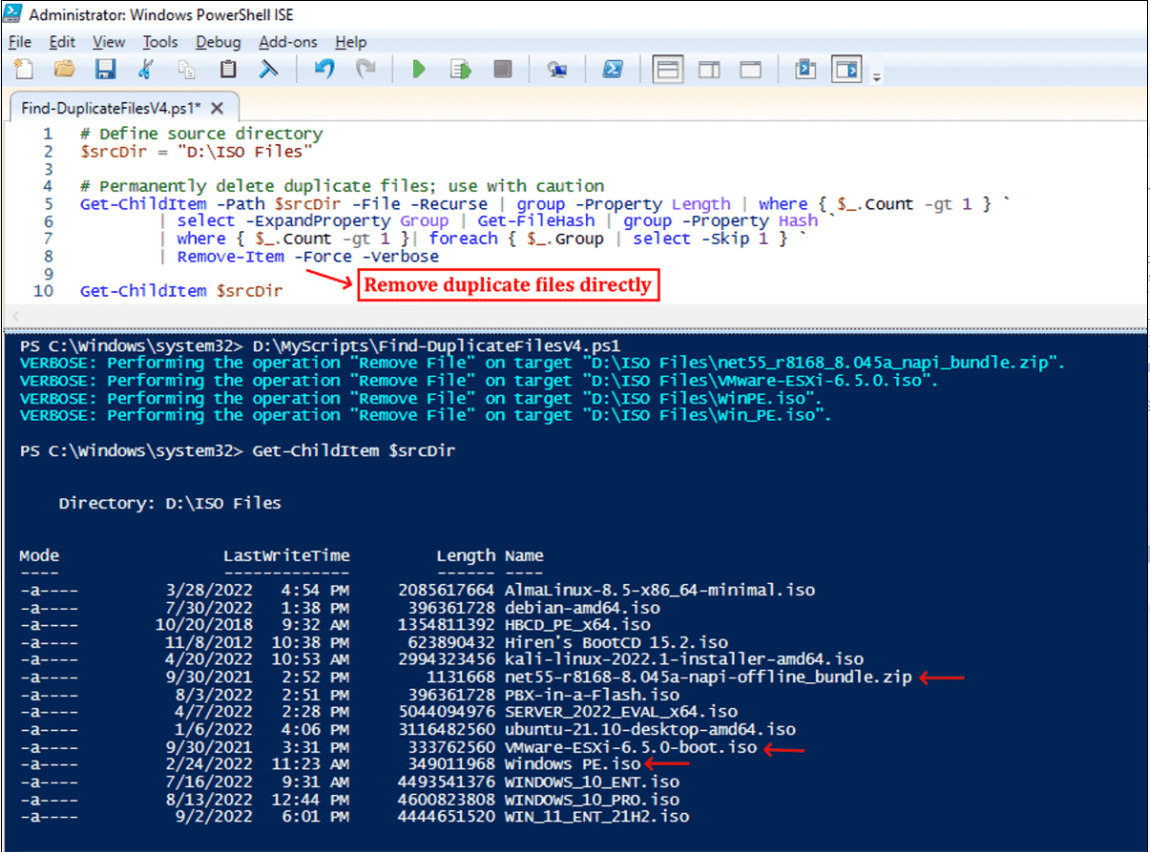
# Define source directory
$srcDir = "D:\ISO Files"
# Permanently delete duplicate files; use with caution
Get-ChildItem -Path $srcDir -File -Recurse | group -Property Length | where { $_.Count -gt 1 } `
| select -ExpandProperty Group | Get-FileHash | group -Property Hash `
| where { $_.Count -gt 1 }| foreach { $_.Group | select -Skip 1 } `
| Remove-Item -Force -Verbose
How to easily and safely find and delete duplicates with a few clicks?
Using Windows command lines to find duplicate files and remove them can be challenging for some users. More importantly, these complex commands can potentially lead to the accidental overwriting of system-related data, which can cause serious consequences.
Given the risks and complexities involved, why not consider trying an easy and safe solution to deal with the bothersome issue of duplicate files? PartitionAssistant Cleanup is dedicated to providing straightforward solutions for computer problems.
For example, its Duplicate Files Finder function can speedily and comprehensively scan your entire computer and list all the file types (pictures, audio, documents, etc.), and offers customization based on your needs. Once you delete important files, you can also use its Recover Data feature via AOMEI Partition Assistant to get them back.
The Best Windows Disk Partition Manager and PC Optimizer
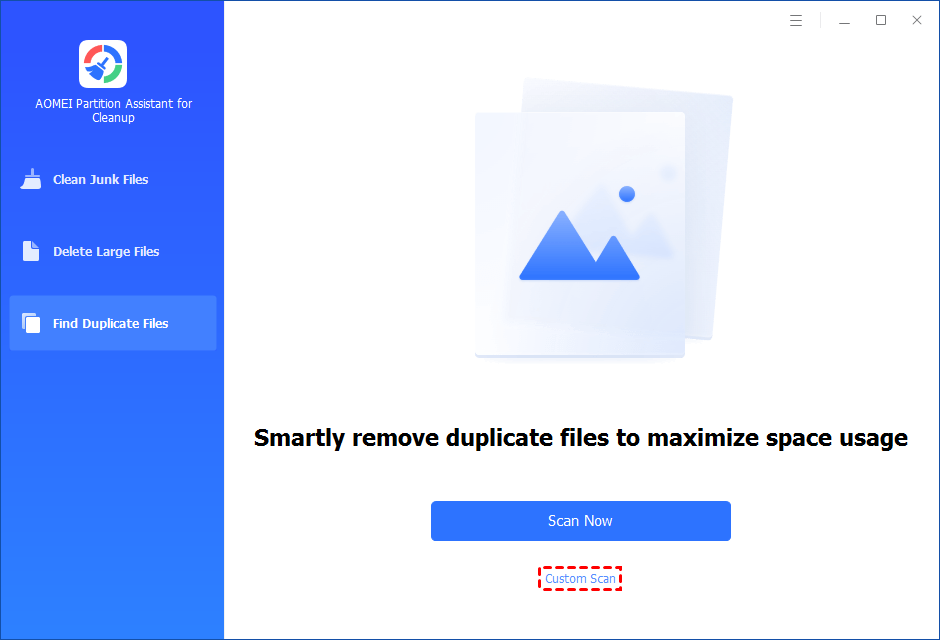
Step 1. Install and launch PartitionAssistant Cleanup. Click the "Find Duplicate Files" tab. You can either click "Scan Now" to start the scan of your system C: drive. Or, click "Custom Scan" to manually select paths to be scanned. (Here, we take the "Custom Scan" as an example.)
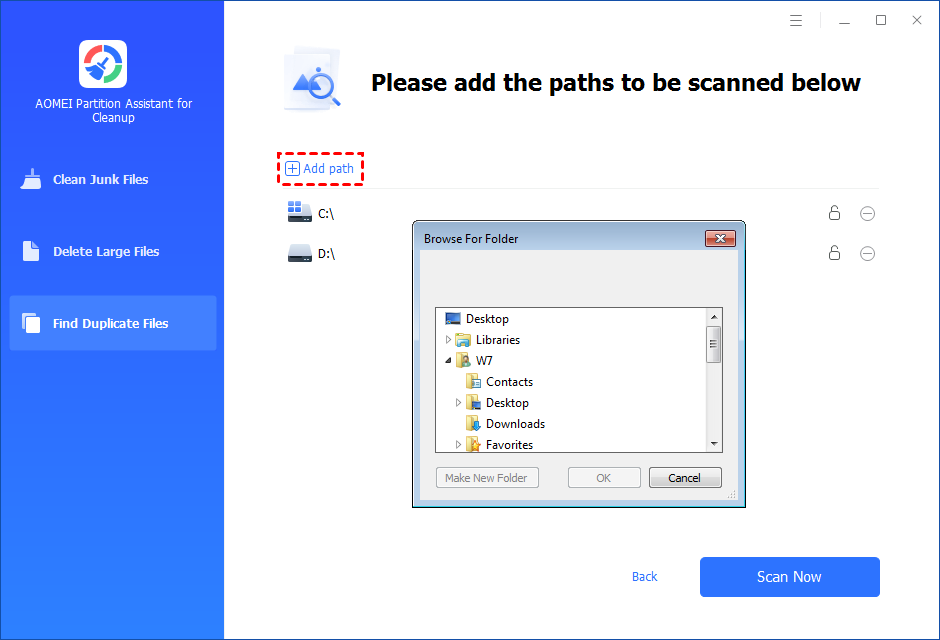
Step 2. After clicking "Custom Scan", all local and external drives on your PC will be displayed. You can also click the "Add Path" button, and then a browse folder window will pop up. So you can add more paths on this PC, like Desktop, Downloads, and other folder paths.
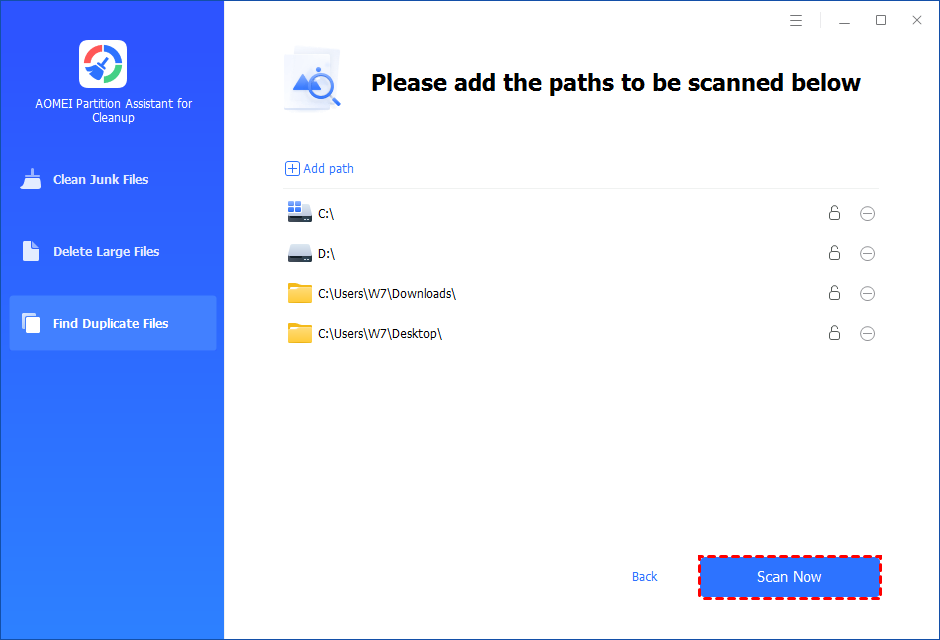
Step 3. Once necessary paths are added, you can click the "Scan Now" button to start the scan process.
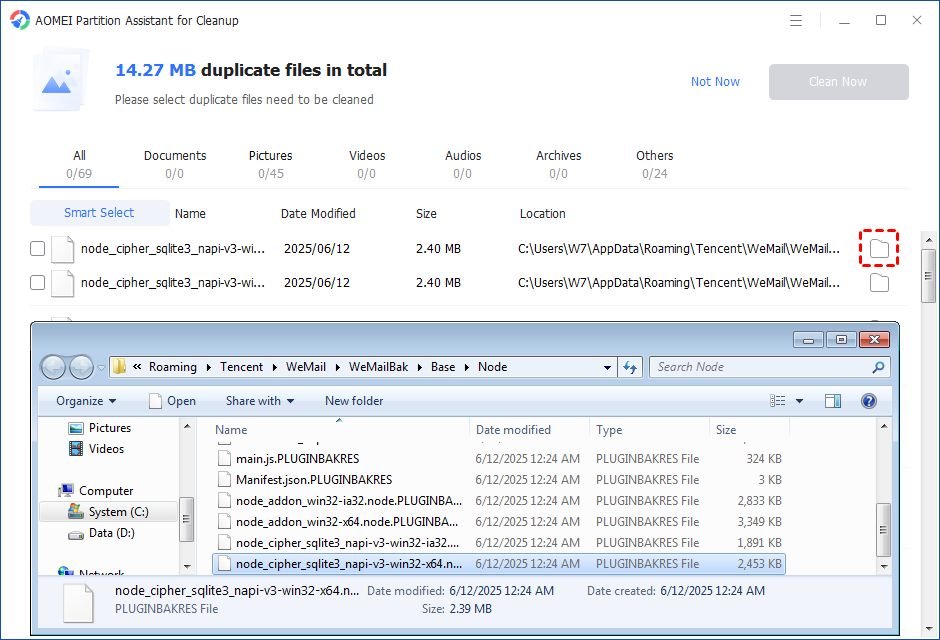
Step 4. The scan process might take time. After the scan is complete, all duplicate files will be listed. You can click the button behind to locate them.
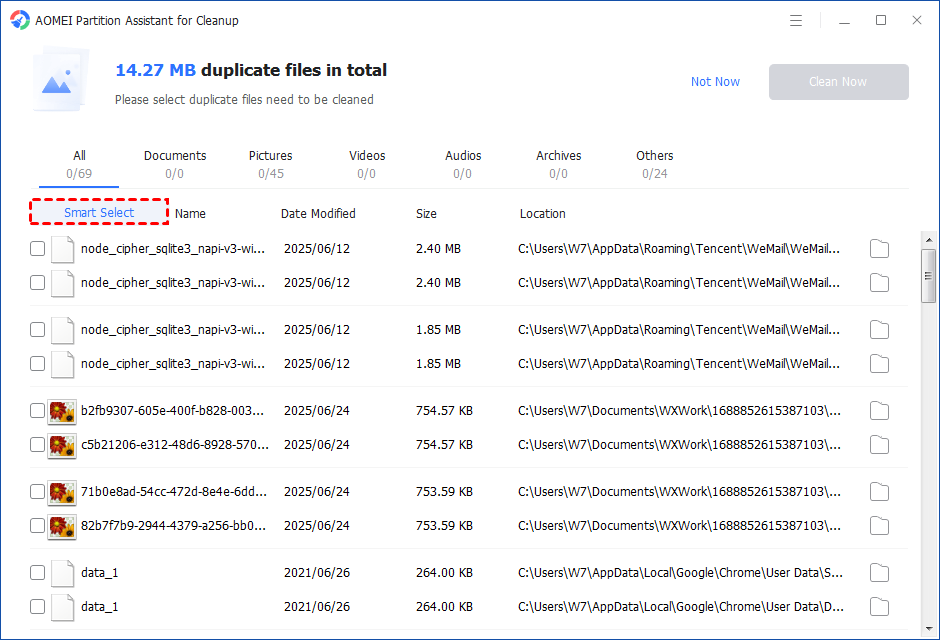
Step 5. You can either manually select duplicate files, or click the "Smart Select" button to automatically select unnecessary duplicate files to delete.
Tips: If the "Smart Select" is ticked, only the oldest duplicate file will be unticked. It means that all duplicate files except the oldest one will be ticked to delete. (The oldest file means the file that was created first. This file will not be deleted. All other duplicate files are conside red copies of the oldest file. )
If you manually select all copies of duplicate files, you will get a pop-up warning window to keep at least one copy of the duplicate files. If you indeed want to delete all copies of duplicate files, you can click "OK" so all copies of duplicate files will be selected to delete.

After unnecessary duplicate files are selected, please click the "Clean Now" button to start the deletion.

Step 6. The deletion might take time. After the process is finished, the selected files will be deleted, and you will get a cleaning completed window displaying how much data you deleted in total.

Further reading: Delete large or junk files on your Windows computers
Sometimes, apps or software can unintentionally create duplicates during updates or file syncing. Over time, these duplicates can clutter your storage, making it harder to manage files and potentially slowing down your device, and even causing 99% disk usage. The same results will also happen if your computer stores many useless large files or junk files. PartitionAssistant Cleanup offers the 2 functions that can help you quickly free up space with ease.
The Best Windows Disk Partition Manager and PC Optimizer
▌Option 1. Delete Large Files
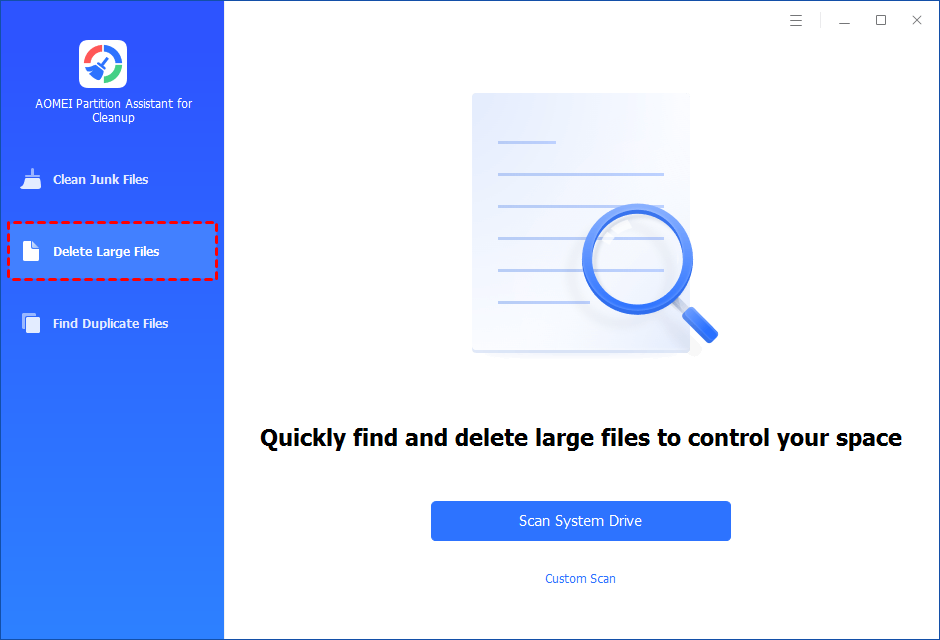
Step 1. Install and launch PartitionAssistant Cleanup. Click the "Delete Large Files" tab.
Step 2. You can either click "Scan System Drive" to start the scan of your system C: drive. Or, click "Custom Scan" to manually select paths to be scanned. (Here, we take the "Custom Scan" as an example.)
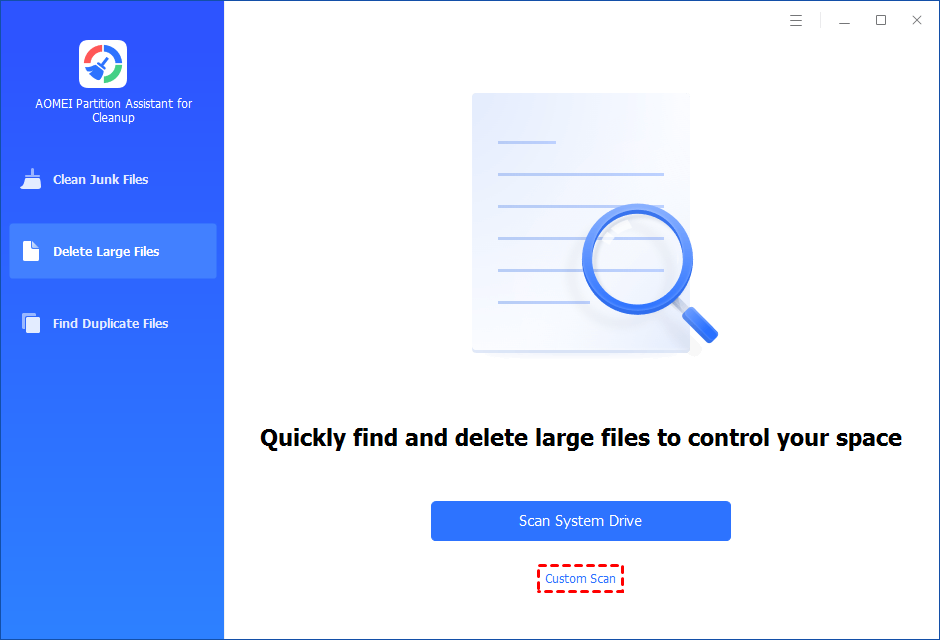
Step 3. After clicking "Custom Scan", all local and external drives on your PC and the common Desktop, Documents, and Downloads paths will be displayed. You can manually select paths to be scanned. Once necessary paths are added, you can click the "Scan Now" button to start the scan process.

Step 4. The scan process might take time. After the scan is complete, all large files found will be listed.
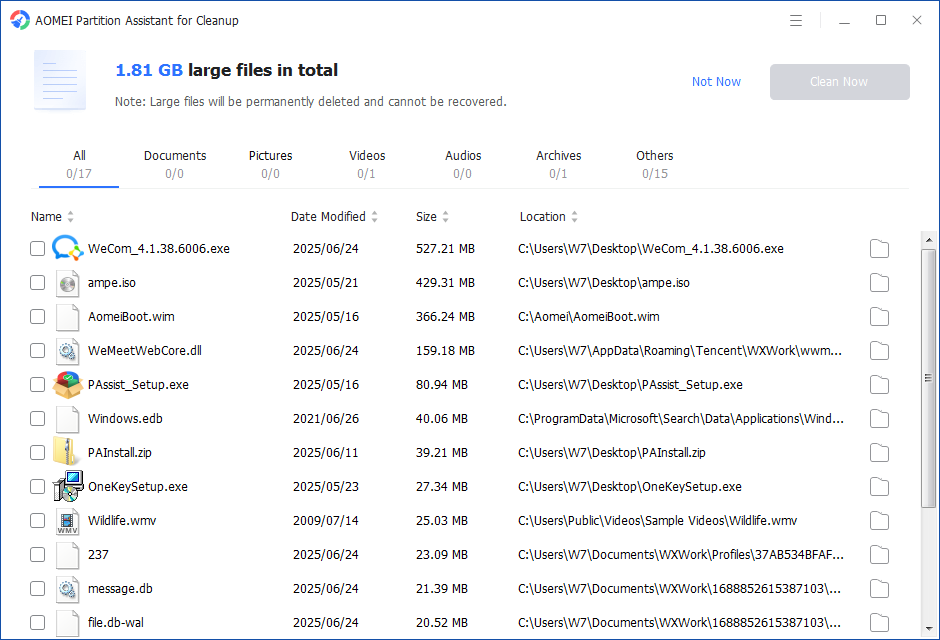
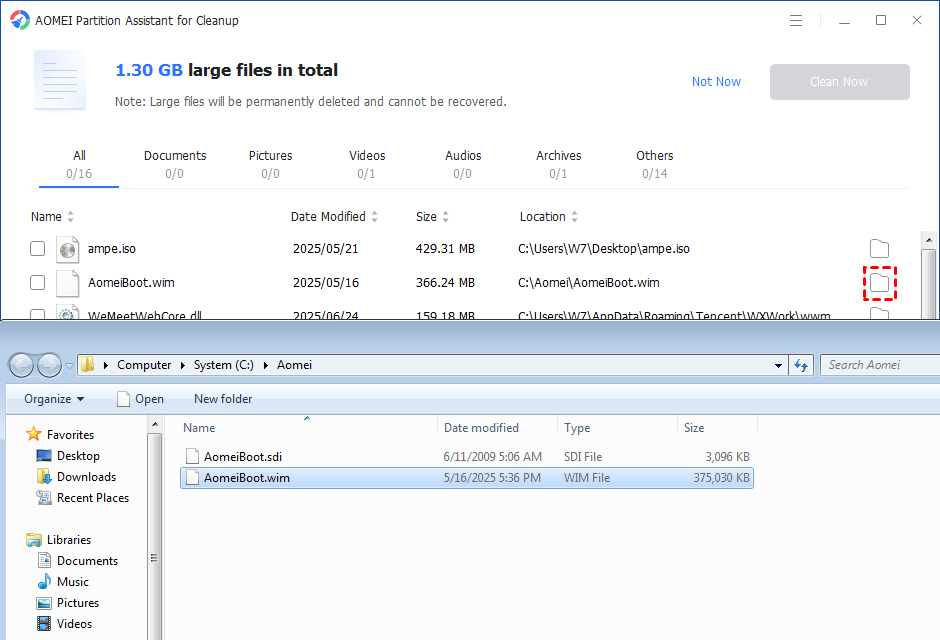
Step 5. You can also check the large files and click the button behind to locate them.
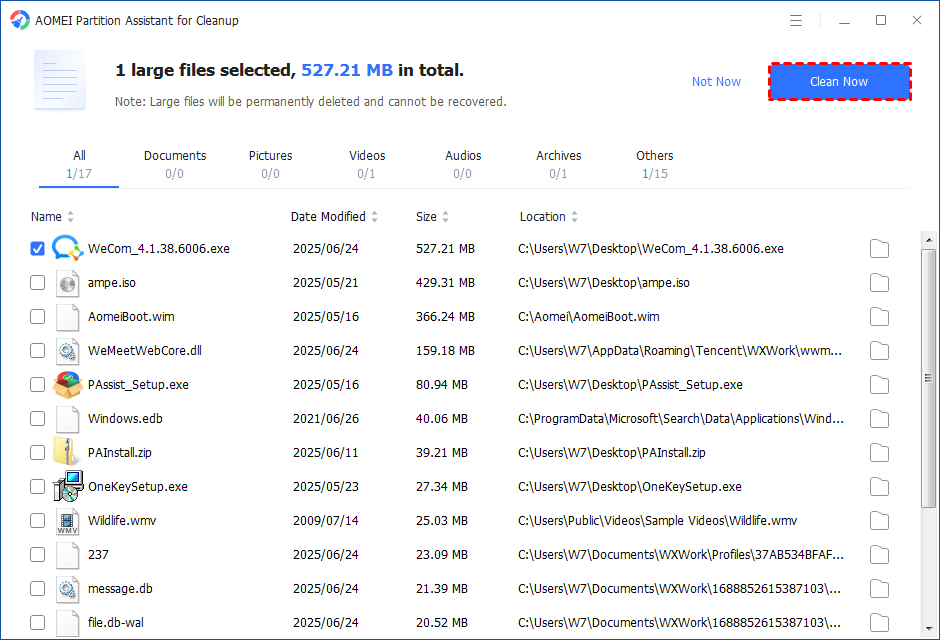
Step 6. Tick the files you want to delete, and then click the "Clean Now" button to start the deletion.
Step 7. The deletion might take time. After the process is finished, the selected files will be deleted, and you will get a cleaning completed window displaying how much data you deleted in total.
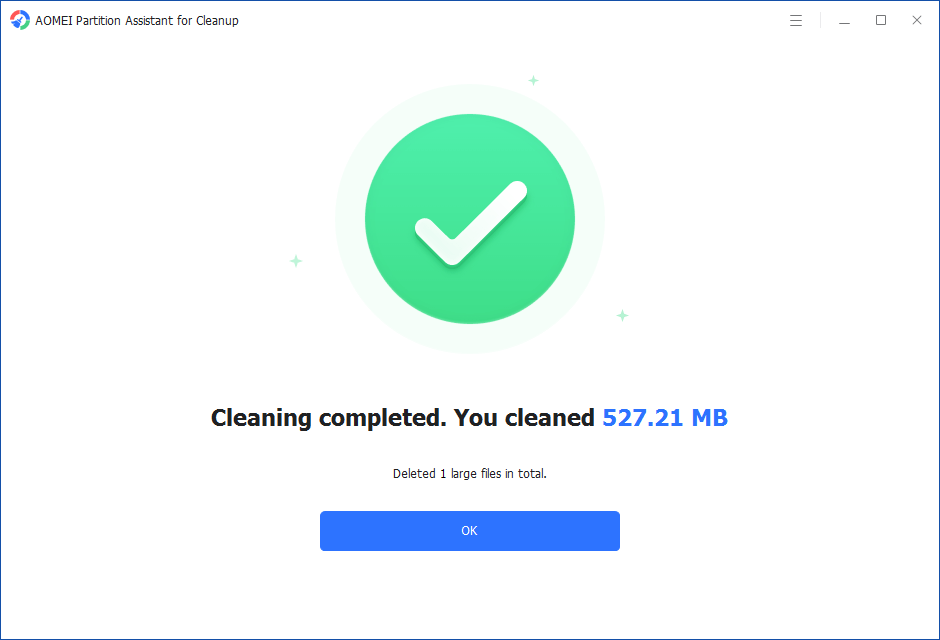
Step 5. Just for a while, the large files will be deleted successfully, and then you will see a warm notification suggesting you clean up your PC regularly.
▌Option 2. Remove junk files
Step 1. Install and launch PartitionAssistant Cleanup. Click the "Clean Junk Files" tab.

Step 2. Click the "Scan Now" button to start the process of scanning junk files.

Step 3. After the scan process is finished. All system junk files (including recycle bin files, temporary files, log files, invalid shortcuts, and so on) and registry junk files (including DLL registry, system registry, and program registry) will be displayed.

Step 4. You can also click the button behind to view the junk files details.

Step 5. And, you can click the button behind to locate the file.

Step 6. By default, the program will select some junk files to clean up, for example, temporary files, log files, and so on. You can also manually check to select more or uncheck to deselect fewer listed junk files. Or, click "Select All" to select all junk files to clean up if you need to clean up all.
After selecting junk files that are not needed anymore, you can click the "Clean Now"button to start the cleanup.

Step 7. The process of the cleanup might take time, and the selected files will be cleaned up. After the process is finished, you will get a cleanup completed window displaying how many files you have cleaned and not yet cleaned.

Conclusion
This is a comprehensive guide on using command line to find duplicate files. If you are willing to explore more convenient method like relying on PartitionAssistant Cleanup, you can make it effective and easy to maintain high computer performance. By the way, a more comprehensive tool AOMEI Partition Assistant shares functions like App Mover, Disk Speed Test, Migrate OS, and so on for your computer management.

