How To Force Eject On Mac Without Data Loss?
This post explores how to force eject on Mac without data loss. It assists users who can't eject an external hard drive on Mac due to the disk being in use.
By Irene / Updated on January 12, 2026
What does force eject mean on a Mac?
For Mac users, the term “force eject” can be confusing. In simple terms, force eject on a Mac does not mean pulling out a drive in an unsafe way. Instead, it usually refers to trying stronger software methods to remove a drive when the normal Eject option does not work.
On macOS, an external drive may fail to eject because it is still being used. This use can come from open files, running apps, or background system processes. When this happens, macOS blocks ejection to protect your data. You may see a message saying the disk is in use and cannot be ejected.
So, what does force eject mean on a Mac in practice? It means asking the system to release the drive by stopping or closing whatever is using it. This can include quitting apps, logging out of your account, restarting Finder, or using built-in system tools to unmount the disk. Some users also rely on third-party disk tools to help manage these locks more smoothly.
It is important to know that macOS does not truly allow unsafe force ejection while data is being written. This design helps prevent file corruption, data loss, and drive damage. The purpose of “force eject” is still safe unmounting, not physical removal. Once the drive is fully unmounted and disappears from the desktop, it is safe to unplug it.
Why Mac sometimes cannot eject an external hard drive
Before looking for solutions, it helps to understand why a Mac sometimes cannot eject an external hard drive. In most situations, this is not a system error. macOS is simply trying to protect your files and prevent data loss. When the system believes a drive is still active, it will stop the ejection process. There are some common reasons a Mac cannot eject an external hard drive
| Cause | Explanation |
|---|---|
| Background system activity | macOS may be running hidden tasks on the drive, such as indexing files, creating previews, checking backup availability, scanning media, or monitoring storage for security purposes. These actions can keep the drive busy even when no files are open. |
| Files or apps still in use | If an app is using a file stored on the external drive, macOS will block ejection. This can happen even when the app is minimized or running quietly in the background. |
| Finder access | An open Finder window showing the external drive can prevent ejection. Finder may still be reading file details or metadata, which counts as active use. |
| NTFS file system limits | Many external drives use the NTFS format. On macOS, NTFS is usually read-only and has limited compatibility, which can cause unstable mounting and unmounting behavior. This often leads to “disk is in use” messages. |
Because of these reasons, macOS may refuse to eject a drive until all activity fully stops. To safely remove the drive and protect your data, make sure all programs and processes accessing it are closed first.
How to force eject on Mac with an external hard drive?
Fix 1. Safely force eject an external hard drive on Mac
Ejecting an external hard drive on a Mac is usually simple, but sometimes macOS shows errors like “The disk is in use” or “One or more programs may be using this disk.” Directly unplugging the drive can risk data loss.
This problem often occurs with NTFS drives, as macOS can read but not write to them by default. PartitionAssistant NTFS for Mac solves this by providing full read/write access, allowing safe file management and secure ejection.
Force ejecting a drive means disconnecting it safely when macOS reports it as in use. While Terminal commands or force-quitting apps are possible, they risk data loss. PartitionAssistant NTFS for Mac offers a safer, professional solution, supporting NTFS, FAT32, and exFAT drives, and working on both Intel and Apple Silicon Macs. With this tool, ejecting stubborn external drives becomes simple, safe, and reliable.
Step 1. Download the installer, follow the on-screen instructions to install it on your Mac, and then launch PartitionAssistant NTFS for Mac.
Step 2. Connect your drive to the Mac. The software will find it and show it on the screen.

Step 3. Select the external hard drive you want to operate. If the state is "Read Only", please click "Enable Writable".
Once the status changes to "Read & Write," you can click "Open" to copy, delete, or rename files on your Mac.
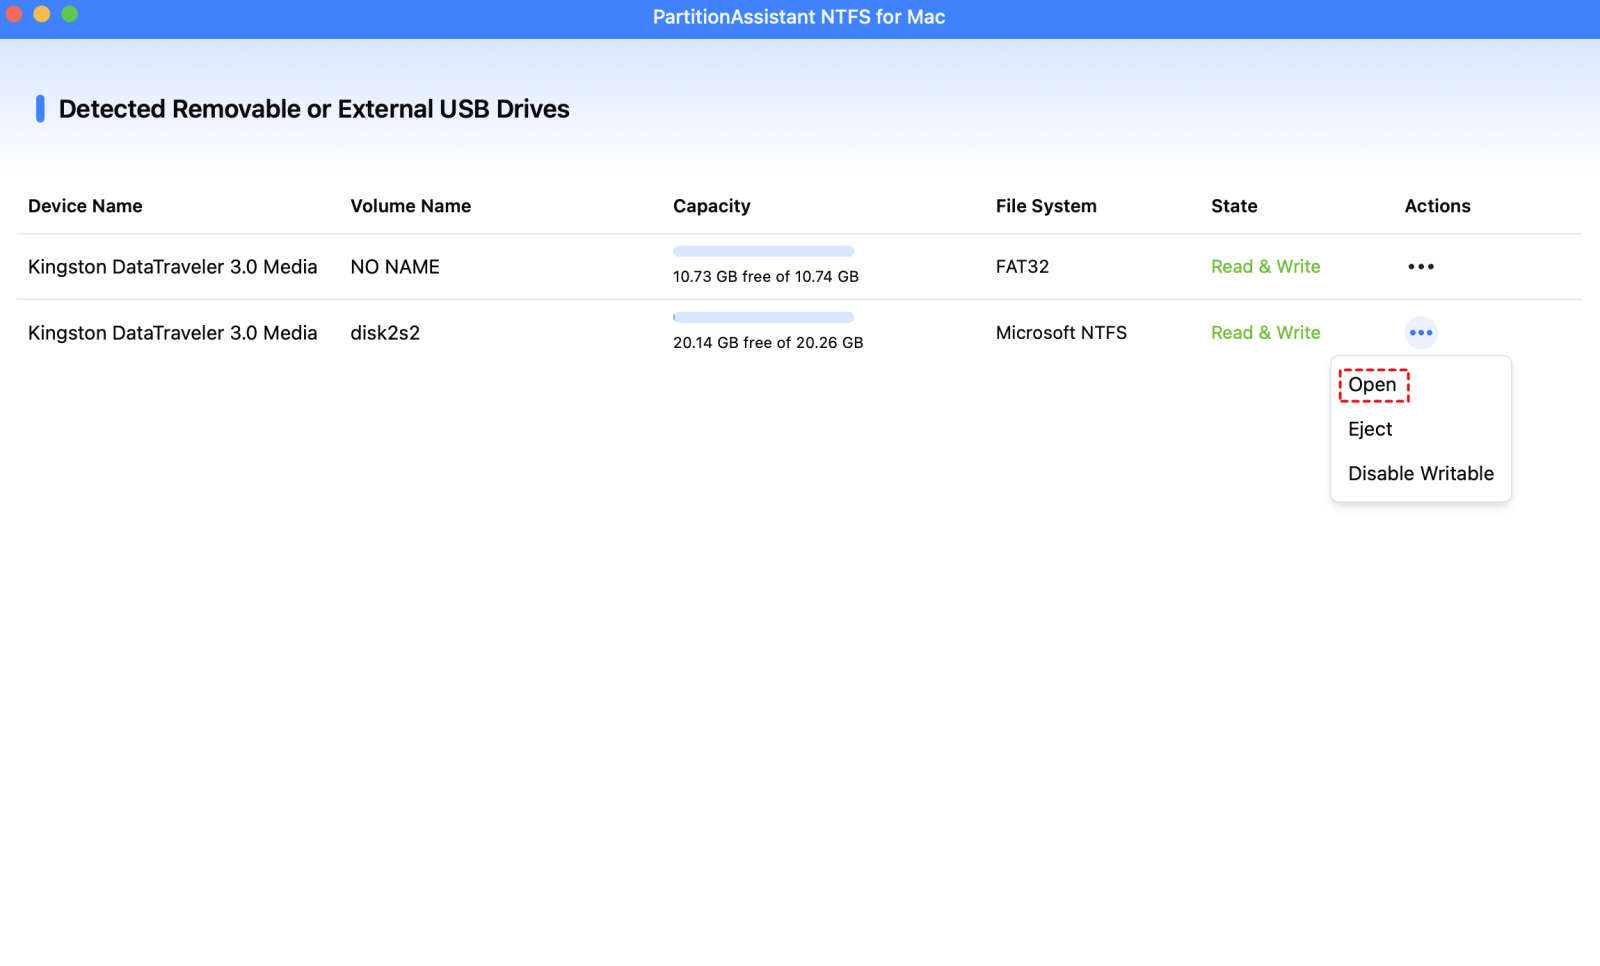
Step 4. Once you have finished all tasks, click "Eject" to safely remove the external hard drive from your Mac.
Fix 2. Safely eject external hard drive with the Finder Sidebar
Using the Finder sidebar to safely eject an external hard drive on a Mac ensures the system properly closes all files and stops any processes connected to the drive before removal. This prevents data loss by avoiding corrupting files that are still being read or written and maintains the integrity of the drive’s file system, especially for NTFS or other non-native macOS formats. Ejecting through Finder is simple and safe, and macOS will alert you if the drive is still in use, giving you a chance to close apps or wait for operations to finish.
Step 1. Open a Finder window.
Step 2. Look at the sidebar on the left under the "Locations" section.
Step 3. Find your external drive in the list.
Step 4. Click the small Eject icon (an arrow pointing up with a line under it) next to the drive name.
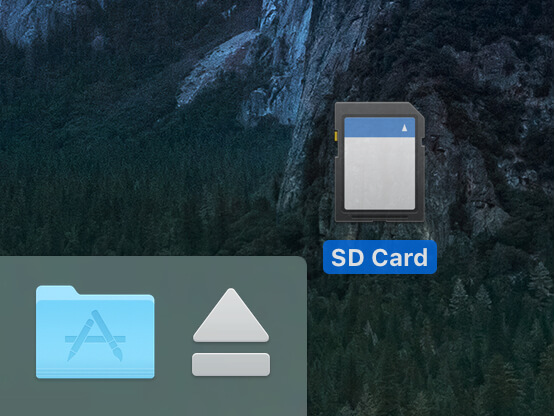
Fix 3. Drag external hard drive to Trash
In addition to the other methods, you can use the Trash on your Mac to safely eject an external hard drive.
Step 1. Locate your external storage device's icon on the desktop and drag it to the Trash bin. The Trash bin will now change to an Eject icon.
Alternatively, you can hold the "Ctrl" key and press the left-click button on your mouse on the external disk's icon to popup the menu and then click on the Eject button.
Step 2. If the icon is no longer visible, you have safely ejected your external disk. And now, you can disconnect the external device from your Mac.
Conclusion
In summary, understanding what force eject means on a Mac can help you protect your data and manage external drives safely. macOS prevents ejection when files or processes are still using the drive, so using proper methods is key to avoiding data loss. You can safely eject drives through Finder, by dragging them to the Trash, or by using professional tools like PartitionAssistant NTFS for Mac. These methods ensure that your files remain intact and your external drives are properly unmounted, making it easy and safe to disconnect them whenever needed.
FAQs
🗨️ How to force exit out of Mac?
To force exit an app on Mac, press Command + Option + Esc to open the Force Quit window. Select the app that is not responding and click Force Quit. This stops the app immediately without restarting your Mac.
🗨️ How to force an eject disc?
If a disc won’t eject normally, restart your Mac and hold the mouse or trackpad button while it boots. The disc should eject automatically. You can also eject through Finder or Disk Utility if the disc is still recognized.
🗨️ How do you force eject a hard drive?
To force eject a hard drive, close all apps and files using it. You can try Finder > Eject, drag the drive to the Trash, or use Disk Utility to unmount it. If it’s still stuck, professional tools like PartitionAssistant NTFS for Mac can safely force eject the drive without risking data loss.
🗨️ How to force unmount disk on Mac?
Open Disk Utility, select the disk, and click Unmount. If it fails, use Terminal with the command diskutil unmount force /Volumes/YourDiskName. Make sure no files or apps are using the disk to avoid data corruption.
🗨️ How to eject a drive that won't eject on Mac?
First, close any programs or files accessing the drive. Try Finder > Eject, drag it to the Trash, or use Disk Utility to unmount. If the drive is still in use, restarting your Mac often helps. For stubborn drives, tools like PartitionAssistant NTFS for Mac make ejecting safe and easy.

