How to Format a USB Drive To Fat32 In macOS With Disk Utility?
This guide illustrates how to format a USB flash drive on a Mac. It details the steps for formatting USB to FAT32 or NTFS using Disk Utility and Mac Terminal.
By Irene / Updated on December 26, 2025
Why do you need to format a USB drive to FAT32 in macOS?
People often format a USB drive to FAT32 (shown as MS-DOS (FAT) in macOS) to make sure it works with almost any device. While macOS and Windows each have their preferred file systems, FAT32 is the most widely supported option, making it a safe choice for sharing files across different platforms.
One main reason to use FAT32 is universal compatibility. Files saved on a Mac can be read on a Windows PC and vice versa without extra software. Older devices like printers, digital cameras, car stereos, and smart TVs often only recognize FAT32. Even some gaming consoles, such as PlayStation 3 and Xbox 360, require FAT32 for external drives, and certain firmware updates also rely on it.
Another advantage is convenience. You can format a drive directly using macOS’s built-in Disk Utility, so there’s no need to install third-party software. Note that Disk Utility does not list FAT32 by name, and you need to choose MS-DOS (FAT). For drives larger than 32GB, macOS automatically applies the FAT32 version of this format.
How to format a USB drive to FAT32 in macOS with Disk Utility?
If you need your USB drive to work with multiple operating systems, formatting it to FAT32 is a reliable choice. This format is compatible with macOS, Windows, Linux, and even DOS, making it ideal for cross-platform use. Keep in mind that formatting will erase all data on the USB, so back up any important files before starting.
Step 1. Plug the USB flash drive into your Mac.
Step 2. Open "Applications", then go to "Utilities" and launch "Disk Utility".
Step 3. In Disk Utility, select your USB drive from the sidebar and click "Erase".
Step 4. If you want, enter a new name for the USB drive.
Step 5. Set the format to MS-DOS (FAT) and the scheme to Master Boot Record, then click "Erase" to start formatting.
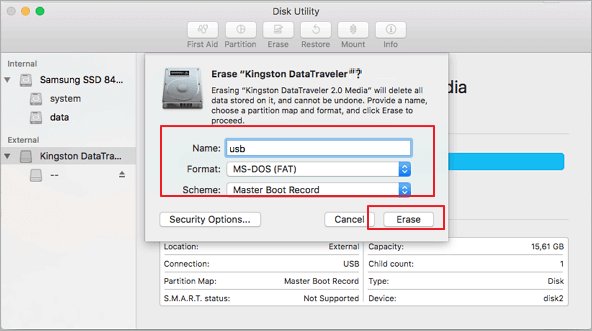
Once the process finishes, your USB drive will be empty and formatted as FAT32, ready for use on multiple devices.
What is the difference in Mac File Systems
Mac users often work with different types of file systems depending on the device and purpose. Understanding how each system works on macOS helps avoid compatibility issues, especially when using external drives. While macOS has its preferred formats, Windows-based formats like NTFS are widely used but require extra tools for full functionality.
| File System | Read on Mac | Write on Mac | Notes |
|---|---|---|---|
| APFS | Yes | Yes | Apple’s default for internal drives on macOS High Sierra and later. Optimized for SSDs and modern Macs. |
| HFS+ (Mac OS Extended) | Yes | Yes | Older macOS format, works well for internal and external drives, fully supported by Mac. |
| exFAT | Yes | Yes | Compatible with both Mac and Windows. Good for large files and external drives. |
| FAT32 (MS-DOS FAT) | Yes | Yes | Works across almost all devices. File size limit: 4GB. Ideal for USB drives. |
| NTFS | Yes | No (read-only) | To write to NTFS on Mac, third-party software like PartitionAssistant NTFS for Mac is required. Without it, the drive is read-only. |
Transitioning between these file systems depends on your needs. For example, if you mainly work on Mac, APFS or HFS+ is ideal. If you frequently share files with Windows PCs or older devices, exFAT or FAT32 is better. For NTFS drives, using software like PartitionAssistant NTFS for Mac is necessary to unlock full read-write access.
How to write to NTFS drive on Mac?
Mac users often run into a problem when trying to modify files on an external drive. Even if you follow all the usual steps, you might see a “Read-only file system” message or find that you cannot save, edit, or delete files. This happens because the drive is formatted in NTFS, the standard file system for Windows. macOS can read NTFS drives, but it cannot write to them natively. It is not a permission issue, so using Terminal commands like chmod will not help.
The easiest and most reliable way to unlock full access to your NTFS drives on Mac is with PartitionAssistant NTFS for Mac. This powerful tool instantly transforms your Windows-formatted drives into fully usable Mac disks without reformatting, risk, or hassle. Once installed, your NTFS drive behaves just like a native Mac drive, allowing you to copy, move, rename, or delete files directly in Finder with complete freedom.
Built for speed and stability, PartitionAssistant NTFS for Mac works seamlessly with a wide range of storage devices. It supports NTFS, FAT32, and exFAT file system to ensure maximum compatibility. Fully optimized for the latest macOS versions and both Intel and Apple Silicon Macs, it makes using NTFS drives on a Mac effortless and worry-free.
Step 1. Download the installer and follow the instructions to install it on your Mac. Then open PartitionAssistant NTFS for Mac.
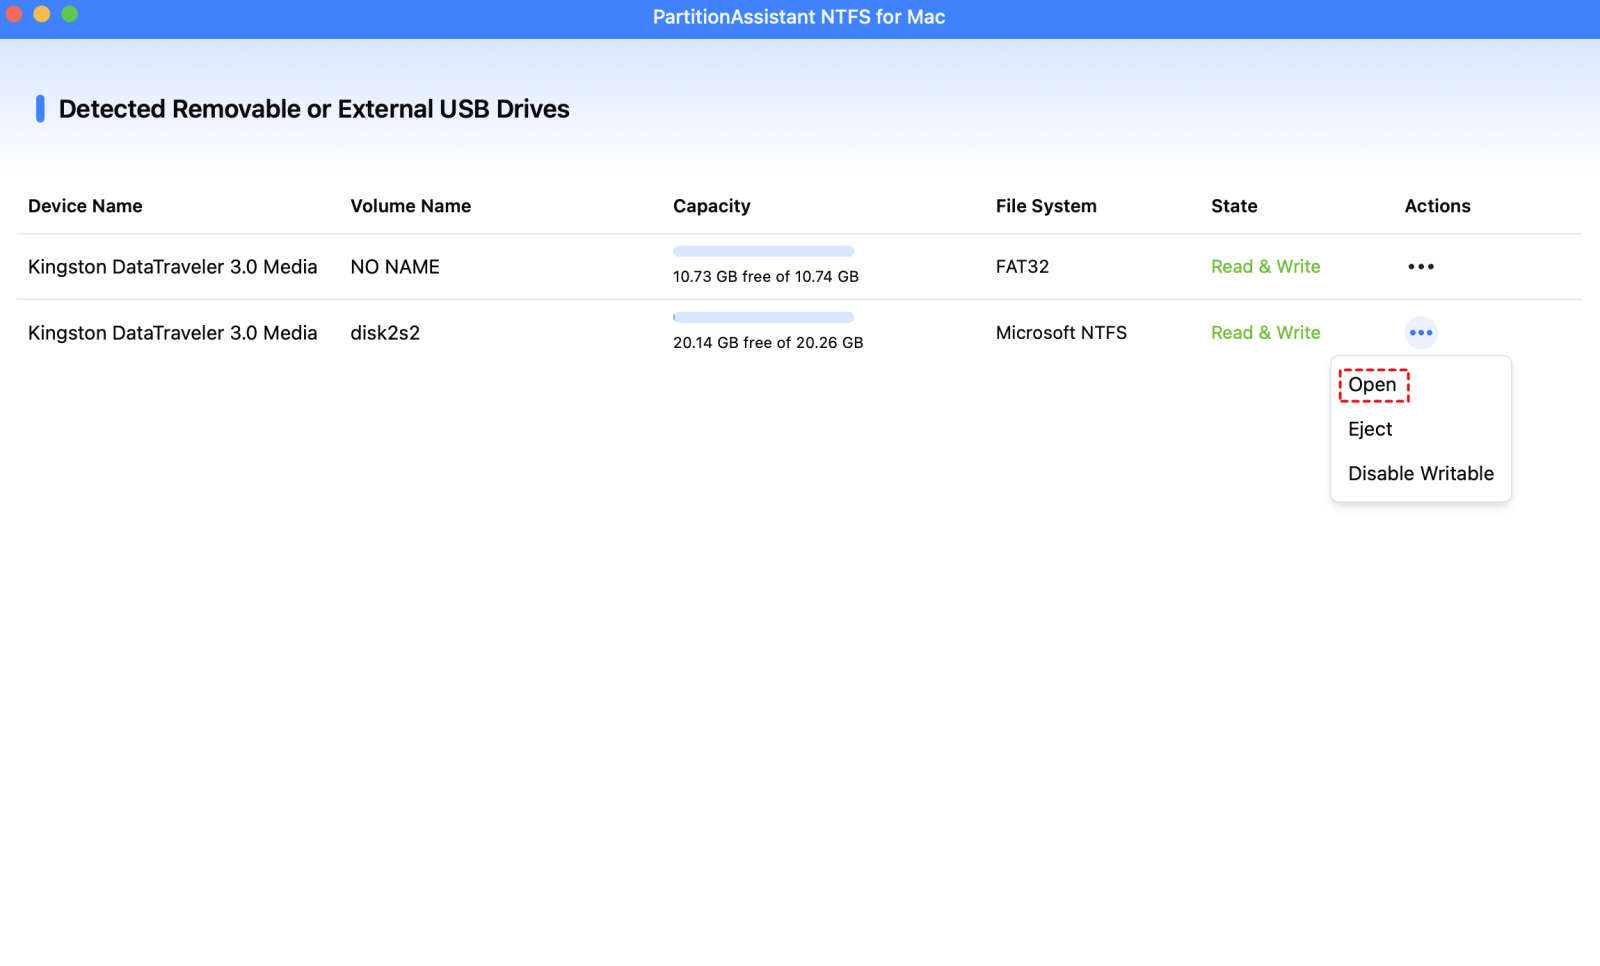
Step 2. Connect your drive to the Mac. The software will find it and show it on the screen.

Step 3. Select the USB you want to operate. If the state is "Read Only", please click "Enable Writable".
When the state change to "Read & Write", you can click "Open" then copy, delete, and rename files on your Mac.
Step 4. After all operations are complete, please click "Eject" to disconnect the USB from your Mac.
Conclusion
In summary, understanding how different file systems work on Mac helps you use USB drives and external storage more effectively. Formatting a USB drive to FAT32 ensures compatibility across multiple devices, while knowing the differences between APFS, HFS+, exFAT, FAT32, and NTFS allows you to choose the best option for your needs. For NTFS drives, tools like PartitionAssistant NTFS for Mac make it easy to enable full read and write access, allowing you to manage your files on Mac without restrictions. By following these steps and using the right tools, you can enjoy smooth and trouble-free file management across all your devices.
FAQs
🔶 How to format FAT32 on Mac using Disk Utility?
To format a USB drive to FAT32 on Mac, open Disk Utility from Applications > Utilities. Select your USB drive, click “Erase,” choose MS-DOS (FAT) as the format, and Master Boot Record as the scheme. Then click “Erase” to start. For drives larger than 32GB, macOS will automatically use the FAT32 version of MS-DOS (FAT).
🔶 Why is FAT32 not an option on my Mac?
FAT32 may not appear as a separate option because macOS labels it as MS-DOS (FAT) in Disk Utility. If your drive is larger than 32GB, macOS still uses FAT32 internally even though it does not list FAT32 explicitly.
🔶 Why is there no FAT32 option when formatting USB?
Mac uses the name MS-DOS (FAT) instead of FAT32. To format a USB to FAT32, select MS-DOS (FAT) in Disk Utility. For drives larger than 32GB, it will automatically format the drive as FAT32.
🔶 How do I reformat my USB to NTFS?
macOS cannot write to NTFS by default. To format a USB drive to NTFS on Mac, you need third-party software such as PartitionAssistant NTFS for Mac. This tool allows you to format and write to NTFS drives safely.
🔶 Does macOS support NTFS USB?
Mac can read NTFS drives but cannot write to them natively. To enable full read and write access, you need a tool, which makes NTFS drives fully usable on Mac without reformatting.

