How to Format WD My Passport for Mac | Full Guide
This guide covers the full guide on how to format WD My Passport for Mac. You can also learn how to make WD My Passport always readable and writable on Macs.
By Hedy / Updated on March 19, 2026
Why is formatting necessary for Mac?
macOS uses specific file systems that differ from Windows, and this is where compatibility issues arise. Most WD drives are formatted as NTFS, which macOS can read but not write to by default. That means you can open files but cannot edit, delete, or add new ones. For most users, that limitation makes the drive nearly useless.
Formatting solves this problem by converting the drive into a Mac-friendly file system such as APFS, HFS+ (Mac OS Extended), or exFAT. Each format has its own strengths depending on your needs, but the goal remains the same—full functionality.
Another reason formatting becomes necessary is performance optimization. A properly formatted drive works faster, reduces errors, and ensures long-term reliability. It also minimizes compatibility glitches when transferring files between devices.
Skipping formatting is like driving a car with the wrong fuel—it might run for a while, but eventually, problems will surface. Taking a few minutes to format your WD My Passport correctly ensures smooth performance and a stress-free experience.
File systems explained for Mac users
APFS vs HFS+ vs exFAT
Choosing the right file system can feel overwhelming at first, especially if you’re new to macOS. But once you break it down, it’s surprisingly simple. The three main formats you’ll encounter are APFS, HFS+, and exFAT.
◆ APFS (Apple File System) is the modern standard for macOS. It’s optimized for speed, especially on SSDs, and offers advanced features like encryption and snapshots. If you’re using a newer Mac, APFS is usually the best choice for performance and reliability.
◆ HFS+ (Mac OS Extended) is the older file system but still widely supported. It’s a safe option for compatibility, especially if you’re working with older macOS versions. While not as fast as APFS, it’s stable and dependable.
◆ exFAT, on the other hand, is the bridge between Mac and Windows. It allows full read/write access on both systems, making it ideal for users who frequently switch between platforms. However, it lacks some advanced features like journaling and encryption.
Which format should you choose?
The answer depends entirely on how you plan to use your drive. If your WD My Passport will stay exclusively with your Mac, APFS is your best bet. It’s fast, efficient, and designed specifically for Apple systems.
If you need cross-platform compatibility, exFAT is the obvious choice. It’s like having a universal adapter—you can plug into both Mac and Windows without any issues. Just keep in mind that you might sacrifice some performance and security features.
For older Macs, HFS+ still holds its ground as a reliable option. It’s not flashy, but it gets the job done consistently.
Choosing the right format is less about technical specs and more about your daily workflow. Once you align the format with your needs, everything else falls into place.
How to format WD My Passport for Mac
Here’s a clear, step-by-step guide on how to format your WD My Passport drive for Mac using both Disk Utility and Terminal:
Way 1. Formatting using Disk Utility
Formatting your WD My Passport using Disk Utility is straightforward once you know where to look. Follow these steps carefully:
Step 1. Connect your WD My Passport to your Mac.
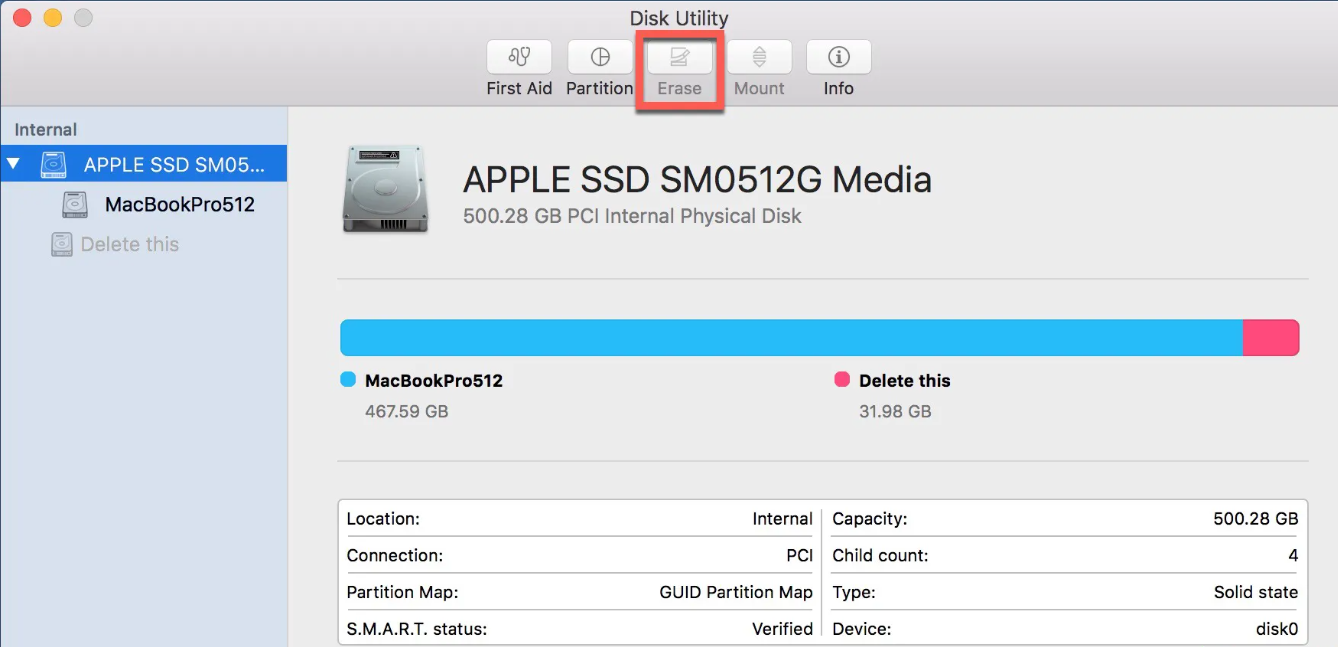
Step 2. Open Disk Utility (Applications > Utilities).
Step 3. Locate your drive in the sidebar.
Step 4. Click Erase at the top.
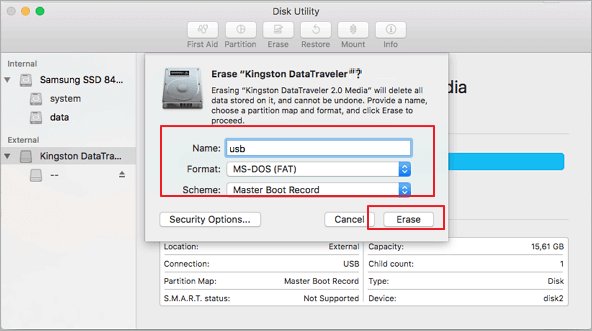
Step 5. Enter a name for your drive.
Step 6. Choose a format (APFS, HFS+, or exFAT).
Step 7. Select GUID Partition Map as the scheme.
Step 8. Click Erase to begin formatting.
The process usually takes just a few seconds to a couple of minutes, depending on the drive size. Once completed, your drive is ready for use.
This method is ideal for most users because it’s simple, visual, and built into macOS. You don’t need any third-party tools or advanced knowledge to get started.
✍ Common mistakes to avoid:
► Even though the process is simple, a few common mistakes can cause problems. Selecting the wrong drive, for example, can lead to accidental data loss on another device. Always double-check before clicking “Erase”.
► Another mistake is choosing the wrong format. If you pick APFS but later need Windows compatibility, you’ll have to format the drive again. Planning ahead saves time and effort.
► Rushing through the steps is another issue. Take your time, read each option carefully, and ensure everything is set correctly before proceeding.
Way 2. Formatting using Terminal (advanced method)
For most users, Disk Utility is more than enough. But sometimes, advanced situations require a more powerful approach. That’s where Terminal comes in. It allows you to format drives using command-line instructions, giving you more control over the process.
Terminal is especially useful when Disk Utility fails to detect or format your drive properly. It can bypass certain limitations and provide deeper access to system-level functions.
However, it’s not beginner-friendly. One wrong command can lead to unintended consequences, so it’s important to proceed carefully.
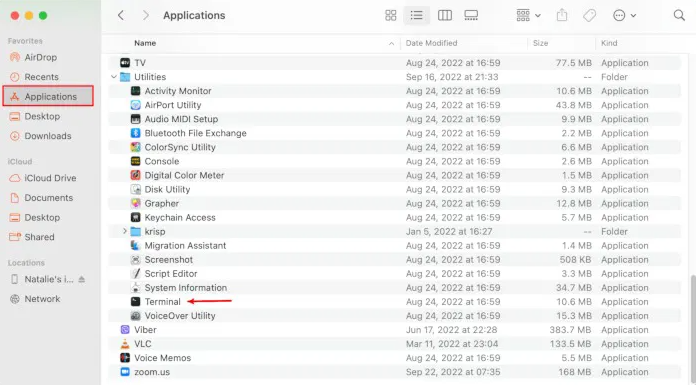
Step 1. Go to Applications > Utilities > Terminal, or search via Spotlight.
Step 2. Type the following command and press Enter:
diskutil list
Step 3. Find your WD My Passport in the list (e.g., /dev/disk2). Make sure you note the correct identifier.
Step 4. Use the following command to format:
diskutil eraseDisk JHFS+ "MyPassport" GPT /dev/disk2
● JHFS+ is Mac OS Extended (Journaled)
● "MyPassport" is the drive name
● GPT sets the GUID Partition Table
● /dev/disk2 should be replaced with your drive’s identifier
Step 5. Press Enter and wait for the process to complete.
Step 6. Type diskutil list again to confirm the drive is formatted properly.
How to make WD My Passport fully compatible with Mac
PartitionAssistant NTFS for Mac is a third‑party macOS utility that installs an NTFS driver and management interface on your Mac. It bridges the file system gap between macOS and Windows by giving your Mac full read/write access to NTFS‑formatted drives — including external hard drives like a Western Digital My Passport.
By default, macOS can read files on NTFS drives but can’t write to them without additional software. PartitionAssistant unlocks this limitation, so your My Passport drive behaves more like a native Mac drive.
✎ Key features of PartitionAssistant NTFS for Mac:
✔️ Full read & write NTFS support: Once installed, the software gives your Mac complete control over NTFS volumes — not just read‑only access.
✔️ Easy file management: You can drag and drop files in the Finder just like a native Mac drive.
✔️ Automatic drive mounting: Connected external drives (including WD My Passport) mount automatically and are ready for use.
✔️ Compatibility with multiple devices: Works with external HDDs, SSDs, USB flash drives, and memory cards formatted as NTFS, FAT32, or exFAT.
✔️ Support for modern macOS & Apple Silicon: Designed for macOS 12 and later on both Intel and Apple Silicon (M1/M2/M3) Macs.
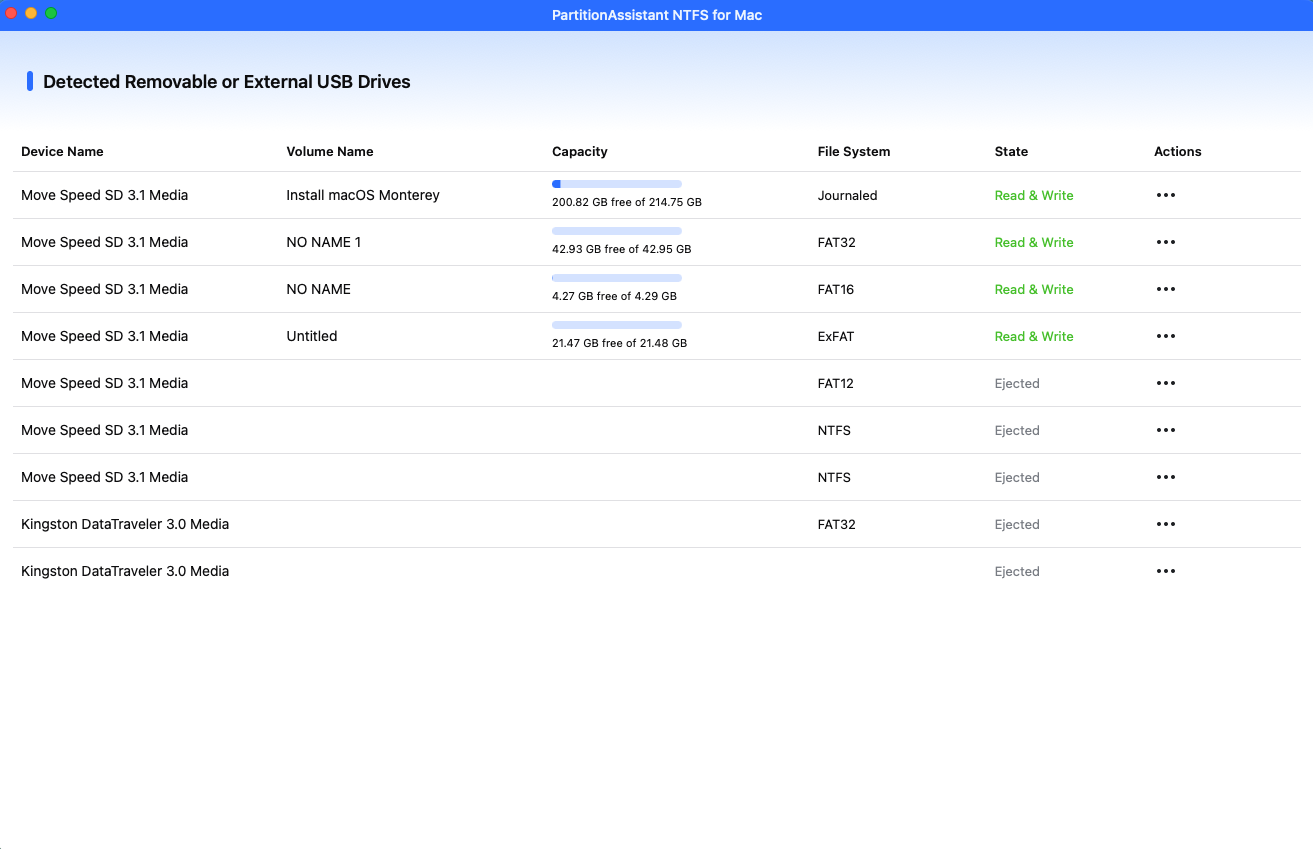
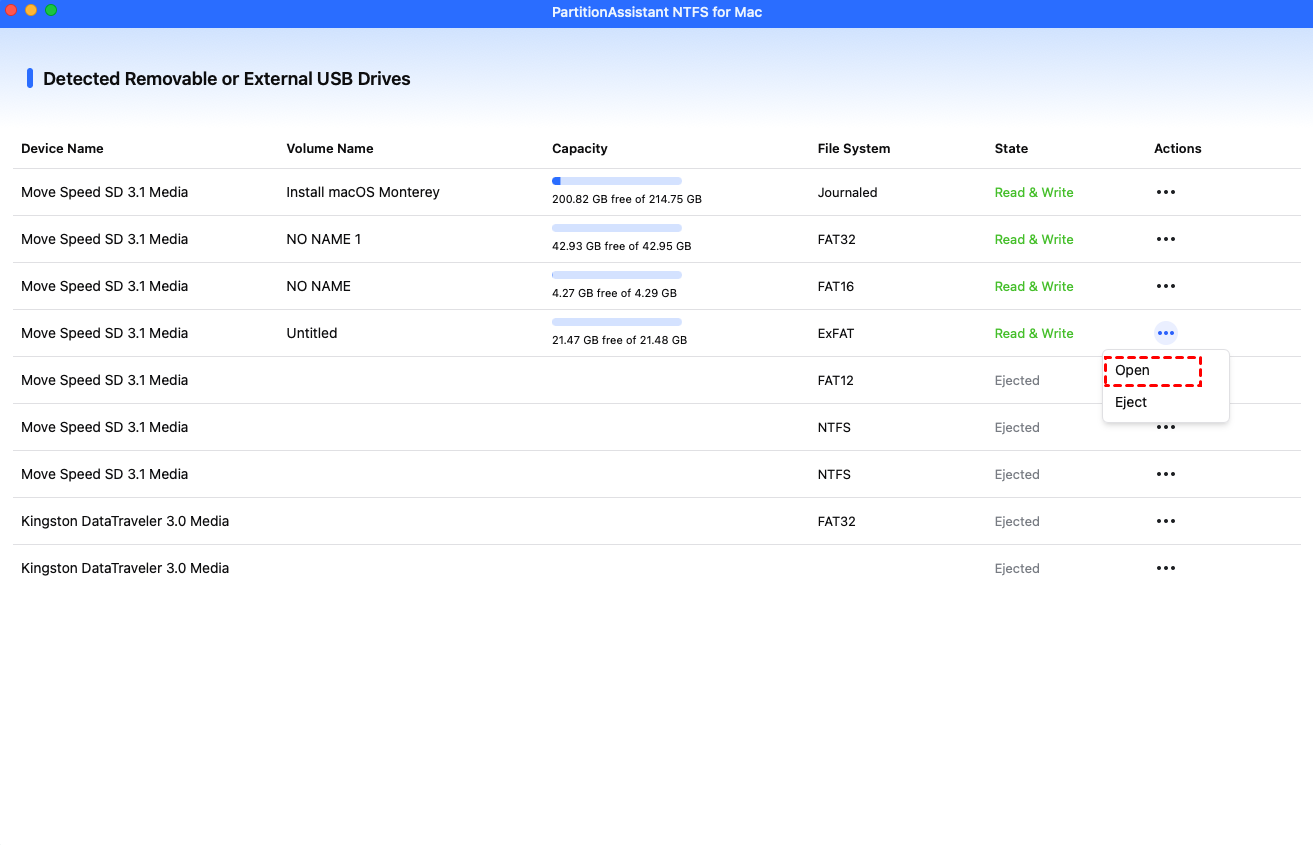
Step 1. Run PartitionAssistant NTFS for Mac and connect your WD My Passporthard drive.
Step 2. The connected, removable, and external hard drives will be mounted and listed.
Step 3. Select the drive you want to operate and click "Open".
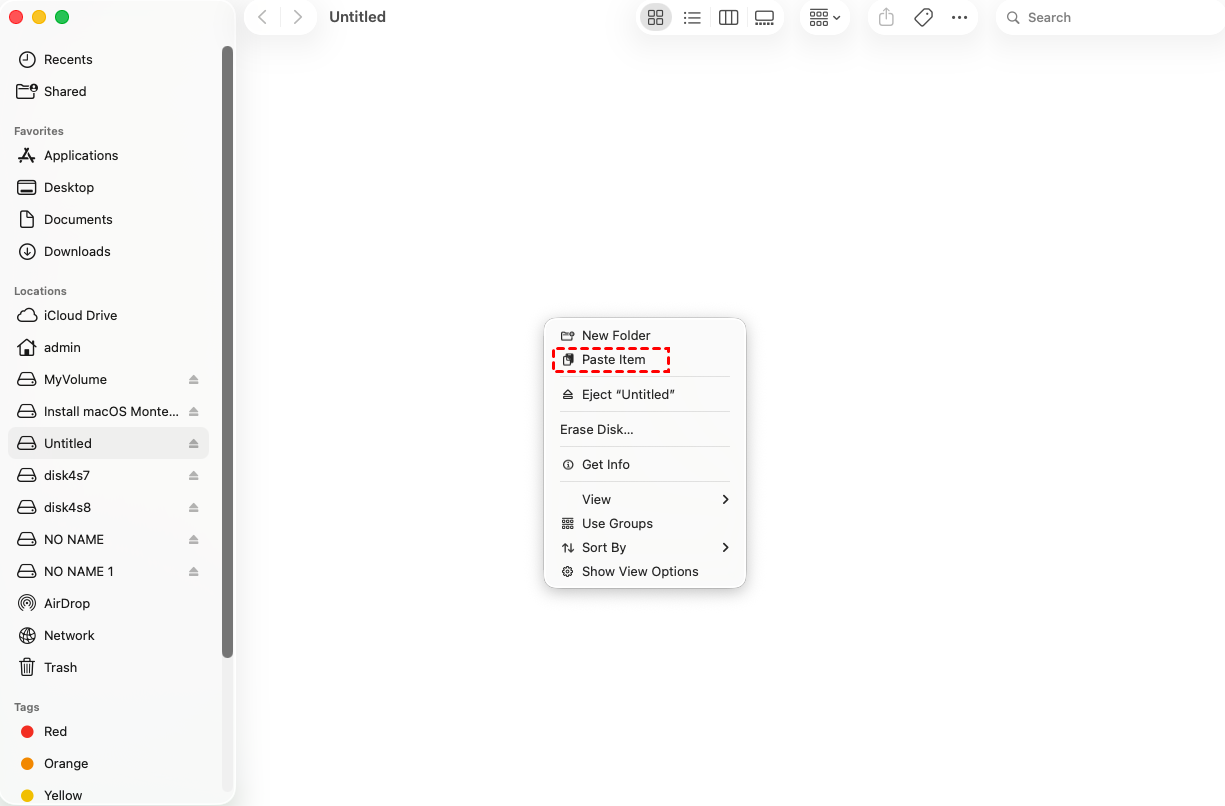
Step 4. Now you can copy files on your Mac and click "Paste Item" to copy the files to the WD My Passport hard drive.
Step 5. You can also copy, delete, and rename files on the external hard drive.
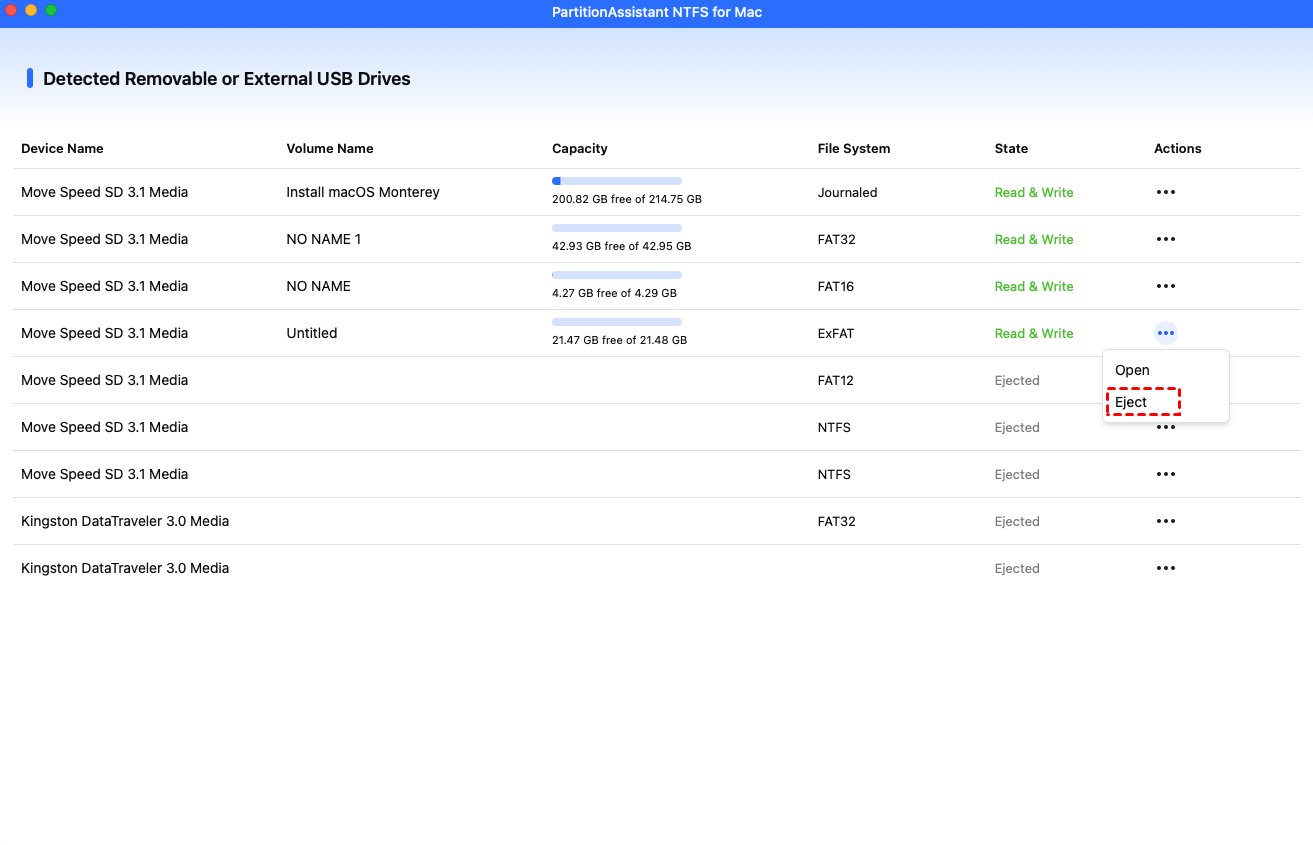
Step 6. After all operations are complete, please click "Eject" to disconnect the WD My Passport hard drive from your Mac.
FAQs
🚩 Will formatting erase all data on my WD My Passport?
Yes, formatting a WD My Passport will erase all data on the drive. Make sure to back up important files before proceeding, as the process removes existing files, partitions, and file system structures permanently.
🚩 Can I use WD My Passport on both Mac and Windows?
Yes, WD My Passport can be used on both Mac and Windows, but it may require formatting or additional software like WD Drive Utilities or NTFS drivers to ensure full read/write compatibility across both operating systems.
🚩 What is the best format for Mac only use?
The best format for Mac-only use is APFS for SSDs or Mac OS Extended (Journaled) for HDDs. These formats ensure full macOS compatibility, support Time Machine backups, and provide optimal performance and reliability.
🚩 Why is my WD My Passport read-only on Mac?
WD My Passport may appear read-only on Mac if it is formatted in NTFS, a Windows-native format. Macs can read NTFS but cannot write to it without third-party drivers or reformatting the drive for Mac.
🚩 How long does it take to format a WD My Passport?
The time to format a WD My Passport depends on drive size, connection type, and chosen format. Typically, it takes 5–30 minutes for quick format; full formatting may take longer for large drives.
Conclusion
In short, formatting your WD My Passport for Mac is essential to unlock full functionality, improve performance, and ensure seamless compatibility. By choosing the right file system—APFS, HFS+, or exFAT—you align the drive with your workflow. Whether using Disk Utility, Terminal, or third-party tools, proper formatting guarantees a smoother, more reliable, and frustration-free experience across your devices.

