How to Fix Windows Stop Code Kernel Security Check Failure
There is no need to panic when the KERNEL_SECURITY_CHECK_FAILURE error appears. With the right approach, it can be resolved. This guide walks through practical and reliable methods to help fix the issue and restore system stability.
By Hedy / Updated on January 8, 2026
Overview of kernel security check failure
When a BSOD occurs during Windows 10 startup, the system displays a blue screen along with a specific stop code. Among the many possible codes, KERNEL_SECURITY_CHECK_FAILURE is one of the most frequently reported.
This error often prompts users to search for immediate solutions. While it may look serious, the problem is usually manageable. Understanding the causes makes troubleshooting far easier.
Common triggers include software conflicts, faulty memory, malware infections, incompatible or outdated drivers, corrupted system files, and hard disk damage.
Once the underlying cause is identified, targeted fixes can be applied for Windows 8, 8.1, or 10. Before moving on to advanced solutions, start with basic steps such as running a full virus scan. It is also wise to back up important files to prevent accidental data loss. After that, proceed confidently with the six proven fixes outlined ahead.
How to fix Windows stop code kernel security check failure
The Kernel Security Check Failure blue screen error usually appears due to corrupted system files, faulty drivers, memory issues, or disk errors. Below are effective methods to fix this problem step by step.
Solution 1. Check your computer for memory problems
As mentioned earlier, faulty memory is a common cause of the KERNEL_SECURITY_CHECK_FAILURE blue screen. Identifying RAM issues does not require third-party tools. Windows includes a built-in memory diagnostic utility that simplifies the process.
Step 1. To begin, open the Windows search box and type memory or mdsched.
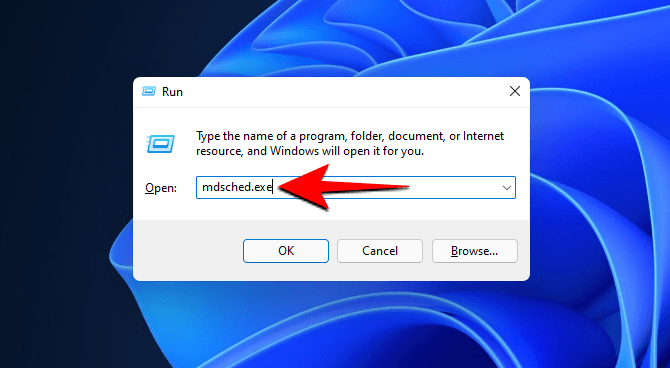
Step 2. Select Windows Memory Diagnostic from the results to launch the tool.
Step 3. You will be prompted to choose how the test runs. Select either Restart now and check for problems or Check for problems the next time I start my computer.

Step 4. Follow the on-screen instructions as Windows scans the system memory.
If the tool detects errors, the installed RAM may be faulty. Replacing the affected memory module can resolve the issue and prevent the error from returning.
Solution 2. Check and fix hard drive errors
The KERNEL_SECURITY_CHECK_FAILURE error could also be linked to a damaged or corrupted hard drive. To address this, you can either use Windows' built-in CHKDSK utility or a third-party tool to repair disk issues.
Step 1. Open the search bar and type cmd. Right-click on Command Prompt from the results and select Run as administrator.
Step 2. In the Command Prompt window, type:
CHKDSK c: /f /r (replace c with the appropriate drive letter).

Step 3. Press Enter to start the scan and repair process. Once finished, type exit and press Enter to close the Command Prompt.
While CHKDSK is effective, users unfamiliar with command-line tools may make mistakes. For a more user-friendly option, consider using a third-party tool like AOMEI Partition Assistant for drive repairs.
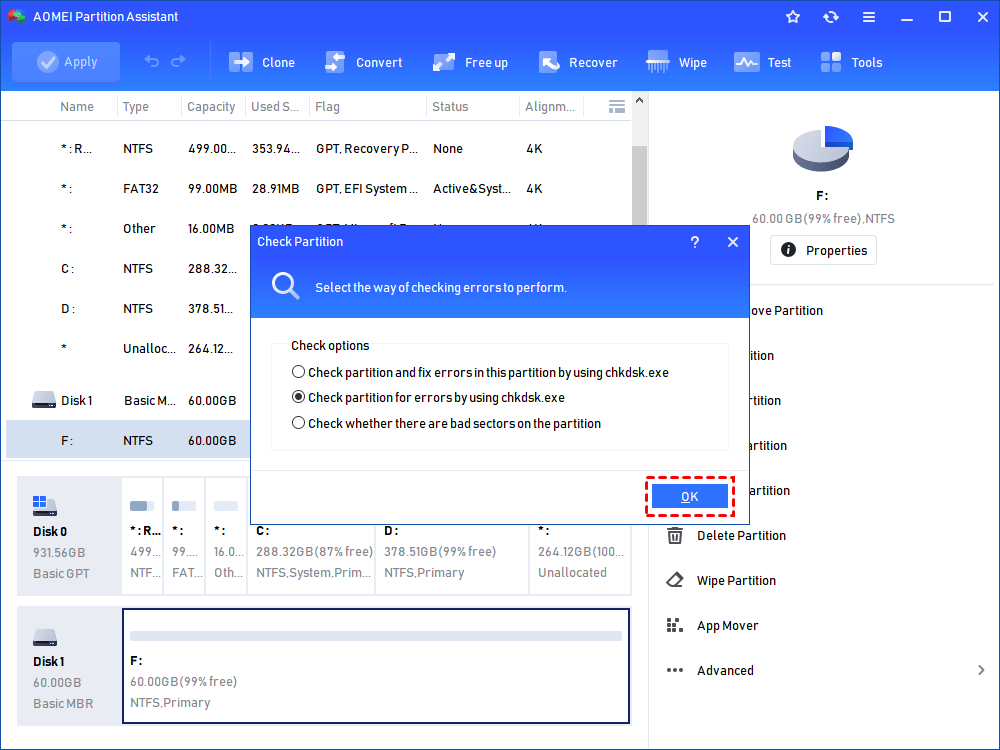
Step 1. Download the software, install and launch it. It will display to you the basic situation of your hard drives. Select the partition that you want to check for, right-click it, and select Advanced -> Check Partition.

Step 2. It will pop up a small window that you can select the way of checking errors to perform. Choose one according to your needs and click OK. It will proceed immediately.
Solution 3. Boot Windows 10 in safe mode
If the KERNEL_SECURITY_CHECK_FAILURE error stops occurring in Safe Mode, it likely means a program on your system is causing the issue. You can then identify and remove the problematic software to fix the problem.
Step 1. Open Settings by pressing Windows + I or right-clicking the Start button and selecting Settings.
Step 2. Go to Update & Security > Recovery. Under Advanced startup, click Restart now.
Step 3. After your PC restarts and you see the Choose an option screen, select Troubleshoot.
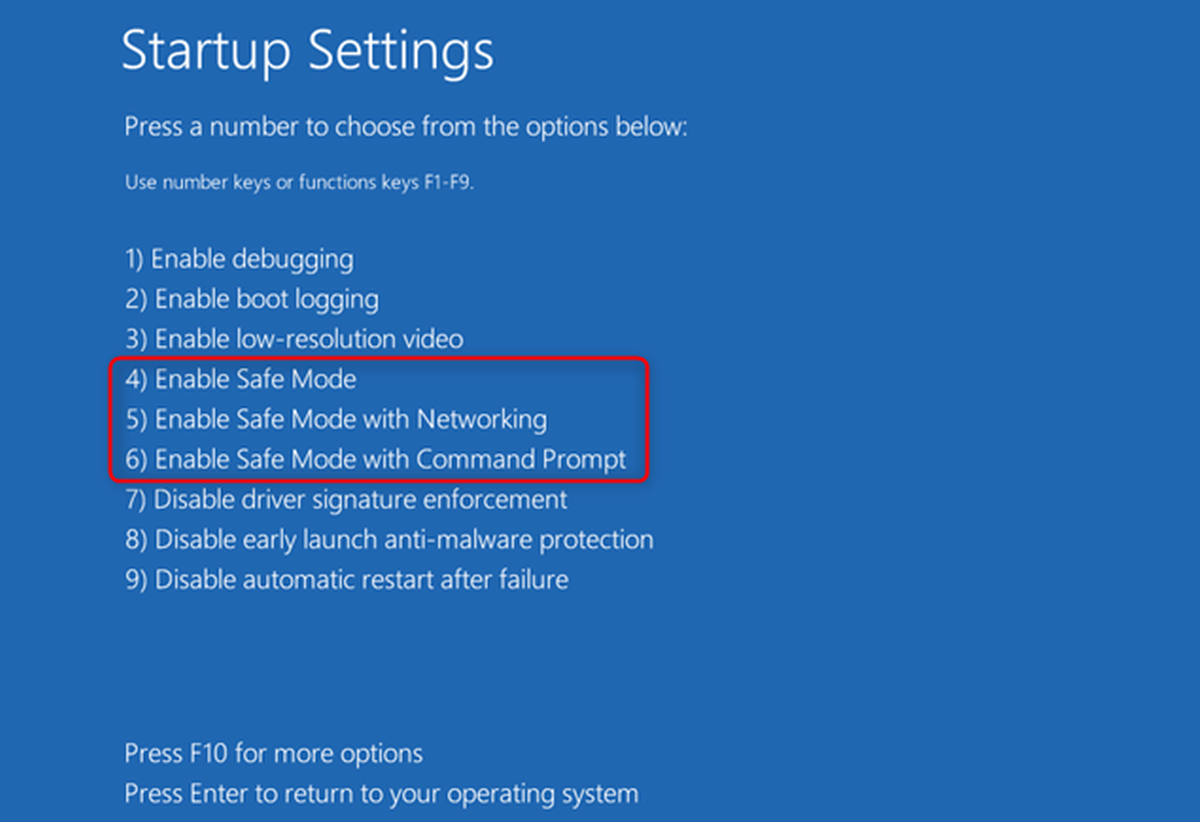
Step 4. Navigate to Advanced options > Startup Settings > Restart.
Step 5. When the PC restarts, you'll see a list of options. Select 4 or press F4 to boot into Safe Mode, or select 5 or press F5 for Safe Mode with Networking.
Once in Safe Mode, observe if the issue persists. If the error doesn't appear, it's likely caused by a third-party program. Enable each program one by one to pinpoint the culprit, then uninstall the software responsible for triggering the KERNEL_SECURITY_CHECK_FAILURE error.
Solution 4. Uninstall, reinstall, or update hardware driver
The KERNEL_SECURITY_CHECK_FAILURE error may occur due to newly installed, outdated, or incompatible drivers.
If the issue appears after installing a new driver, uninstalling or reinstalling it could resolve the problem. Additionally, if you've upgraded to Windows 10 from an earlier version, you may need to update your drivers, as older drivers might not be compatible with the new system.
Step 1. You can open Device Manager by right-clicking the Start menu and selecting Device Manager, or typing Device Manager into the Windows search bar and selecting the best match.
Step 2. In Device Manager, locate Disk drives and double-click it. Identify the drive that may be causing the issue. Right-click the drive and select Update driver or Uninstall device.
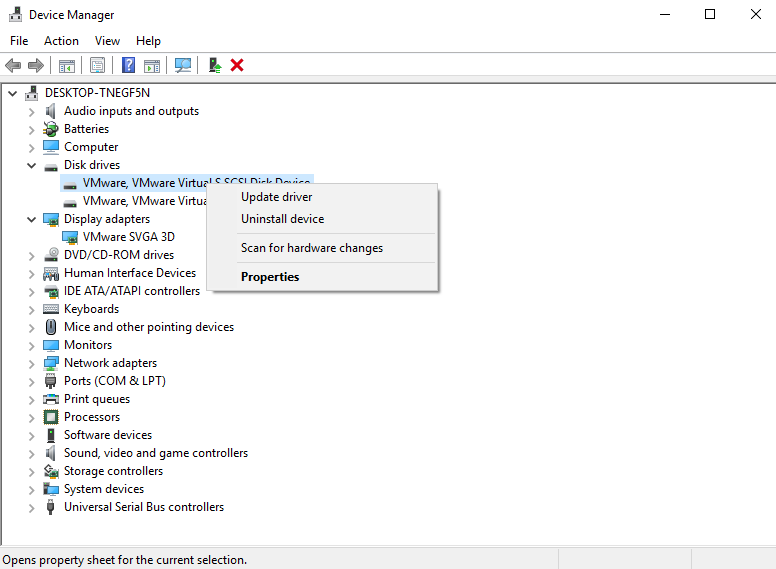
Tip: To reinstall a device, simply click Scan for hardware changes under the Action menu after uninstalling. Windows will automatically reinstall the driver.
Solution 5. Run system file checker
Step 1. Type cmd in the search box. Right-click on the Command Prompt result and select Run as administrator.
Step 2. In the Command Prompt window, type sfc /scannow and press Enter.

Step 3. The system will begin scanning and repairing any corrupted files that may be causing the KERNEL_SECURITY_CHECK_FAILURE BSOD. The scan may take some time, so please be patient. It will not take too long to complete.
Solution 6. Run boot repair
AOMEI Partition Assistant is a powerful all-in-one disk and system management tool that can help resolve Windows stop code KERNEL_SECURITY_CHECK_FAILURE, especially when the error is caused by disk corruption, boot issues, or improper system partition settings.
When this blue screen error prevents Windows from starting normally, AOMEI Partition Assistant allows you to create a bootable USB on another working PC and access your system in WinPE mode. From there, you can check and repair disk errors, rebuild damaged boot records, and fix incorrect partition configurations that may trigger the crash.
Its Check Partition and Surface Test features help detect bad sectors and file system errors, while the Boot Repair function can repair MBR-related problems that often lead to kernel-level failures. In addition, you can safely manage system partitions without reinstalling Windows, reducing the risk of data loss.
Step 1. Install AOMEI Partition Assistant on a running PC and connect an available USB drive to it.
Step 2. Launch the software and select the Boot Repair option under the Recovery section.

Step 3. Click the Create Bootable Disk option to create a WinPE boot repair disk.
Step 4. Connect the created disk to the faulty laptop and configure it to boot from USB. It will then automatically load the Boot Repair tool to detect boot problems.
Step 5. Select the repairable boot item to be repaired and click the Repair button.
FAQs about kernel security check failure
◉ What is stop code kernel security check failure?
It’s a Blue Screen of Death error indicating Windows detected critical system file, driver, or memory integrity violations during kernel-level security checks.
◉ Can bad RAM cause kernel security check failure?
Yes. Faulty or incompatible RAM can corrupt data in memory, triggering kernel security checks and causing the system to crash with this stop code.
◉ How to tell if RAM is corrupted?
Run Windows Memory Diagnostic or MemTest86. Frequent system crashes, random restarts, or file corruption also commonly indicate faulty or corrupted RAM.
Conclusion
In summary, the KERNEL_SECURITY_CHECK_FAILURE error is common but fixable with the right approach. By checking memory, repairing disk errors, updating drivers, and fixing boot issues, most users can restore system stability. Always back up important data first, apply fixes step by step, and use reliable tools like AOMEI Partition Assistant when Windows cannot start normally.

