[3 Ways] How to Resize Partitions in Windows 11?
What’s the best tool to resize partitions in Windows 11? If you’re still drifting on the internet, trying to figure it out, you can refer to this post, since the top 3 tools for partition resize in Windows 11 will be introduced.
By Lucas / Updated on January 22, 2024
How can I enlarge the C drive in Windows 11?
“Recently, I notice my laptop runs extremely slowly. I checked disk condition and found the C drive was running low on space. I once heard that if the system drive had insufficient storage, the performance of the computer will be affected. However, I have no idea how to make the condition better by enlarging the C drive because I was really bad at computing. Is there any relevant tool that helps get it done?
Why resize partitions in Windows 11?
Windows 11 was released in Oct 5th and for Windows 10 users, some of them may need to change the size of partitions for Windows 11 installation because Windows 11 has larger space on partition than Windows 10. When they install Windows 11 for the first time, they may find there’s only one partition, namely the C drive that’s also the system drive, after the installation, and in this case, they’re supposed to resize the only drive to create other partitions for classifying files.
Or over time, the C drive on Windows 11 could become smaller as we download and install more applications. When the C drive full issue appears, there might be problems including system crashes and the black screen.
Resizing or moving Windows 11 partitions allows you to make room for more data and better organize storage. Disk space on hard drives is always running out. So, it is not an uncommon task, and is also easy to screw up. Depending on the size of the disk partition, this could take hours to finish. If you do not know what you are doing, it might even render your computer inoperable.
How to resize partitions in Windows 11 without data loss
In the paragraphs above, you learned the reason why you should resize partitions in Windows 11. So, here, we come to the theme – how to change partition size in Windows 11? When it comes to partitioning resize, usually, there are 3 different ways.
Method 1. Use partition manager to resize partition on Windows 11
There are plenty of third-party software utilities claiming to resize disk partitions well and sometimes, you might feel puzzled for you have no idea which to choose. Here, I recommend the partition resizer Windows 11 - AOMEI Partition Assistant Standard, which is the best of them.
With this user-friendly and easy-to-use software utility, you can resize any partitions including encrypted partition and system partition by shrinking or extending in only a few clicks. It’s 100% secure so you do not need to worry about any data loss. Moreover, it’s so functional that many other useful features including partition clone, partition wipe and partition format are provided.
To resize partitions in Windows 11, free download this powerful disk manager to have a try.
Shrink a partition
You may sometimes need to shrink a partition for certain purposes, for example, to create a piece of unallocated space. Here, let’s see how to get it done most easily.
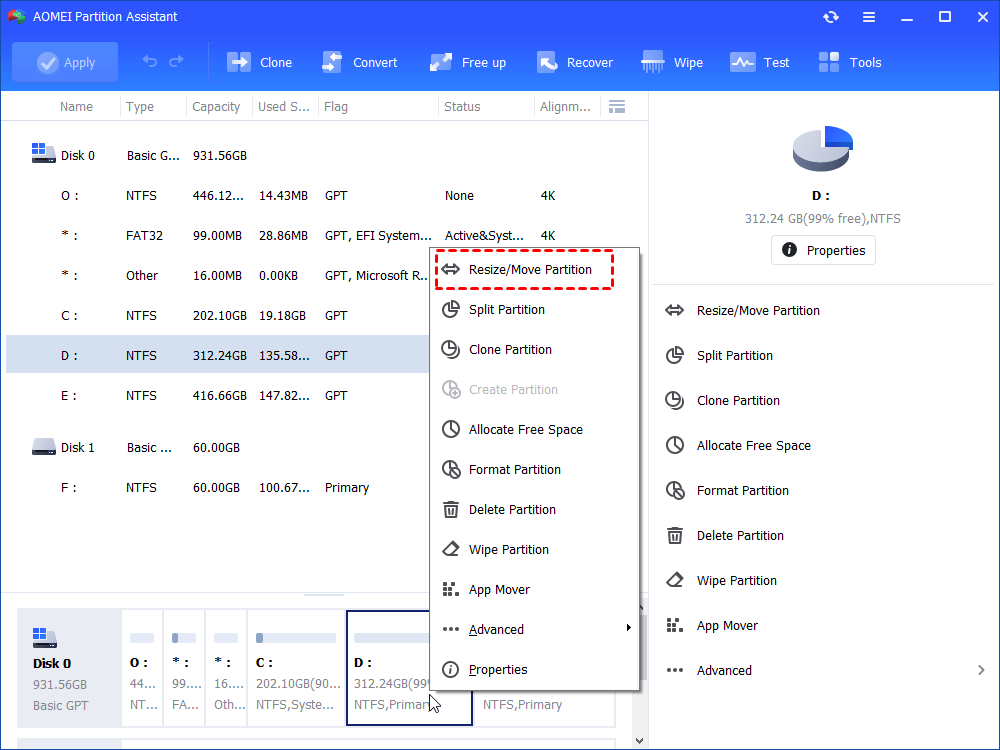
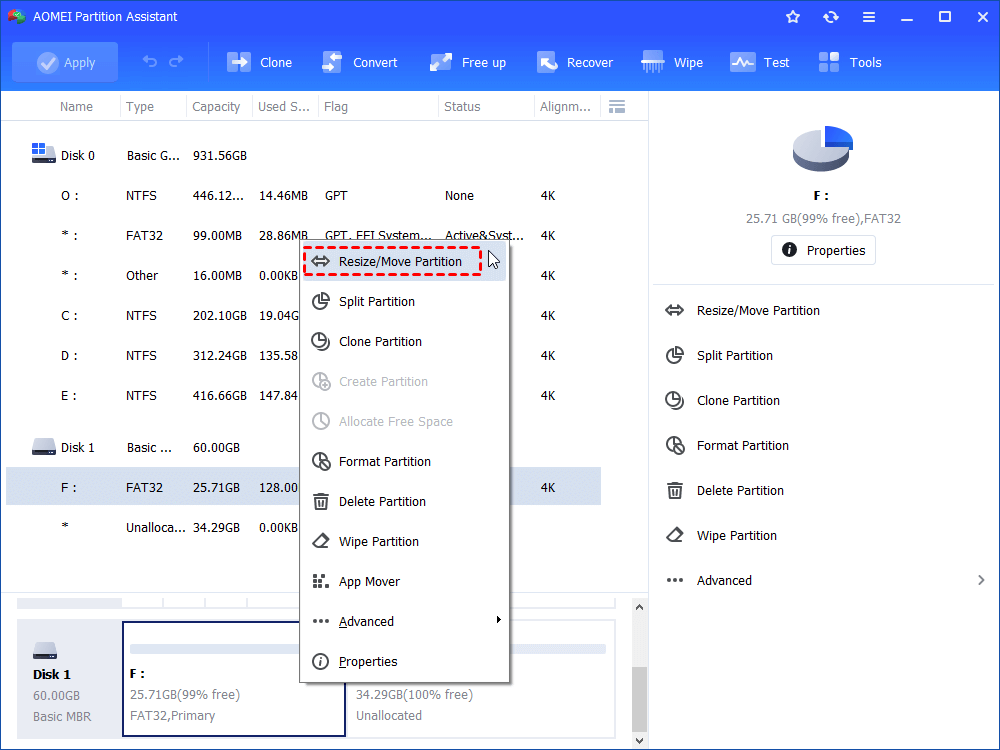
Step 1. Install and launch AOMEI Partition Assistant Standard. The home interface will display info of all hard disks and partitions.
Step 2. Locate the target partition, right-click on it, and select “Resize/Move Partition”.
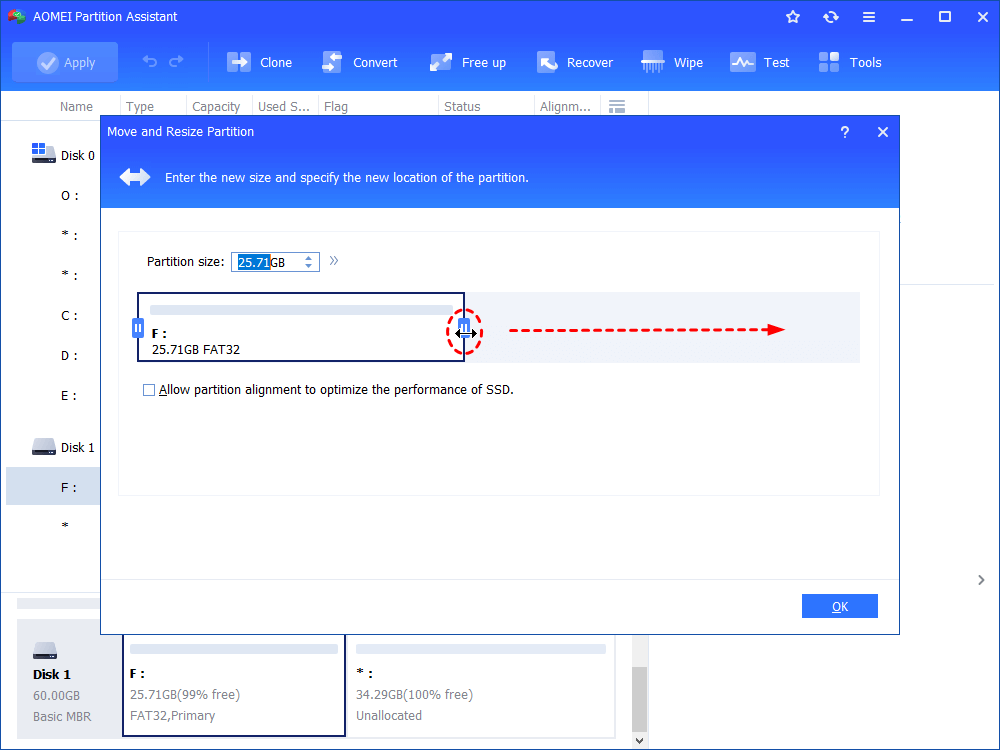
Step 3. In the following window, adjust the length of the green bar by dragging the rings on both sides to determine the size to shrink. When done, hit “OK”.

Step 4. After returning to the home interface, hit “Apply > Proceed” to start the shrinking process.

Extend a partition in 2 methods
AOMEI Partition Assistant provides 2 ways to enlarge a partition in 2 different cases.
Part 1. Extend by resizing
This method is applicable only when there’s unallocated space on either side of the partition.
Step 1. Locate the partition you want to shrink, right-click on it, and select “Resize Partition”.
Step 2. Now, you find there’s a segment of white bar next to the green bar. The white bar is the unallocated space. Drag the ring to fulfill the white bar. After finished, click on “OK”.
Step 3. Hit “Apply” on the upper left to start the extension.
Part 2. Extend by merging
When the unallocated space and the target partition is not contiguous to each other, you can extend the partition by merging them.
Step 1. Right-click on the unallocated space, select "Advanced"> “Merge Partitions”.
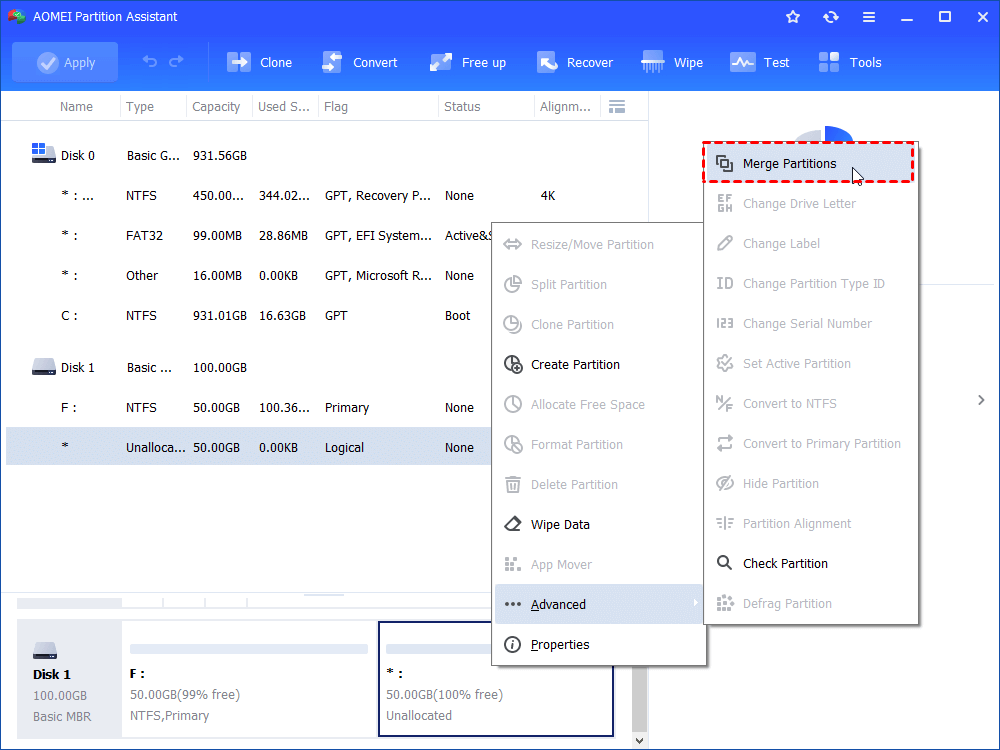
Step 2. In the popup window, tick the target partition and hit “OK”.

Step 3. Hit “Apply” to commit the extension.
Method 2. Resize partition with Windows 11 command line
Other than using third-party freeware to resize a partition, Windows 11 also provides its built-in program DiskPart to get it done. If you’re a professional user, managing disks by inputting command lines is a good choice. But if you’re not so good at computing, you may stick to the tool recommended in Method 1.
Shrink a partition
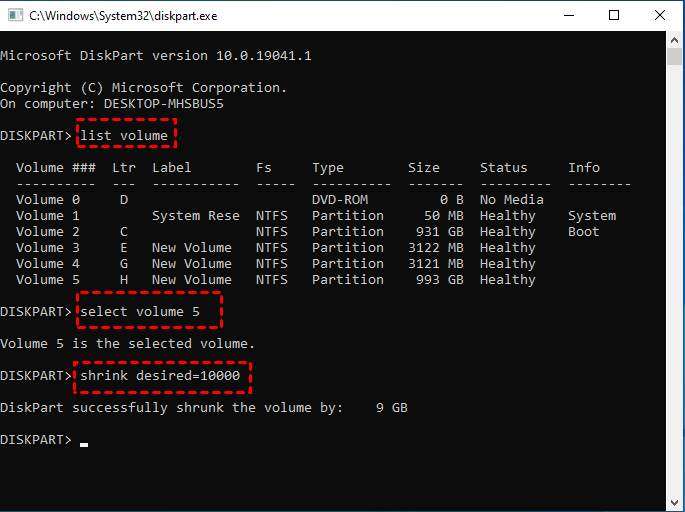
1. Type “diskpart” in the search box on the lower left of the screen and select “Run as administrator”.
2. Type “list volume” and hit “ENTER” to list all of your partitions.
3. Type “select volume x” and hit “ENTER”. “x” stands for the target partition.
4. Type “shrink desired=xxxx” and hit “ENTER”. ”xxxx” represents the amount of storage to be shrunk.
Extend a partition
Note: To extend a partition with DiskPart, the unallocated space should be on the right side of the target partition and adjacent to it. Meanwhile, the partition is supposed to be in NTFS or FAT32.
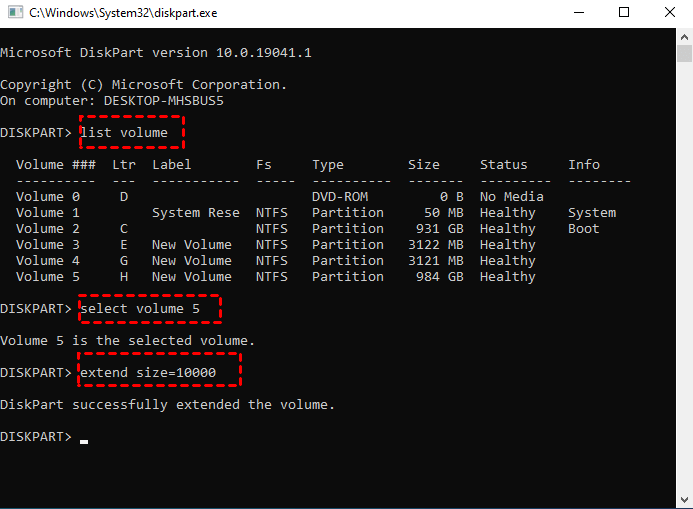
1. Launch DiskPart utility.
2. Type “list volume” and hit “ENTER” to bring all partitions on your PC.
3. Type “select volume x” and hit “ENTER”. “x” represents the target partition
4. Type “extend size=xxxx” and hit “ENTER”. “x” refers to the amount of storage to be added.
If there’s no unallocated space next to the target partition, you’re supposed to delete the partition that’s next to it to create unallocated space.
Method 3. Run Disk Management to do Windows 11 resize partition
Another Windows built-in tool to resize partitions in Windows 11 is Disk Management. With this utility, you’re able to perform various operations including disk resize, disk format, and disk deletion.
Shrink a partition
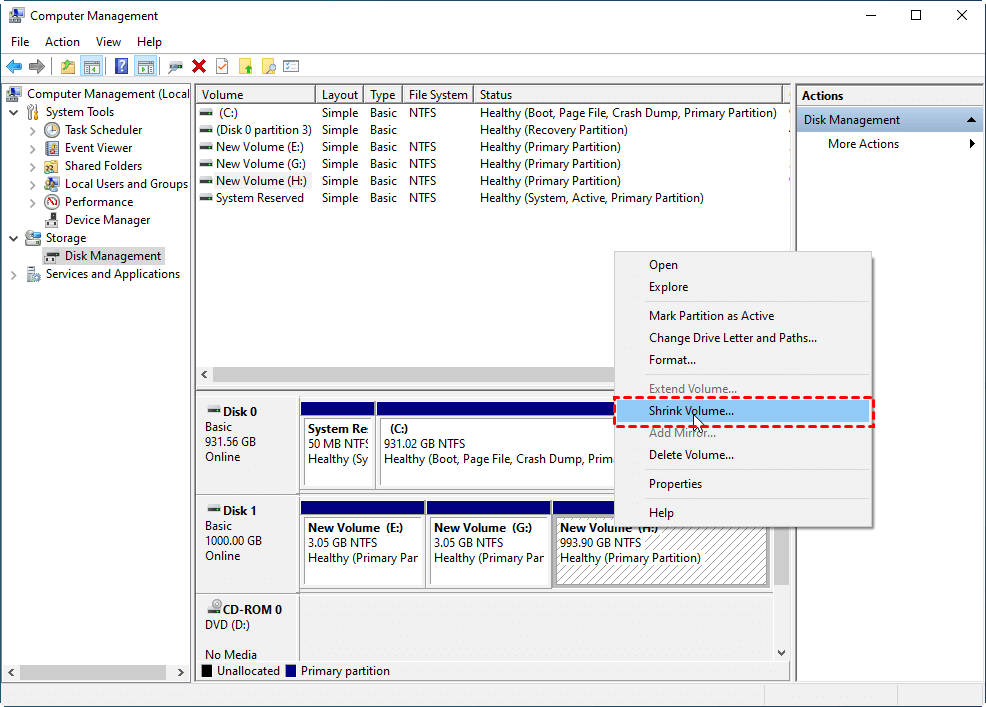
1. Right-click on “This PC” from your desktop and select “Manage”.
2. Select “Disk Management” under the tab “Storage”.
3. Right-click on the partition you want to shrink and select “Shrink Volume”.
4. In the following window, input the amount of space you want to shrink and hit the “Shrink” button.
Extend a partition
Note: To use Disk Management to extend a partition, there should be a piece of unallocated space next to the partition and what’s more, the partition should be in NTFS or RAW.
1. Run Disk Management utility.
2. Right-click on the partition you want to extend and select “Extend Volume”.
3. Follow the onscreen guide to complete the rest steps.
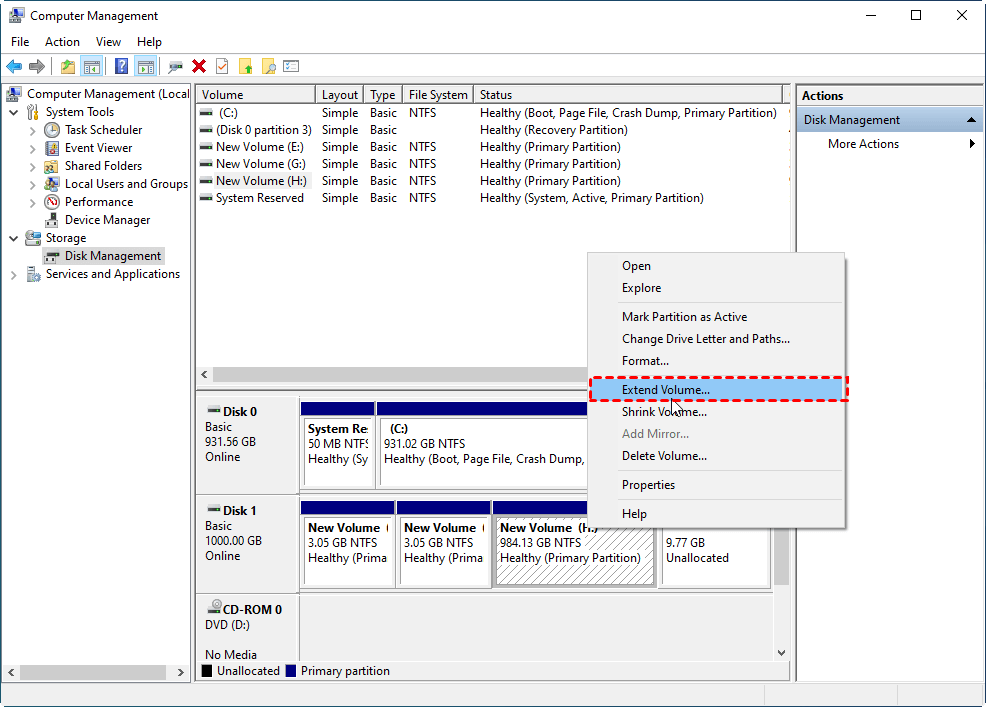
If there’s no unallocated space next to the partition, the button “Extend Volume” will be greyed out. In this case, you have to delete the partition that’s next to the targe partition.
Conclusion
That’s all about how to resize partitions in Windows 11. In the post above, 3 practical tools are recommended. Disk Part and Disk Management are both Windows 11 built-in program utilities and can do some favors. However, both of them have some limits that affect your user experience. If you want to make everything easier, you might as well try the first method.
AOMEI Partition Assistant Standard helps resize partitions in a few clicks without any hassles and it’s free from any limits. There are also many other features including free space allocation and partition split in this very program. But to use them, you should upgrade it to the Professional edition.

