How to Fix Windows 11 Installation Has Failed
The error “Windows 11 installation has failed” happens frequently when users try to upgrade, this article will help you fix this issue with 4 tricks.
By Lucas / Updated on December 11, 2024
Why does Windows 11 installation has failed happen?
There are some possible reasons that may cause the problem that the Windows 11 install has failed:
• Driver conflict or drivers are outdated
• Windows 11 installation failed in the safe_OS phase error
• Error code 0xC1900101
• External hard drives connected to PC.
• Downloaded faulty Windows 11 ISO files or problematic insider preview build
...
However, in most situations, many users meet this error when they attempt to install Windows 11 on a PC that doesn’t satisfy all system requirements of Windows 11.
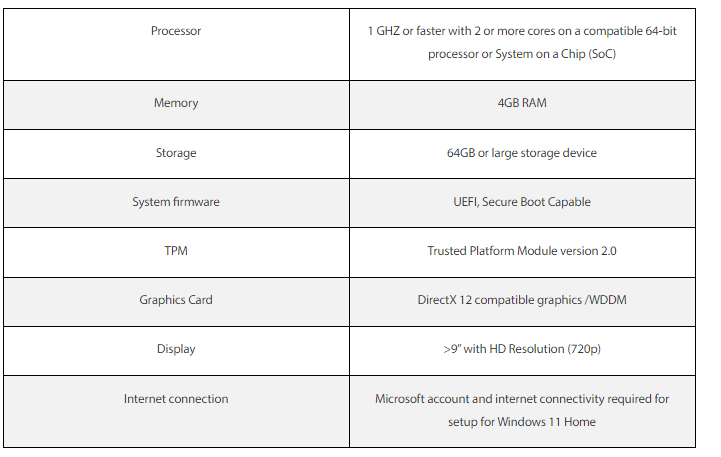
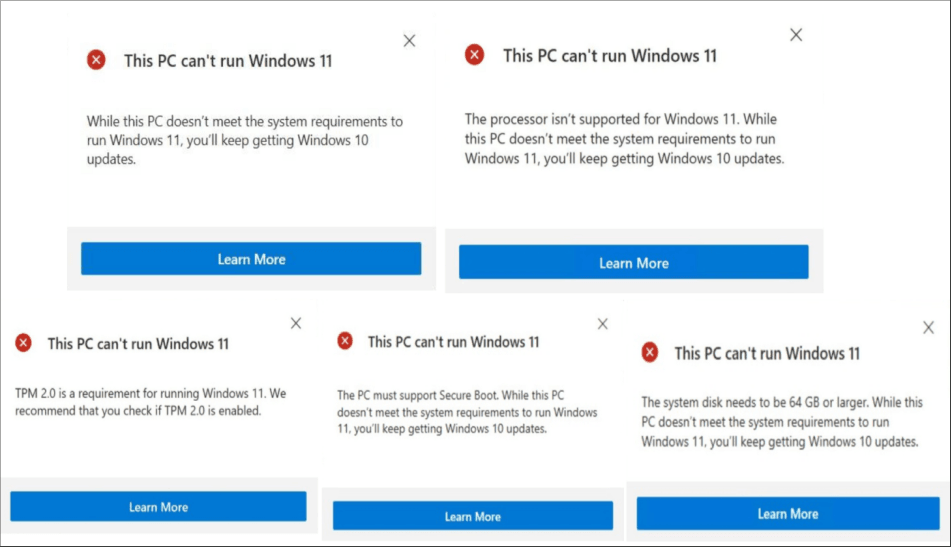
To help users check whether their devices meet these requirements or not, Microsoft offers a tool—PC health Check to show the problem:
• This PC doesn’t meet the system requirements to run Windows 11.
• The processor does not support Windows 11.
• TPM2.0 is a requirement for running Windows 11.
• The PC must support a secure boot.
• The system disk needs to be 64GB or larger.
Although you can fix errors like TPM2.0 or Secure Boot by changing some settings (only if your devices support them), some of them need you to upgrade your hardware, but let’s try our best.
4 ways to fix Windows 11 installation failed
You can find the solution to the error that impedes you to install Windows 11 in this part. We’ll fix the problem via changing some settings and a Windows management tool.
Method 1. Convert to GPT
The first issue we must care about is converting your MBR disk to a GPT disk. Windows 11's system hardware indicates that UEFI is the needed boot method. It's a PC system specification for defining the software interface between the operating system and the system firmware.
Compared to BIOS Legacy, it is easier to use because users can use the mouse to operate. UEFI also enables Windows to boot from disks greater than 2TB (GPT disk). Some new motherboards support both the old BIOS and the new UEFI.
To change the Legacy to UEFI and boot successfully, a GPT disk is a necessary condition. If you’re not sure which boot mode you’re using now, here’s how to check it.
Step 1. Press “Win” + “R” at the same time, type “msinfo32” and hit “Enter” to open the System Information window.
Step 2. Find “BIOS Mode” in the window, if it shows “UEFI”, then you can upgrade your Windows 10 if this is the only issue that bothers you. If it shows “Legacy”, it only means your PC is running BIOS.
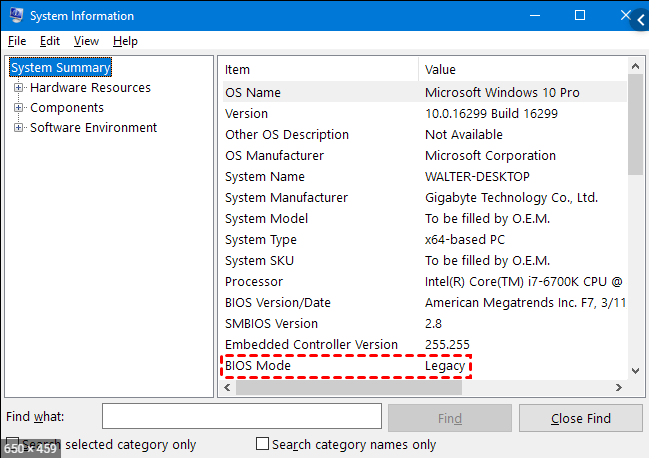
If your BIOS mode is set to "Legacy," this does not rule out the possibility of the motherboard supporting UEFI. You may look up the brand and manufacturer of your motherboard on the Internet to see if it supports UEFI.
To do a data-safe Windows 11 upgrade, if you’re using Windows 10 OS, we recommend you try AOMEI Partition Assistant Professional to execute a data-safe conversion before changing the boot mode. It’s a convenient Windows device manager for Windows 11/10/8/8.1/7 which can convert data disk (including external disk) or system disk from MBR to GPT or from GPT to MBR without asking users to clear their data. So compared to MBR2GPT or Disk Management, it’s safer.
The steps are also simple for all users. In only three steps you can finish the conversion. After converting your disk, we’ll show you how to change the boot mode.
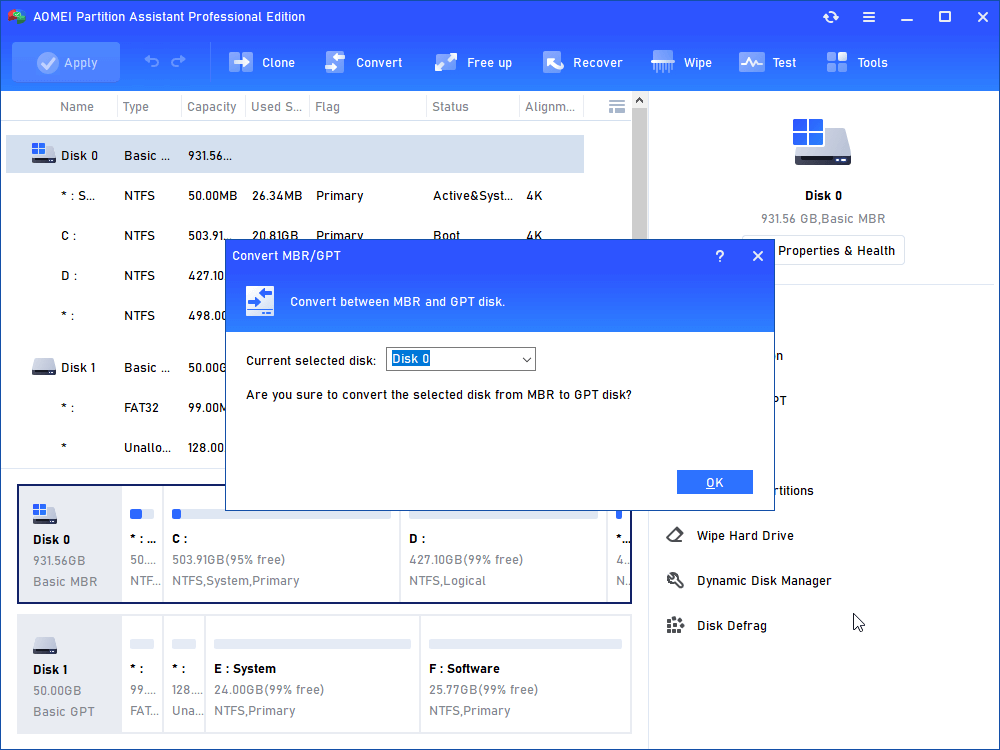
Step 1. Install and launch AOMEI Partition Assistant Professional. Right-click the system disk and choose “Convert to GPT”.
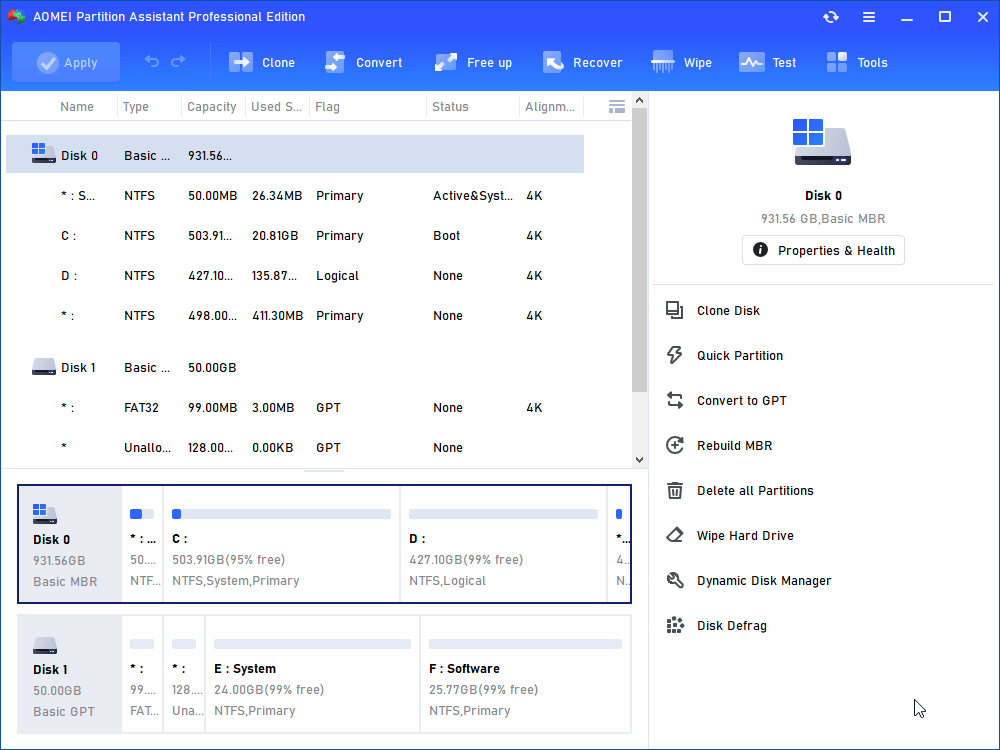
Step 2. Click “OK” to confirm your operation.
Step 3. Click on “Apply” to commit the pending operation.
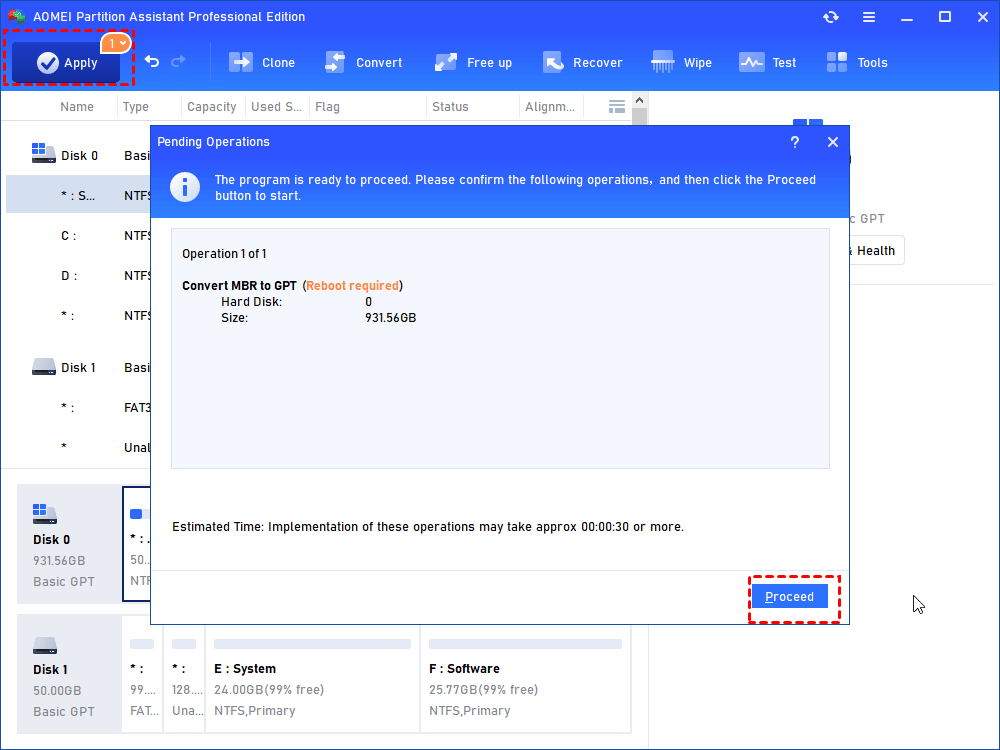
And then the computer will finish the operation in WinPreOS mode.
Now, we can change to UEFI:
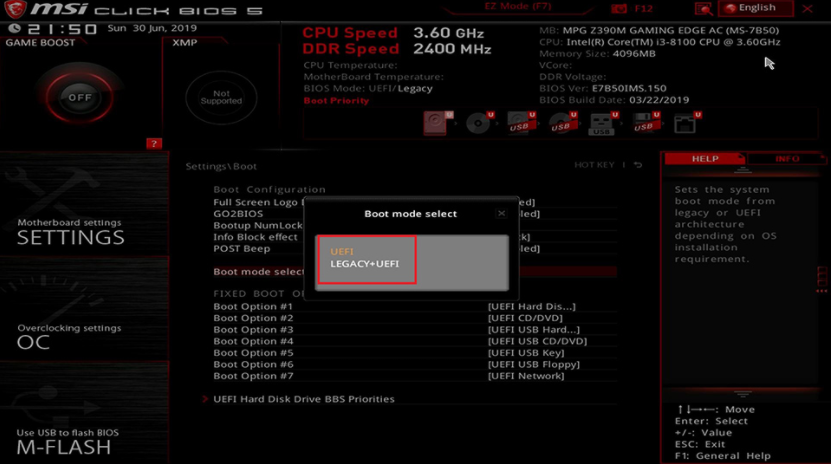
Step 1. Start your computer and press the functional key (generally, it is F1, F2, F3, F10, or F12, ESC) to enter the firmware interface when you see the first screen. The functional key is different from computer to computer.
Step 2. Under the BOOT tab, choose the UEFI/BIOS Boot Mode, and change the Legacy to UEFI. Then save and exit the firmware interface.
Method 2. Extend C drive capacity
This method is for users who see the error “The system disk needs to be 64GB or larger.” Honestly, this might be the easiest issue to solve in all the errors. With AOMEI Partition Assistant, you can share the free space from another drive to extend the C drive.
Step 1. Launch AOMEI Partition Assistant, right-click the partition from which you want to allocate free space, and select "Allocate Free Space".

Step 2. Type in the size of the free space which you want to cut from the D partition (or another drive has much free space) and this free space will be directly added to the destination partition.

Step 3. Click "Apply" to execute this operation.

If it’s still not enough but the target disk has discontinuous unallocated space, you can choose the “Merge Partition” feature to directly merge that space to extend the C drive, and "App Mover" to release the C drive space.
Method 3. Remove GPU to fix error 0xc1900101
This error usually appears during the installation due to faulty peripherals, corrupted drivers, buggy registry entries, even incorrect system settings, malfunctioning hardware, or insufficient disk space.
The solution to this error is to change the GPU settings. First, please remove all external devices.
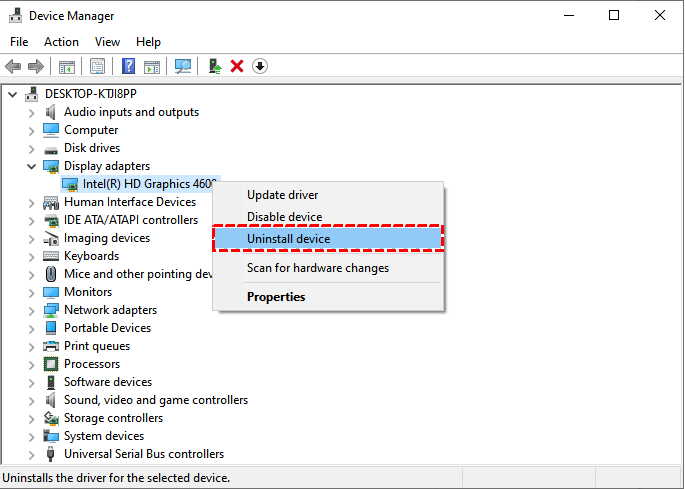
Step 1. Type “Device Manager” in the search box to open it, and find “Extend Display adapters”.
Step 2. Right-click “Intel(R) UHD Graphics”, and select "Uninstall device".
Method 4. Enable TPM2.0 & Secure Boot
TPM and Secure Boot are both requisites for Windows 11 installation, first, let’s learn some information about them.
▶ About TPM
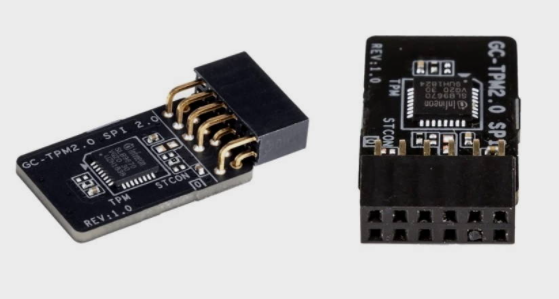
TPM is an abbreviation for "Trust Platform Module," which is a standalone chip dedicated to encryption, decryption, privacy protection, and other purposes. This chip functions as hardware safe, locking vital data such as the user's key, credentials, and biometric traits. Its authority management is independent of the OS. It means that even if a hacker installs a virus on the computer and gains control of the rights, he won't be able to obtain the identity certificate that is locked without the user's PIN or biometric keys.
How to check the TPM settings:
Step 1. Press “Win” and “R” together, then type “tpm.msc” and click “OK”.
Step 2. Open the TPM management window, if the “Status” tab shows “The TPM is ready for use”, it means that the TPM is already enabled. You can check the TPM version in the right corner.

If the TPM version is compatible but disabled. The screen will show “Compatible TPM can’t be found”, then we need to turn it on in the BIOS.
Step 1. Press “Shift” to enter the Windows Advanced Options menu after you click restart, and choose “Troubleshoot”.
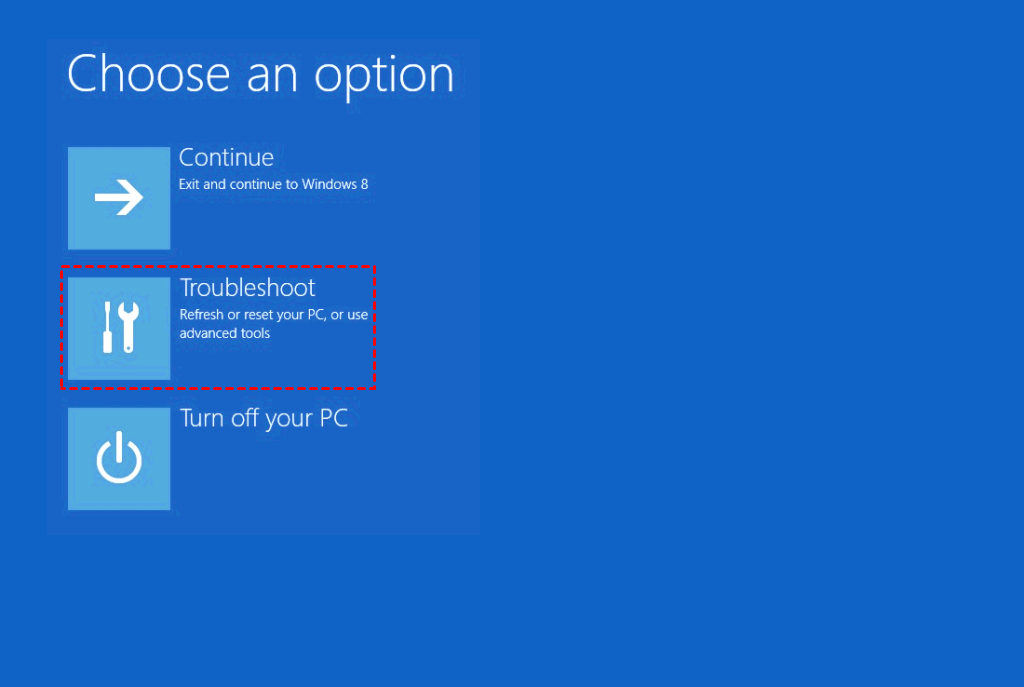
Step 2. Choose “Advanced options”.
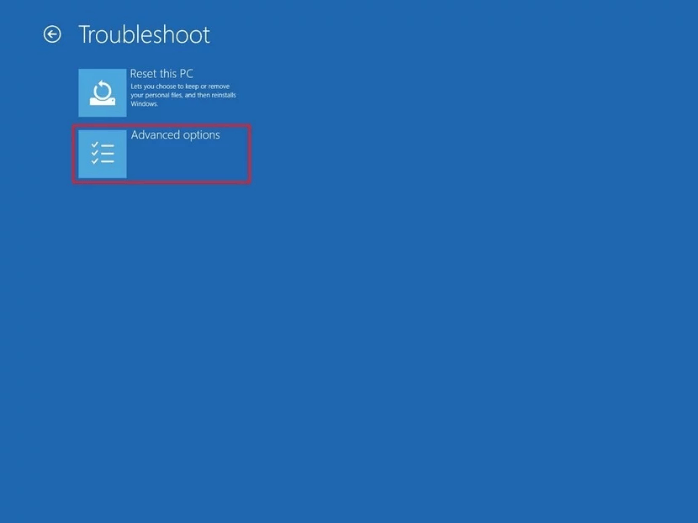
Step 3. Choose “UEFI Firmware Settings” to enter BIOS. In different PC, TPM might have other names, like PTT. TPM and PTT do the same purpose, open it directly. And the TPM will be placed under the advanced settings on some PCs, and its name will be Trusted Platform Module.

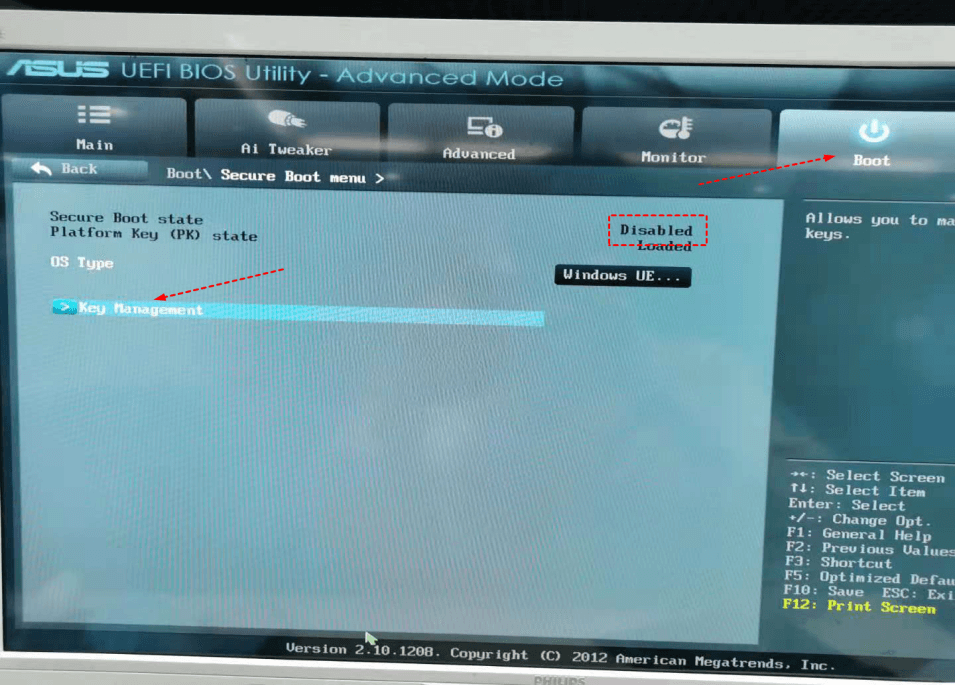
About Secure Boot
Secure Boot is just one aspect of UEFI. The goal of Secure Boot is to prevent malicious malware from infiltrating the system. It employs a key-based strategy. UEFI requires that certain trustworthy public keys be pre-installed on the motherboard before it leaves the manufacturer. Any operating system or hardware driver that wishes to be loaded on this motherboard must first authenticate with these public keys. Although most PCs support Secure Boot, it might not be activated.
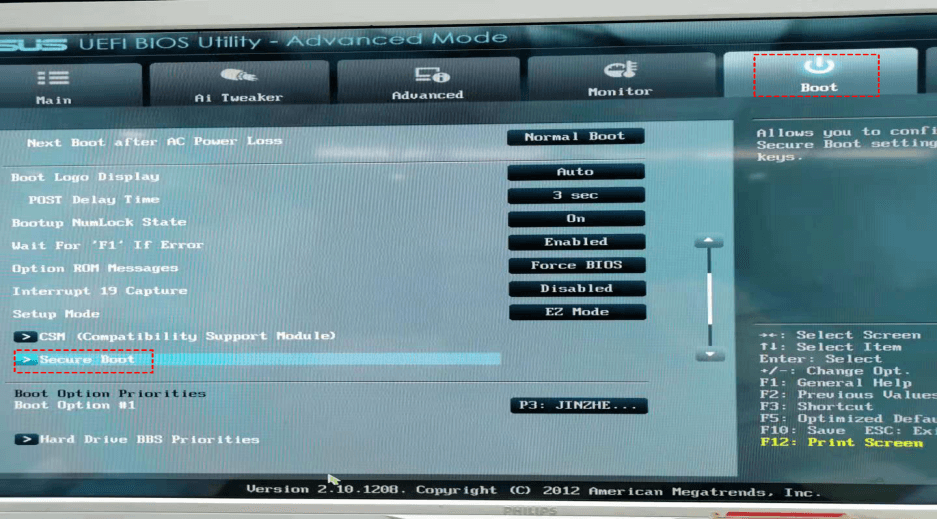
Step 1. Reboot your computer, press the specific key to enter BIOS, then click “Boot”, and choose “Secure Boot”.
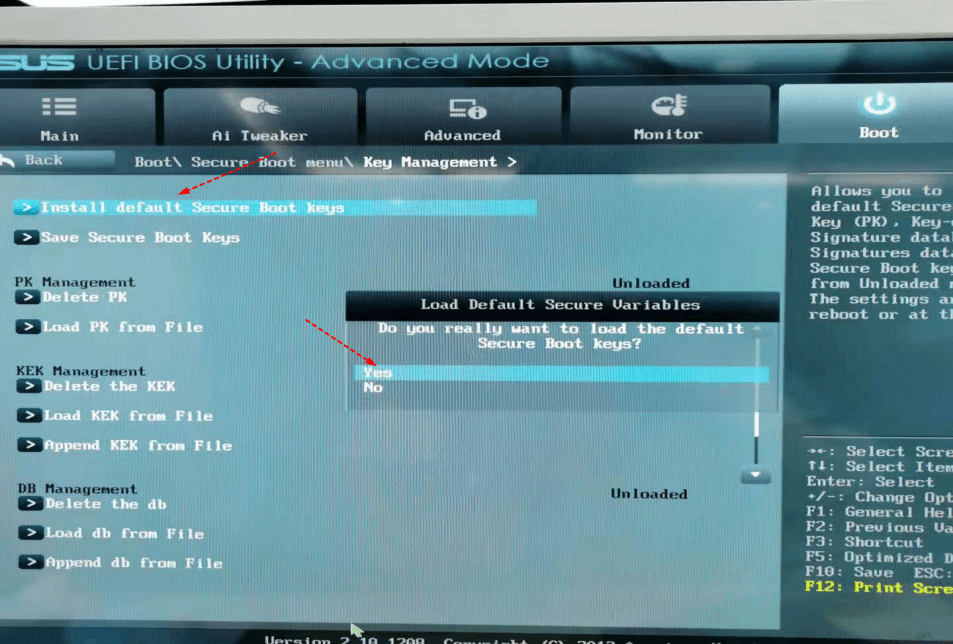
Step 2. Choose “Key Management”.
Step 3. Choose “Install default Secure Boot keys”.
There’s one thing we wish you understand, theoretically, if a PC can’t install Windows 11 only because of TPM and Secure Boot, we can modify the installation files to bypass the check of these two points, but you won’t be allowed to update your Window 11 after we do that. And due to the change in the files, the OS is unstable, and the possibility of crashing is higher. If your PC still can’t install Windows 11 but you need it, making a Windows 11 to Go USB might be a better choice for you.
Ending lines
You can select some methods of the “Windows 11 installation has failed” error in this post to have a try. AOMEI Partition Assistant can also clone disks, migrate OS, convert file systems…It is quite handy for all types of users, even for Server users.

