How to Fix “Can’t Transfer ISO File to USB” on Windows 11/10
If you can’t transfer ISO file to USB drive, this post breaks down all the possible reasons behind the issue. It also explores each cause in detail and offers a range of effective troubleshooting methods to help you resolve the problem and complete the transfer successfully.
By Hedy / Updated on June 30, 2025
Why you can’t transfer ISO file to USB?
USB flash drives have become essential tools for everyday tasks—whether it's storing videos, burning ISO files, or creating bootable installation media. However, as widely used as they are, these drives can run into various problems. Common issues include “USB drive greyed out”, “USB flash drive can’t play videos”, and one that’s frequently discussed: “can’t put ISO file on USB drive”.
Many users have reported difficulties when trying to copy ISO files, such as Windows 10/11 onto a USB flash drive. So, why does this happen? Based on user feedback and technical analysis, here are the most common reasons:
File size exceeds the USB’s file system limit: If your USB drive is formatted as FAT32, it cannot handle files larger than 4GB. ISO images exceeding the 4GB limit will fail to copy.
◆ Transfer was interrupted: Unexpected interruptions like power loss or system crashes during the copying process can corrupt the file, making it unusable or impossible to transfer.
◆ Insufficient storage space: If the ISO file is larger than the available space on the USB, the process will fail.
◆ No ISO burning tool available: To properly burn an ISO file and make the USB bootable, specialized tools like Windows Media Creation Tool or Rufus are required. Simply copying the ISO won’t work in most cases.
◆ Incompatible file system: For certain bootable ISO files, the USB must be formatted as FAT32. Using NTFS or exFAT may prevent the file from being properly written or recognized during boot.
Now that the key causes are clear, let’s move forward and explore how to fix the issue and successfully copy ISO files to a USB drive.
What to do if you can’t transfer ISO file to USB on Windows 11/10
If you're unable to transfer an ISO file to a USB drive, don’t worry—this is a common issue with several potential solutions. Based on extensive feedback from users across forums and tech communities, here are five practical methods you can try. Follow them one by one until the problem is resolved:
Way 1. Re-download the ISO file properly
To begin resolving the issue, it's best to re-download a fresh and correct version of the ISO file directly from its official source. This ensures the file isn't corrupted and that the transfer won’t fail due to file integrity issues. Here's how to do it using the Windows 11 ISO as an example:
Step 1. Go to the official Microsoft website and scroll down to the section labeled "Download Windows 11 Disk Image (ISO)".
Step 2. From the dropdown, choose Windows 11 (multi-edition ISO) and click Download. Then, select your preferred language, confirm your choice, and click on 64-bit Download to begin.
Step 3. The download process might take some time depending on your internet speed. Allow it to complete without interruption.
Step 4. Once finished, you can proceed to copy the ISO file to your USB drive or use a tool like Rufus to properly burn it and make the drive bootable.
Step 5. Re-downloading ensures you’re working with a clean, complete ISO file—one of the simplest and most effective first steps in troubleshooting.
Way 2. Reformat the USB drive
Numerous users across Microsoft forums have found that reformatting the USB drive often resolves the issue of being unable to copy ISO files. The root cause? Incompatible file systems. When the ISO image exceeds 4GB in size, it won’t transfer to a drive formatted with FAT32.
In such cases, switching to NTFS or exFAT is essential—many users confirm that exFAT works well. However, when the goal is to create a bootable Windows installation, FAT32 is required for compatibility.
There are two main ways to format your USB stick. You can either use Windows' built-in Disk Management utility or opt for a third-party tool like AOMEI Partition Assistant, which offers more advanced features.
1. Format the USB using Disk Management
For USB drives under 32GB, Windows' native tools offer a quick solution. Here's how you can do it:
Step 1. Press Win + R, type diskmgmt.msc, and hit Enter to launch Disk Management.
Step 2. Right-click the USB device listed in the interface and choose Format.
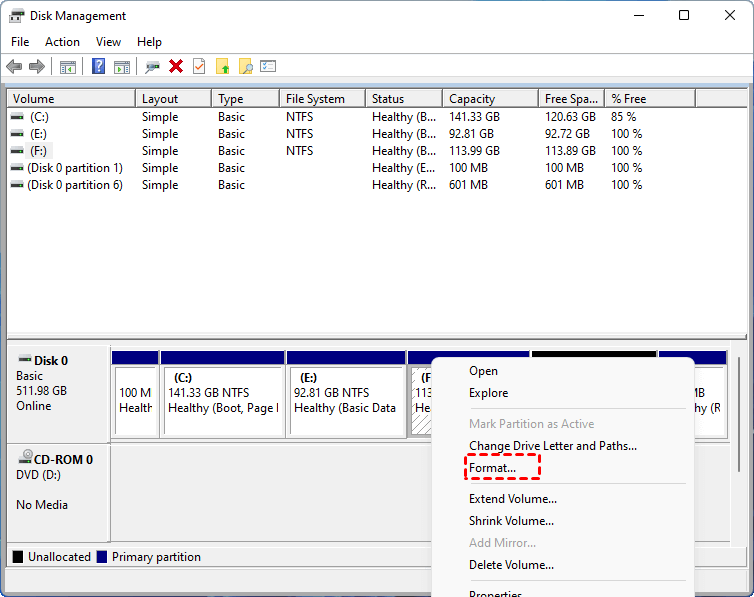
Step 3. In the formatting window, pick a file system—FAT32, NTFS, or exFAT—based on the size of your ISO file. Click OK to proceed.
Step 4. If the ISO file exceeds 4GB, be sure to choose NTFS or exFAT; otherwise, the transfer will fail.
2. Format the USB using AOMEI Partition Assistant
When the USB drive is larger than 32GB or Disk Management becomes unresponsive (e.g., greyed-out options), it's better to turn to a dedicated partitioning tool. AOMEI Partition Assistant is a free and powerful option.
This utility does more than just formatting. It lets you resize, move, or copy partitions; recover deleted partitions; check disk health; migrate the OS, and much more. It’s a comprehensive solution tailored for those who need flexibility and performance.
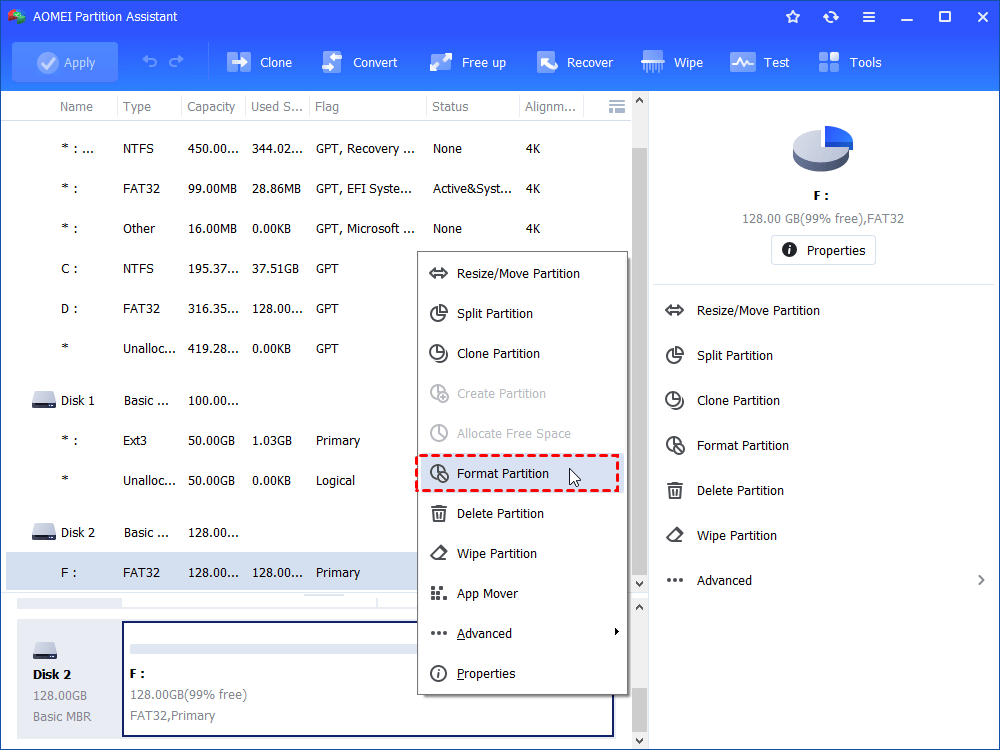
Step 1. Download AOMEI Partition Assistant, install and run it. In the main interface, right-click the target drive and select “Format Partition”.
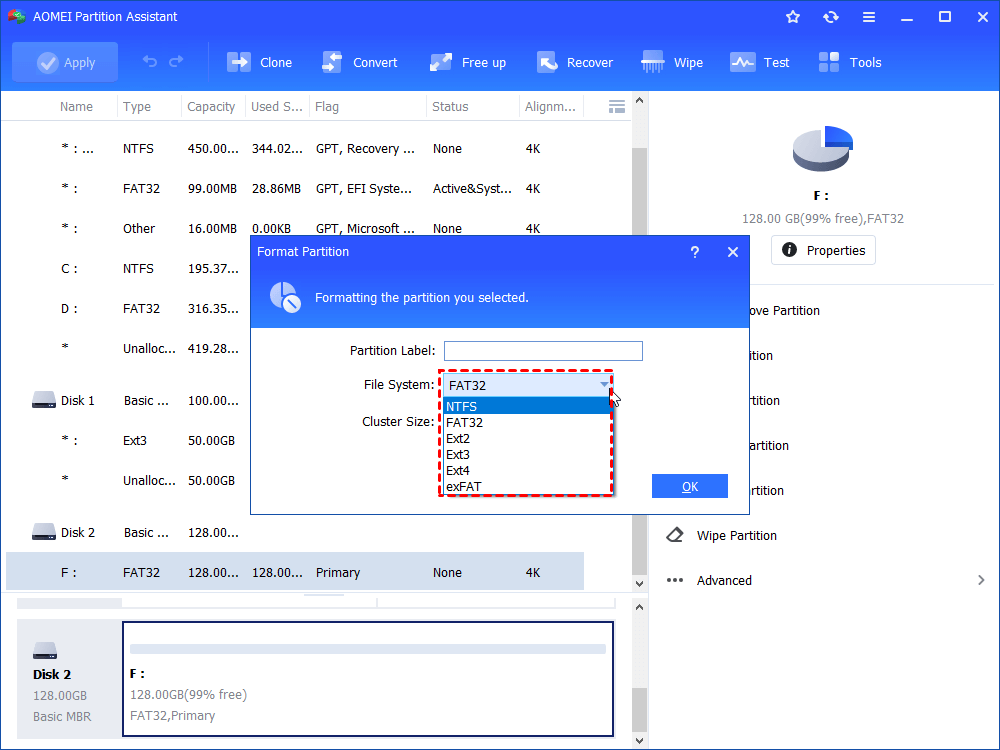
Step 2. In this small window, specify the file system of the drive based on your own demand and click “OK”.
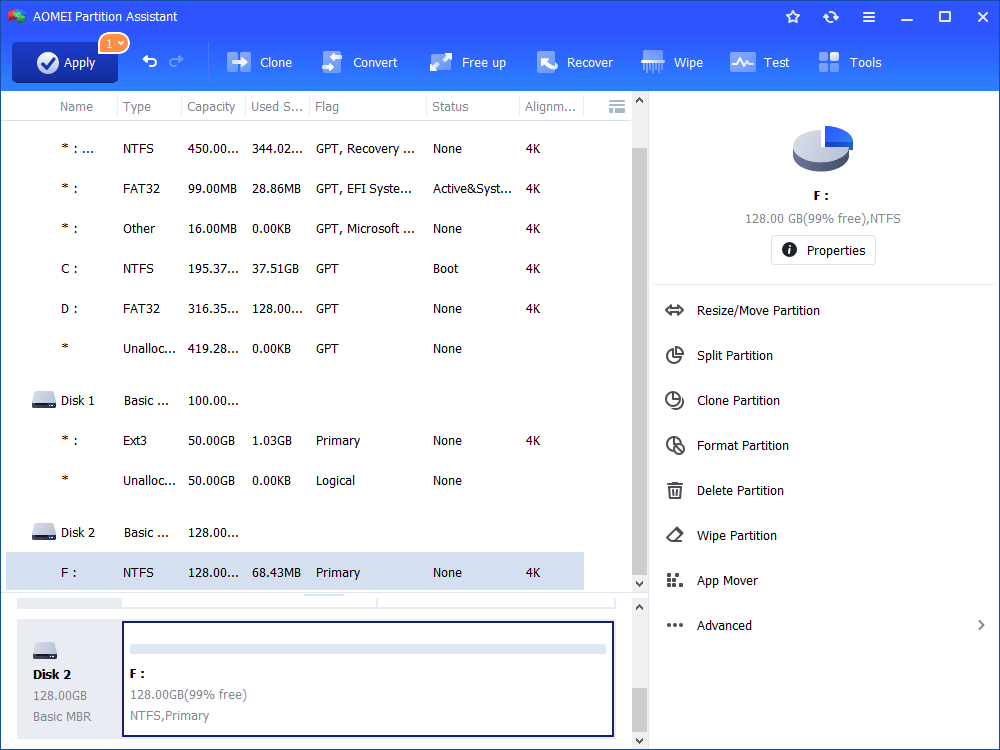
Step 3. Preview the operation. Then, click “Apply” and “Proceed” to perform it.
Way 3. Convert the file system of USB to NTFS
Users have pointed out a common culprit behind ISO transfer failures—FAT32 file system limitations. Since FAT32 cannot handle individual files larger than 4GB, trying to move a sizable ISO to a USB formatted this way will result in failure. The solution? Convert the drive to NTFS.
Fortunately, this can be done without losing your data. AOMEI Partition Assistant offers a reliable and straightforward way to switch from FAT32 to NTFS without the hassle of formatting. Here's how you can make the conversion safely using this tool:
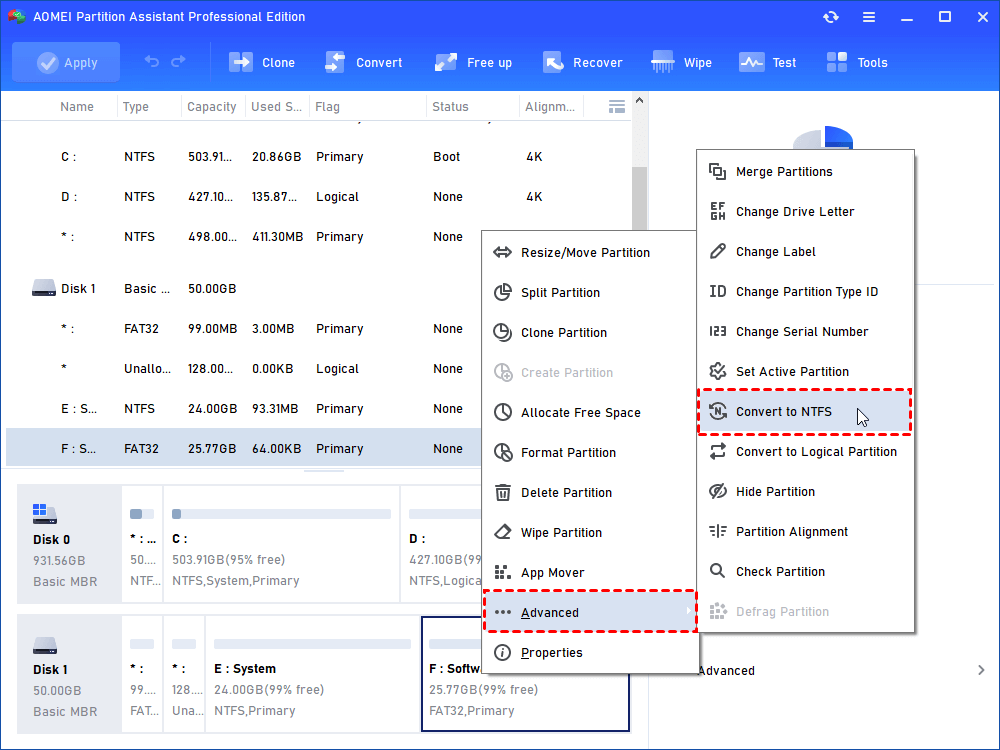
Step 1. Install and run AOMEI Partition Assistant. Right-click the drive you need to convert. Select “Advanced”> “Convert to NTFS”.
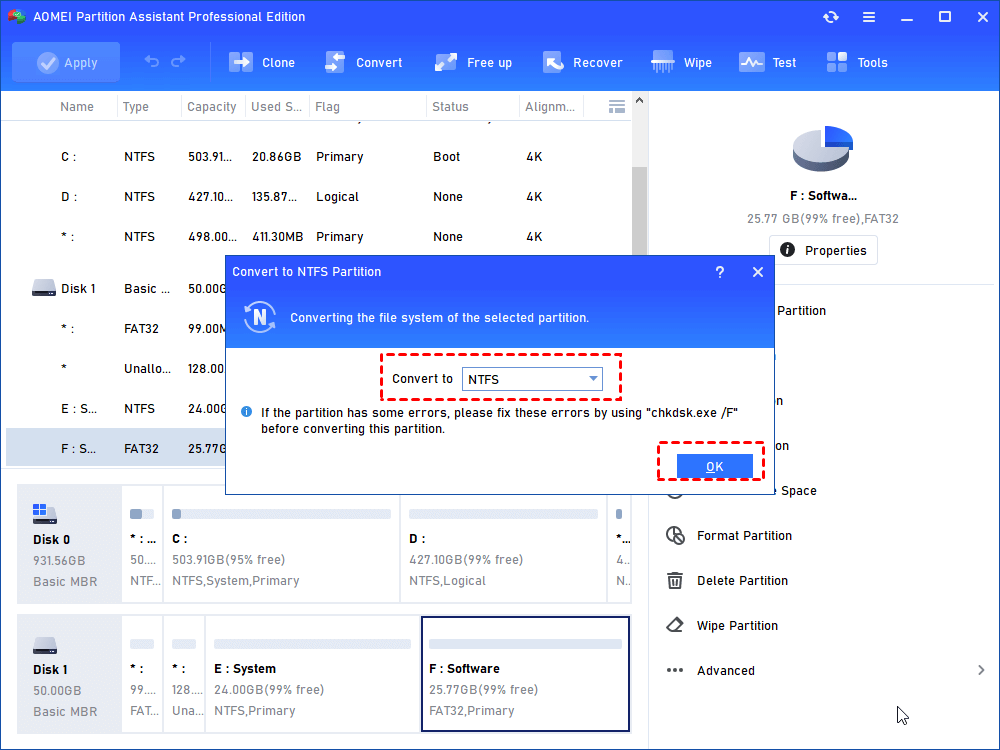
Step 2. In the pop-up window, NTFS is selected by default. Click “OK”.
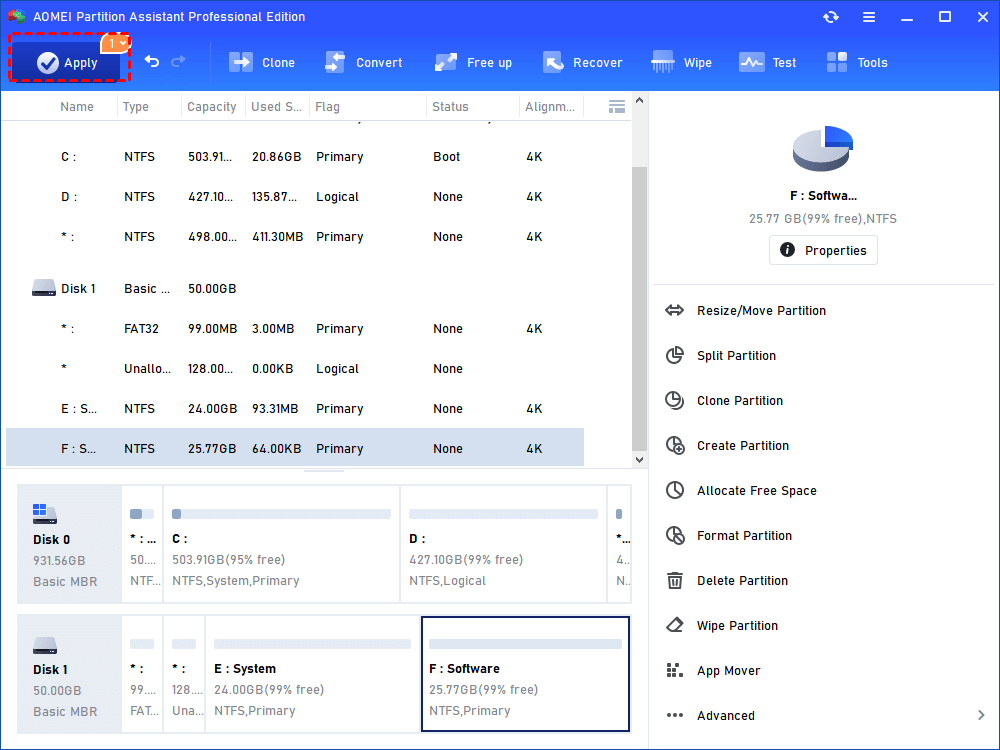
Step 3. Now the USB drive is with NTFS file system. Click “Apply” to execute it.
Way 4. Burn the ISO file using a professional tool
If you’re unable to copy an ISO file to a USB drive directly, switching to a dedicated ISO burning tool may be the answer. Rufus is a lightweight, open-source utility designed for creating bootable USB drives. It’s especially effective when you're working with Windows installation files.
Step 1. Download the official Windows ISO file from Microsoft, ensuring it's complete and verified.
Step 2. Install and launch Rufus on your PC. Once opened, it will automatically detect any connected USB devices.
Step 3. Under the Boot selection section, click Select, then browse to and choose your Windows ISO file.
Step 4. Configure the remaining settings—Partition scheme, Target system, File system, and Cluster size—according to your system requirements.
Step 5. Hit the START button to begin the ISO burning process. Once done, click Close to exit.
Step 6. Using Rufus simplifies the creation of a bootable USB, especially when file system limitations prevent direct copying.
Way 5. Check the USB drive for errors
If none of the previous methods work, the problem may lie deeper. A damaged USB drive—whether due to bad sectors or file system corruption—can prevent successful ISO transfers. Running a disk check is a smart next step to diagnose and possibly repair the issue.
Here’s how to scan your USB for errors using CHKDSK:
Step 1. In the Windows search bar, type cmd, then right-click Command Prompt and choose Run as administrator. Click Yes if prompted for confirmation.
Step 2. At the command line, enter the following command, replacing L with your actual USB drive letter:
chkdsk C: /f /r

Step 3. Hit Enter to start the scan. Once completed, unplug and reinsert your USB to see if the issue has been resolved.
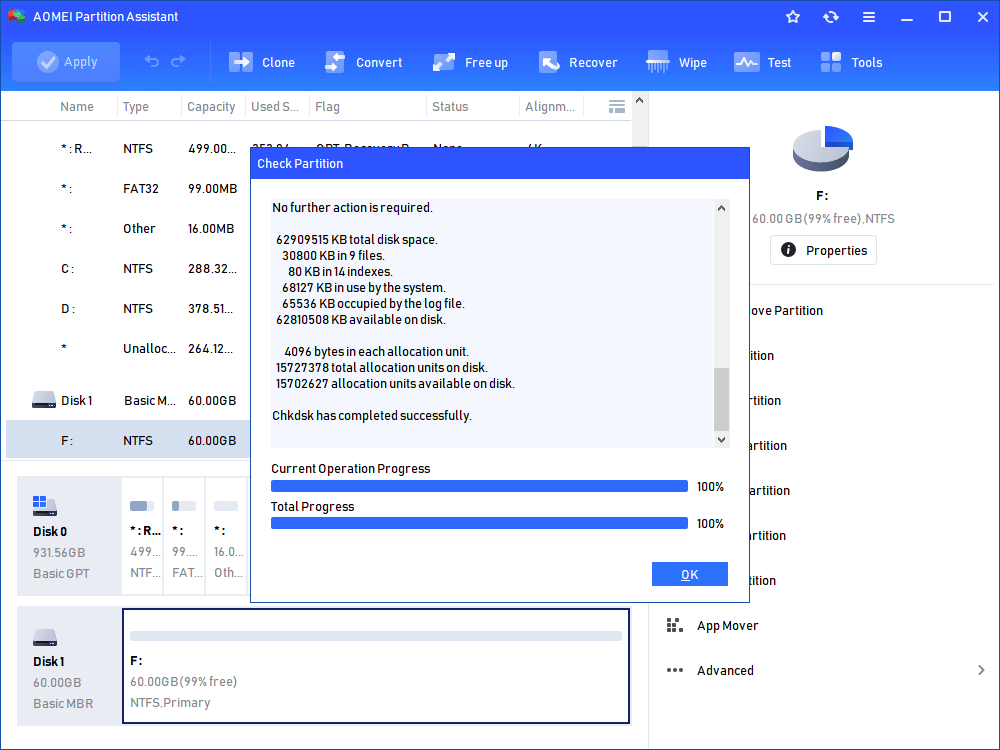
If CHKDSK fails to complete or throws up errors like “write-protected” or runs indefinitely, consider using AOMEI Partition Assistant instead. This versatile utility can scan for bad sectors, repair corrupted file systems, and handle drive issues more efficiently than native Windows tools.
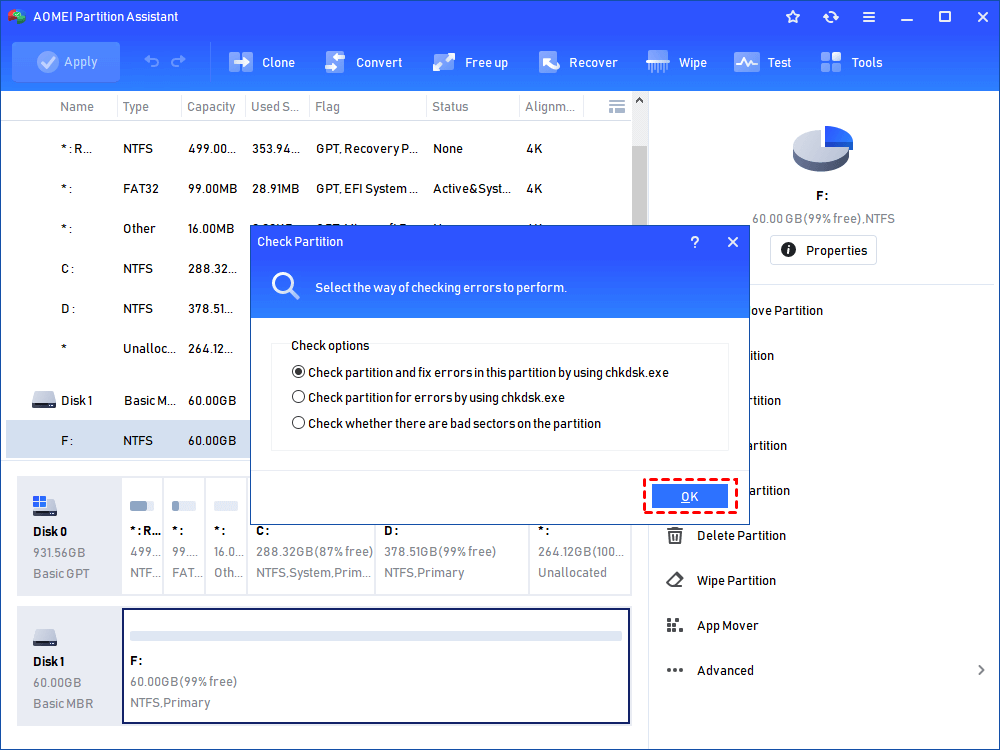
Step 1. In the main interface, right-click the target drive and then click "Check Partition".

Step 2. Choose the "Check partition and fix errors in this partition by using chkdsk.exe" option, then click "OK".
Step 3. Wait for a while and click "OK" when it's finished.
Conclusion
If you can’t transfer an ISO file to a USB drive, the issue is likely due to file system limitations, insufficient space, transfer interruptions, or the lack of a proper ISO burning tool. This post wraps up with 5 proven solutions to help you fix the “can’t transfer ISO file to USB” issue on Windows 10 and 11. These steps can help ensure a successful ISO transfer and bootable USB creation.

