Can You Clone VHD to HDD? Here Is a Full Guide!
This guide shows how to clone a VHD file to an HDD using reliable methods. Follow clear steps to convert, copy, or restore your virtual disk to a physical hard drive.
By Irene / Updated on October 27, 2025
If you are trying to restore or move a VHD or VHDX file back to a physical disk on Windows 11, 10, 8, 7, or Windows Server, you’re in the right place. This guide explains what a VHD is and shows how to safely convert or clone it to a real hard drive without data loss.
Many users will choose to clone a VHD to an HDD when they no longer need the virtual machine or want to use the same system setup on a physical computer. For example, a Reddit user asked how to transfer a VHD back to a hard drive in Windows without using complicated commands. Actually, it is a common concern for many.
Fortunately, it’s easy to clone or restore a VHD to a physical disk with the right tool. In the sections below, you’ll learn the simplest and most reliable way to convert a VHD or VHDX file to a real hard drive using a user-friendly disk cloning program.
How to clone VHD to HDD?
If you want to restore or transfer a VHD or VHDX file to a real hard drive without losing any data, AOMEI Partition Assistant offers one of the easiest and most reliable solutions. This professional disk management tool supports all Windows versions, including Windows 11, 10, 8, 7, and Windows Server, and lets you complete the conversion in just a few simple steps, and no command lines required.
By using AOMEI Partition Assistant, you can attach the VHD, view its partitions, and clone all data from the virtual disk to a physical HDD with just a few clicks. The software supports both VHD and VHDX formats and allows flexible clone options such as “Clone Disk Quickly” (for faster data migration) or “Sector-by-Sector Clone” (for exact duplication).
The Best Windows Disk Partition Manager and PC Optimizer
Stage 1. Attach the VHD first
Before cloning a VHD to a physical disk, it must be attached so that Windows can treat it like a real drive. Once mounted, the VHD shows up in Disk Management with all its partitions and data available. This makes it easy for software like AOMEI Partition Assistant to identify the virtual disk and copy its contents accurately. Attaching the VHD ensures that every file, system setting, and configuration is preserved during the transfer. In short, mounting the VHD is essential to prepare it for a smooth and safe conversion to a physical hard drive.
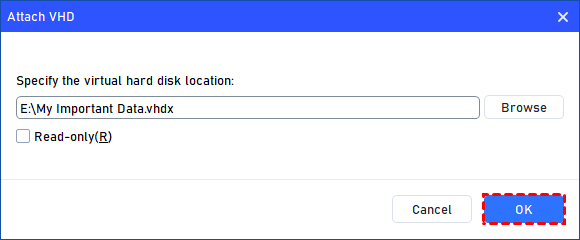
Step 1. Select the "Attach VHD" option after clicking the"Virtual Disk" tab.

Step 2. Click "Browse" to locate the location where the .vhd or .vhdx file is saved. Select the .vhd or .vhdx file you want to attach and click "Open" to attach it.

Step 3. Once the virtual file is selected, you can click "OK" to start attaching the VHD.
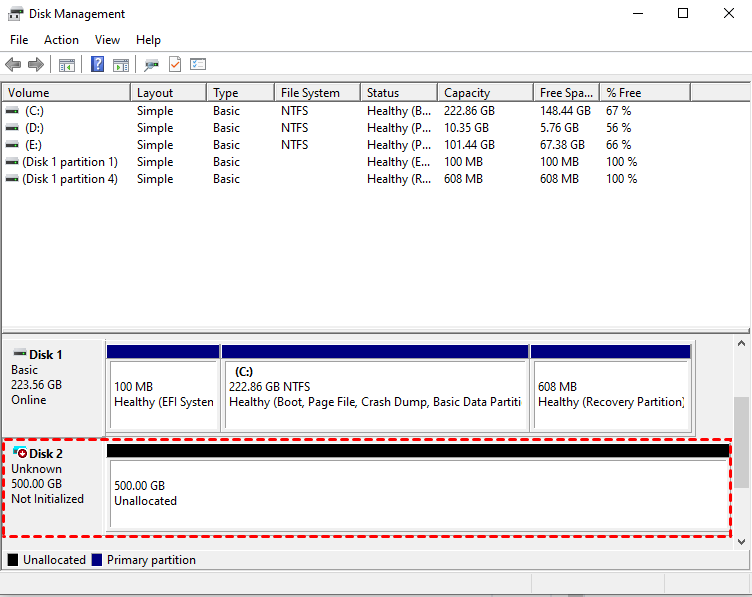
Step 4. Once the process is finished, you will see that the VHD is attached successfully.
Stage 2. Clone VHD to HDD now
Once the VHD is attached and recognized by Windows, the next step is to clone it to a physical hard drive. Using a reliable tool like AOMEI Partition Assistant, you can transfer all data, partitions, and system settings from the virtual disk to the HDD efficiently. Simply select the attached VHD as the source disk, choose your physical HDD as the destination, and start the cloning process. This ensures a complete and safe transfer from virtual to real disk. You can also use it to transfer data from an HDD to an SSD or from an SSD to an HDD.
The Best Windows Disk Partition Manager and PC Optimizer
Step 1. Install and launch AOMEI Partition Assistant, click "Clone" in the main interface, and select "Clone Disk".

Step 2. Choose the hard disk that you need to clone as the source disk and click "Next".

Step 3. Select another drive as the destination disk, and then click "Next".

Step 4. Then, you can check the source and destination disk in the next window or change to "Sector to Sector clone", and click the "Confirm" button to continue if there is no problem.

Here, you can also click the "Settings" button to adjust the partition size on the destination disk or tick "4k alignment" to improve the reading and writing speed of the SSD.

Step 6. You can preview the disk cloning operation by viewing the "Pending Operations". To commit the "Pending Operations", please click "Apply" and "Proceed".

Conclusion
Cloning a VHD or VHDX to a physical hard drive is a simple and effective way to restore virtual data to a real disk. By using AOMEI Partition Assistant, you can attach the VHD, view its partitions, and safely transfer all files, system settings, and configurations to an HDD. The process is fast, reliable, and requires no command-line knowledge. Whether you need a complete system migration, data backup, or want to reuse a virtual disk on a physical computer, this method ensures a smooth and secure conversion from virtual to real disk.
The Best Windows Disk Partition Manager and PC Optimizer

