How to Check the Performance of Your PC and Speed it up?
If you don’t know how to check the performance of your PC and speed it up, then this post will help you with detailed steps of PC testing and speed your PC up with some tricks.
By Lucas / Updated on May 12, 2023
After using a PC for several years, many users would feel that the computer is slow down and the performance of the computer is not as good as before. Thus, if you can check the performance of your computer, you may find what makes your PC slow and fix the problem to speed it up.
In this post, we will show you how to use a Windows built-in tool and a third-party tool to check the computer performance and reading/writing speed of your disks. Then we’ll list some solutions for you. You can choose some of them to do a PC upgrade and make your PC faster and smoother.
How to check PC performance?
In this part, you can see how to check PC performance and speed with 2 tools.
Tool 1. Use Windows System Performance Report
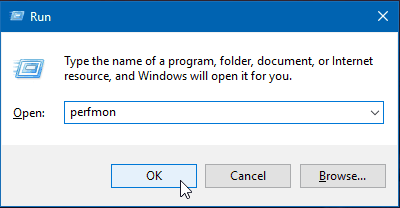
Step 1. Press the “Windows” Key + “R” and type: perfmon and hit Enter, or click OK.
Step 2. From the left pane of the Performance Monitor program, locate Data Collector Sets > System > System Performance. Then right-click on System Performance and click Start.

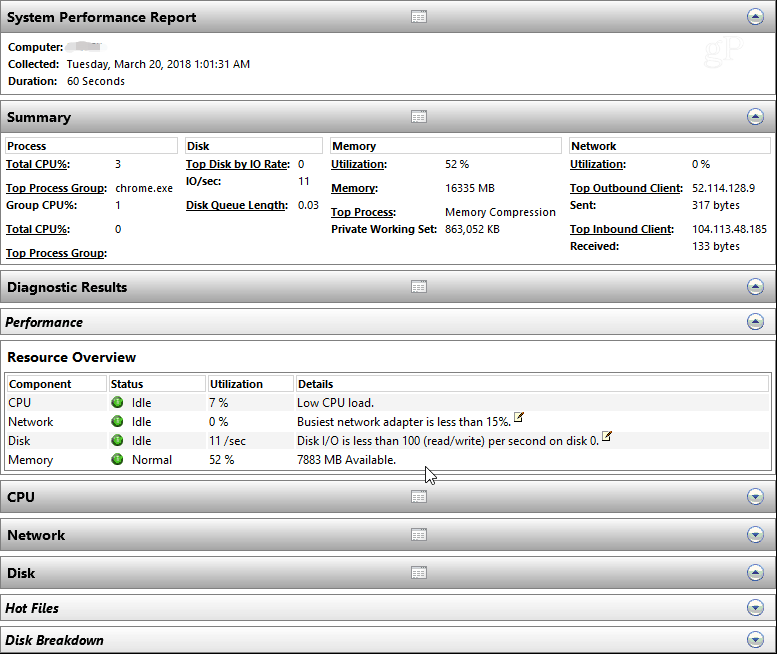
Step 3. The check should only take about a minute to run, but your mileage will vary depending on your system. While it’s running, you will see an icon next to System Performance. When it’s finished, in the left pane, please go to Reports > System > System Performance.

Step 4. Double-click the report to open it, and you’ll find it provides an overall system summary, and you can drill further down into components like Disk, CPU, and Network. Each section provides information regarding all aspects of your PC.
Tool 2. Free disk speed test app
The Windows built-in tool doesn’t check detailed disk performance, so if you wish to carefully check the reading and writing speed of your disks, you can choose AOMEI Partition Assistant Standard, a free disk and partition manager for Windows 11/10/8/8.1/7/XP systems.
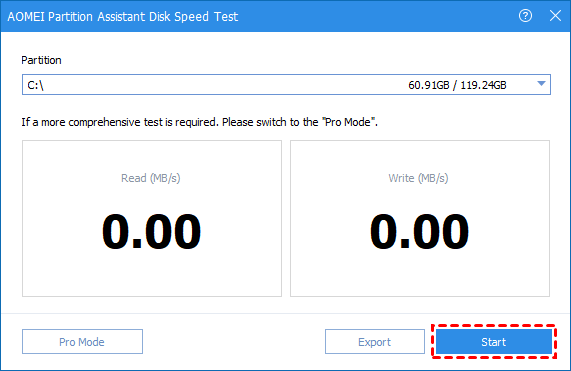
The “Disk Speed Test” provides simple test and Pro test modes to help users test disk speed for different requirements. And after the test, you can export the test result to read all details.
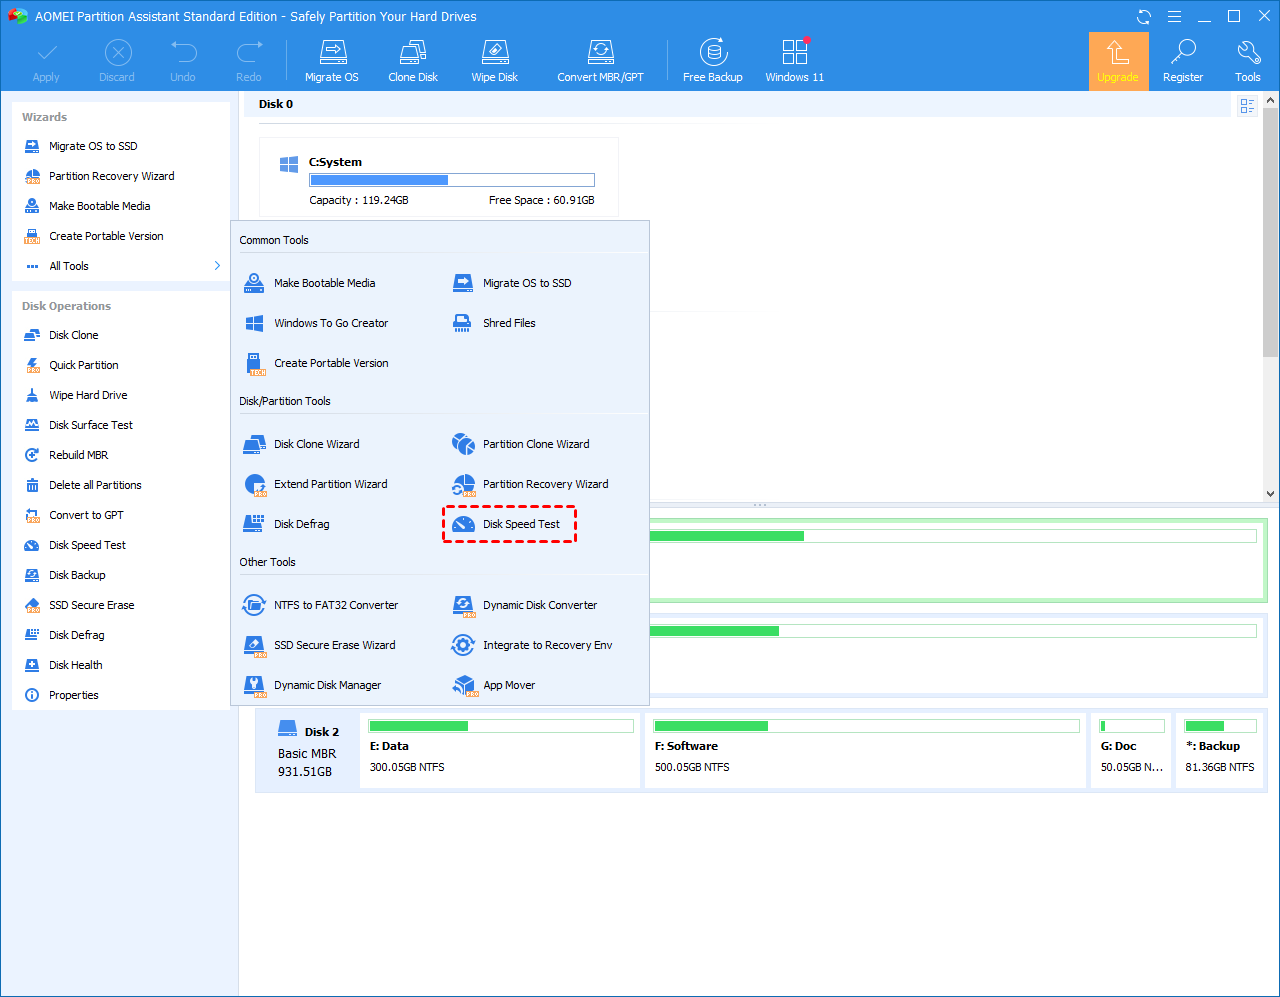
Step 1. Install and launch AOMEI Partition Assistant, and then click "Test" and "Disk Speed Test".
Step 2. All partitions will be listed here and you can choose the one you want to test and click "Start" to begin the process.
Step 3. After the speed test is complete, you can export the results.
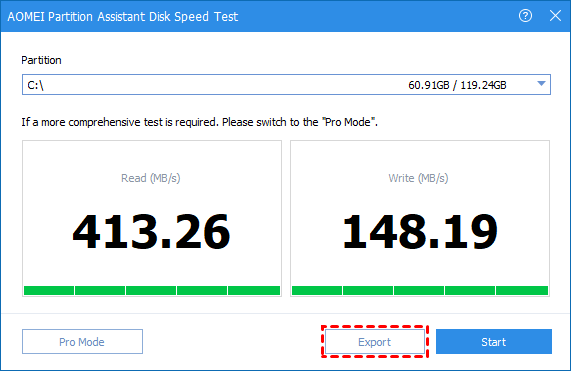
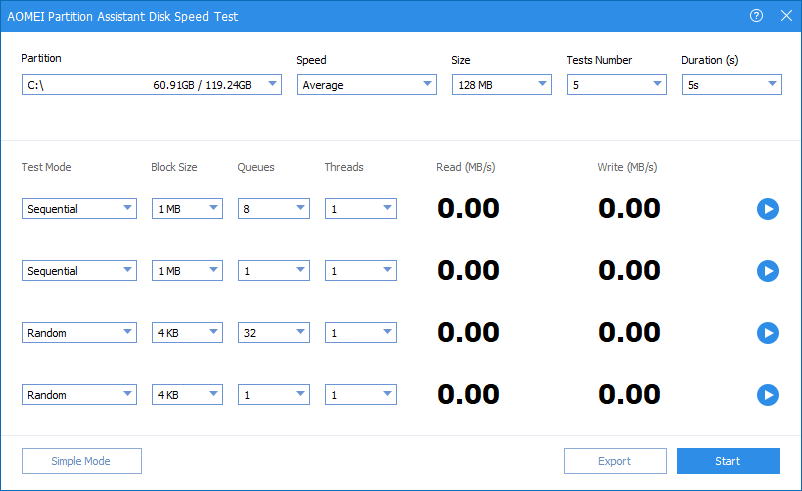
Step 4. If you need a more comprehensive test, please use Pro Mode.

In the Pro Mode interface, more information will be displayed:
How to improve PC performance and speed it up?
After you check the computer performance and disk speed, you may have found the problem that makes the performance of the PC decrease. In this part, we list some practical methods to help you improve PC performance.
Method 1. Check the Windows updates and device drivers
Check that you have the most recent version of Windows installed. When you check for updates, your PC will also look for the most recent device drivers, which can assist improve the performance of your computer.
Step 1. Select the Start button, then select Settings > Windows Update > Check for updates.
Step 2. If the status says "You're up to date," continue and check for optional updates. If the status says "Updates are available," once they are downloaded, select Install now.
Step 3. Select the updates you want to install, then select Install, restart your PC, and see if it seems to run better.
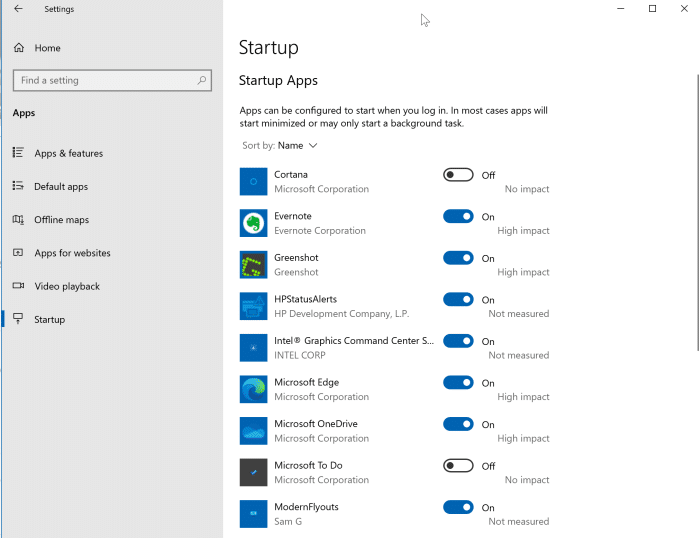
Method 2. Ban some apps in the Startup settings
You can restrict the number of programs that execute during startup.
Step 1. Open Settings > Apps > Startup.
Step 2. Click the Sort by menu and select the Startup impact option.
Step 3. Turn off the toggle switch for any unnecessary app especially those marked as "High impact" by the system.
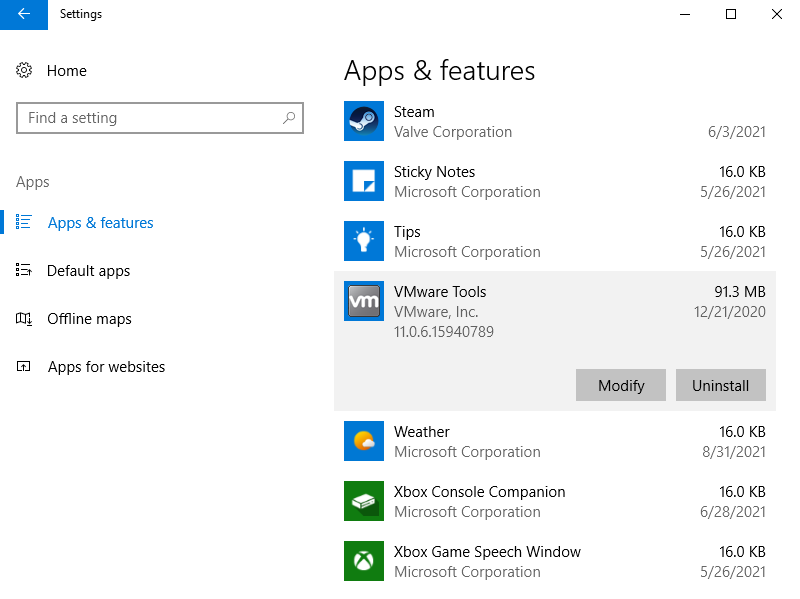
Method 3. Uninstall some useless apps
Your computer comes pre-installed with a slew of software that the majority of users will never use, but which may eat up a lot of system resources and disk space. These are often detected by a pop-up prompting you to upgrade a previously unknown application.
Step 1. Click on the "Start" button and visit the “All apps” menu
Step 2. You can view a list of the applications you have installed and those you haven’t. Once you find the program you want to uninstall, right-click on the icon to see the "Options" menu.
Method 4. Use third-party App Mover to relocate apps
If you do not want to delete any software, you may upgrade the Standard Edition of AOMEI Partition to the Professional edition to relocate large programs to another drive/disk, freeing up space on your system drive.
The Pro edition has an "App Mover" function that allows you to transfer installed programs after scanning the disk to identify any moveable applications and folders. After the operation is complete, you can run your applications from the new storage path, and your data will be saved in the new place.
▶ Note: Make sure the target drive has sufficient free space to save all you move. If there’s a notice that tells you the space is insufficient, you can extend the partition at first.
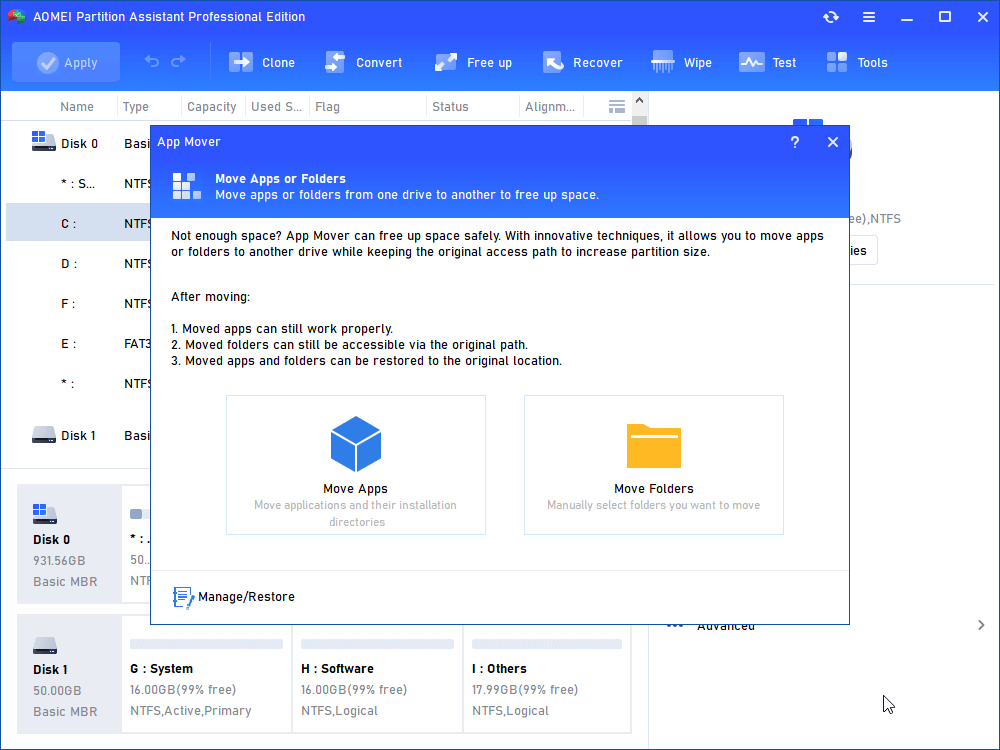
Step 1. Run AOMEI Partition Assistant Professional, click “Free up” > “App Mover”.

Step 2. In the new window, click “App Mover”. If you wish to move Users folders or Profiles folders, you can click “Move Folders”.
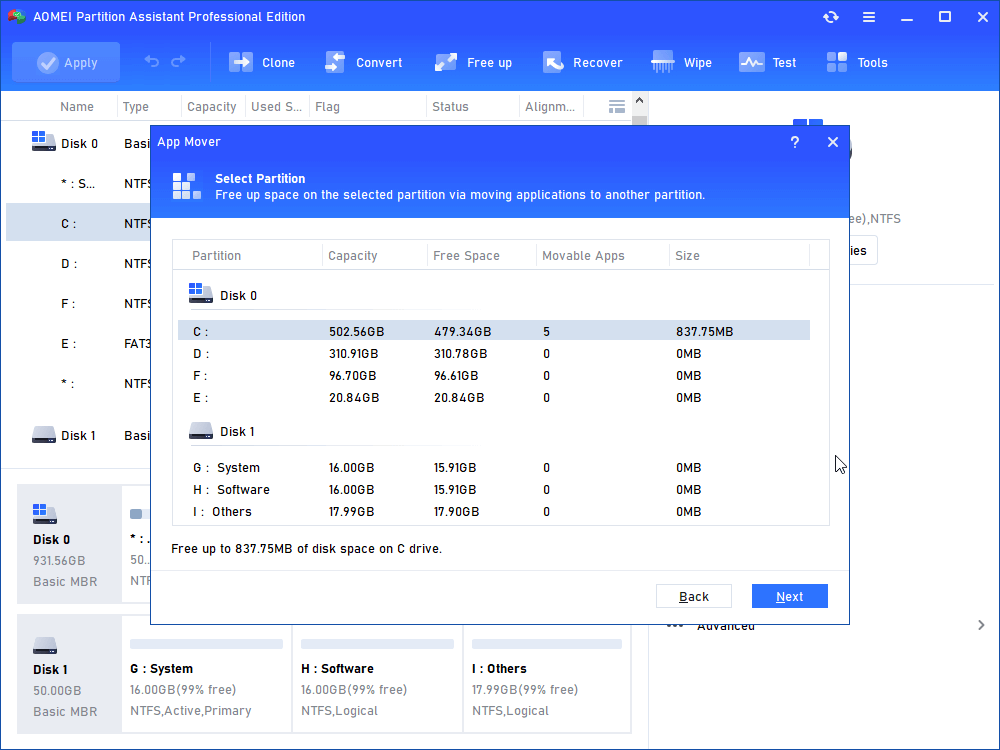
Step 3. In the pop-up window, choose the partition that you want to free up via moving apps (here is partition C) and click “Next”.
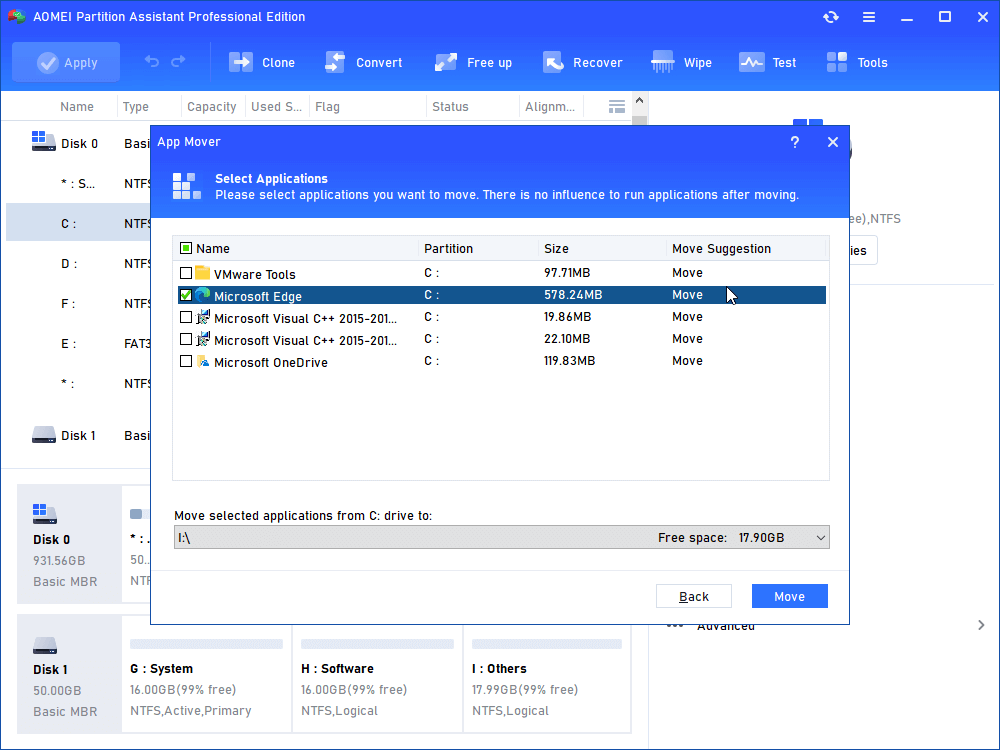
Step 4. In the window, all movable apps on the C drive will be listed. You can choose one or multiple apps that you need to move and the destination partition. Then click “Move” to execute the operation.
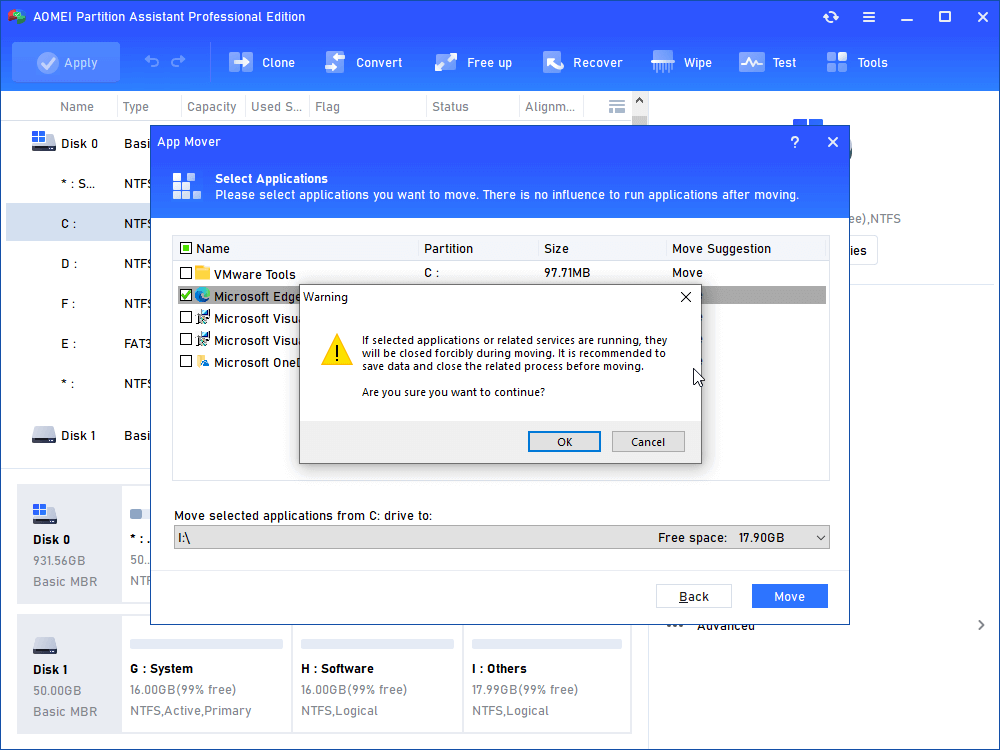
Step 5. Confirm that you have closed the apps that you will move from C drive to D drive. Then, click "OK".
Step 6. Wait for the move process to complete. Then, click "Finish".
Method 5. Upgrade hard disk
If you’re using an HDD as the system disk for your PC, then we suggest you replace it with an SSD. SSD has better performance, faster data processing speed, and a more stable physical structure. And now, the SSD with the same capacity as an HDD is not as expensive as before. You can enjoy better disk performance on your PC with a suitable SSD.
To properly replace your disk, we recommend that you clone it instead of reinstalling the system and all of your programs. AOMEI Partition Assistant also has a "Drive Clone Wizard" capability that can clone a hard disk to another and offers two cloning methods. You may also resize and align the SSD partition throughout the operation.
After you back up all important data files and steadily connected your SSD to your computer, we can start.
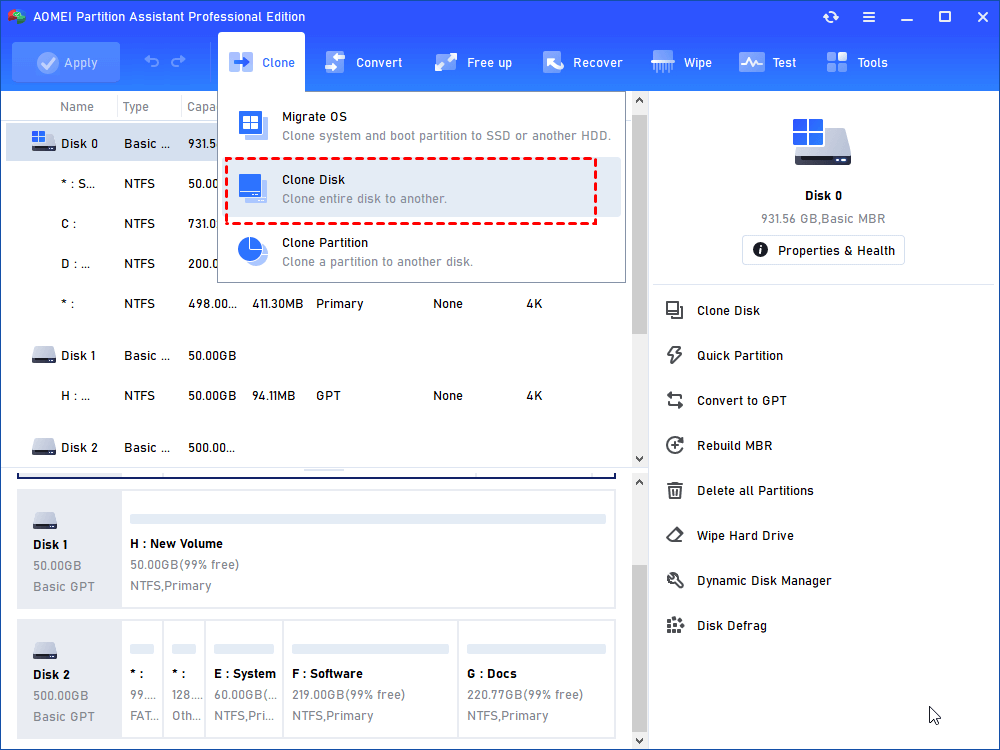
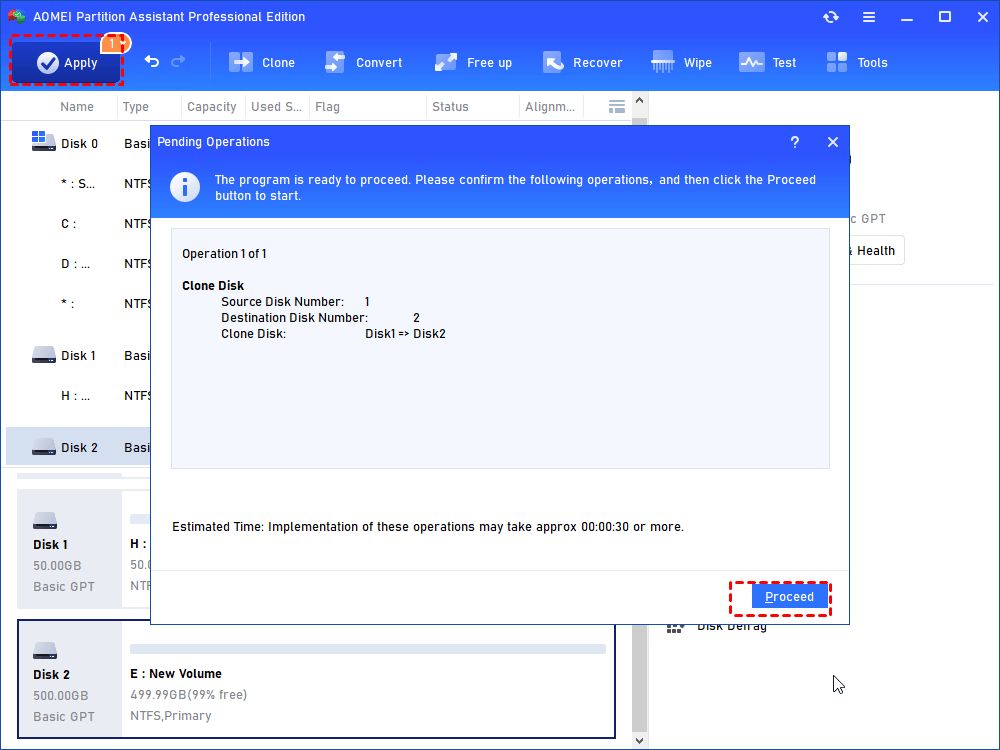
Step 1. In the main interface of AOMEI Partition Assistant Professional, please click “Clone” and then “Clone Disk”.
Step 2. Select a copying method you need from "Clone Disk Quickly" and "Sector-by-Sector Clone". Here, we select “Clone Disk Quickly” as an example.
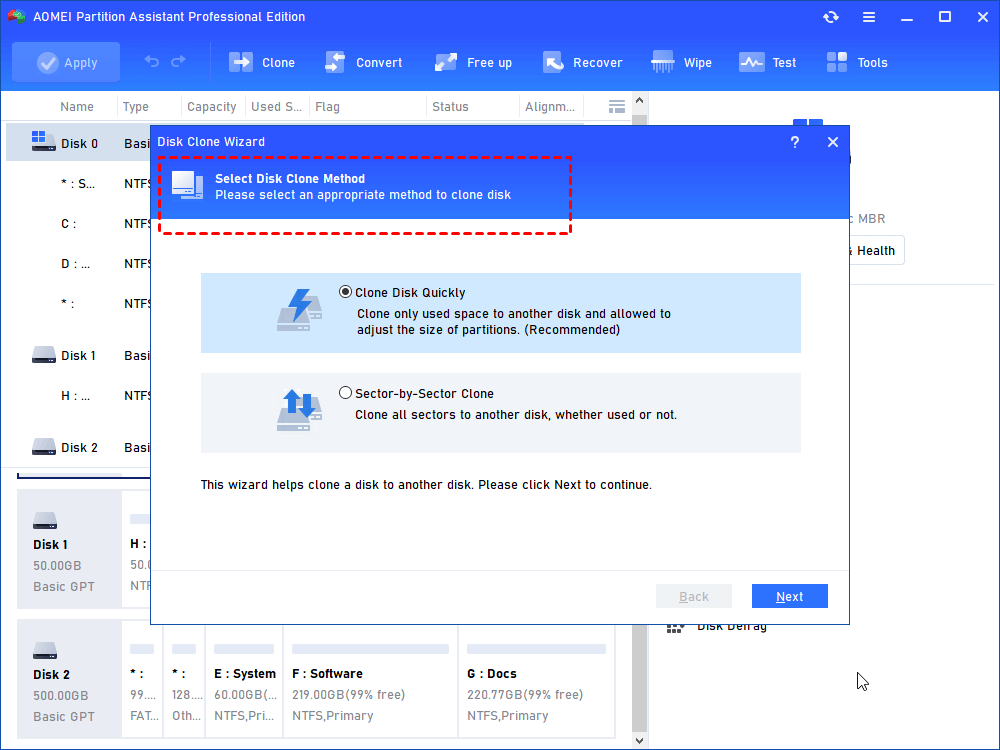
☛ “Clone Disk Quickly” only copies the used sectors to the destination location, allowing users to clone the larger disk to a smaller disk.
☛ “Sector-by-Sector Clone” will copy all sectors to the target disk, so the destination disk must be equal to or larger than the source disk.
Step 3. Select the Windows system disk as the source disk and hit “Next”.
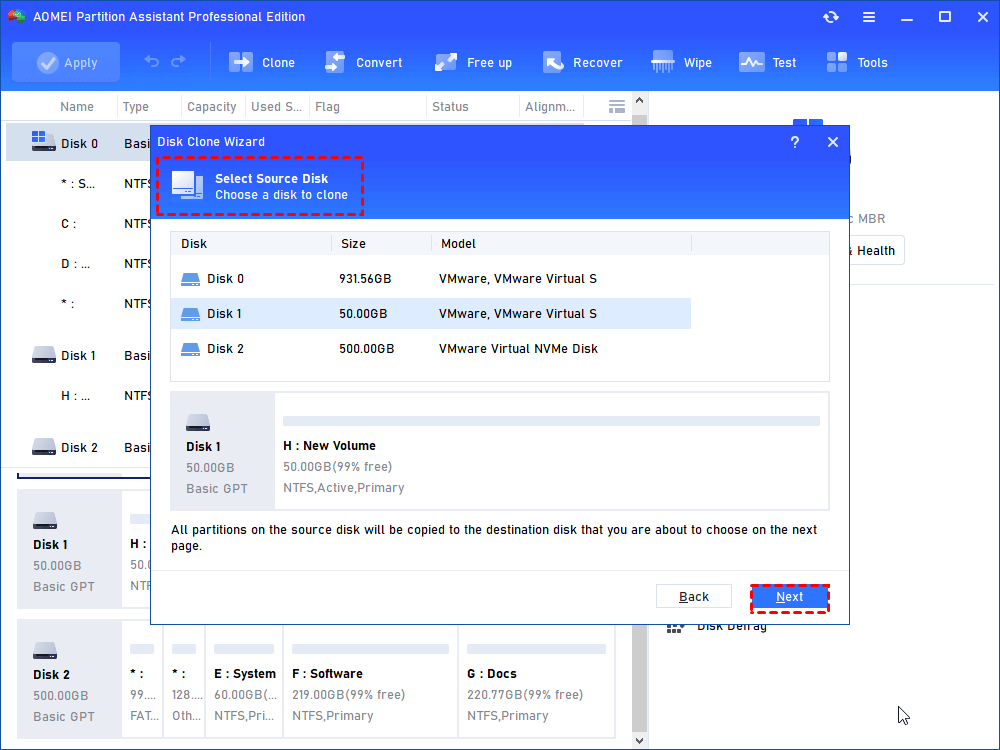
Step 4. Then select the SSD drive as the destination disk and click “Next”.

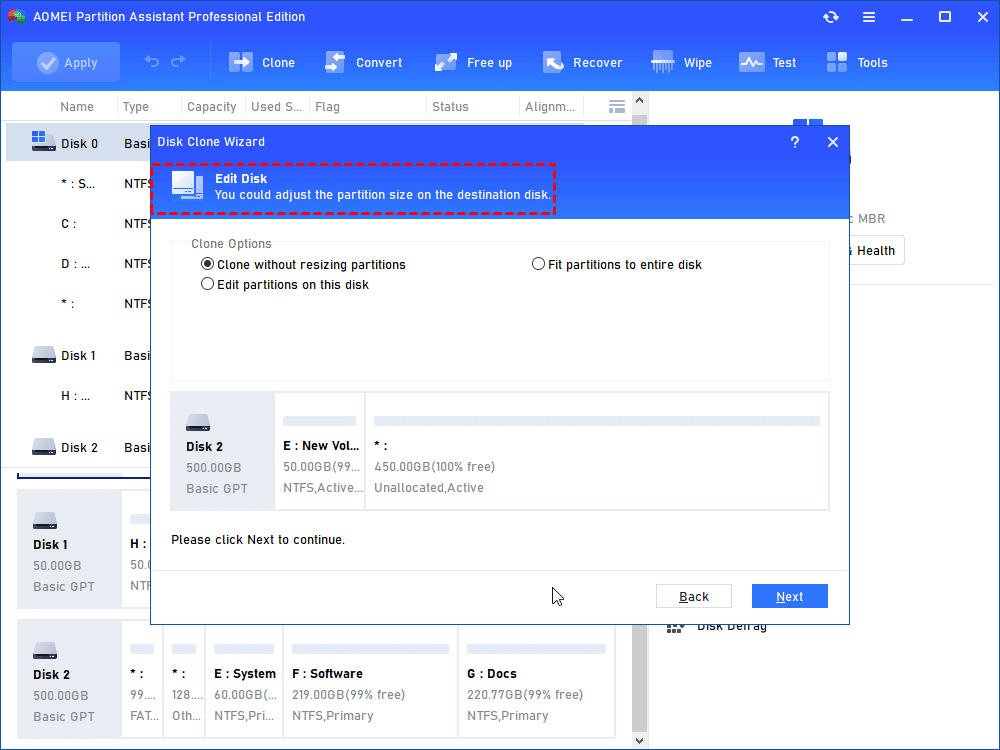
Step 5. Now, you can also resize partitions just being created on the SSD drive.
Step 6. Read the subsequent boot note, click “Finish” and then click “Apply” to execute the pending operation.
Tip: If you want to move OS only, you can choose the “Migrate OS to SSD” feature.
Method 6. Clean junk files
Junk files will affect hard disk performance. If you haven’t cleared junk files for a long time, then cleaning junk files may improve PC performance a little.
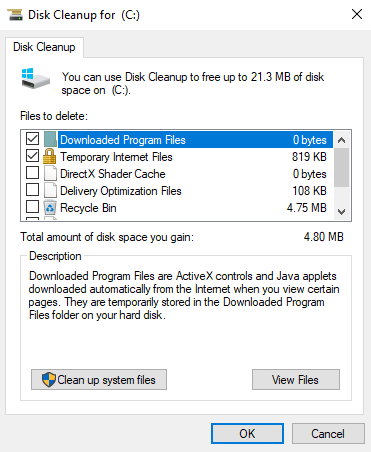
Step 1. Press Windows + S, search for Disk Cleanup, and double-click the search result to open this tool.
Step 2. In the pop-up window, select the drive you want to clean up from the drop-down menu and click OK.
Step 3. Wait patiently until the tool finishes scanning this drive. Then, in the new window, click Clean up system files to scan for more system cache.
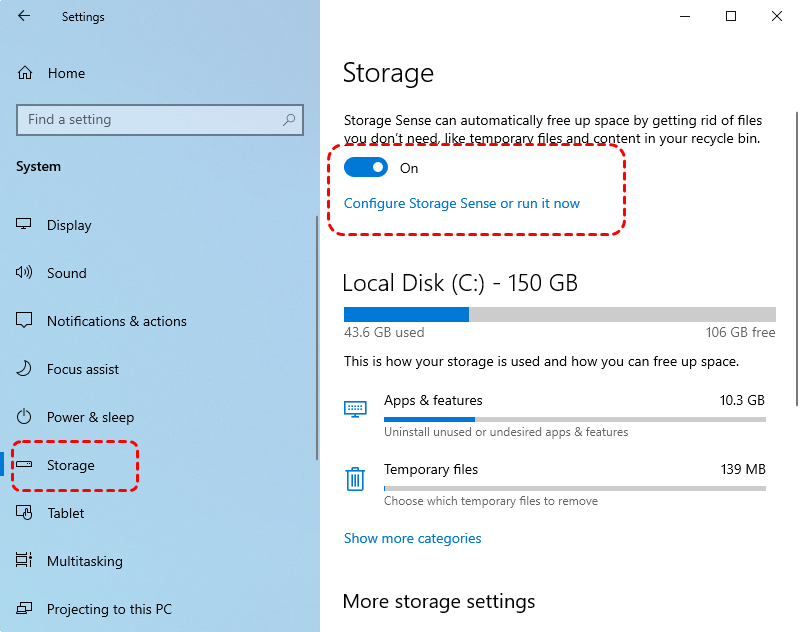
Click "Start" and "Settings" in turn, then click "System". In the new window, click "Storage" and turn on "Storage Sense".
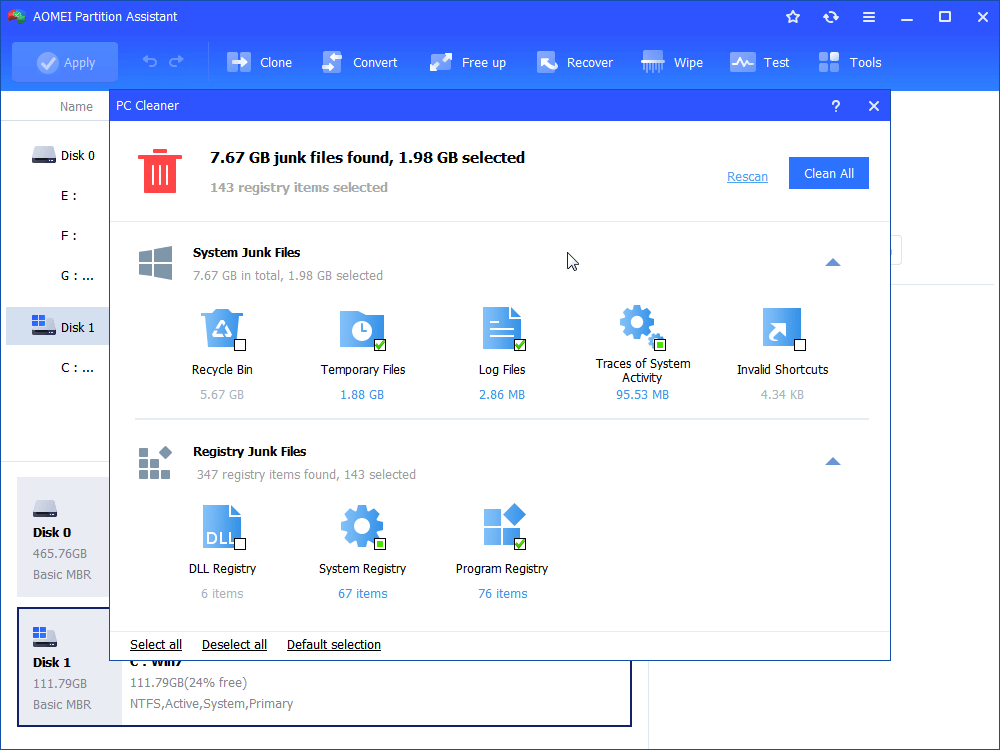
If you want deep cleaning, you can use the “PC Cleaner” function of AOMEI Partition Assistant.
Summary
This post shows you how to check the performance of your PC and speed it up. To keep the performance of the PC at a nice level, you need to keep nice maintenance in daily use. AOMEI Partition Assistant is a practical partner to help you manage your disks. Besides the functions we’ve mentioned above, this tool can also convert disk to MBR/GPT without deleting partitions, convert file systems between NTFS and FAT32 without formatting, completely wipe and erase a hard disk, etc.
And if you need, you can choose the Server Edition which is specifically designed for Windows Server users (supporting Windows Server 2025/2022/2019/2016/2012(R2)/2008(R2)/2003).

