[Ultimate Guide] How to Do Samsung Galaxy Book 4 Pro SSD Upgrade?
Want to do Samsung Galaxy Book 4 Pro SSD upgrade? This tutorial will share how to replace SSD in laptop without any data loss and boot issues.
By Irene / Updated on June 17, 2025
Why upgrade SSD in a Samsung Galaxy Book 4 Pro?
The Samsung Galaxy Book 4 Pro is a sleek and powerful laptop designed for professionals, students, and tech lovers. It already comes with a fast SSD, but there are times when upgrading it can make a big difference.
Sometimes, the SSD may be damaged and no longer work properly. This can lead to data loss or system crashes, so replacing it is necessary. Other times, the built-in storage just isn’t enough. As you install more apps, store more files, or work with large projects, your laptop may slow down if the SSD is full. Upgrading to a larger drive helps avoid this problem. A new SSD can boost overall performance. Your laptop will start faster, open apps quicker, and handle tasks more smoothly. It also gives you more space to save your work, games, or media without constantly worrying about running out of room.
In short, upgrading the SSD in your Galaxy Book 4 Pro can give you faster speed, more space, and a better experience overall.
How to choose the right SSD for your Samsung Galaxy Book 4 Pro
Before upgrading the SSD in your Samsung Galaxy Book 4 Pro, it's important to choose one that's compatible with your laptop. Here are a few simple things to consider:
| Factor | What to Look For |
|---|---|
| Form Factor | M.2 (check if your model needs 2280 or 2230 size) |
| Interface | NVMe (PCIe) – much faster than SATA |
| Capacity |
- 512GB or 1TB for basic use - 2TB or more for heavy tasks (e.g., video editing, gaming) |
| Brand | Trusted brands: Samsung, Crucial, Kingston, Western Digital |
| Warranty | Minimum 3-year warranty recommended |
If you have already chosen the appropriate SSD for your laptop, you can now follow our step-by-step guide to replace it.
How to do Samsung Galaxy Book 4 Pro SSD upgrade?
Once you’ve picked the right SSD for your Samsung Galaxy Book 4 Pro, you’re ready to begin the upgrade. The process is fairly simple and involves three main steps: setting up the new SSD, transferring data, and swapping out the old SSD for the new one. Before getting started, make sure you have the necessary tools:
● A plastic prying tool or guitar pick to gently open the back cover without scratching or damaging the case.
● A USB-to-M.2 adapter, which lets you connect the new SSD to your laptop externally for data transfer.
● A professional disk manager tool, AOMEI Partition Assistant, which will be helpful during the disk upgrading process.
The Best Windows Disk Partition Manager and PC Optimizer
Once everything is ready, you can move forward with replacing the SSD in your Galaxy Book 4 Pro.
Stage 1. Prepare the new SSD
Before you can use the new SSD, it must be initialized with a partition style—either MBR or GPT. This process can be done using Windows Disk Management or directly using AOMEI Partition Assistant.
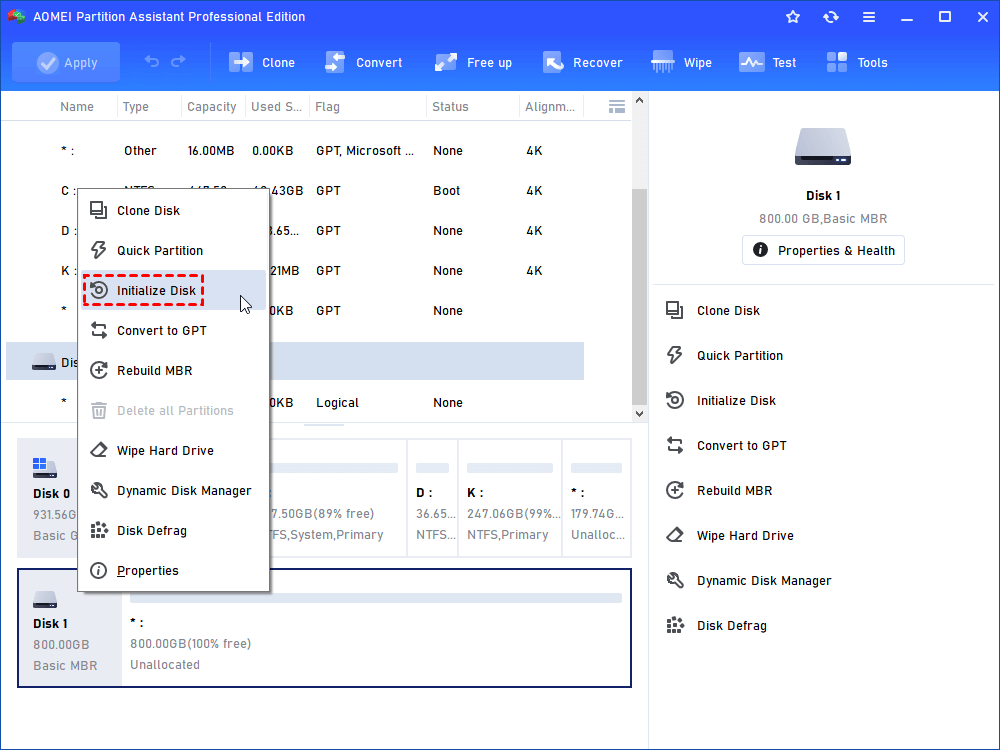
If you prefer to use Disk Management, you can follow these steps below. However, if the disk already contains data, doing so will delete the partition table, making existing data inaccessible. To initialize disk to MBR or GPT without losing data, you can read the article.
Step 1. Use a USB‑to‑M.2 adapter to connect the new SSD to your laptop. Press Win + R, type diskmgmt.msc, and click OK to open Disk Management.
Step 2. In Disk Management, right‑click the new drive and select Initialize Disk.
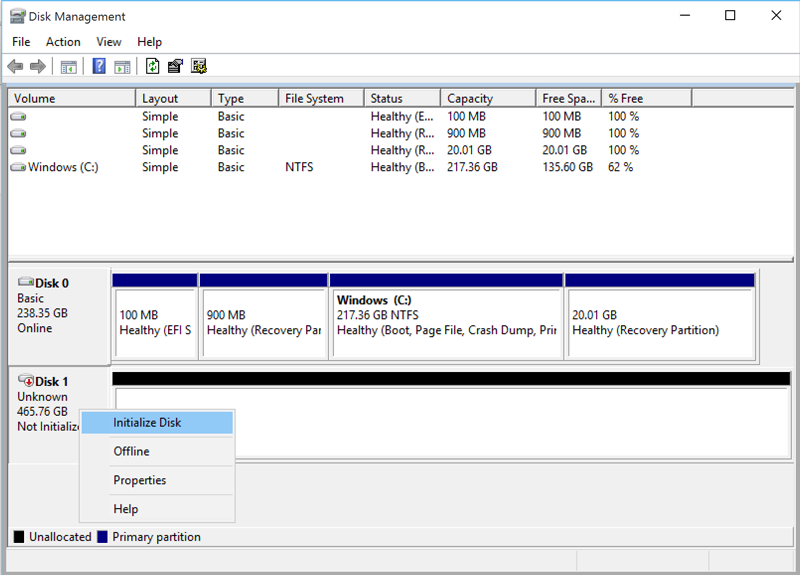
Step 3. Choose MBR or GPT, click OK, and follow the on‑screen prompts to complete initialization. After the disk is initialized, leave it connected and move on to Stage 2 to replace the SSD in your Samsung Galaxy Book 4 Pro.
Stage 2. Upgrade the disk for Samsung Galaxy Book 4 Pro
When upgrading the SSD in your Samsung Galaxy Book 4 Pro, you have 3 main options:
✔️ Upgrade with a fresh Windows installation – This method involves backing up your files, replacing the SSD, and then installing Windows again from scratch.
🔥Upgrade with only Windows OS – This only moves the Windows OS partition to another disk without affecting the original OS, programs, and data on the system drive.
In this guide, we’ll show you the first method—how to upgrade the SSD without reinstalling anything on Windows. You’ll clone your current SSD to the new one so everything transfers over, and you can start using your laptop just like before. To do this, you can use a tool called AOMEI Partition Assistant. It has a feature called "Clone Disk", which makes it easy to move your entire system to the new SSD. This tool also supports many other tasks like formatting drives, resizing partitions, cloning disks, and recovering data.
The Best Windows Disk Partition Manager and PC Optimizer
Step 1. Connect the New Drive: Connect the hard drive from your new PC to your old computer using the SATA-to-USB adapter.
Step 2. Launch AOMEI Partition Assistant. Open the software and navigate to the "Clone" menu, then select "Clone Disk."

Step 3. Choose the hard disk that you need to clone as the source disk and click "Next".

Step 4. Select the destination disk to store the data on the source disk, and then click "Next".

Step 5. Then, you can check the source and destination disk in the next window or change to "Sector to Sector clone", and click the "Confirm" button to continue if there is no problem.

Here, you can also click the "Settings" button to adjust the partition size on the destination disk or tick "4k alignment" to optimize performance of SSD.

① Clone without resizing partitions: all partition will be cloned to the target disk as the original partition size. It is available when the target disk is large enough to hold all partitions on the source disk.
② Fit partitions to entire disk: all partitions will be cloned to the target disk and take up its full capacity according to the original partition size proportion.
③ Edit partitions on this disk: you can change every partition size on the target disk as you need.
Step 6. After returning to the main interface, check the pending operation and click "Apply" and "Proceed" to commit the operation.

Stage 3. Replace the disk
Once the cloning process is complete, you can remove the back cover of your laptop and swap out the old SSD for the new one. Follow these steps to do it properly. Firstly, ensure the laptop is powered off and disconnected from AC power. Disable or remove the battery accordingly. For laptops with removable batteries, power off, unlock, and remove the battery. If the battery is integrated, access the BIOS and disable the built-in battery.

Step 1. Remove the bottom panel or hatch of the laptop. Some laptops have a designated hatch or panel for the drive, while others require removing the entire panel.

Step 2. Locate the SSD and remove the securing screw.
Step 3. Carefully lift the drive from the board with minimal friction, taking note of any adhesive securing the drive and removing it carefully. Insert the replacement drive at an angle and gently push it into place.
Step 4. Secure the drive in place by replacing the screw. Put back the hatch or panel, ensuring that the SSD does not make contact with it. Power up your laptop. Lenovo users with embedded batteries should connect the power supply during this process to enable the battery.
Stage 4. Boot from the newly set SSD
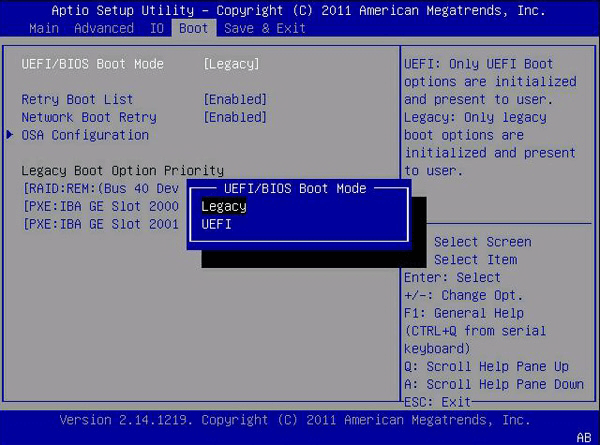
Once all the steps are completed, restart your laptop, and it will boot from the new solid-state disk. However, if your old drive and the new drive use different partition styles, you may need to change Legacy BIOS to UEFI boot mode, or vice versa, to ensure compatibility between the partition scheme and boot mode.
When you reboot your PC, press ESC, F1, F2, F8, or F10 repeatedly to access the BIOS setup. Look for the Boot tab, switch the boot mode to either Legacy or UEFI, and then press Enter.
Conclusion
Upgrading the SSD in your Samsung Galaxy Book 4 Pro is a smart move if you need more storage space, better performance, or a replacement for a failing drive. With the right tools and a compatible SSD, the upgrade process is straightforward. By following the steps—preparing the new SSD, cloning your data with AOMEI Partition Assistant, replacing the old drive, and setting the correct boot mode—you can enjoy a faster, more reliable laptop with more room for your files and applications.
The Best Windows Disk Partition Manager and PC Optimizer

