Fixed: VHD Boot Initialization Failed in Windows 11 or 10
How to fix VHD boot initialization failure on Windows 11 or 10? Explore the common causes behind VHD boot initialization issues and find practical solutions in this guide.
By Hedy / Updated on February 11, 2026
Have you ever tried booting Windows from a VHD and suddenly got hit with the dreaded “VHD boot initialization failed” message? It feels like the system just slammed the door in your face. The OS exists, the file exists — yet Windows refuses to start.
🔎 Good news: this error is usually fixable.
🔎 Even better: once you understand why it happens, you’ll never panic again when you see it.
Let’s break it down like a mechanic opening a car hood — simple, logical, step-by-step.
Why VHD boot initialization failed?
VHD boot initialization failed because Windows cannot properly load or access the virtual hard disk during startup. This usually happens due to configuration errors, missing boot files, or compatibility issues. Below are the most common reasons explained clearly.
1. Corrupted or missing Boot Configuration Data (BCD): Windows relies on BCD entries to locate and boot the VHD file. If the BCD is damaged, deleted, or incorrectly configured, Windows won’t know where the VHD is stored, causing boot initialization to fail.
2. VHD file is moved, renamed, or deleted: If the VHD file location has changed since it was added to the boot menu, Windows cannot find it during startup. Even a small path change will break VHD boot initialization.
3. Unsupported Windows edition or boot mode: Booting from a VHD requires specific Windows editions (such as Pro, Enterprise, or Education) and is sensitive to boot mode. A mismatch between BIOS/UEFI mode or GPT/MBR disk style can prevent successful initialization.
4. File system errors on the host disk: If the physical disk containing the VHD has file system corruption or bad sectors, Windows may fail to read the VHD file during boot, leading to initialization errors.
5. Incorrect disk or partition configuration: VHD boot depends on the system partition being properly marked and accessible. Missing EFI System Partition (ESP), inactive system partitions, or wrong partition flags can all block the boot process.
6. Corrupted VHD or virtual disk metadata: Improper shutdowns, interrupted conversions, or failed VHD operations can corrupt the VHD structure itself, making it unreadable at boot time.
How to fix VHD boot initialization failed issue
Below are the most reliable ways to fix the “VHD boot initialization failed” error in Windows.
Fix 1. Rebuild Boot Configuration (BCD)
When Windows boots from a VHD, it fully depends on BCD entries to know where the virtual disk lives and how to load it. If BCD becomes corrupted, deleted, or mismatched, Windows cannot initialize the VHD and stops immediately.
Step 1. Boot from Windows installation media (USB/DVD).
Step 2. Click Repair your computer.
Step 3. Select Troubleshoot → Advanced options → Command Prompt.
Step 4. Run the following commands one by one:
bootrec /fixmbr
bootrec /fixboot
bootrec /scanos
bootrec /rebuildbcd

Step 5. If Windows isn’t detected, manually recreate BCD:
bcdboot C:\Windows /s C: /f ALL
Step 6. Restart the PC and try booting again
Fix 2. Correct VHD path in BCD
Sometimes the VHD file was moved, renamed, or the partition letter changed. The boot manager still points to the old location, so it attempts to load a non-existent disk, causing the initialization failure during startup.
Step 1. Enter Windows Recovery → Command Prompt.
bcdedit /enum
Step 2. Locate the entry containing device vhd=
Step 3. If the path is wrong, correct it:
bcdedit /set {default} device vhd=[D:]\VHD\win11.vhdx
bcdedit /set {default} osdevice vhd=[D:]\VHD\win11.vhdx
Step 4. Close Command Prompt. Restart the computer
Fix 3. Attach and repair the VHD
The VHD itself may be damaged due to improper shutdown, storage errors, or interrupted updates. Attaching it manually lets Windows check the file system and repair logical corruption preventing the operating system inside the VHD from loading.
Step 1. Boot into Windows or Windows Recovery.
Step 2. Open Command Promptand run DiskPart:
diskpart
select vdisk file=D:\VHD\win11.vhdx
attach vdisk
exit
Step 3. Run disk check:
chkdsk g: /f /r /x:
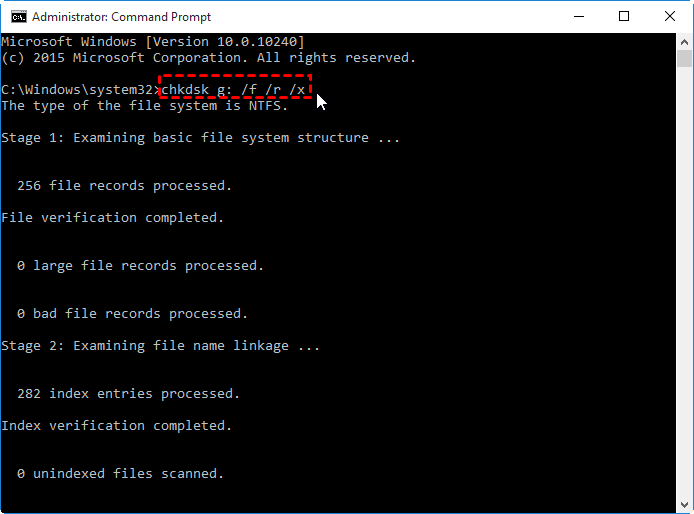
(Replace g: with the assigned drive letter)
Step 4. Detach the VHD:
diskpart
select vdisk file=D:\VHD\win11.vhdx
detach vdisk
exit
Fix 4. Disable secure boot
Secure Boot blocks untrusted bootloaders. If the VHD OS was created on another machine or modified manually, its boot signature may not match firmware policies, preventing Windows Boot Manager from loading the virtual disk environment.
Step 1. Press Start → Settings.
Step 2. Go to System → Recovery.
Step 3. Under Advanced startup, click Restart now.
Step 4. Select troubleshoot → advanced options → UEFI firmware settings → restart.
Step 5. Your PC will reboot directly into BIOS/UEFI.
Fix 5. Repair using third-party tools
If the boot structure inside the VHD is severely damaged, manual commands may not detect the problem. Professional disk management software like AOMEI Partition Assistant can rebuild boot files automatically and repair partitions without complex command-line operations.
AOMEI Partition Assistant includes several boot-repair technologies designed for exactly this scenario:
1. Boot Repair (core solution)
Automatically detects Windows installations inside a VHD and repairs:
Step 1: Install AOMEI Partition Assistant on a functional computer. Connect a USB flash drive with sufficient free space to that machine.
Step 2: Launch the program and navigate to Recover > Boot Repair.

Step 3: Choose Create a bootable disk to generate a WinPE-based Boot Repair USB.

Step 4: Insert the newly created USB into the computer that won’t start. Enter BIOS/UEFI settings and adjust the boot priority so the system starts from the USB. The Boot Repair environment will load automatically and scan available boot entries.

Step 5: After scanning, a list appears showing system locations, Windows versions, and boot conditions. Select the entries that can be fixed and click Repair.
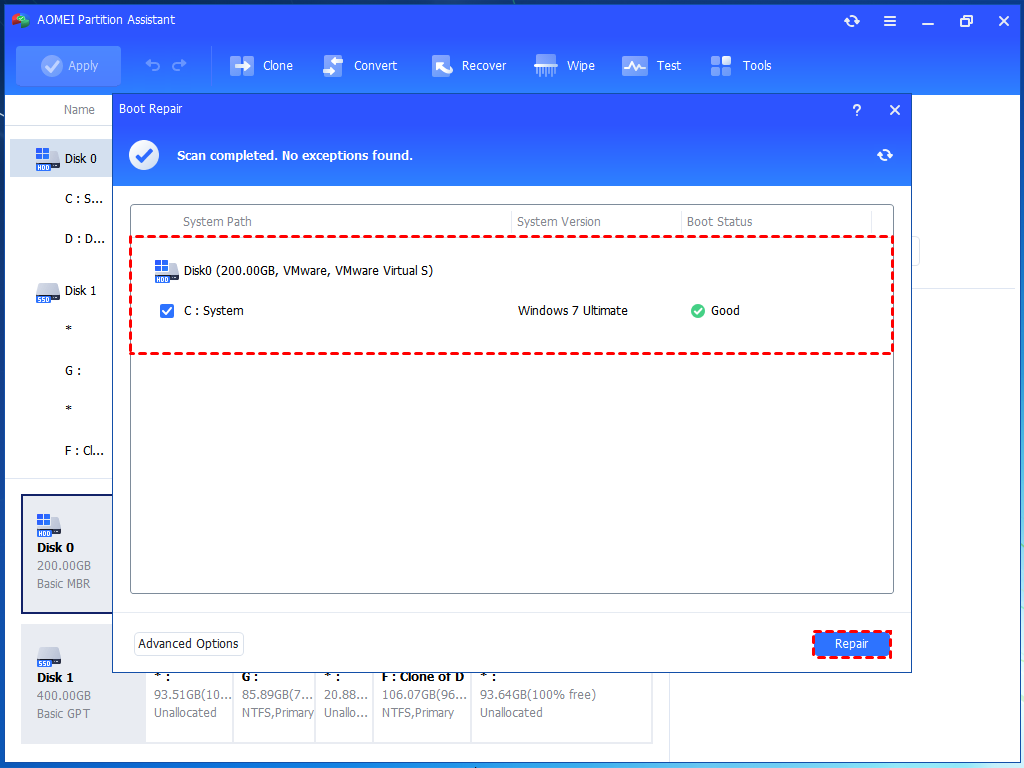
Step 6: When the repair completes, remove the USB drive and restart the computer from its original system disk.

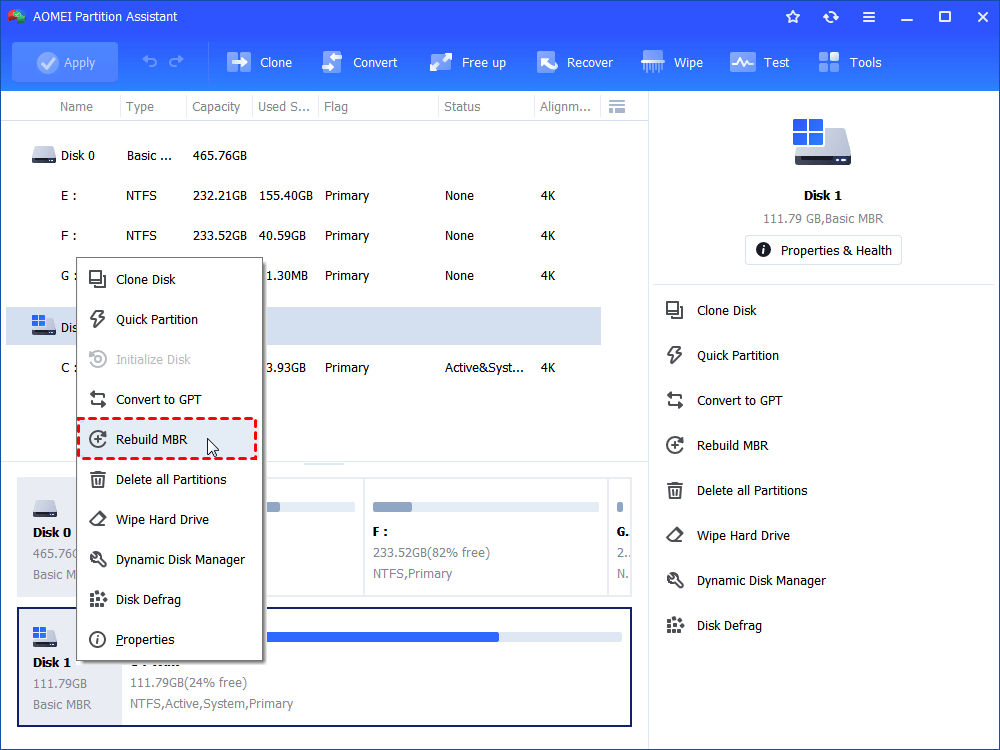
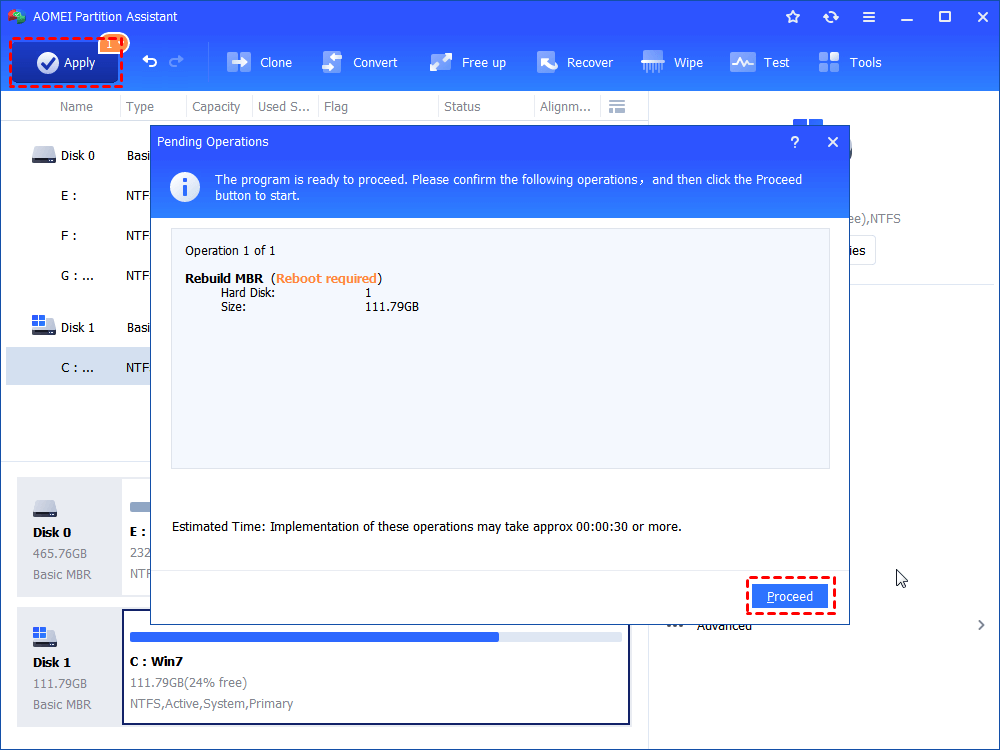
2. Rebuild MBR
If your PC boots in Legacy/MBR mode and the boot code is damaged:
Step 1. After seeing the interface of AOMEI Partition Assistant, right-click on the system disk and select "Rebuild MBR".
Step 2. Choose an MBR type for your Windows 10.
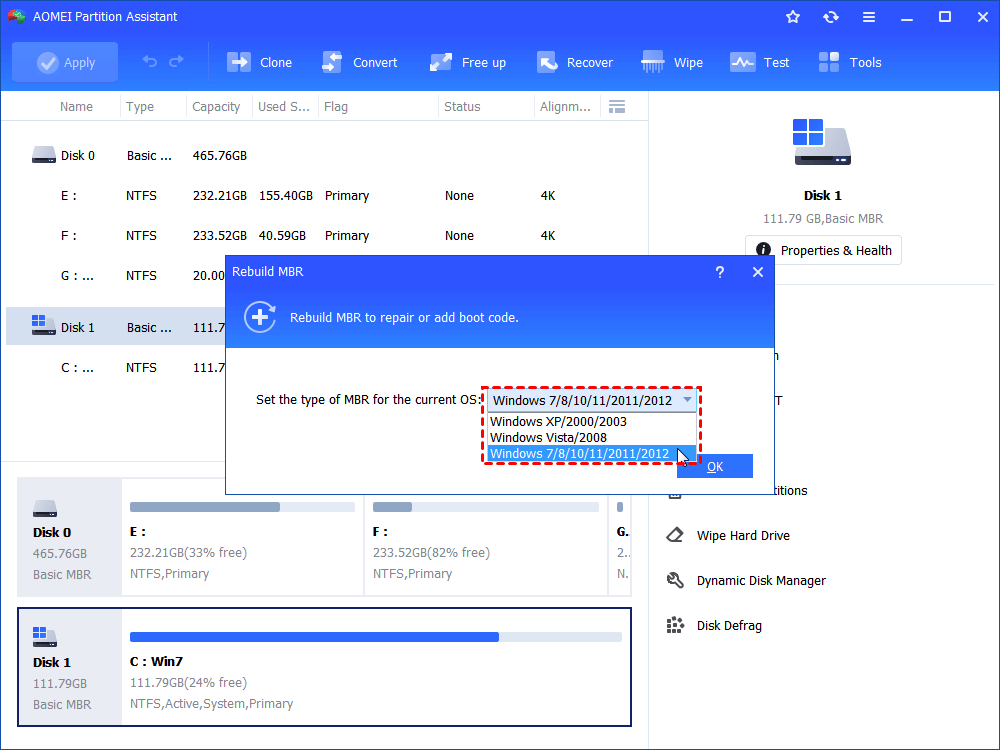
Step 3. After returning to the main interface, hit "Apply" on the upper left corner and hit "Proceed" to start the rebuilding process.
FAQs
1. Can a VHD boot on external drive?
Sometimes, but not officially supported in most Windows versions. Native boot usually requires an internal disk. External USB drives often fail due to driver timing, BitLocker policies, or Windows boot restrictions.
2. Difference between VHD and VHDX boot reliability?
VHDX is more reliable. It supports larger sizes, better crash protection, and power-failure resilience. Legacy BIOS systems prefer VHD, while modern UEFI systems boot more consistently from VHDX.
3. Does Windows Update break VHD boot?
Yes, occasionally. Updates may rebuild the bootloader, change device identifiers, or update drivers, causing the BCD entry to lose the VHD path or permissions.
4. Why does boot work once then fail?
Usually due to dynamic disk IDs, changed drive letters, hibernation state, or pending update configuration. After first boot, Windows rewrites boot data and the loader can no longer locate the VHD.
5. Can cloning fix the issue?
Often yes. Cloning the VHD to a physical partition or recreating the BCD removes path-dependency problems and improves stability, especially for repeated boot failures.
Conclusion
VHD boot initialization errors look scary, but they’re usually just broken paths, damaged boot files, or disk inconsistencies. By rebuilding BCD, correcting the VHD location, checking the disk, or repairing boot structures — especially with automated tools like AOMEI Partition Assistant — you can restore boot access quickly. Once you understand the logic behind the failure, troubleshooting becomes predictable instead of stressful.

