How to Install NVMe SSD for Windows PC
Many users know that NVMe SSD has extraordinary performance and want to replace old disk to NVMe disk. However, some of them don’t know how to install NVMe SSD in PC. In this post, we’ll show to how to set it in your PC with step-by-step guide.
By Lucas / Updated on October 21, 2024
Brief overview about NVMe SSD
NVMe SSD is the SSD that has Non-Volatile Memory Express, a high-performance interface protocol designed for accessing disks. This protocol allows your SSD directly over the PCIe bus, which offers significantly faster data transfer speeds compared to traditional storage interfaces like SATA or SAS.
Developed to take full advantage of the low latency and parallelism of modern SSDs, NVMe reduces the overhead of command processing and queuing, resulting in improved I/O performance and lower latency.
Can you use NVMe SSD in your PC?
Although NVMe SSD can bring great improvement to your computer, not all devices can install it. When selecting an M.2 NVMe SSD, it's crucial to ensure your motherboard's compatibility.
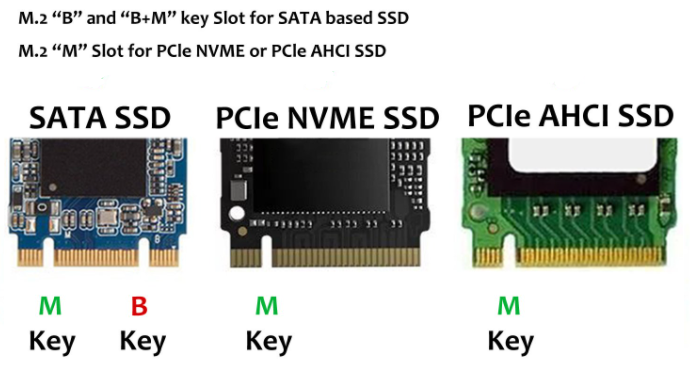
The M.2 form factor comes in variations, supporting both SATA and PCle NVMe protocols, with the latter offering significantly faster speeds. These differences are indicated by distinct 'keys' on the SSD. To ensure proper compatibility, verify if your motherboard's M.2 slot supports the correct keying—be it B-keyed, B+M-keyed, or exclusively M-keyed.
This step is vital, as it determines whether your high-speed NVMe drive will function optimally or if you're limited to a SATA M.2 drive's speed.
How to install NVMe SSD
If you’ve checked motherboard and it has a suitable plot, then, we can continue. To install NVMe SSD, there are 2 stages: install it on your motherboard, and install it in BIOS.
Part 1. Insert NVMe SSD in PC
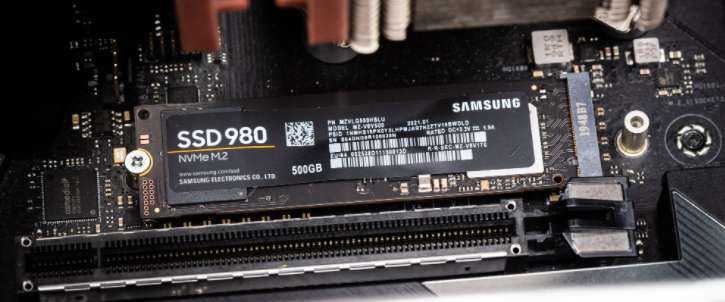
If your motherboard has heatsinks built in, you’ll need to remove one before you add NVMe SSD. Unscrew one and put it off to the side for now. Then, you need to locate your disk slot. The slots placed on motherboard can differ depending on the manufacturer and variant of the motherboard. Most motherboards feature an M.2 NVMe slot between the graphics processing unit and the central processing unit, or in the lower right corner.
It may be necessary to detach a special metal plate that conceals the NVMe drive and helps to chill it on some motherboards.
Some slots may be rather inconveniently sandwiched between a graphics card and a processor. To comfortably insert the new SSD, we’ll need to remove GPU and set it aside carefully. Once you’ve got all obstructing hardware out of the way, it’s time to insert your NVMe SSD into the slot.
1. Remove the built-in heatsink from the motherboard before adding an NVMe SSD.
2. Locate the M.2 NVMe slot on the motherboard, which varies by manufacturer.
3. Some motherboards may have a metal plate covering the NVMe slot for cooling, which might need to be removed.
4. If the slot is hard to access, you may need to remove the GPU.
5. Once everything is clear, insert the NVMe SSD into the slot.

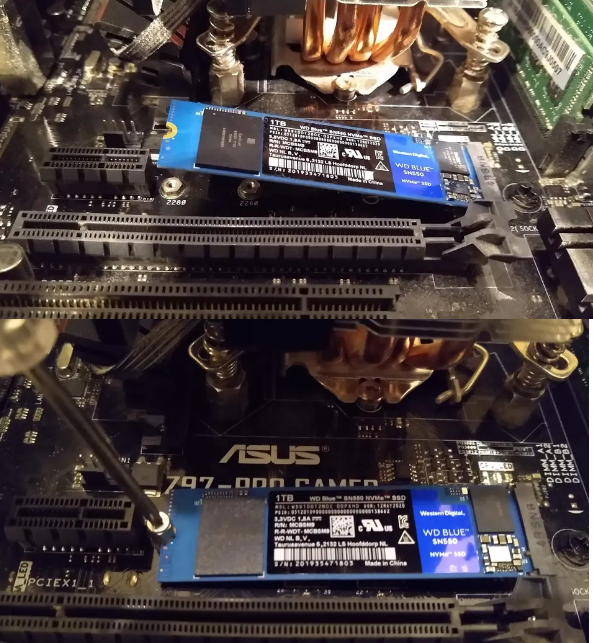
Once you locate slot, the next step is to carefully remove the screw securing it in place. Next, you'll need to carefully insert the SSD at a diagonal angle into the designated slot. If the object is not fitting properly, it is likely upside-down.
There is only one correct way for it to fit. This step can be quite challenging as it requires inserting the drive diagonally and then pushing it down afterward. If you apply a bit of pressure to the M.2, you should have no trouble finding the correct angle. Hold off on pressing it down for now.
Part 2. Install NVMe SSD in BIOS
This step depends on your motherboard. Some motherboards have M.2 Mode/M.2 PCIe mode. Users can enable it manually.
Our example is ASUS Z97 Pro Gamer board.
Step 1. Go to your BIOS.
Step 2. Navigate to Advanced > Onboard Devices Configuration > M.2 PCIe mode and change the dropdown to ‘Enabled’.
On other Asus boards, you go to Advanced, click the dropdown next to ‘PCI Express X4_3 Slot Bandwidth’ and change it to M.2 Mode.
Step 3. Save and exit.

Install NVMe SSD in Windows
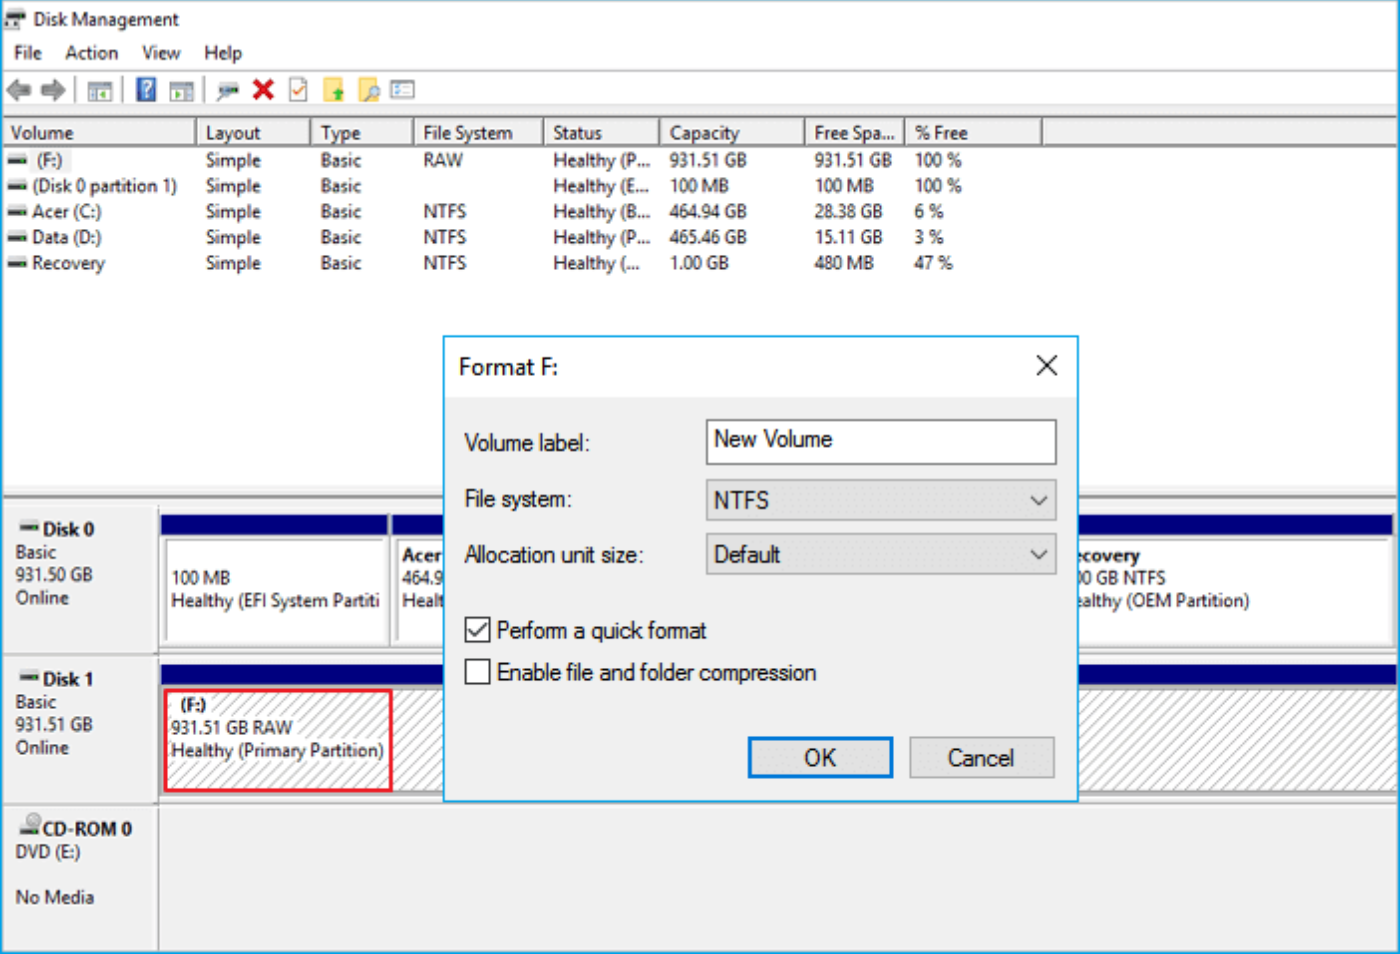
Your drive should now be recognized by Windows. Log into Windows, and type ‘disk management’ into the Start search bar, here, your new NVMe drive should appear in the lower half of the window with ‘Unallocated’ space.
From now, you have 2 options to set your NVMe SSD: using it as a data disk or making it bootable as the system disk.
If you wish to use it as your data disk for your games or large programs, you can initialize it and format it into NTFS file system. Then you can create partitions according to your needs.
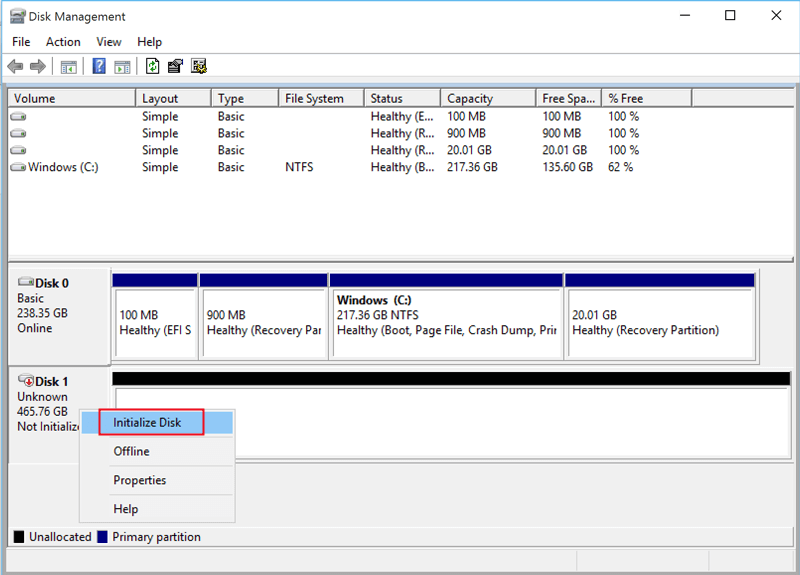
Another option is to set your new NVMe SSD as your system disk. When Disk Management recognizes your new SSD as unallocated space, you can set about making it bootable.
An easier solution to install NVMe SSD as boot disk
To set your new NVMe SSD as a bootable disk, the best solution is to clone your old system to your new disk to avoid reinstalling OS and losing all settings.
If you're looking to keep your current operating system or migrate an OS, we have a convenient software solution for you. AOMEI Partition Assistant Professional is an incredibly effective tool for resolving any problems you may encounter with your disks and partitions.
The "Migrate OS to SSD" feature allows you to effortlessly transfer your operating system and all associated system files to the desired hard drive. And "Clone Disk" function can help you easily duplicate your current disk to the new one. Once the migration is complete, you'll be able to effortlessly boot your operating system from the NVMe drive the next time you use your PC.
Tip: Windows Server users can choose the Server edition of this handy tool.
Here, we take "Clone Disk" as an example.
Step 1. Install and launch AOMEI Partition Assistant, click "Clone" in the main interface and select "Clone Disk".

Step 2. Choose the hard disk that you need to clone as the source disk and click "Next".

Step 3. Select the destination disk to store the data on the source disk, and then click "Next".

Step 4. Then, you can check the source and destination disk in the next window or change to “Sector to Sector clone”, and click the "Confirm" button to continue if there is no problem.

Here, you can also click the "Settings" button to adjust the partition size on the destination disk or tick "4k alignment" to improve the reading and writing speed of SSD if the target disk is an SSD drive.

Step 5. At last, click "Apply" and "Proceed" in the main interface to start cloning the hard drive.

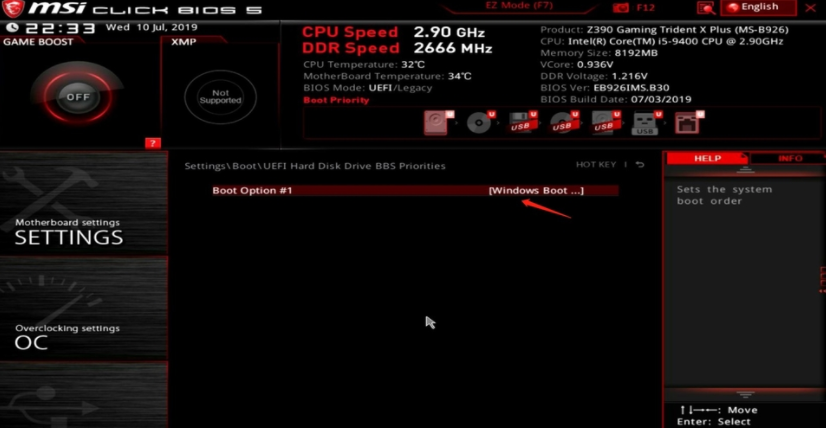
▌Tips: Boot settings
In this section, we’ll take MSI BIOS as an example to show you how to set NVMe drive as a boot drive.
Step 1. Power on the device and tap the [Delete] key to enter the BIOS settings menu:
[SETTINGS] → [Boot] → Set boot priority for your device.
Step 2. Set [Boot Option #1] as the system disk.
To sum up
NVMe SSD can offer you better performance on your devices, so if you recently find that your computer appears frozen, sluggish, and suddenly showdown, installing NVMe SSD is a nice option. In this post, we show you how to install NVMe SSD via a step-by-step guide, hope you can successfully upgrade your disk.
After you clone your old disk to your new NVMe SSD, you can wipe your old disk and reuse it as your second storage disk for your games, programs and other pieces of stuff that need large capacity. AOMEI Partition Assistant also has "Wipe Disk" function to help you recycle your old disk and "App Mover" to organize your disk resources without reinstalling installed programs.
FAQs about how to install NVMe SSD in PC
1. What tools do I need to install an NVMe SSD?
Installing an NVMe SSD is relatively simple and requires minimal tools. You'll need a screwdriver to open your computer case and secure the SSD, and depending on your motherboard, you may need a small screw to secure the NVMe SSD in place.
2. Do I need to migrate my data from my old drive to the new NVMe SSD?
If you're replacing your existing boot drive with the NVMe SSD, you'll need to migrate your data to the new drive. You can do this using backup and migration software, or by performing a clean install of your operating system and reinstalling your applications and files.
3. How much faster is an NVMe SSD compared to a traditional SATA SSD?
NVMe SSDs can be up to six times faster than traditional SATA SSDs, with read and write speeds exceeding 3,000 MB/s in some cases. This results in significantly faster boot times, quicker application launches, and improved overall system responsiveness.
4. Do NVMe M 2 SSDs need drivers?
No, NVMe M.2 SSDs typically do not require separate drivers to function properly. Windows 10, 8.1, and 7 have built-in support for NVMe drives. However, for best performance and to manage the drive effectively, it's recommended to install the latest NVMe driver provided by your SSD manufacturer or your motherboard manufacturer.

