

[Solved]: How to Clean Up Main Drive on Windows PCs?
Is your Windows PC running out of space or slowing down? No worries! This guide walks you through how to clean up your main drive on Windows PCs, helping your system maintain peak performance.
By Gia / Updated on May 16, 2025
What’s Taking Up Space on Your Main Drive?
The main drive (usually the C: drive) is where your Windows operating system, system files, and most programs are installed by default. Over time, it can quietly accumulate a wide range of files. If you’ve noticed slower performance or frequent low disk space warnings, it’s time to clean it up.
Before we dive into solutions for cleaning up the main drive, it’s important to understand what exactly is taking up space. Below are the most common file types that tend to fill up your main drive:
- Programs and Applications
- Large Personal Files
- Temporary Files and Cache
- User Data Files
- Recycle Bin Contents
- System Files and Updates
- Backups and Restore Points
How to Clean Up the Main Drive on Windows PCs?
Now that you understand what's taking up space on your main drive, let’s get into the practical steps to clean it up and improve your PC's performance.
Method 1: Uninstall Unnecessary Programs
One of the quickest ways to free up space on the main drive is to remove software you no longer use. Many people install programs for a one-time task and then forget about them, letting them quietly consume precious disk space. Follow these steps to review your installed applications and remove unnecessary ones.
Step 1: Press Windows + I to open Windows Settings.
Step 2: Go to Apps > Apps & features.
Step 3: Click on an app you want to uninstall. An Uninstall button will appear.
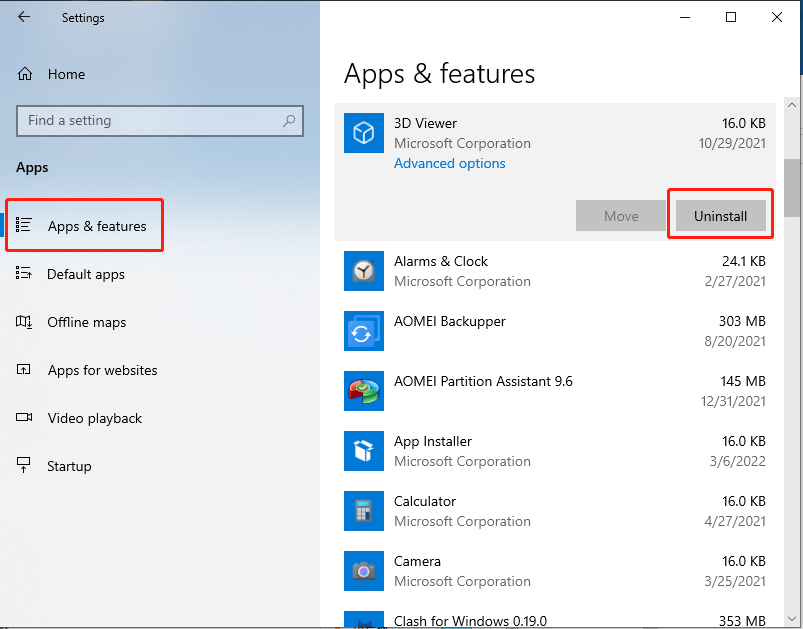
Step 4: Click Uninstall. You might see a confirmation prompt; click Uninstall again.
Method 2: Remove Duplicate Files
Sometimes, you may accidentally save the same document or photo multiple times. These duplicate files can take up a significant amount of space without you even realizing it.
Manually searching through thousands of files to find duplicates can be very time-consuming. Fortunately, AOMEI Partition Assistant offers a “Duplicate Files Finder” feature that quickly locates and removes redundant files. With just a few clicks, you can easily clean up your main drive and free up valuable space.
Here’s how to clean up your main drive by removing duplicate files:
Step 1: Install and launch AOMEI Partition Assistant. Then click Free up > Duplicate Files Finder.

Step 2: By default, all hard drives and partitions on your computer will be displayed. You can manually adjust the scan range and file types. Then Click Scan.
Step 3: Once the scan is complete, all duplicate files that meet the conditions you set will be displayed. You can click the Preview button to view the duplicate file details.
Step 4: You can set up a delete method and personal preferences in Settings.
Then manually delete unnecessary ones. Normally, it is recommended to keep at least one duplicate file.
Method 3. Empty the Recycle Bin
When you delete files on Windows, they don’t immediately disappear from your system. Instead, they are moved to the Recycle Bin, where they continue to occupy space on your main drive. To free up space, you can empty the Recycle Bin if you no longer need those files.
Step 1: Right-click the Recycle Bin icon on your desktop.
Step 2: From the context menu, select Empty Recycle Bin.
Step 3: A confirmation dialog box will appear asking if you are sure you want to permanently delete these files. Click Yes to proceed.
Method 4: Clean Up Temporary Files
Your device, web browsers, and various applications generate a large number of temporary files. Although these files are meant to be short-lived, they often fill up over time and can consume several gigabytes of storage.
Here's how to free up space on your main drive by removing them:
Step 1: Type disk in the Windows search box, and select Disk Cleanup.
Step 2: Choose your main drive (usually C:) and click OK.
Step 3: Disk Cleanup will calculate how much space can be freed on the selected drive.
Step 4: Check Temporary Files and any other file categories you want to delete, then click OK to start the cleanup.
Method 5. Transfer Data from Your Main Drive to Another
Even after uninstalling programs, removing duplicates, and cleaning unnecessary files, your main drive might still be running low on space. In such cases, the best way to free up space without losing data is to move files or applications to another drive.
AOMEI Partition Assistant offers a powerful feature to safely relocate apps or large files. By doing so, you can reclaim valuable space on your main drive and ensure your system continues to run smoothly.
Here's how to move applications from your main drive to D: drive:
Step 1: Click the Free up > App Mover.
Step 2: Choose Move Apps or Move Folders as you like. In this step, we choose App Mover.
Step 3: Select the partition you want to move applications from and click Next.
Step 4: In the pop-up window, select the applications you want to move and choose a target location for them. Then click Move.
Step 5: Click OK to start the process. Then your applications will be safely moved to the target location.
Summary
In this guide, you've learned how to clean up your main drive on Windows PCs. For easier and more effective disk management, using AOMEI Partition Assistant is highly recommended. Don’t let a full drive slow you down; take control of your storage and enjoy a faster, more efficient computing experience today.
FAQs
Q1: Is cleaning my main drive safe?
Yes, the methods described in this guide are generally safe when performed correctly. Always follow the instructions carefully and preview files before deletion to avoid removing anything important.
Q2: Will cleaning my main drive affect my personal files?
If you follow the methods outlined, your personal files should be safe. However, it's always a good idea to create a backup beforehand.
Q3: My C drive is still full after cleaning. What else can I do?
If your main drive is still consistently full, consider upgrading to a larger SSD for better performance.

